Introduction to Bacon Cheeseburger Rice Stack
Life can be a whirlwind, especially when you’re juggling work, family, and the never-ending list of chores. That’s why I’m thrilled to share my Bacon Cheeseburger Rice Stack with you! This recipe combines the beloved flavors of a juicy bacon cheeseburger into a hearty, comforting meal that comes together in just 30 minutes. It’s the perfect solution for busy nights, ensuring everyone leaves the table happy—without a mountain of dishes to tackle afterward. Trust me, your taste buds will thank you, and your family will be asking for seconds!
Why You’ll Love This Bacon Cheeseburger Rice Stack
This Bacon Cheeseburger Rice Stack isn’t just delicious; it’s a lifesaver for busy moms like us! With its simple preparation and minimal cleanup, it’s a dish designed for those hectic weeknights when time runs short. Plus, its rich flavors and cheesy goodness are sure to win over even the pickiest eaters. Who wouldn’t want a meal that delivers on taste while keeping things stress-free?
Ingredients for Bacon Cheeseburger Rice Stack
Gathering all the ingredients for this delectable Bacon Cheeseburger Rice Stack is a breeze! Here’s what you’ll need:
- Ground Beef: The heart of this dish! An 80/20 blend gives the best balance of flavor and juiciness.
- Yellow Onion: Diced, it adds sweetness and depth. I love the way it caramelizes when cooked!
- Fresh Garlic: Minced for a pop of robust flavor; garlic is the fairy dust of many dishes.
- Seasoned Salt: This versatile seasoning elevates the entire dish, enhancing every bite.
- Tomato Sauce: Adds moisture and a tangy flavor; it’s the classic companion for beef.
- Ketchup: A must for that sweet touch; it reminds me of summer barbecues!
- Yellow Mustard: For a hint of acidity, mustard cuts through richness brilliantly.
- Instant Rice: A quick-cooking staple that soaks up all those delicious flavors.
- Beef Broth: For extra flavor and moisture; homemade or store-bought works well.
- Cooked Bacon: Chopped and ready to go! Smoky, crunchy bits are the key to making this stack feel indulgent.
- Sharp Cheddar Cheese: Shredded and melting beautifully, this cheese ties the whole dish together.
Feel free to get creative! For something spicy, add hot sauce or jalapeños. If you need it gluten-free, swap in gluten-free soy sauce or Worcestershire. You’ll find all the exact quantities for these ingredients at the bottom of the article, perfect for printing out!
How to Make Bacon Cheeseburger Rice Stack
Cook the Ground Beef and Onions
To start, heat a large skillet over medium-high heat. Adding ground beef and diced onion creates a beautiful foundation for our Bacon Cheeseburger Rice Stack. Break up the meat with a spatula as it cooks, which usually takes about 6–8 minutes. You want that beef browned nicely, while the onions turn a lovely translucent color. This browning adds so much flavor, setting the stage for the layers to come!
Incorporate Flavorful Ingredients
Once the beef is browned, it’s time to add our aromatics. Toss in the minced garlic and let it sauté for a minute until it’s aromatic. The smell is irresistible! Next, drain any excess fat—you want the dish hearty, not greasy. Now, stir in the tomato sauce, ketchup, mustard, instant rice, and beef broth. It’s like a flavor party in your skillet! Make sure everything is well combined, and let it all blend together for a couple of minutes to soak in those amazing flavors.
Simmer and Combine
Bring the mixture to a gentle simmer. Keep stirring occasionally for about 2–3 minutes. The goal here is to let the broth get absorbed, allowing the rice to become tender. This is where the magic happens! Once you achieve that perfect consistency, remove the skillet from heat. Fold in half of the shredded cheddar cheese and half of the chopped bacon until everything is cohesive and melty. Talk about savory bliss!
Create the Stack
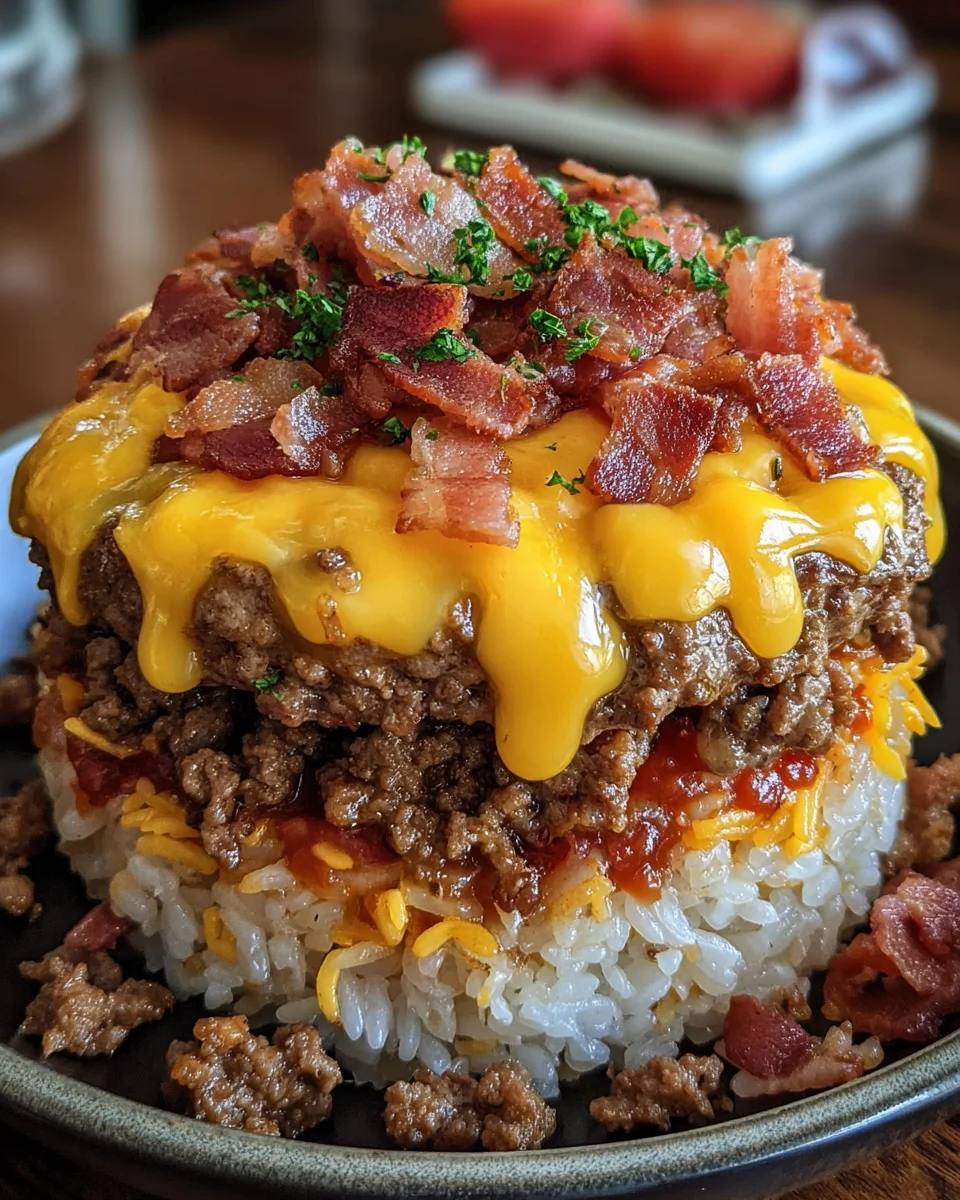
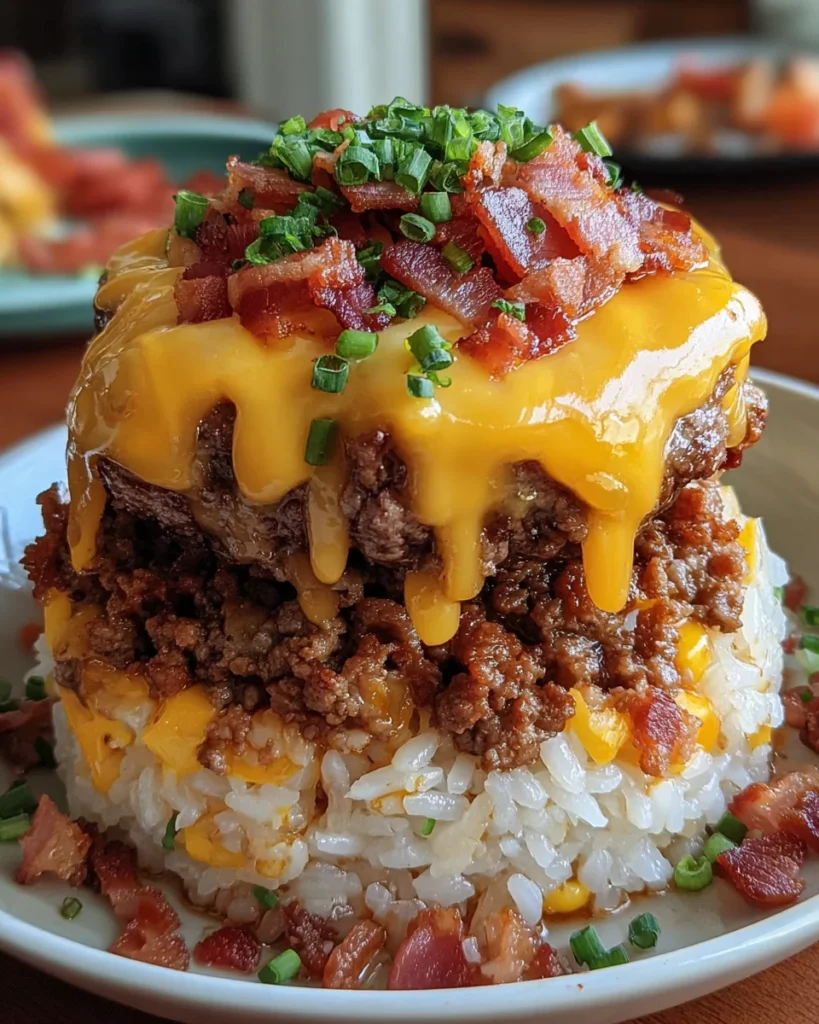
Now we’re ready to build our masterpiece! Lightly grease the inside of a 7–10 cm cooking ring mold and position it on a serving plate. Scoop in 2–3 tablespoons of the rice mixture and press firmly, creating a stable base for your stack. For a fun surprise, sprinkle reserved bacon and cheese right in the center before layering more rice on top. Press down gently to stabilize it all. To finish, scatter any remaining bacon and cheese on top for that gorgeous final touch.
Final Touches
For a little extra flair, consider broiling or using a torch for a golden finish. Just make sure to keep an eye on it—the goal is that ooey-gooey melt! Afterward, cover it for 2–3 minutes to let those layers settle nicely. To serve, gently remove the ring mold while applying a soft press on the top to maintain the integrity of your lovely stack. Trust me; it’s so worth it!
Tips for Success
- Always drain the excess fat after browning the beef for a lighter dish.
- Let the mixture simmer long enough for the rice to absorb all the flavors.
- Experiment with different cheeses for added flavor; pepper jack is a favorite!
- Use a measuring cup to press down the layers firmly for a stable stack.
- Keep an eye on the broiler; it works quickly!
Equipment Needed
- Large skillet: A frying pan works too if you don’t have a skillet.
- Spatula: Any sturdy spoon can do, but a spatula makes it easier to break up meat.
- Ring mold: You can use a large cookie cutter in a pinch.
- Measuring cups: Essential for precision, but eyeballing can work for experienced cooks!
Variations
- Spicy Kick: Add diced jalapeños or a splash of hot sauce for some heat!
- Veggie Delight: Incorporate diced bell peppers, corn, or mushrooms for added nutrition.
- Turkey Option: Substitute ground turkey for a leaner version of this tasty dish.
- Gluten-Free: Use gluten-free soy sauce or Worcestershire sauce to keep it celiac-friendly.
- Cheese Lover: Try different cheeses like Monterey Jack or Gouda for a unique twist.
Serving Suggestions
- Pair with a crisp green salad to balance the richness of the stack.
- Serve alongside sweet potato fries for a delicious twist.
- Drinks like iced tea or a light lager complement the flavors beautifully.
- Garnish with fresh parsley or sliced pickles for a pop of color.
FAQs about Bacon Cheeseburger Rice Stack
Can I make Bacon Cheeseburger Rice Stack ahead of time?
Absolutely! You can prepare the mixture a day in advance and store it in the fridge. Just reheat before layering and assembling your stacks. Easy peasy for busy nights!
What if I don’t have instant rice?
No worries! You can use regular rice; just follow the package instructions for cooking times. The flavors will still shine through deliciously.
Can I use ground turkey instead of beef?
Yes, ground turkey works great! It’s a leaner substitute, and it still absorbs all those comforting flavors. Perfect for a lighter take on this classic!
Is this dish gluten-free?
It can be! Just ensure you use gluten-free soy sauce or Worcestershire sauce. Simple swaps keep this dish friendly for those avoiding gluten.
How can I store leftovers?
Store any leftovers in an airtight container in the fridge for up to three days. Just reheat gently in the microwave for a quick meal anytime!
Final Thoughts
The Bacon Cheeseburger Rice Stack truly embodies comfort food at its finest. It’s more than just a meal; it’s a joyful experience that brings family and friends together around the dinner table. The rich flavors, cheesy goodness, and crispy bacon make every bite heavenly. Plus, the ease of preparation means you can spend less time in the kitchen and more time making memories. The smiles from your loved ones as they savor this delicious dish will be priceless. With this stack, you’re not just feeding their bellies; you’re warming their hearts. Enjoy every moment and every bite!
Print
Bacon Cheeseburger Rice Stack
- Prep Time: 15 minutes
- Cook Time: 15 minutes
- Total Time: 30 minutes
- Yield: 4 servings 1x
- Category: Main Course
- Method: Stovetop
- Cuisine: American
- Diet: Gluten Free
Description
A delicious layered dish combining the flavors of a bacon cheeseburger with rice, perfect for a hearty meal.
Ingredients
- 450 grams ground beef (80/20 blend)
- 1/2 medium yellow onion, diced
- 1 tablespoon fresh garlic, minced
- 1 teaspoon seasoned salt
- 225 milliliters tomato sauce
- 60 milliliters ketchup
- 1 tablespoon yellow mustard
- 320 grams instant rice
- 480 milliliters beef broth
- 120 grams cooked bacon, chopped
- 110 grams sharp cheddar cheese, shredded
Instructions
- Heat a large skillet over medium-high heat. Add ground beef and diced onion, breaking up the meat with a spatula. Cook for 6–8 minutes until beef is browned and onions are translucent.
- Add minced garlic and sauté for 1 minute until aromatic. Drain excess fat from the skillet, then season with seasoned salt.
- Stir in tomato sauce, ketchup, mustard, instant rice, and beef broth. Mix until fully integrated.
- Bring mixture to a gentle simmer. Cook for 2–3 minutes, stirring occasionally, until broth is absorbed and rice is tender.
- Remove from heat. Stir in half the shredded cheese and half the chopped bacon until the cheese melts and mixture becomes cohesive.
- Sprinkle the remaining cheese and bacon evenly over the surface. Cover and let stand for 2–3 minutes to melt the cheese with residual steam.
- Lightly grease the inside of a 7–10 cm cooking ring mold and position it on a serving plate. Add 2–3 tablespoons of the rice mixture to the mold and press firmly to form a stable base.
- Sprinkle reserved bacon and cheddar in the center for a melted core.
- Spoon additional rice mixture over the center and press gently to compact and stabilize the stack. Scatter remaining bacon and cheese on top.
- Optionally, briefly broil or torch for a golden finish, then cover for 2–3 minutes to allow layers to settle. Gently remove the ring mold while pressing softly on the top to maintain stack integrity. Serve immediately while hot.
Notes
- For a spicier version, consider adding hot sauce to the mixture.
- Ensure the beef is drained well to avoid a greasy stack.
- This recipe can be made gluten-free by using gluten-free soy sauce or Worcestershire sauce.
Nutrition
- Serving Size: 1 stack
- Calories: 650
- Sugar: 6 grams
- Sodium: 1200 mg
- Fat: 35 grams
- Saturated Fat: 15 grams
- Unsaturated Fat: 10 grams
- Trans Fat: 0 grams
- Carbohydrates: 58 grams
- Fiber: 2 grams
- Protein: 30 grams
- Cholesterol: 90 mg

