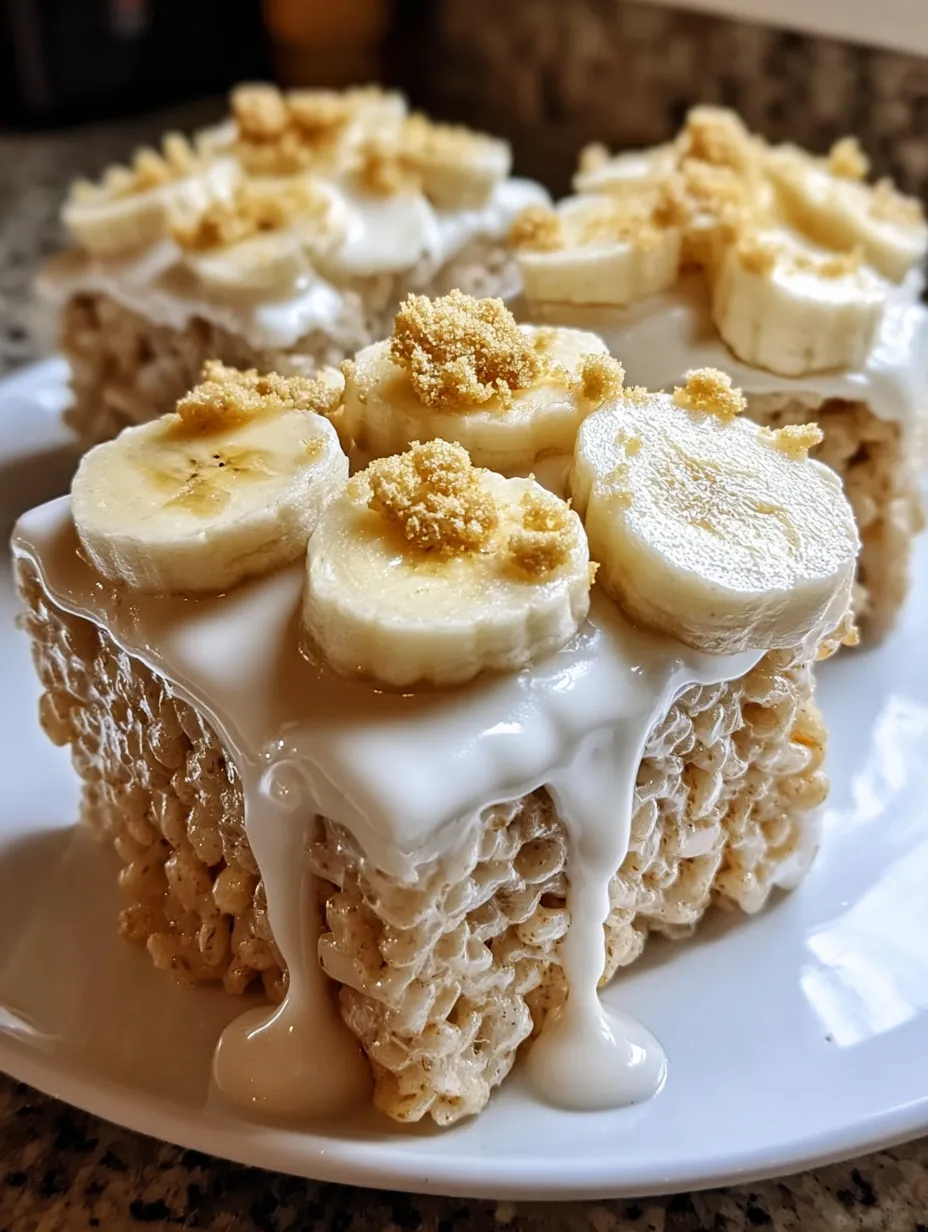
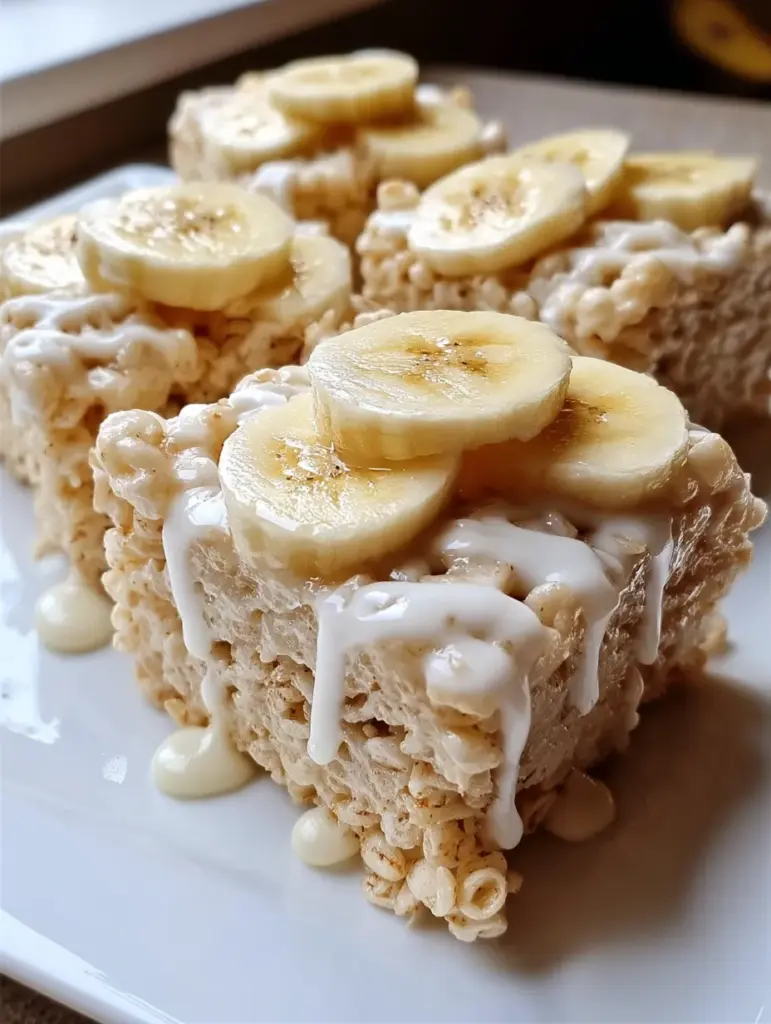
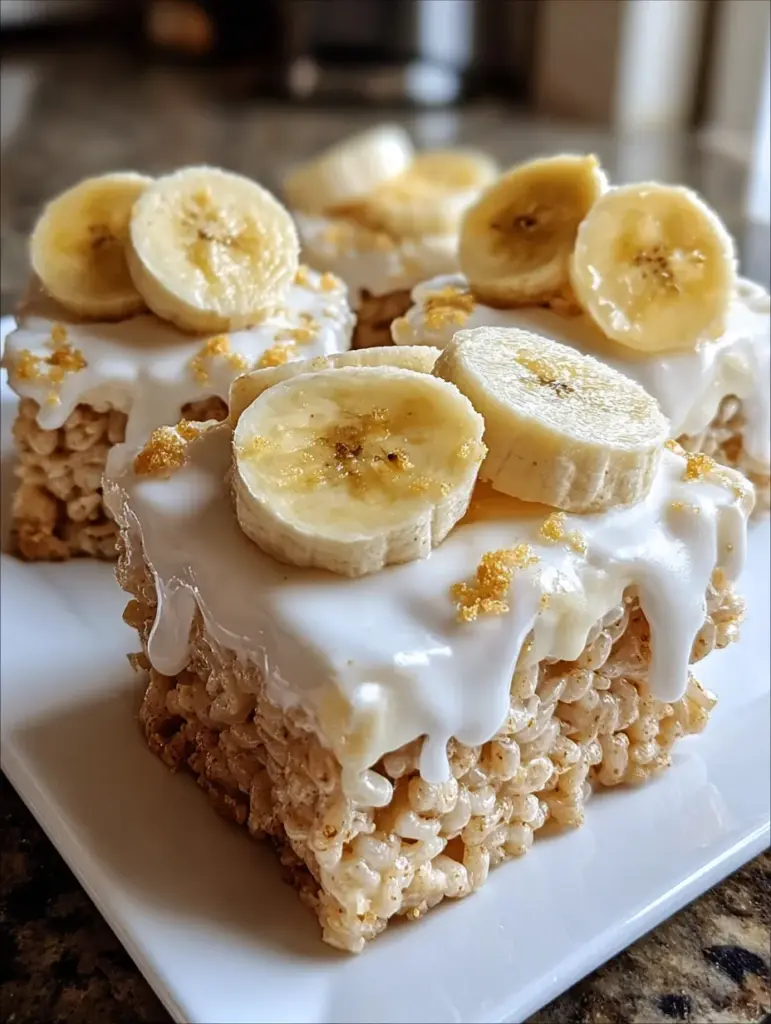
Ever wonder what would happen if banana pudding and Rice Krispie treats had a delicious little baby? Well, wonder no more—because Banana Pudding Rice Krispie Treats are here to blow your mind and satisfy every single sweet craving you’ve got. We’re talking layers of creamy marshmallow goodness, crispy rice cereal, that unmistakable banana cream pudding flavor, topped with crushed vanilla wafers and fresh banana slices for that final creamy punch. Just look at them—aren’t they calling your name?
This recipe combines nostalgic childhood flavors with a bit of grown-up flair. It’s got crunch, it’s got melt-in-your-mouth softness, it’s got banana cream flavor oozing through each bite. Oh, and did we mention they’re ridiculously easy to make? No oven. No mixer. Just a microwave, a spoon, and a sweet tooth.
What Are Banana Pudding Rice Krispie Treats?
Picture your classic Rice Krispie treat, now imagine what happens when you stir in banana cream pudding mix and top it with crushed vanilla wafers and a dreamy drizzle of sweet glaze—and then, to seal the deal, you crown it with glossy fresh banana slices. It’s banana pudding in crispy treat form, and yes, it’s as magical as it sounds.
This dessert takes inspiration from traditional Southern banana pudding—rich, creamy, comforting—and fuses it with everyone’s favorite quick treat: Rice Krispie squares. The result? A handheld dessert bar that feels nostalgic but new at the same time.
What You’ll Love About This Recipe
- It’s no-bake – no oven required, and you can have dessert ready in under 20 minutes.
- It’s versatile – want to add some chocolate chips? Go for it. Prefer banana slices over the top like in the photo? Yes, please!
- It’s texture perfection – marshmallowy and gooey, yet crispy and crunchy, with a creamy-tart banana flair.
- It’s visually stunning – the banana slices glistening over a fluffy white topping make it a total showstopper (yep, just like the pic!).
The Star Ingredients Breakdown
Let’s break it down and show some love to the real MVPs of this recipe:
- Unsalted Butter (3 tbsp): Adds richness and helps everything melt together smoothly.
- Mini Marshmallows (10 oz): This is the gooey glue that holds the treats together.
- Instant Banana Cream Pudding Mix (1 box – 3.4 oz): Here’s the secret weapon—adding this dry mix infuses that unmistakable banana pudding flavor right into the marshmallow mix. No cooking needed.
- Rice Krispies Cereal (6 cups): The light, airy crunch we all love.
- Crushed Vanilla Wafers (½ cup): A nod to traditional banana pudding and a crunchy topping that seals the deal.
- Fine Sea Salt (pinch): Don’t skip this. It brings out the sweetness and keeps the flavor balanced.
- Fresh Bananas (sliced, optional but recommended): Adds freshness and looks amazing!
Ingredient List (With Optional Enhancements)
Base Ingredients
- 3 tbsp (42 g) unsalted butter
- 10 oz mini marshmallows (or regular, cut in half)
- 1 (3.4 oz / 96 g) box instant banana cream pudding mix (dry, NOT prepared)
- 6 cups (about 210 g) Rice Krispies cereal
Topping (Optional but Highly Recommended)
- ½ cup crushed vanilla wafers (about 8–10 cookies)
- Pinch of fine sea salt
- Sliced fresh bananas (for topping, just like in the photo)
- Optional: drizzle of sweetened condensed milk or white chocolate
Kitchen Tools You’ll Need
- 9×9-inch or 8×8-inch square baking pan
- Parchment paper
- Large microwave-safe bowl
- Silicone spatula or wooden spoon
- Measuring cups
- Sharp knife for slicing (wipe between cuts for clean edges)
Step-by-Step Instructions
Step 1: Prep the Pan
Lightly grease a 9×9-inch pan (or 8×8 for thicker squares) with butter or cooking spray. Line it with parchment paper and let a bit hang over the sides—this makes it super easy to lift the whole slab out later for clean slicing.
Step 2: Melt the Butter and Marshmallows
In a big microwave-safe bowl, melt the butter (about 30–45 seconds). Toss in the marshmallows and stir to coat. Microwave in 30-second bursts, stirring each time until everything is smooth and melty (usually around 90 seconds total). Don’t overheat—burnt marshmallows = chewy, tough treats.
Step 3: Add Banana Pudding Mix
Whisk in the banana pudding powder while the mixture is still hot and glossy. It’ll turn pale yellow and smell amazing. This step transforms your treats from good to what is this heaven?!
Step 4: Stir in the Cereal
Now stir in your Rice Krispies cereal. Go fast while the mixture is still warm and pliable. You want every little puffed rice coated in that banana-marshmallow bliss.
Step 5: Press It Into the Pan
Pour it all into your prepped pan. Grease your hands or use the old zip-top bag trick (spray the outside of the bag with oil, slip your hand inside) and press the mixture down evenly. A flat measuring cup or glass can help you press it super smooth and compact.
Step 6: Top It Off Right
While still sticky (within 2 minutes), sprinkle on the crushed vanilla wafers. Gently press them in so they stick. Add a tiny pinch of sea salt over the top—it’s a flavor enhancer, trust me. You can also drizzle some white chocolate or sweetened condensed milk for extra decadence.
Step 7: Cool and Cut
Let it sit at room temp for about 5–10 minutes, or pop it in the fridge for a super clean cut. Lift out using the parchment, then slice into 12 or 16 squares. Clean your knife between cuts for those gorgeous bakery-style edges.
Fresh Banana Topping: Optional But Magical 🍌
So here’s the thing—the banana flavor from the pudding mix already brings the heat, but topping your treats with actual banana slices like in the photo? That takes this dessert from snackable to Instagrammable. Just look at how those fresh banana rounds sit perfectly on top, adding color, natural sweetness, and creaminess.
How to Do It Right:
- Use firm, ripe bananas: You want that perfect yellow banana—not overly ripe or spotty—for clean slices and better presentation.
- Slice just before serving: Bananas brown quickly. To avoid that unappetizing look, slice and place them just before serving.
- Optional drizzle: A bit of honey, caramel, or even sweetened condensed milk over the banana slices gives them that glossy, irresistible finish (as seen in the image).
- Keep them cool: If you’re making these in advance, wait to add the banana slices until serving time, or store in the fridge and cover lightly with plastic wrap to reduce browning.
Fresh banana topping not only tastes like heaven, it also mimics the creamy layers of real banana pudding, completing the experience.
Troubleshooting Tips
Even the easiest recipes can go sideways. Here’s how to avoid common banana Krispie mistakes:
Why Are My Treats Too Hard?
- You probably overheated the marshmallows. When marshmallow is cooked too long, it becomes stiff and loses its gooey magic. Stick to 30-second intervals and stir well each time.
Why Doesn’t the Banana Flavor Pop?
- Make sure you’re using instant banana pudding mix and whisking it thoroughly into the hot marshmallow mix. If you want even more punch, add ½ tsp banana extract.
How Do I Keep Bananas from Turning Brown?
- Slice bananas fresh and brush lightly with lemon juice or a sugar syrup glaze to slow oxidation. Refrigerate after adding them if not serving right away.
Tips for Making the Best Banana Pudding Rice Krispie Treats
Let’s get down to the crunchy, gooey truth—here’s how to make your bars turn out bakery-perfect every time:
- Use fresh marshmallows: Stale marshmallows don’t melt as well and can affect texture.
- Don’t overheat anything: Gentle melting is the secret to soft, chewy bars.
- Mix fast: The mix sets quickly as it cools, so fold in the cereal fast before it stiffens.
- Use parchment + grease: This combo ensures easy lifting and clean cutting.
- Add toppings before the bars cool: So they stick nicely and don’t fall off later.
Storage Tips
So you made a batch (or two)—how do you store them?
Short-Term (1–3 Days):
- Store at room temperature in an airtight container. If topped with fresh bananas, refrigerate and consume within 24 hours.
Long-Term (Up to 2 Weeks):
- Freeze the bars without fresh bananas. Wrap them in wax paper and pop them in a zip-top freezer bag. Thaw at room temperature before eating.
Banana Pudding Rice Krispie Treats Recipe
- Prep Time: 10 minutes
- Cook Time: 5 minutes
- Total Time: 15 minutes
- Category: No-Bake Dessert / Snack / Bars
Description
🍌 Sweet, creamy, and crunchy all in one bite! These bars combine the nostalgic flavors of banana pudding with the crispy fun of Rice Krispies—perfect for dessert tables, lunchboxes, or a quick treat. ✨
Ingredients
Base:
3 tbsp (42 g) unsalted butter
10 oz mini marshmallows (or regular, halved)
1 (3.4 oz / 96 g) box instant banana cream pudding mix
6 cups (about 210 g) Rice Krispies cereal
Topping (Optional but Recommended):
½ cup crushed vanilla wafers (about 8–10 cookies)
Tiny pinch of fine sea salt
Instructions
Lightly grease a 9×9-inch square pan (or 8×8 for thicker bars) with butter or nonstick spray. Line with parchment, leaving overhang on two sides. ⏱️ 3 minutes
In a large microwave-safe bowl, melt butter for 30–45 seconds. Add marshmallows and stir. Microwave in 30-second intervals, stirring between each, until melted and smooth. ⏱️ 60–90 seconds
Immediately whisk in dry banana pudding mix until fully dissolved and pale yellow. ⏱️ 2 minutes
Gently fold in Rice Krispies until no dry cereal remains. ⏱️ 2 minutes
Transfer mixture to the prepared pan. Grease hands or use a greased bag to press evenly and firmly. ⏱️ 2 minutes
Sprinkle crushed vanilla wafers and a tiny pinch of salt over the top, pressing lightly to adhere. ⏱️ 1 minute
Let set at room temperature for at least 5 minutes or chill for 10 minutes for cleaner slices. Lift out using parchment and cut into 12 squares (or 16 smaller bars). ⏱️ 10 minutes
Notes
These treats are perfect for parties, lunchboxes, or holiday dessert tables.
For extra flavor, try adding sliced fresh bananas between layers before pressing.
You can swap vanilla wafers for crushed graham crackers for a slightly different crunch.
Store in an airtight container at room temperature for up to 2 days, or refrigerate for longer freshness.
A light drizzle of melted chocolate over the top adds a festive touch and extra indulgence.
Nutrition
- Serving Size: 12 squares
- Calories: 210 kcal
Making It Ahead of Time
Banana Pudding Rice Krispie Treats are perfect for prep! Just make the base treats up to 2 days ahead. Keep them in an airtight container, and when it’s time to serve, add your fresh banana slices and optional drizzle.
Want them ready to go but still beautiful? Slice your bananas a couple of hours ahead and soak briefly in lemon water to prevent browning. Pat dry and place on treats before serving.
Similar recipes :
Christmas Chocolate Rice Krispie Balls – A Festive Treat Everyone Will Love
Peanut Butter Rice Krispie Balls – Your New Favorite No-Bake Treat
Creamy Pecan Streusel Cobbler: A Cozy Dessert You’ll Fall in Love With
Fun Variations to Try
Want to mix things up a bit? Here are some creative spins on the original recipe:
1. Banana-Nut Krispie Treats
- Stir in ½ cup chopped toasted walnuts or pecans for added crunch.
2. Chocolate Banana Bomb
- Drizzle melted dark or white chocolate over the finished bars.
- Add mini chocolate chips into the mix before pressing into the pan.
3. Peanut Butter-Banana Dream
- Replace 1 tbsp of the butter with peanut butter for that Elvis Presley vibe.
- Garnish with crushed peanuts or a peanut butter drizzle.
Serving Suggestions
These bars are a hit anywhere desserts are welcome:
- Birthday parties: Kid- and adult-approved.
- Potlucks & cookouts: Easy to transport and serve.
- Lunchbox treat: Add a surprise square in your kiddo’s lunch.
- Holiday dessert trays: Add some flair with banana coins and crushed cookies.
- Picnics & tailgates: Portable, no mess, and totally snackable.
Final Thoughts
Banana Pudding Rice Krispie Treats might just be the best dessert mashup ever invented. They’re nostalgic yet new, classic but creative, and totally irresistible. With layers of banana cream flavor, crispy cereal, and that creamy topping crowned with fresh banana slices, these bars are the perfect combo of comfort and fun.
Plus, they’re easy enough for beginners but tasty enough to impress your pickiest dessert snob friends. Whether you’re making them for a party, a snack, or just because it’s Tuesday—you’re going to fall in love.
FAQs
1. How long do Banana Pudding Rice Krispie Treats last?
Without bananas on top, they last 3–4 days at room temp in an airtight container. With bananas, they’re best within 24 hours.
2. Can I use cook-and-serve banana pudding mix instead of instant?
Nope! It needs to be instant pudding mix, and you’re adding it dry—don’t prepare it like normal pudding.
3. Do these need to be refrigerated?
Not unless you add fresh bananas. Once topped with fruit, they should go in the fridge and eaten within a day.
4. Can I skip the vanilla wafers?
Sure, but you’ll miss that banana pudding vibe. You could try graham crackers or golden Oreos instead.
5. Are these gluten-free?
Most Rice Krispies cereal brands contain malt (which is derived from barley). Use a certified gluten-free puffed rice cereal and make sure all other ingredients (especially pudding and wafers) are gluten-free.


