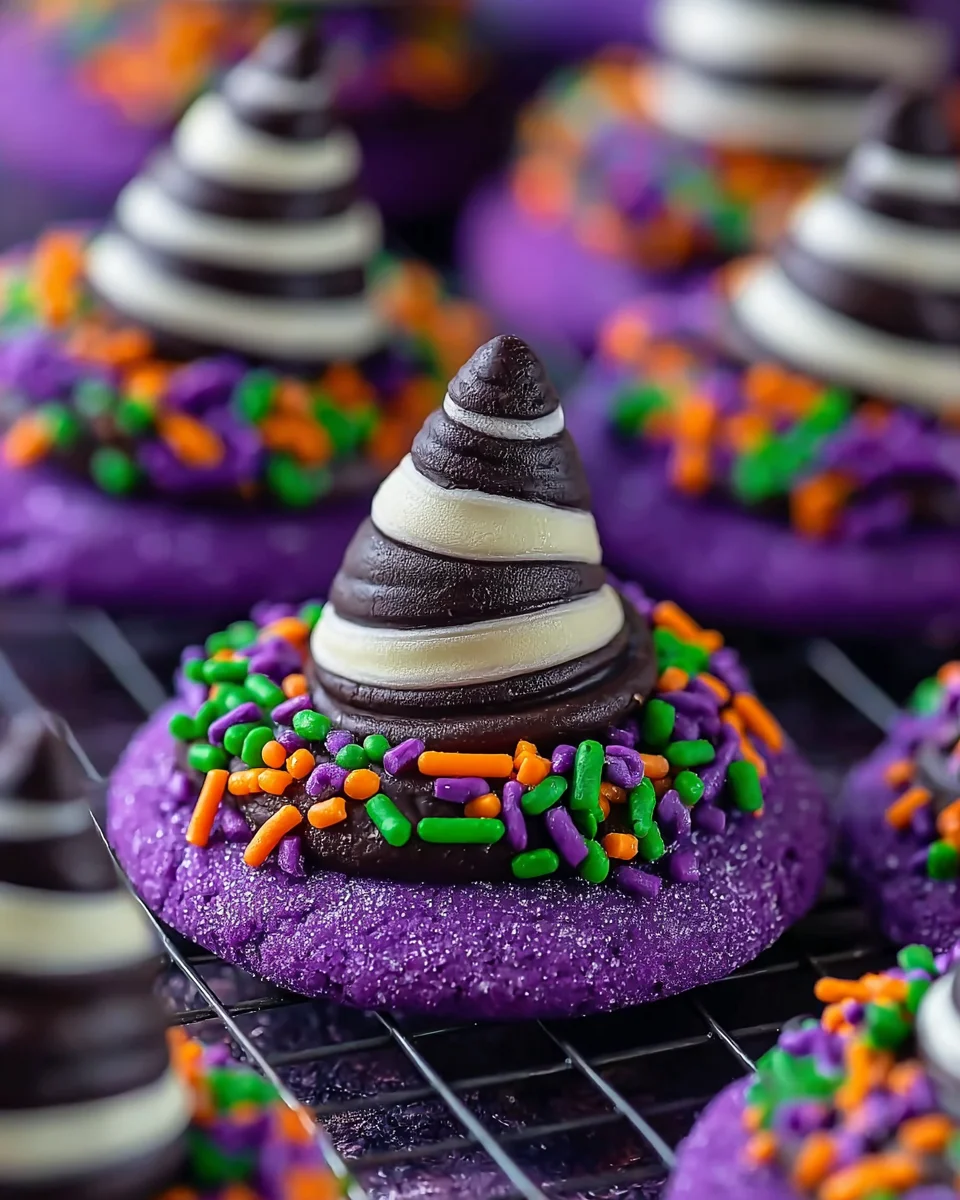
Introduction to Best Witch Hat Halloween Cookies
Leaves are falling; nights are getting crisp, and it’s the season for fun and festivities. Who doesn’t love Halloween? ‘Cause I sure do! The very Best Witch Hat Halloween Cookies are a treat so eager to please and so very simple to pull together with a little bit of fun in the making. What a delightful way to brighten your loved ones’ day. And, psst… busy day after all but still need something special to take along to your Halloween potluck? These cookies are the perfect little number. Get cracking with some baking magic!
Why You’ll Love This Best Witch Hat Halloween Cookies
You’ll love the look of these cookies-they’re just fun to eat. Not time consuming at all and perfect for any busy mom-thanks to the mom’s hormone. The sweet and nutty taste is very addicting that people will look for more. From a school’s affair to a family get-together along with simply sitting over the warm drinks, these cookies are sure to charm every crowd!
Ingredients for Best Witch Hat Halloween Cookies
To create these enchanting cookies, gather the following magical ingredients:
- All-purpose flour: The base of our cookie, providing structure and a nice chew.
- Cornstarch: Helps keep the cookies light and tender, giving them that perfect melt-in-your-mouth texture.
- Baking soda: This leavening agent helps the cookies puff up beautifully in the oven.
- Baking powder: Works in tandem with baking soda to ensure our cookies rise just right.
- Fine sea salt: A pinch helps to balance the sweetness and enhances all the flavors.
- Unsalted butter: This creamy goodness adds richness and depth to our dough, making every bite heavenly.
- White sugar: Sweetens the cookies while contributing to their lovely texture.
- Large egg: Essential for binding the ingredients together and adding moisture.
- Smooth peanut butter: The star of the show, bringing a delicious nutty flavor and adding chewiness.
- Vanilla extract: A splash amplifies the sweetness and aroma, making the cookies irresistible.
- Purple gel food coloring: This fun addition turns our cookies into spooky witch hats, completing their Halloween charm.
- Halloween sprinkles or purple sanding sugar: Optional but highly recommended for a festive flair that will delight both kids and adults.
- Chocolate kisses or Hugs candies: These are the magical toppings that give our cookies their signature witch hat look!
For exact quantities and more details on these ingredients, scroll down to the bottom of this article where you’ll find our handy printable recipe!
How to Make Best Witch Hat Halloween Cookies
Now, let’s dive into the fun part: making the Best Witch Hat Halloween Cookies! Follow these simple steps, and I promise you’ll have a trick-or-treat treat that will steal the show. Just keep your apron on and your kitchen spirit high!
Step 1: Prepare the Baking Sheet and Dry Ingredients
First things first, grab your baking sheets! Line them with parchment paper—this keeps everything neat and makes clean-up a breeze.
In a large bowl, whisk together the all-purpose flour, cornstarch, baking soda, baking powder, and fine sea salt. Ensure everything is evenly combined because we don’t want any surprises while baking! Set this dry mix aside to let it rest while we tackle the wet ingredients.
Step 2: Cream the Butter and Sugar
Now, let’s cream the butter and sugar together. In a separate bowl, beat the softened unsalted butter and white sugar for about two minutes.
You’re aiming for a light and fluffy texture here. When done right, this step adds air, helping our cookies achieve that delightful softness. Don’t rush it—patience is key!
Step 3: Combine Wet Ingredients
Next up, we’ll blend in our wet ingredients. Mix in the large egg until fully incorporated, followed by the smooth peanut butter and vanilla extract. The rich, nutty aroma wafting through the air will make your mouth water!
Give it a good stir until the mixture is smooth and creamy. This adds depth and flavor that makes these cookies uniquely delicious!
Step 4: Combine Dry and Wet Mixtures
Time to join forces! Gradually add the dry mixture into the wet ingredients. Stir until a uniform dough forms. Be gentle here—over mixing can lead to tough cookies!
Now, for a splash of spooky fun, add in your purple gel food coloring. Mix until your desired witchy hue is achieved. This isn’t just a treat; it’s a colorful celebration!
Step 5: Chill the Dough
Chilling the dough is crucial for making these cookies thick and chewy! Cover your bowl with plastic wrap and let it chill for at least two hours in the fridge. If you have the time, overnight is even better.
This step helps the flavors meld together and keeps our cookies from spreading too much in the oven. Trust me; the wait is absolutely worth it!
Step 6: Bake the Cookies
Preheat your oven to 350°F (175°C) when you’re ready to bake.
Roll each chilled dough mound into a smooth ball, then coat them in Halloween sprinkles or purple sanding sugar for a festive touch. Spread your cookie balls about two inches apart on the prepared trays.
Bake for 9–11 minutes—look for puffed-up cookies that are just starting to crack on top.
Once they come out, let them cool for about five minutes, then press a chocolate kiss or Hug into the center of each cookie. This is what gives them that adorable witch hat look!
Finally, transfer the trays to the freezer for 10 minutes before placing them on a wire rack to cool completely. There you have it: magical cookies that everyone will swoon over!
Tips for Success
- Make sure your butter is soft but not melted for perfect creaming.
- Don’t skip the chilling step; it’s essential for thick cookies!
- Use a cookie scoop for uniform cookie sizes.
- Experiment with different food coloring shades to match your theme.
- Keep an eye on the baking time; underbaking slightly gives a soft center.
Equipment Needed for Best Witch Hat Halloween Cookies
- Baking sheets: Use any flat pan; just line it with parchment.
- Parchment paper: Wax paper can work in a pinch, but parchment is preferred.
- Mixing bowls: Any size works; just ensure they’re deep enough.
- Whisk or electric mixer: A fork can do if that’s all you have!
- Cookie scoop: A spoon is a great alternative for shaping dough.
Variations of Best Witch Hat Halloween Cookies
- Peanut Butter Alternatives: Try using almond butter or sun butter for a nut-free version, especially for school events.
- Gluten-Free Option: Substitute all-purpose flour with a 1:1 gluten-free flour blend. It keeps the texture delightful!
- Chocolate Lovers: Add chocolate chips or chunks to the dough for an extra chocolatey twist.
- Spooky Flavors: Mix in spices like cinnamon or nutmeg for a Halloween warmth.
- Healthier Cookie: Reduce the sugar by ¼ cup and add mashed bananas or applesauce for natural sweetness and moisture.
Serving Suggestions for Best Witch Hat Halloween Cookies
- Pair these cookies with a tall glass of cold milk for a classic, delightful combo.
- Serve alongside spooky punch or hot apple cider for a festive treat.
- Arrange on a decorative platter with Halloween-themed decorations for eye-catching presentation.
- Perfect for school parties or as a fun dessert to share with neighbors!
FAQs about Best Witch Hat Halloween Cookies
Can I make these cookies ahead of time?
Absolutely! You can prepare the dough and chill it in the fridge for up to 24 hours. This is a great time-saver for busy moms like us! Just roll them out and bake when you’re ready.
How should I store the Best Witch Hat Halloween Cookies?
Keep your cookies in an airtight container at room temperature. They should remain fresh for about a week. If they last that long, that is!
Can I use different candies on top?
Of course! Feel free to get creative with the toppings. Any candy that suits your Halloween spirit could work, like mini marshmallows or gummy worms for a spooky twist!
Are these cookies suitable for dietary restrictions?
With a few tweaks, they can be! Try using gluten-free flour for a gluten-free version or nut butter alternatives for allergies. Just be sure to adapt the rest of the ingredients accordingly.
What’s the best way to serve these cookies at a party?
Present them on a spooky-themed platter surrounded by Halloween decorations. You can also add some fun labels or tags to enhance the festive feel!
Final Thoughts
There’s something truly magical about baking the Best Witch Hat Halloween Cookies. They not only taste incredible but also bring a fun twist to any gathering. The joy of creating these whimsical treats with your loved ones is what makes them unforgettable. Watching the smiles light up their faces as they bite into these delightful cookies is a moment to cherish. So this Halloween, embrace the spirit of the season with these enchanting cookies! They’ll surely become a beloved tradition, and who knows? They might even spark a little kitchen creativity among your family!
Print
Best Witch Hat Halloween Cookies
- Prep Time: 20 minutes
- Cook Time: 11 minutes
- Total Time: 2 hours 31 minutes
- Yield: 33 cookies 1x
- Category: Dessert
- Method: Baking
- Cuisine: American
- Diet: Vegetarian
Description
Delicious and fun Witch Hat Halloween Cookies that will impress everyone at your Halloween gatherings.
Ingredients
- 1 1/2 cups all-purpose flour
- 2 tsp cornstarch
- 1/2 tsp baking soda
- 1/4 tsp baking powder
- 1/8 tsp fine sea salt
- 1/2 cup unsalted butter, softened
- 1 cup white sugar
- 1 large egg
- 3/4 cup smooth peanut butter
- 1 tsp vanilla extract
- purple gel food coloring
- Halloween sprinkles or purple sanding sugar
- 33 chocolate kisses or Hugs candies, unwrapped
Instructions
- Line a sheet tray with parchment paper and set aside. In a large bowl, whisk together the all-purpose flour, cornstarch, baking soda, baking powder, and fine sea salt until everything is evenly combined. Set aside.
- In a separate bowl, cream the softened unsalted butter and white sugar together for 2 minutes until light and fluffy. Mix in the egg until fully incorporated, then add the peanut butter and vanilla extract.
- Add the dry ingredients to the wet mixture and stir until a uniform dough forms. Incorporate the purple gel food coloring until desired shade is achieved.
- Using a 1-tablespoon cookie scoop, portion the dough into mounds on the parchment-lined sheet tray. Cover with plastic wrap and chill in the fridge for at least 2 hours, or overnight.
- Preheat your oven to 350°F (175°C) and line new sheet trays with parchment paper. Roll each chilled dough mound into a smooth ball and coat with sprinkles or sugar. Arrange on trays, spacing them 2 inches apart.
- Bake for 9–11 minutes until cookies are puffed and beginning to crack. Let cool for 5 minutes, then press a chocolate kiss or Hug into each cookie.
- Transfer the tray to the freezer for 10 minutes and then move cookies to a wire rack to cool completely.
Notes
- Chilling the dough is crucial for thick cookies.
- Using purple gel food coloring will help achieve a vibrant color.
- Underbake slightly for a soft interior.
Nutrition
- Serving Size: 1 cookie
- Calories: 120
- Sugar: 10g
- Sodium: 50mg
- Fat: 6g
- Saturated Fat: 3g
- Unsaturated Fat: 2g
- Trans Fat: 0g
- Carbohydrates: 15g
- Fiber: 1g
- Protein: 2g
- Cholesterol: 10mg