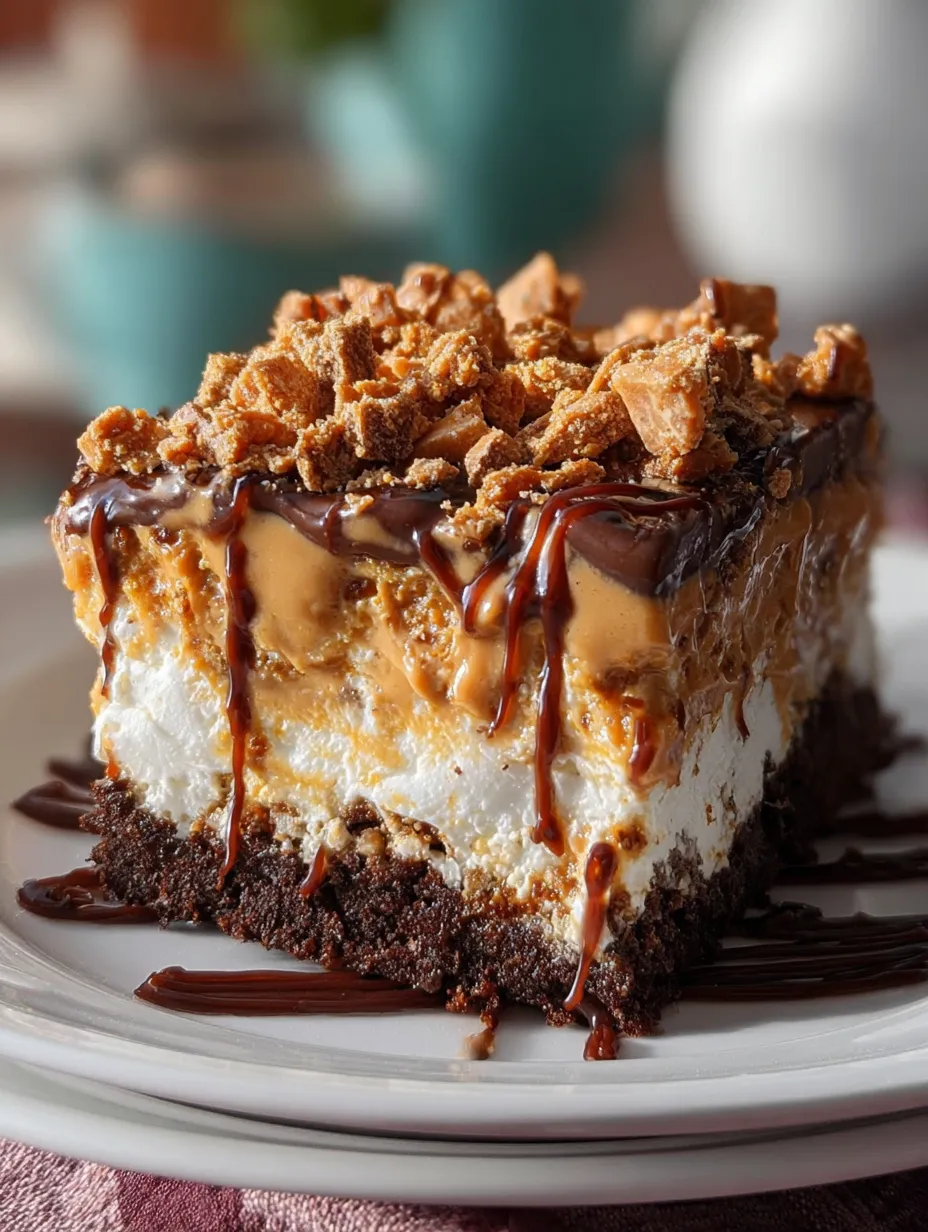
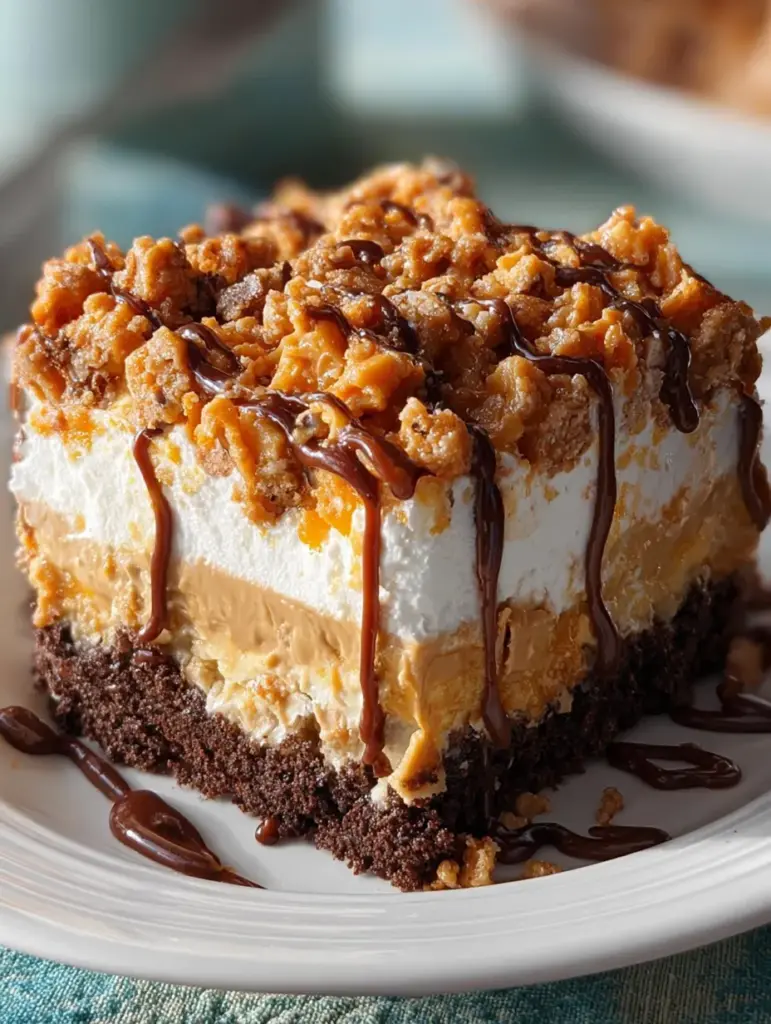
If you’ve ever taken a bite of a dessert so indulgent that it stops you mid-sentence, this Butterfinger Candy Bar Poke Cake is that dessert. It’s rich, creamy, peanut-buttery, and layered with all the good things — moist yellow cake, luscious peanut butter filling, fluffy whipped topping, gooey chocolate fudge, and that signature Butterfinger crunch on top.
It’s a dessert that doesn’t just satisfy your sweet tooth — it hugs your soul. Whether you’re making it for a potluck, a family get-together, or just a quiet Friday night treat, this poke cake never fails to steal the show.
What makes it even better? It’s easy. Like “I didn’t need to be a pastry chef” easy. You start with a boxed cake mix, stir together a few pantry staples, and let the magic happen. The result tastes like something you spent hours perfecting — soft, gooey, and irresistible.
Let’s break it all down step by step and turn your kitchen into the sweetest candy lab on Earth.
What Exactly Is a Poke Cake (and Why It’s Genius)
If you’ve never made a poke cake before, get ready to fall in love with the concept. The name comes from — you guessed it — poking holes all over a freshly baked cake. Then you pour something rich and flavorful (like pudding, syrup, or sweetened milk) right on top. The mixture seeps down into the holes, creating pockets of sweetness throughout the cake.
The result? Every bite is moist, flavorful, and beautifully textured — not just the top or the edges. It’s the perfect method for lazy bakers and flavor lovers alike.
For this version, we’re going bold. Instead of pudding or fruit syrup, we’re using a blend of sweetened condensed milk and creamy peanut butter. It melts into the cake’s surface, filling every crevice with nutty sweetness. Add a fluffy whipped topping, drizzle on some chocolate fudge, and finish with crushed Butterfinger bars — it’s like layering a candy bar inside a cake.
The first time you slice into it, you’ll see the peanut butter ribbons running through the cake, dotted with crunchy toffee bits. It’s messy, it’s over-the-top, and it’s absolutely divine.
Ingredients Breakdown (And Why Each One Matters)
Here’s what makes this dessert so balanced and addictive:
- Yellow Cake Mix: The perfect neutral base — buttery and soft without overpowering the peanut butter flavor.
- Eggs, Water, and Oil: Give the cake moisture and structure, ensuring it’s light but sturdy enough to soak up the filling.
- Sweetened Condensed Milk: The backbone of that gooey, luscious filling. It adds sweetness and richness without being heavy.
- Creamy Peanut Butter: Smooth and nutty, it transforms the condensed milk into a velvety dream that oozes into every poke hole.
- Whipped Topping: The light and airy finish that balances out the richness below.
- Chocolate Fudge Sauce: Adds contrast and visual appeal — plus, chocolate + peanut butter = perfection.
- Crushed Butterfinger Bars: The signature crunch! They give that toffee-caramelized candy texture that makes this cake a total showstopper.
You only need a handful of ingredients, yet every one of them contributes something unique. That’s what makes this dessert so magical — simple pantry items that transform into something extraordinary.
Step-by-Step Instructions (With Pro Baker Notes)
Step 1: Preheat and Prepare
Start by preheating your oven to 350°F (175°C). Grease and lightly flour a 9×13-inch baking dish. This ensures your cake doesn’t stick and helps it release cleanly once baked.
Pro Tip: Use a glass dish if you can — it helps you see how the filling soaks into the cake later.
Step 2: Mix and Bake
In a large bowl, combine your yellow cake mix, eggs, water, and oil. Beat the mixture for two minutes on medium speed until it’s smooth and lump-free. Pour it into your prepared baking dish and bake for 25–30 minutes or until a toothpick inserted in the center comes out clean.
Your kitchen will smell incredible — warm, buttery, and sweet. This is where the anticipation builds.
When the cake is done, don’t rush to poke it right away. Let it cool for about 15 minutes. It should be warm enough to absorb the filling but not so hot that it melts the peanut butter mixture on contact.
Step 3: Make the Peanut Butter Mixture
In a medium bowl, whisk together one can of sweetened condensed milk and one cup of creamy peanut butter until smooth and pourable. The consistency should be similar to warm caramel.
If it’s too thick, microwave it for 10–15 seconds to loosen it up. This is the flavor powerhouse — rich, nutty, and incredibly silky.
Step 4: Poke and Pour
Using the handle of a wooden spoon or a fork, poke holes evenly across the surface of your warm cake. Don’t be shy — make about 25–30 holes.
Now pour the peanut butter mixture slowly over the top, letting it sink into each hole. Watching the filling disappear into the cake is oddly satisfying — like peanut butter lava finding its home.
Give the cake about 20 minutes to rest, allowing the filling to settle into all the little pockets you’ve created.
Step 5: Cool, Top, and Decorate
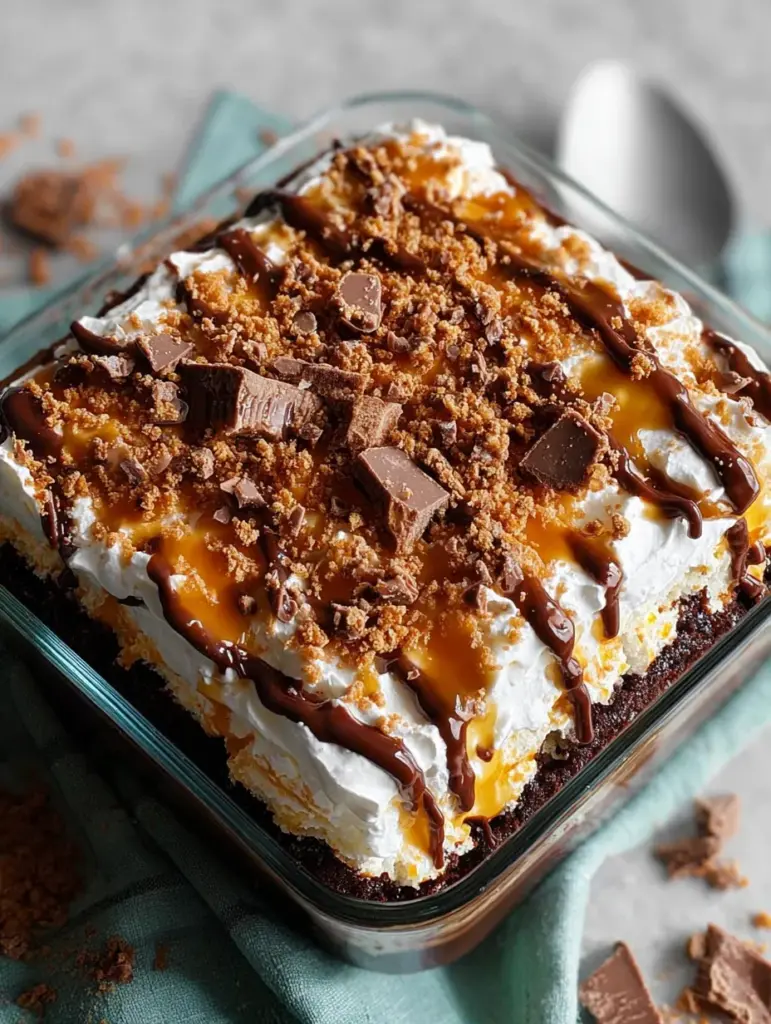
Once the cake has completely cooled, it’s time to decorate. Spread a generous layer of whipped topping over the surface. Smooth it out with a spatula until even and fluffy.
Then drizzle chocolate fudge sauce in zigzag lines, letting it drip slightly down the sides. Sprinkle crushed Butterfinger candy bars all over the top for that irresistible crunch.
The final result looks like a dessert straight out of a bakery window — glossy, layered, and impossible to resist.
Step 6: Chill and Serve
Cover the cake with plastic wrap and refrigerate for at least 2 hours, though overnight is even better. The chilling time allows the flavors to marry — the cake becomes moist and fudgy, the topping firms up, and the Butterfinger bits stay crunchy.
When ready to serve, slice into squares and top with extra crushed Butterfinger pieces for a little flair.
Baker’s Notes and Tips
- Poke While Warm: Poking the cake while it’s slightly warm helps the peanut butter mixture soak in better.
- Creamy Peanut Butter Only: Skip the chunky version — smooth peanut butter creates a better texture.
- Crushing Butterfingers: Place the bars in a ziplock bag and lightly crush with a rolling pin for perfect bite-sized bits.
- Chill Time is Key: Don’t rush this! The longer it chills, the more the flavors deepen.
- Use Real Fudge Sauce: Avoid syrup — thick chocolate fudge sauce gives a better, richer layer.
- Make Ahead: You can prepare this cake a day before serving. It gets even better overnight.
Flavor Variations to Try
Want to play around a little? Here are some fun twists:
- Reese’s Poke Cake: Swap Butterfingers for chopped Reese’s cups and drizzle peanut butter sauce instead of fudge.
- Oreo Crunch Version: Replace candy bars with crushed Oreos for a cookies-and-cream twist.
- Caramel Dream: Drizzle caramel sauce over the peanut butter layer before chilling.
- Chocolate Cake Base: Use chocolate cake mix instead of yellow for a deeper cocoa flavor.
- Nut-Free Option: Use crushed pretzels instead of Butterfingers for a salty-sweet variation.
Butterfinger Candy Bar Poke Cake – Sweet, Decadent, and Oh-So-Delicious! 🍫
- Prep Time: 20 minutes
- Cook Time: 30 minutes
- Total Time: 2 hours 50 minutes
- Category: Dessert
Description
🍫 A dreamy dessert that combines peanut butter creaminess, moist cake layers, and that irresistible Butterfinger crunch! ✨ Perfect for birthdays, potlucks, or those nights when you crave something truly indulgent. 🥜🍰
Ingredients
1 box yellow cake mix 🎂
3 large eggs 🥚
1 cup water 💧
1/3 cup vegetable oil 🛢️
1 (14 oz) can sweetened condensed milk 🥫
1 cup creamy peanut butter 🥜
1 cup whipped topping (e.g., Cool Whip) 🍦
1 cup crushed Butterfinger candy bars 🍬
1/2 cup chocolate fudge sauce 🍫
Optional: extra Butterfinger pieces for garnish 🍫
Instructions
Preheat Oven:
Preheat oven to 350°F (175°C). Grease and flour a 9×13-inch baking dish. ⏱️ 10 minutesPrepare the Cake:
In a bowl, mix cake mix, eggs, water, and oil. Beat for 2 minutes on medium speed until smooth. Pour into the prepared dish and bake for 25–30 minutes, or until a toothpick inserted in the center comes out clean. 🎂⏱️ 30 minutesPoke and Pour:
Let the cake cool for 15 minutes. Poke holes all over the surface with the handle of a wooden spoon or a fork. Mix the sweetened condensed milk with peanut butter, then pour evenly over the warm cake so it seeps into the holes. 🥜🥄⏱️ 20 minutesCool and Top:
Allow the cake to cool completely. Spread whipped topping evenly over the top, drizzle with chocolate fudge sauce, and sprinkle crushed Butterfinger candy bars. 🍫🍬⏱️ 15 minutes
Chill and Serve:
Garnish with extra Butterfinger pieces if desired. Refrigerate for at least 2 hours before serving for best flavor and texture. ❄️⏱️ 2 hours
Notes
Cake Mix Variations:
You can use a white or yellow cake mix; chocolate can also work for an extra chocolatey twist. Adjust baking time slightly if using a different mix.Peanut Butter Options:
Creamy peanut butter works best for smooth soaking. Natural peanut butter can be used but may make the sauce slightly thinner—stir well before pouring.Poking the Cake:
Make the holes deep enough so the peanut butter mixture seeps through but not all the way to the bottom; about 1–1.5 inches deep works perfectly.Whipped Topping:
Store-bought or homemade whipped cream both work. For a firmer topping, chill your bowl and beaters before whipping.Butterfinger Crunch:
Crush the candy bars coarsely for texture. Fine crumbs may sink into the whipped topping. You can also reserve some larger pieces for garnish.Chocolate Fudge Sauce:
Warm slightly before drizzling if needed for easier pouring. You can also substitute with hot fudge for richer chocolate flavor.Chilling Time:
Refrigeration is key! The cake is much easier to slice and the flavors meld together better after at least 2 hours. Overnight chilling intensifies flavor.Serving Tips:
Cut with a hot knife for cleaner slices. Serve slightly chilled for creamy, fudgy bites.Storage:
Keep covered in the refrigerator for up to 4–5 days. Avoid freezing the whipped topping—it may separate.Optional Add-Ins:
Add a drizzle of caramel sauce for extra sweetness.
Top with chopped peanuts for added crunch.
Nutrition
- Serving Size: 12 servings
- Calories: 320 kca
Serving Ideas
- Top with extra whipped cream and a drizzle of chocolate syrup.
- Add a scoop of vanilla or peanut butter ice cream on the side for ultimate indulgence.
- Sprinkle with sea salt flakes to balance the sweetness.
- Serve in individual dessert cups for parties — it looks fancy and keeps things neat.
Storage & Make-Ahead Info
- Refrigerate: Store leftovers covered in the fridge for up to 4 days.
- Freeze: Wrap tightly and freeze for up to 2 months. Thaw overnight before serving.
- Transport Tip: This dessert travels well — just keep it chilled until serving.
You may like these recipes as well :
Butterfinger Caramel Crunch Bars – Layers of Crunch, Caramel, and Chocolate Bliss
No Bake Caramel Crunch Butterfinger Truffles – The Ultimate Indulgent Dessert Bite
Butterfinger Pie – The No-Bake Dessert Dream
Why This Recipe Works So Well
It’s the perfect trifecta:
- Moist and fluffy cake base.
- Creamy peanut butter filling that seeps into every bite.
- Crunchy, candy-loaded topping that adds contrast and texture.
It’s easy, crowd-pleasing, and irresistibly rich — exactly what a poke cake should be.
Common Mistakes to Avoid
- Overbaking: A dry cake won’t soak up the filling properly. Check early at 25 minutes.
- Pouring Filling on Hot Cake: Wait until it’s warm, not hot, to prevent curdling the milk mixture.
- Skipping Chill Time: This is crucial for flavor development and structure.
- Too Much Fudge Sauce: Use a light drizzle; too much can make the topping soggy.
Conclusion – A Dessert Worth Every Bite 🍫
The Butterfinger Candy Bar Poke Cake isn’t just a dessert — it’s a statement. A bold, rich, candy-layered masterpiece that combines nostalgia with indulgence.
Each bite bursts with creamy peanut butter, gooey fudge, and that iconic Butterfinger crunch — the kind of treat that makes people pause mid-conversation and say, “Oh wow, this is amazing.”
Whether it’s for a potluck, birthday, or a simple weekend reward, this poke cake delivers joy, flavor, and a little bit of candy-inspired magic.
Similar recipes :
Butterfinger Caramel Crunch Pie: A No-Bake Dream Dessert
Butterfinger Caramel Crunch Mini Pies – Bite-Sized Bliss in Every Bite
No-Bake Butterscotch Pie
FAQs
1. Can I make this cake a day ahead?
Yes! In fact, it tastes even better the next day once the flavors settle.
2. Can I use homemade whipped cream instead of Cool Whip?
Absolutely. Just make sure it’s stabilized (add a bit of powdered sugar or gelatin).
3. What other candy bars can I use?
Snickers, Reese’s, or Heath bars work beautifully too!
4. Can I make it gluten-free?
Use a gluten-free yellow cake mix — the rest of the ingredients are naturally gluten-free.
5. How long does it last in the fridge?
Up to 4 days when stored covered and refrigerated.