Some desserts are meant to be shared, while others are meant to be savored slowly in blissful silence — and Butterfinger Caramel Crunch Bars fall right into the second category. Imagine buttery graham cracker crust, velvety caramel, creamy chocolate, and that unmistakable Butterfinger crunch — all stacked in perfect harmony. It’s everything you love about candy bars, transformed into a decadent homemade dessert bar that melts in your mouth yet crackles with each bite.
These bars are the ultimate comfort treat — rich, crunchy, and perfectly sweet without being cloying. Whether you’re making them for a party, a bake sale, or a lazy weekend indulgence, they deliver bakery-level flavor with minimal effort. And the best part? They’re ridiculously easy to make, using simple pantry staples and a few clever layering techniques.
Let’s unwrap the magic layer by layer and see what makes Butterfinger Caramel Crunch Bars a dessert worth obsessing over.
Why These Bars Are a Candy Lover’s Dream
If you’re the kind of person who can’t resist a candy aisle, this dessert is for you. Butterfinger Caramel Crunch Bars are a love letter to candy enthusiasts — the kind of sweet where buttery graham crust meets silky caramel, topped with melted chocolate and that signature Butterfinger crunch. Each bite is an explosion of textures — chewy, creamy, crunchy, and melt-in-your-mouth goodness all at once.
This dessert combines the nostalgic joy of Butterfinger candy bars with the comfort of homemade baking. You don’t need advanced pastry skills — just a mixing bowl, a saucepan, and a bit of patience while the layers cool. What emerges is a stunning dessert bar that tastes like it came straight from a gourmet bakery.
And here’s the beauty of it: these bars are incredibly versatile. They’re perfect for:
- Bake sales (they’ll be the first to disappear)
- Potlucks (they travel beautifully)
- Gift boxes (wrapped in parchment and tied with ribbon)
- Late-night sweet cravings (no judgment here)
Once you take that first bite — the buttery crunch giving way to creamy caramel and chocolate — you’ll understand why this recipe deserves a spot in your dessert hall of fame.
The Magic of Layered Desserts – Why Texture Matters
Have you ever wondered why layered desserts feel so satisfying? It’s because each layer brings its own personality to the table — texture, flavor, and balance. Butterfinger Caramel Crunch Bars are the perfect example of this sensory harmony.
Let’s break it down:
- The Base – Graham Cracker Crust:
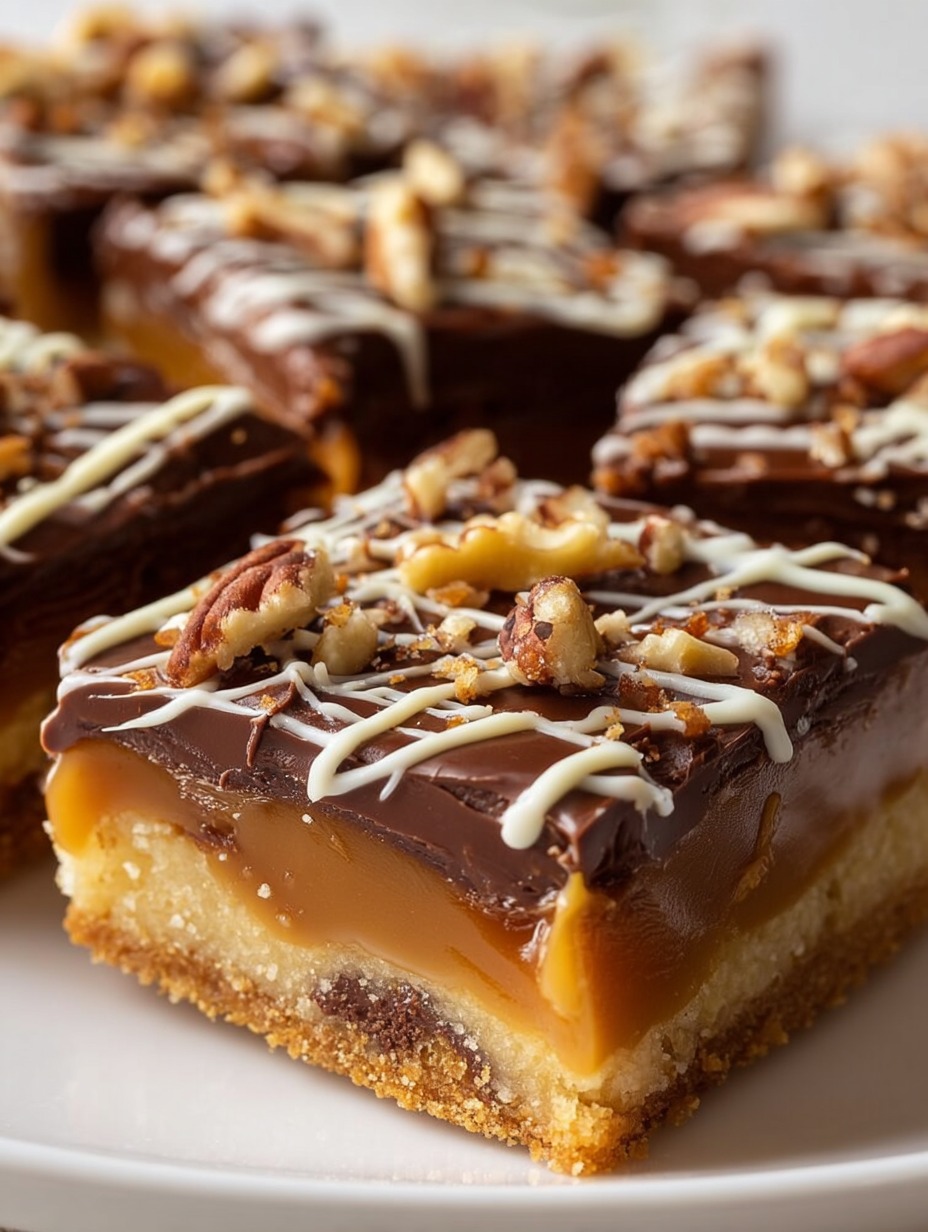
Buttery, slightly salty, and crumbly, it anchors the entire dessert. The brown sugar caramelizes in the oven, creating a firm yet tender crust that’s easy to bite into but holds up beautifully when sliced. - The Middle – Caramel Layer:
This is the heart of the dessert — smooth, gooey, and irresistible. Made with sweetened condensed milk and caramel sauce, it adds richness and depth. When it bakes, it thickens slightly, creating a chewy, fudgy center that glues the layers together. - The Top – Butterfinger and Chocolate Heaven:
Melted semi-sweet chocolate forms a glossy blanket over the caramel, while chopped Butterfinger bars bring that classic candy crunch. A sprinkle of chopped pecans adds sophistication, creating a sweet-salty balance that keeps you coming back for “just one more bite.”
The interplay of textures — the snap of chocolate, the sticky caramel stretch, and the crumbly crust — makes each bite a tiny symphony. It’s the kind of dessert that feels indulgent yet balanced, rich yet surprisingly light on the palate.
The Ingredients – Simple Staples, Elevated Results
The beauty of Butterfinger Caramel Crunch Bars is how it transforms everyday ingredients into something truly special. You don’t need fancy chocolate or exotic nuts — just a few kitchen basics and a bit of layering love. Here’s what you’ll need and why each ingredient matters.
1. Graham Cracker Crumbs (2 cups)
The graham cracker base gives structure and flavor. It’s buttery, nutty, and slightly sweet, providing the perfect canvas for the caramel and chocolate layers. You can crush full graham crackers in a food processor or buy pre-crushed crumbs for convenience.
2. Unsalted Butter (1 cup, melted)
Butter binds the crust and adds richness to every bite. Use unsalted butter so you can control the salt level. For extra depth, try browning the butter before mixing — it adds a nutty aroma that complements the caramel beautifully.
3. Brown Sugar (1 cup, packed)
This sweetener brings molasses undertones and helps the crust caramelize slightly during baking. The result? A golden, toffee-like flavor that pairs perfectly with chocolate.
4. Sweetened Condensed Milk (1 cup)
This ingredient is pure magic — creamy, sweet, and thick. When combined with caramel sauce and heated, it forms a luscious, sticky filling that holds the dessert together.
5. Caramel Sauce (½ cup)
Use a high-quality caramel sauce for a silky, buttery finish. Homemade or store-bought both work, but avoid overly thin versions; you want something rich and velvety.
6. Chopped Butterfinger Candy Bars (1 cup)
The star of the show! Butterfinger bars bring that unmistakable crunch — flaky, peanut-buttery, and slightly salty. Chopping them into small chunks ensures even distribution throughout the top layer.
7. Semi-Sweet Chocolate Chips (1 cup)
Semi-sweet chocolate balances the sweetness of the caramel. When melted, it forms a glossy, fudgy top that sets beautifully once chilled.
8. Chopped Pecans (½ cup)
Pecans add a touch of earthy crunch and Southern flair. They also contrast beautifully with the creamy caramel and smooth chocolate.
Each ingredient plays its part perfectly — nothing fancy, but everything essential. The end result? A dessert that tastes indulgent but feels homemade, cozy, and irresistibly rich.
Step-by-Step Recipe – Creating Caramel Perfection
Let’s get baking! This recipe may look fancy, but it’s incredibly easy to pull off. You’ll be layering, melting, and drizzling like a pro in no time.
Step 1: Preheat and Prep the Pan
Preheat your oven to 350°F (175°C). Line a 9×13-inch baking pan with parchment paper, leaving some overhang for easy removal later. This is your secret weapon for clean, perfect bars that lift right out of the pan without sticking.
Step 2: Make the Graham Cracker Crust
In a medium mixing bowl, combine:
- 2 cups graham cracker crumbs
- 1 cup melted unsalted butter
- 1 cup packed brown sugar
Mix until the crumbs are evenly moistened and resemble wet sand. Press this mixture firmly and evenly into the bottom of your pan using the back of a spoon or the bottom of a measuring cup. A firm press ensures a sturdy crust that holds its shape when sliced.
Bake for 8–10 minutes, just until the crust begins to set and the edges turn golden. Remove from oven and set aside to cool slightly.
Step 3: Prepare the Caramel Layer
In a saucepan over medium heat, combine 1 cup sweetened condensed milk and ½ cup caramel sauce. Stir continuously until smooth and heated through — about 3–4 minutes. Don’t boil it; you just want it silky and warm enough to pour.
Once ready, pour the caramel mixture evenly over the graham crust. Use a spatula to spread it to the edges, creating an even, glossy layer.
Step 4: Add the Butterfinger Crunch
Sprinkle 1 cup of chopped Butterfinger candy bars evenly over the caramel layer. Press them gently into the caramel so they stick but don’t sink completely. This ensures that every bite gets a satisfying crunch.
Step 5: Top with Melted Chocolate and Pecans
Melt 1 cup of semi-sweet chocolate chips in a microwave-safe bowl in 30-second intervals, stirring between each until smooth and glossy. Drizzle the melted chocolate over the top, spreading it evenly with a spatula.
Sprinkle ½ cup chopped pecans over the chocolate while it’s still warm so they adhere perfectly.
Step 6: Bake, Cool, and Chill
Bake for 15–18 minutes, until the edges are slightly bubbling and the top looks set. Then remove from oven and let cool completely in the pan on a wire rack.
Once cooled, refrigerate for at least 2 hours before slicing. This allows the caramel and chocolate layers to firm up, giving you those perfect, clean bars that hold together beautifully.
Pro Tips for the Best Butterfinger Caramel Crunch Bars
- Use quality caramel sauce. It’s the backbone of your flavor — thick, buttery caramel works best.
- Chill before slicing. Cold bars slice neatly without cracking. Use a sharp knife dipped in hot water for even cleaner cuts.
- Don’t overbake. You just want to set the edges. Overbaking can make the crust too hard and the caramel too chewy.
- Experiment with toppings. Drizzle white chocolate, add a pinch of sea salt, or sprinkle extra Butterfinger bits for extra decadence.
- Store properly. Keep bars refrigerated in an airtight container for up to 5 days or freeze them (individually wrapped) for up to 3 months.
Serving Suggestions – From Simple Snack to Showstopping Dessert
Butterfinger Caramel Crunch Bars are as versatile as they are indulgent. You can serve them straight from the fridge for a firm, candy-bar-like bite, or let them soften slightly at room temperature for a gooey, caramel-dripping experience. Either way, these bars have a way of turning even casual moments into something special.
1. Classic Bar Presentation
For a clean, bakery-style presentation, use a sharp knife dipped in hot water and wiped dry before each cut. Slice the bars into neat squares or rectangles — their glossy chocolate tops and layered interiors make them look effortlessly elegant. A light sprinkle of sea salt on top adds a modern touch and balances the sweetness beautifully.
2. Dessert Platter Perfection
Want to impress guests at your next gathering? Arrange these bars on a wooden dessert board with an assortment of mini brownies, chocolate truffles, and shortbread bites. The varied textures and colors create a showstopping dessert spread that screams luxury with minimal effort.
3. Ice Cream Bar Upgrade 🍨
Serve a warm Butterfinger Caramel Crunch Bar alongside a scoop of vanilla or butter pecan ice cream. The heat from the bar softens the chocolate and caramel, creating an ooey-gooey topping that pairs beautifully with cold, creamy ice cream. Drizzle extra caramel sauce for the ultimate indulgence.
4. Coffee Lover’s Treat ☕
If you’re a coffee enthusiast, you’re in for a treat. The rich chocolate and buttery caramel pair beautifully with a hot espresso, cappuccino, or even a cold brew. The subtle bitterness of the coffee cuts through the sweetness, making each bite taste balanced and satisfying.
5. Perfect for Gifting
Butterfinger Caramel Crunch Bars make the perfect homemade gift. Wrap individual bars in parchment paper, tie them with a ribbon, and place them in a tin or gift box. Add a handwritten tag — “Made with love and extra caramel” — and you’ve got a thoughtful treat that feels personal and delicious.
Whether you’re serving them at a fancy dinner or sneaking one from the fridge at midnight, these bars deliver a moment of pure dessert bliss every time.
Print
Butterfinger Caramel Crunch Bars
- Prep Time: 15 minutes
- Cook Time: 18 minutes
- Total Time: 2 hours 33 minutes
- Category: Dessert
Description
🍬 These Butterfinger Caramel Crunch Bars are pure dessert bliss — buttery, caramel-filled, and loaded with crunchy Butterfinger pieces and pecans! Perfectly chewy, delightfully rich, and drizzled with smooth chocolate — they’re the kind of bars that disappear fast! 😋💛
Ingredients
2 cups graham cracker crumbs
1 cup unsalted butter, melted
1 cup brown sugar, packed
1 cup sweetened condensed milk
1/2 cup caramel sauce
1 cup chopped Butterfinger candy bars
1 cup semi-sweet chocolate chips
1/2 cup chopped pecans
Instructions
Preheat the oven to 350°F (175°C). Line a 9×13-inch baking pan with parchment paper, leaving an overhang for easy lifting. 🧁 (⏱️ 5 minutes)
Mix the crust — In a medium bowl, combine graham cracker crumbs, melted butter, and brown sugar until fully mixed and sandy in texture. 🍪 (⏱️ 5 minutes)
Press firmly into the prepared pan to form an even crust base. 🧈 (⏱️ 2 minutes)
Make the caramel layer — In a saucepan over medium heat, stir together sweetened condensed milk and caramel sauce until smooth and warmed through, about 3-4 minutes. 🍯 (⏱️ 4 minutes)
Pour the caramel mixture evenly over the graham crust. 🥄 (⏱️ 1 minute)
Sprinkle the chopped Butterfinger pieces evenly over the caramel layer. 🍫 (⏱️ 1 minute)
Melt the chocolate chips in a microwave-safe bowl, heating in 30-second intervals and stirring until silky smooth. 🍩 (⏱️ 2 minutes)
Drizzle melted chocolate over the Butterfinger layer, then top with chopped pecans. 🌰 (⏱️ 1 minute)
Bake for 15–18 minutes, or until the edges are lightly golden. 🍰 (⏱️ 18 minutes)
Cool completely in the pan on a wire rack, then refrigerate for at least 2 hours before cutting into bars. ❄️ (⏱️ 2 hours)
Notes
For an extra chewy texture, don’t overbake — remove the bars as soon as the edges turn golden.
Use high-quality caramel sauce for the best creamy and buttery flavor. 🍯
Let the bars chill completely before slicing to get clean, neat edges. ❄️
You can replace pecans with crushed peanuts or almonds for a different crunch. 🥜
Store leftovers in an airtight container in the refrigerator for up to 5 days — they taste even better the next day! 😋
Nutrition
- Serving Size: 12 servings
- Calories: 380 kcal
Storage and Make-Ahead Tips
One of the best things about these bars is how well they store. They not only hold up beautifully over time but often taste better after resting overnight — the layers meld together, the flavors deepen, and the texture becomes even more irresistible.
Short-Term Storage
If you plan to enjoy them within a few days, store your Butterfinger Caramel Crunch Bars in an airtight container in the refrigerator. Layer parchment paper between each bar to prevent sticking. They’ll stay fresh for up to 5 days and maintain their delightful crunch.
Before serving, let the bars sit at room temperature for about 10 minutes. This softens the caramel slightly, making the texture even more luxurious.
Freezing Instructions
Need to prepare ahead for a party or the holidays? No problem! These bars freeze exceptionally well. To freeze:
- Cut into individual squares once fully cooled and chilled.
- Wrap each piece tightly in plastic wrap or wax paper.
- Place the wrapped bars in a freezer-safe ziplock bag or airtight container.
They’ll stay fresh for up to 3 months. When you’re ready to enjoy them, simply thaw at room temperature for 30–45 minutes or overnight in the fridge. The flavor and texture will be as perfect as the day you made them.
Make-Ahead Option
Want to get ahead on prep? You can make the graham cracker crust and caramel layer up to 24 hours in advance. Keep the pan covered in the fridge, then add the Butterfinger, chocolate, and pecans right before baking. This saves time and still guarantees fresh, glossy topping and crunchy texture.
Pro Storage Tip
Always store these bars in a cool place — heat and humidity can cause the chocolate layer to sweat or soften. If you live in a warm climate, the refrigerator is your best friend. To bring back shine to chilled bars, let them sit at room temperature briefly before serving.
Fun Variations to Try
Once you master the classic Butterfinger Caramel Crunch Bars, you’ll want to play around with the flavors. Luckily, this recipe is endlessly adaptable. Here are a few fun and creative twists to keep your dessert game exciting.
1. Peanut Butter Caramel Crunch Bars 🥜
For peanut butter lovers, swap half of the caramel sauce with creamy peanut butter. The combination of caramel, peanut butter, and Butterfinger chunks creates a triple-layer nutty sensation that’s downright addictive.
2. White Chocolate Toffee Bars 🍯
Replace the semi-sweet chocolate chips with white chocolate, and top the bars with crushed toffee bits instead of Butterfinger. The result is a buttery, golden treat with rich caramel and creamy white chocolate sweetness.
3. Pretzel Caramel Crunch Bars 🥨
If you crave that sweet-and-salty combo, sprinkle crushed pretzels over the top before baking. The salt enhances the caramel flavor while adding an extra crunch that balances the richness perfectly.
4. Holiday Butterfinger Bars 🎄
Add festive flair by drizzling red and green candy melts over the chocolate layer or sprinkling crushed peppermint candies for a holiday twist. These bars make beautiful additions to Christmas cookie platters or dessert buffets.
5. S’mores Caramel Bars 🔥
Want campfire nostalgia in every bite? Use crushed graham crackers mixed with mini marshmallows and drizzle melted milk chocolate on top. The gooey caramel blends with the marshmallows, creating a s’mores-inspired masterpiece.
Each variation brings its own personality — whether it’s peanut butter indulgence, white chocolate elegance, or salty-sweet contrast, you can reinvent these bars for any mood, season, or occasion.
You may like also :
No Bake Caramel Crunch Butterfinger Truffles – The Ultimate Indulgent Dessert Bite
Butterfinger Pie – The No-Bake Dessert Dream
Common Mistakes and How to Fix Them
Even though this recipe is simple, a few missteps can change the outcome. Here’s how to avoid the most common baking pitfalls and ensure your bars turn out picture-perfect every time.
1. Crust Falling Apart
If your crust crumbles when you cut the bars, it’s likely due to not pressing it firmly enough before baking. Always pack the graham cracker mixture tightly using a flat-bottomed cup or spatula. You can also add an extra tablespoon of melted butter if the mixture feels too dry.
2. Caramel Too Runny
This usually happens if the caramel layer wasn’t heated enough or if too much caramel sauce was added. The solution: make sure the caramel-sweetened condensed milk mixture thickens slightly on the stove before pouring it over the crust. It should coat the back of a spoon before removing from heat.
3. Chocolate Layer Cracking
If the chocolate topping cracks when slicing, the bars might be too cold. Let them sit at room temperature for 10–15 minutes before cutting. Warming your knife with hot water also helps achieve clean slices without cracking the top.
4. Bars Too Sticky
Sticky bars can be a result of high humidity or not chilling long enough. Make sure to refrigerate them for at least 2 hours before slicing, and store them in layers separated by parchment paper.
5. Overbaking
Overbaking can lead to tough caramel and an overly hard crust. Keep a close eye on the oven — the bars should be set around the edges but still slightly soft in the center when you remove them. They’ll firm up as they cool.
With these quick fixes and tips, you’ll never have a bad batch — only buttery, crunchy, chocolate-caramel perfection every single time.
The Sweet Legacy – Why Candy Bar Desserts Never Go Out of Style
There’s a reason desserts like Butterfinger Caramel Crunch Bars continue to charm generations — they blend nostalgia with indulgence. Candy bar-inspired desserts remind us of childhood treats, but in a more sophisticated, homemade form. They carry that same joy you felt as a kid unwrapping your favorite candy, but with a grown-up twist of buttery, baked goodness.
From bake sales to birthday parties, these desserts never fail to spark excitement. There’s something universally comforting about caramel, chocolate, and crunch working together — flavors that feel familiar yet always luxurious.
In a way, Butterfinger Caramel Crunch Bars are more than just sweets — they’re edible memories. They remind us that dessert isn’t just about sugar; it’s about sharing joy, one bite at a time.
Expert Tips for Professional Results
If you want your Butterfinger Caramel Crunch Bars to look bakery-perfect and taste like a gourmet treat, a few expert techniques can make all the difference. These little adjustments will elevate your dessert from “homemade” to “how-did-you-make-this?!”
1. Use Room Temperature Ingredients
When mixing your crust or caramel filling, room temperature butter blends more smoothly with sugar and crumbs, giving you an even, firm base. Likewise, if your caramel sauce and condensed milk are not cold, they’ll combine faster and create a silkier texture.
2. Line Your Pan Properly
Always line your baking pan with parchment paper and leave an overhang on the sides. This not only prevents sticking but also makes lifting out the bars for slicing much easier. For clean, sharp edges, chill the bars before cutting.
3. Melt Chocolate Gently
Chocolate can seize or burn easily. The best way to melt it is in 30-second intervals in the microwave, stirring each time. You can also use the double boiler method for more control. Once melted, spread it evenly for that glossy, picture-perfect finish.
4. Chill Before Slicing
This step cannot be skipped. Allow the bars to cool completely at room temperature, then chill them in the fridge for at least 2 hours (or even overnight). Chilling firms up the caramel and chocolate layers, ensuring smooth, clean cuts and perfect texture.
5. Add Texture Contrast
Sprinkling chopped pecans or sea salt over the chocolate layer adds not only flavor but also contrast. The touch of salt enhances the caramel’s sweetness and makes each bite multidimensional — like something straight out of a professional bakery display.
6. Don’t Rush Cooling
If you try to slice or move the bars too early, the caramel can ooze or the layers might separate. Patience here pays off — give your dessert time to set properly, and you’ll be rewarded with flawless bars that hold their shape beautifully.
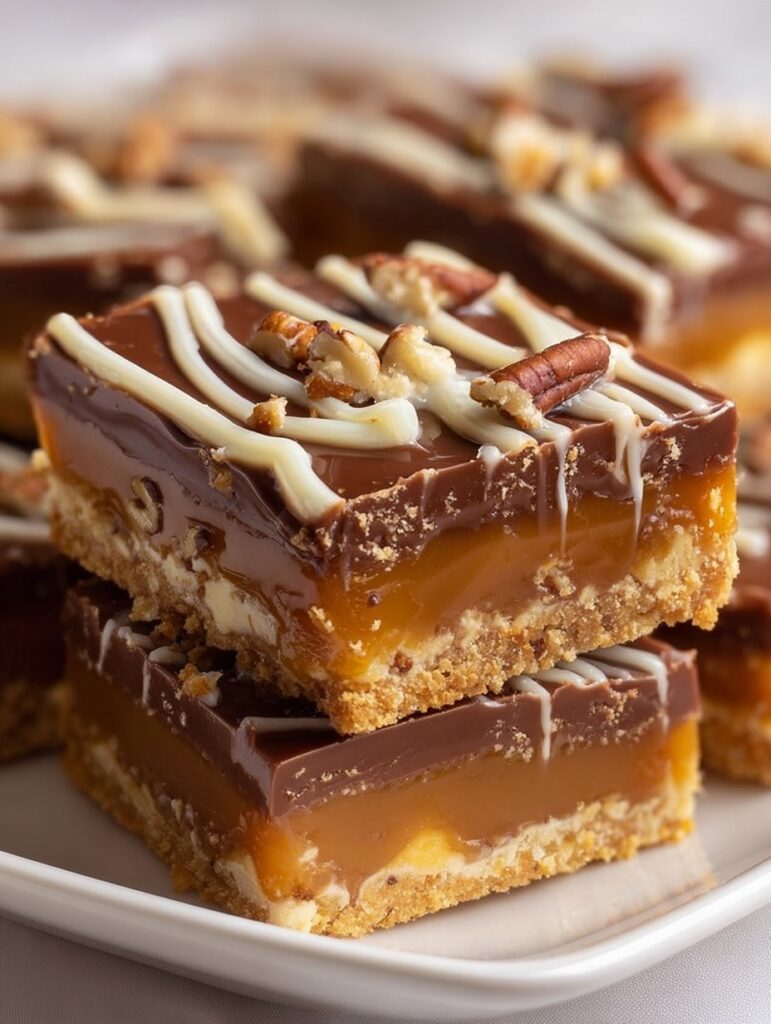
7. Presentation Is Everything
For a polished final touch, drizzle melted white chocolate in zigzag patterns across the top (as in your photo 🍫🤍). Not only does it look stunning, but it also adds a sweet creamy layer that complements the darker chocolate underneath.
These small touches add up to big results — the kind that make your dessert taste as impressive as it looks.
Similar recipes :
Butterfinger Caramel Crunch Mini Pies – Bite-Sized Bliss in Every Bite
Butterfinger Caramel Crunch Pie: A No-Bake Dream Dessert
Frequently Asked Questions (FAQs)
Let’s clear up some of the most common questions bakers have when making Butterfinger Caramel Crunch Bars so you can bake with confidence and enjoy every gooey, crunchy layer.
1. Can I make these bars ahead of time?
Absolutely! These bars actually taste better the next day as the flavors have more time to meld together. You can make them up to 3 days in advance and store them covered in the refrigerator. Just bring them to room temperature before serving for the best texture.
2. Can I use different candy bars instead of Butterfinger?
Yes! If you’re out of Butterfingers or want to experiment, try using Heath bars, Snickers, or Twix for a similar candy-bar crunch. Each one brings its own unique twist, but the base recipe stays the same.
3. How do I keep the chocolate layer smooth?
The trick is to pour and spread the melted chocolate while it’s still warm. Use an offset spatula or the back of a spoon to smooth it out evenly. If the chocolate starts to harden, briefly reheat it for 10–15 seconds before continuing.
4. My caramel layer seems too thin — what happened?
You may have used less caramel or condensed milk than needed, or spread it too thinly. Make sure the mixture is slightly thickened before pouring, and tilt the pan gently to help it spread evenly without thinning out the layer.
5. Can I use homemade caramel instead of store-bought sauce?
Definitely! Homemade caramel adds a rich, buttery flavor that takes these bars to another level. Just make sure your caramel is slightly thick but pourable — about the consistency of honey — before mixing it with the condensed milk.
6. How do I make neat slices without cracking the top?
Run a sharp knife under hot water, wipe it dry, and make each cut in a single motion. Wipe the blade clean between slices. This technique gives you smooth, professional-looking edges every time.
7. Can I make these gluten-free?
Yes! Swap the graham cracker crumbs for gluten-free graham crackers or almond flour mixed with a bit of brown sugar. The texture will be slightly different but still delicious and perfectly crisp.
8. Do I need to bake the crust before adding caramel?
In this recipe, you bake everything together — but if you prefer a firmer, more cookie-like base, you can pre-bake the crust for 8–10 minutes before adding the caramel mixture. It adds a slight crunch that some bakers love.
Conclusion – A Sweet Symphony of Layers and Love
At the heart of every dessert lover’s dream lies the perfect combination of butter, caramel, chocolate, and crunch — and that’s exactly what Butterfinger Caramel Crunch Bars deliver.
Each layer plays its part beautifully: the buttery graham crust provides the foundation, the caramel offers that luscious, melt-in-your-mouth sweetness, the Butterfinger chunks add a playful crunch, and the glossy chocolate topping ties it all together in a moment of pure bliss.
What makes these bars truly special is their versatility. They’re perfect for holidays, bake sales, potlucks, or cozy nights in — wherever a little sweetness is needed. They’re the kind of treat that sparks smiles, starts conversations, and disappears quickly from the dessert tray (often before you can snag a second piece).
So the next time you want a dessert that feels fancy but comes together with simple pantry staples, whip up a batch of these irresistible bars. With every bite, you’ll taste the perfect harmony of buttery crunch, gooey caramel, and chocolatey indulgence — a dessert that feels like comfort and celebration all at once.
Because in the world of homemade sweets, Butterfinger Caramel Crunch Bars are not just a dessert…
They’re a love letter to every caramel-chocolate dreamer out there. 💛🍫✨