There are some desserts that announce themselves loudly — towering cakes, flaming toppings, dramatic finishes. And then there are desserts like this one. The kind that quietly lands on the table, looking humble and familiar, until the first fork goes in. That’s when the room changes. Conversations pause. Someone makes that little “mm” sound without realizing it. Eyes lift. And suddenly, everyone is asking who made it and if there’s more in the fridge.
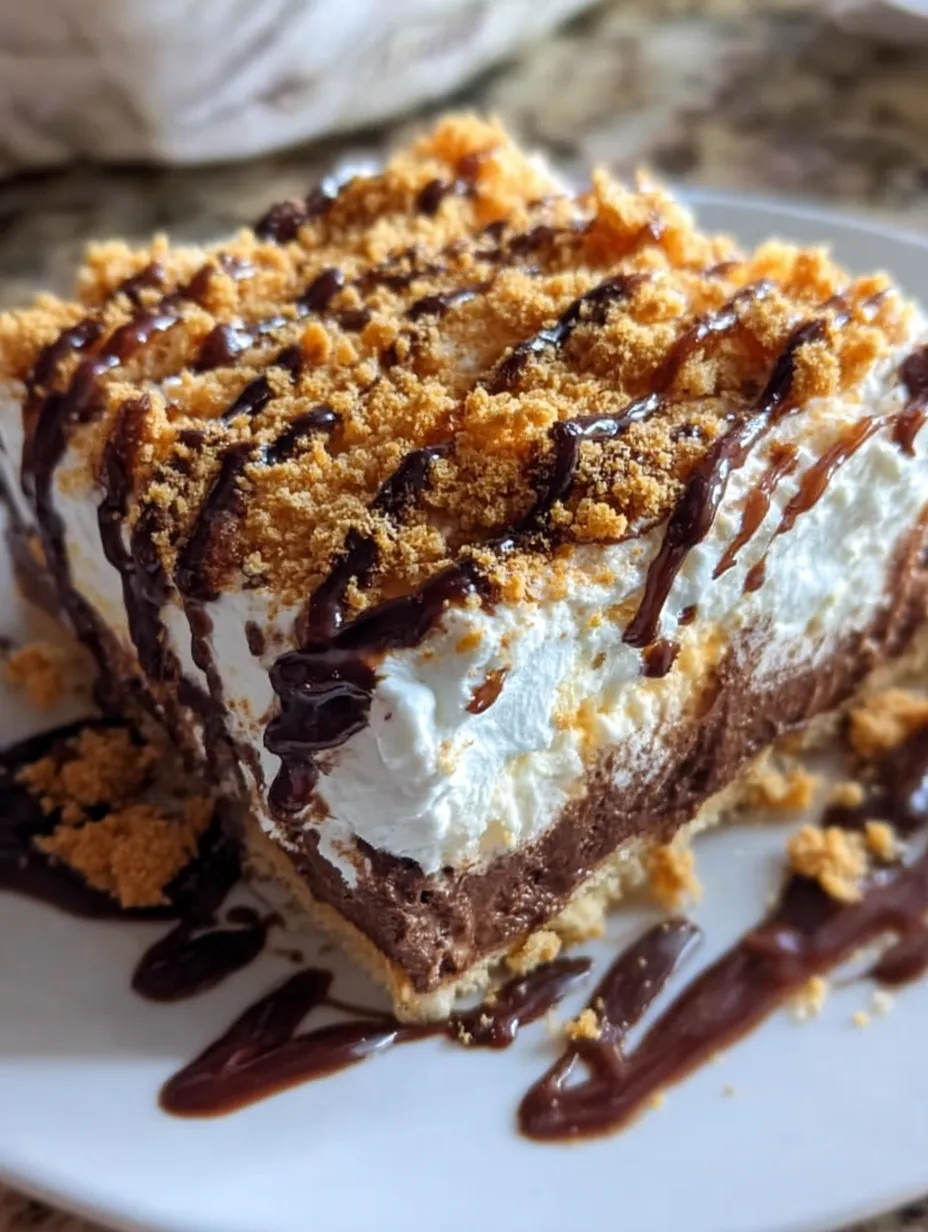
This Butterfinger icebox dessert is exactly that kind of recipe. No baking. No complicated techniques. Just soft, creamy layers stacked with purpose, held together by nostalgia and finished with that unmistakable Butterfinger crunch. The image you see — thick cream topping, chocolate drizzle cascading down the sides, and golden candy crumbles scattered generously — is exactly how this dessert is meant to look and taste. Rich, cozy, and a little indulgent without trying too hard.
What makes it special isn’t just the flavor, though that alone could carry it. It’s the way it settles into itself overnight. Straight from the fridge the next day, cold and firm, the layers slice cleanly, the flavors deepen, and somehow it tastes even better — like it’s been waiting patiently for you.
Why This Dessert Feels Like a Memory
Butterfinger isn’t just a candy bar; it’s a time machine. One bite and suddenly you’re back at school lunches, corner stores, Halloween buckets, or trading candy with friends. That crispy, peanut-buttery crunch is instantly recognizable, and when you fold it into a creamy dessert like this, something magical happens. It stops being just candy and becomes comfort.
This dessert leans hard into that feeling. The cold, creamy texture brings to mind refrigerator desserts our parents and grandparents made — the ones that didn’t need an oven, just time and patience. Those desserts were never flashy, but they were always gone by morning. This one fits right into that tradition, with a modern twist thanks to layered pudding and cream cheese.
There’s also something deeply comforting about knowing this dessert is waiting in the fridge. It doesn’t demand attention. It doesn’t dry out. It just gets better. Like an old friend settling into the couch beside you, it’s there when you need it — quietly excellent.
A Closer Look at the Layers
The Crunchy Chocolate-Butterfinger Crust
The foundation of this dessert does a lot of heavy lifting. It’s not just there to hold the layers; it sets the tone for everything that comes after. By combining crushed Butterfinger candy bars with chocolate sandwich cookie crumbs, you get a base that’s both crunchy and deeply flavorful.
The Butterfinger brings sweetness and that signature crisp bite, while the chocolate cookies add a darker, slightly bitter note that keeps the crust from being overly sweet. Melted butter ties it all together, creating a firm base once chilled. When pressed firmly into the dish and given time in the refrigerator, this crust becomes sturdy enough to support the creamy layers without going hard or crumbly.
Every forkful starts here, and that first crunch is what makes people pause.
The Smooth Chocolate Pudding Layer
Sitting directly on top of the crust is the chocolate pudding layer — smooth, glossy, and rich without being heavy. Instant pudding might seem simple, but in this recipe, it’s exactly what you want. It sets quickly, spreads easily, and holds its shape once chilled.
This layer acts as a bridge between the crunchy base and the fluffy cream layer above it. The cold milk gives the pudding a silky texture, and when it firms up in the fridge, it creates a clean, defined layer that looks just as good as it tastes.
Chocolate lovers will appreciate that this layer doesn’t overpower the rest of the dessert. Instead, it anchors everything, providing depth and balance.
The Cloud-Like Cream Cheese Layer
If the crust is the backbone and the pudding is the heart, this cream layer is the soul of the dessert. Softened cream cheese beaten with powdered sugar and vanilla creates a smooth, slightly tangy base. Folding in the whipped topping lightens it into something airy and luxurious — almost mousse-like.
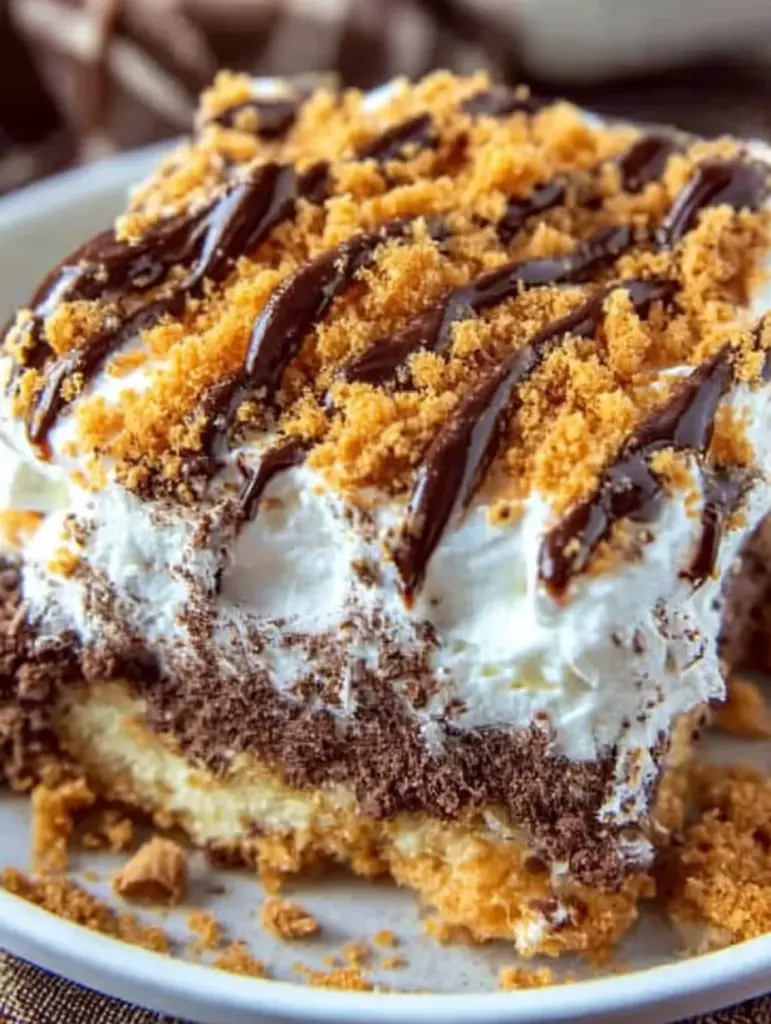
This layer is what you see most clearly in the image: thick, white, and inviting, draped generously over the chocolate layer. It spreads easily and smooths beautifully, creating that clean, bakery-style finish.
The contrast between the cool cream and the rich chocolate underneath is where the magic really happens.
The Final Topping That Makes It Irresistible
Then comes the fun part. Extra crushed Butterfinger pieces are sprinkled over the top, adding texture and visual warmth. The golden crumbs stand out against the white cream, hinting at the crunch waiting inside.
A drizzle of chocolate syrup finishes it off. Not too neat, not too heavy — just let it fall naturally. Those uneven drips down the sides, just like in the image, are part of the charm. They signal that this dessert isn’t trying to be perfect. It’s trying to be good.
And it succeeds.
Ingredients Breakdown and Smart Substitutions
Crust Ingredients Explained
- Butterfinger candy bars: Crushed finely for even distribution. They bring sweetness and crunch.
- Chocolate sandwich cookie crumbs: These balance the sweetness and add depth.
- Unsalted butter: Melted butter binds the crust and helps it set firmly when chilled.
If you prefer, you can use all cookie crumbs or all Butterfinger, but the combination gives the best texture and flavor balance.
Chocolate Layer Ingredients
- Chocolate instant pudding mix: Reliable, smooth, and quick-setting.
- Cold milk: Essential for proper thickness and texture.
Using whole milk results in a richer layer, but any milk works.
Cream Layer Ingredients
- Cream cheese: Softened fully for a smooth, lump-free texture.
- Powdered sugar: Sweetens without graininess.
- Vanilla extract: Adds warmth and depth.
- Whipped topping: Lightens the mixture and adds volume.
Topping Options and Variations
- Extra Butterfinger pieces for crunch
- Chocolate syrup for drizzle
You can also add a light dusting of cookie crumbs for extra visual appeal.
Step-by-Step Instructions With Pro Tips
Preparing the Perfect Crust
In a mixing bowl, combine crushed Butterfinger pieces, chocolate cookie crumbs, and melted butter. Stir until everything is evenly coated and resembles wet sand. Press the mixture firmly into the bottom of a 9×9-inch or 9×13-inch dish, using the back of a spoon or the bottom of a glass to compact it.
Refrigerate while preparing the next layers. This step is crucial for a clean slice later.
Building the Chocolate Layer
Whisk the chocolate pudding mix with cold milk until thick and smooth. Let it sit for a few minutes to fully set, then spread it evenly over the chilled crust. Smooth it gently to the edges and return the dish to the refrigerator.
Creating the Cream Layer
Beat the softened cream cheese with powdered sugar and vanilla until silky. Fold in the whipped topping gently to keep the mixture light and fluffy. Spread this layer carefully over the pudding, smoothing the surface.
Finishing Touches That Matter
Sprinkle crushed Butterfinger generously over the top and drizzle with chocolate syrup. Don’t overthink it — those natural drips are what make it beautiful.
Refrigerate for at least 4 hours, preferably overnight.
Why This Dessert Tastes Better the Next Day
There’s something almost magical that happens to this Butterfinger icebox dessert after it spends a full night in the refrigerator. At first, it’s delicious — no doubt about that. But give it time, and it transforms. The layers settle into each other, the flavors deepen, and the texture becomes perfectly unified without losing contrast.
The crust firms up just enough to hold its shape while still remaining tender when you cut into it. The chocolate pudding layer becomes denser and more luxurious, losing any hint of softness and turning into a clean, sliceable layer. The cream cheese topping chills into a smooth, mousse-like blanket that doesn’t slide or smear. And those Butterfinger pieces on top? They soften slightly at the edges while staying crunchy in the center, creating the best possible bite.
This is why it’s best enjoyed cold, straight from the fridge. Not rushed. Not half-set. When everything has had time to rest, it feels intentional — like the dessert knows exactly what it’s supposed to be. That’s also why people keep sneaking back for “just one more small piece” the next day. It doesn’t feel heavy. It feels comforting.
Serving Suggestions and Presentation Tips
One of the quiet strengths of this dessert is how beautiful it looks when sliced properly. To get those clean, bakery-style layers like the image shows, use a sharp knife and wipe it clean between cuts. Chilling overnight makes this much easier, and it’s worth the wait.
Serve it directly from the dish for a casual, family-style feel, or plate individual squares with an extra drizzle of chocolate syrup on the plate for a slightly more dressed-up presentation. A small fork is ideal — this dessert is rich enough that you don’t need a large portion to feel satisfied.
If you’re serving guests, consider garnishing each slice with a pinch of crushed Butterfinger right before serving. It refreshes the crunch and makes the dessert look freshly assembled, even though it’s been chilling quietly in the fridge.
Storage, Make-Ahead, and Freezing Tips
This is one of those desserts that feels like it was designed for busy schedules. It can be made entirely a day ahead, freeing you up when company arrives. Once assembled, cover it tightly with plastic wrap or a fitted lid and store it in the refrigerator for up to four days.
Because of the whipped topping and cream cheese, freezing isn’t ideal if you want the same creamy texture. While it won’t spoil, freezing can slightly alter the smoothness of the cream layer once thawed. If you do choose to freeze it, wrap it tightly and thaw slowly in the refrigerator overnight.
For best results, stick with refrigeration. This dessert thrives in the cold.
Perfect Occasions for This Dessert
This Butterfinger icebox dessert fits just about anywhere. It’s casual enough for a weeknight family treat but special enough for holidays and gatherings. It shines at potlucks because it travels well and doesn’t require reheating or last-minute assembly.
It’s also a hit at birthdays, especially for anyone who grew up loving candy bars. There’s something unexpectedly charming about turning a familiar candy into a layered dessert — it feels playful without being childish.
And if you’re the kind of person who likes having something sweet waiting in the fridge “just in case,” this dessert feels like a small act of self-care.
Common Mistakes to Avoid
Even simple desserts benefit from a few thoughtful tips. One common mistake is not pressing the crust firmly enough. A loose crust can crumble when sliced, so take a moment to really pack it down.
Another is rushing the chill time. Each layer needs time to set properly, especially the pudding and final assembly. Cutting too soon can cause layers to slide or blur together.
Lastly, avoid overmixing the cream layer after adding the whipped topping. Folding gently keeps the texture light and airy — exactly what you want to balance the richness below.
Print
Butterfinger Icebox Dessert
- Prep Time: 30 minutes
- Total Time: 4 hours 30 minutes
- Category: No-Bake Dessert / Layered Dessert Cups
Description
✨ This is the kind of dessert that makes the kitchen go quiet for a moment — forks pause, eyes widen, and suddenly everyone wants “just a little more.” Creamy layers melt together with that irresistible Butterfinger crunch, and it somehow tastes even better the next day, chilled and perfectly set. Pure comfort in every bite ❄️💛
Ingredients
1½ cups crushed Butterfinger candy bars 🍬
1½ cups chocolate sandwich cookie crumbs 🍪
½ cup unsalted butter, melted 🧈
1 package (3.9 oz) chocolate instant pudding mix 🍫
2 cups cold milk 🥛
1 package (8 oz) cream cheese, softened
½ cup powdered sugar
1 tsp vanilla extract ✨
1 tub (8 oz) whipped topping, thawed
Extra crushed Butterfinger pieces for topping
Chocolate syrup for drizzling 🍫
Instructions
Prepare the crust
In a bowl, mix crushed Butterfinger pieces, cookie crumbs, and melted butter until fully combined. Press firmly into the bottom of a 9×9-inch or 9×13-inch dish. Chill to set.
⏱️ 10 minutesMake the chocolate layer
Whisk pudding mix with cold milk until thick and smooth. Let rest briefly, then spread evenly over the chilled crust. Return to refrigerator.
⏱️ 5 minutesCreate the cream layer
Beat cream cheese with powdered sugar and vanilla until silky. Gently fold in whipped topping until light and fluffy.
⏱️ 7 minutesAssemble the layers
Spread the cream mixture evenly over the chocolate layer, smoothing gently to the edges.
⏱️ 3 minutesFinish and decorate
Sprinkle generously with extra crushed Butterfinger pieces and drizzle with chocolate syrup — let it drip naturally for that irresistible look.
⏱️ 2 minutesChill to perfection
Refrigerate for at least 4 hours, preferably overnight, to allow the layers to set and flavors to deepen.
⏱️ 4 hours
Notes
Nutrition
- Serving Size: 12 servings
- Calories: ~420 kcal per serving
Custom Variations You Can Try
Once you’ve made this dessert once, it’s easy to imagine variations. You can add a thin peanut butter layer between the crust and pudding for extra depth. Swap chocolate pudding for vanilla if you want the Butterfinger flavor to stand out even more. Or assemble the dessert in individual cups for easy serving at parties.
That said, there’s a reason the classic version works so well. The balance of chocolate, cream, and candy crunch is hard to beat.
You may also like :
Butterfinger Pie – The No-Bake Dessert Dream
No Bake Caramel Crunch Butterfinger Truffles
What Makes This Dessert a Crowd Favorite
At its core, this dessert succeeds because it understands contrast. Soft meets crunchy. Sweet meets slightly tangy. Cold cream meets rich chocolate. Every bite has something different to offer, yet it all feels cohesive.
It’s approachable. No special equipment. No oven. No intimidating steps. And yet, it feels thoughtful and indulgent — like something made with care, not just thrown together.
That’s why people remember it. And that’s why they ask for the recipe.
Final Thoughts
This Butterfinger icebox dessert is the kind of recipe that earns a permanent spot in your rotation. It’s reliable, comforting, and endlessly satisfying. Whether you’re making it for a crowd or just for yourself, it delivers every time.
Soft, creamy layers melt together with that unmistakable Butterfinger crunch, and somehow it tastes even better the next day — like it’s been waiting for you. It’s not flashy. It’s not complicated. It’s just really, really good.
Similar recipes :
Butterfinger Caramel Crunch Bars – Layers of Crunch, Caramel, and Chocolate Bliss
Butterfinger Candy Bar Poke Cake – Sweet, Decadent, and Oh-So-Delicious! 🍫
FAQs
Can I use homemade whipped cream instead of whipped topping?
Yes, but keep in mind that stabilized whipped topping holds its structure longer. If using homemade whipped cream, serve within 24 hours for best texture.
How do I crush the Butterfinger bars evenly?
Place them in a zip-top bag and gently crush with a rolling pin. This gives you a mix of fine crumbs and small crunchy pieces.
Can I make this dessert gluten-free?
Yes. Use gluten-free chocolate sandwich cookies for the crust and double-check candy bar labels.
Why is my cream layer too soft?
This usually means the cream cheese wasn’t fully softened or the dessert hasn’t chilled long enough. Give it more time in the fridge.
Can I double this recipe?
Absolutely. Use a larger dish and allow extra chilling time for thicker layers.


