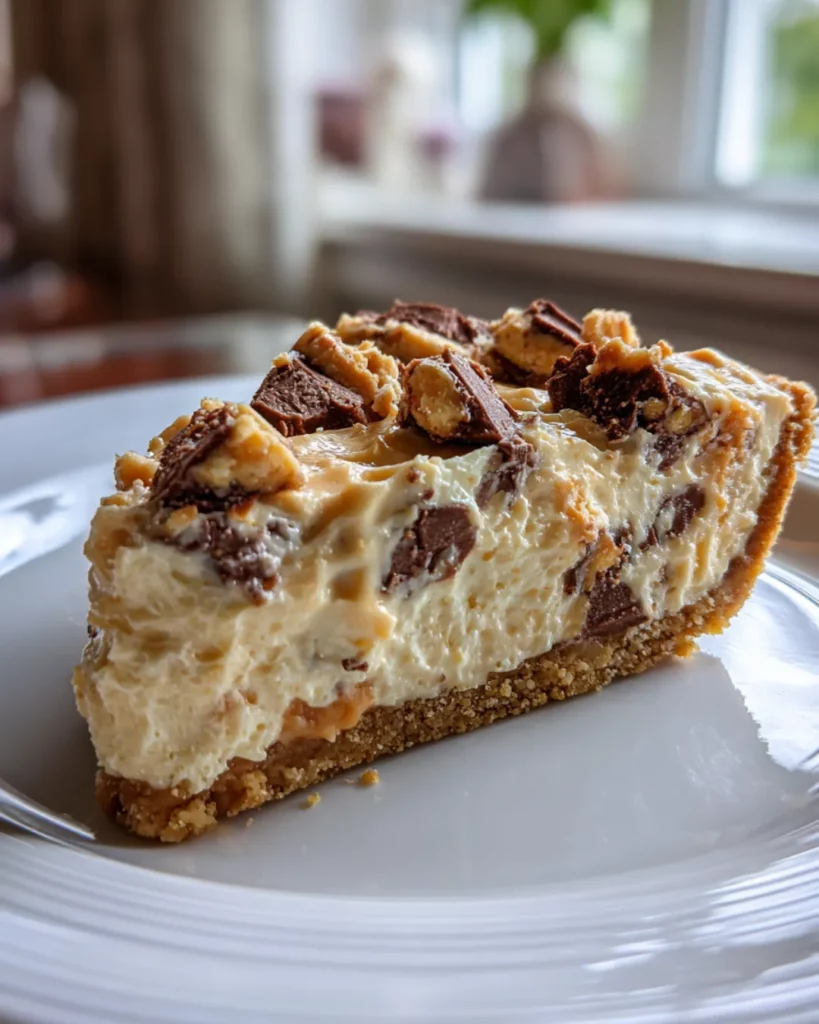
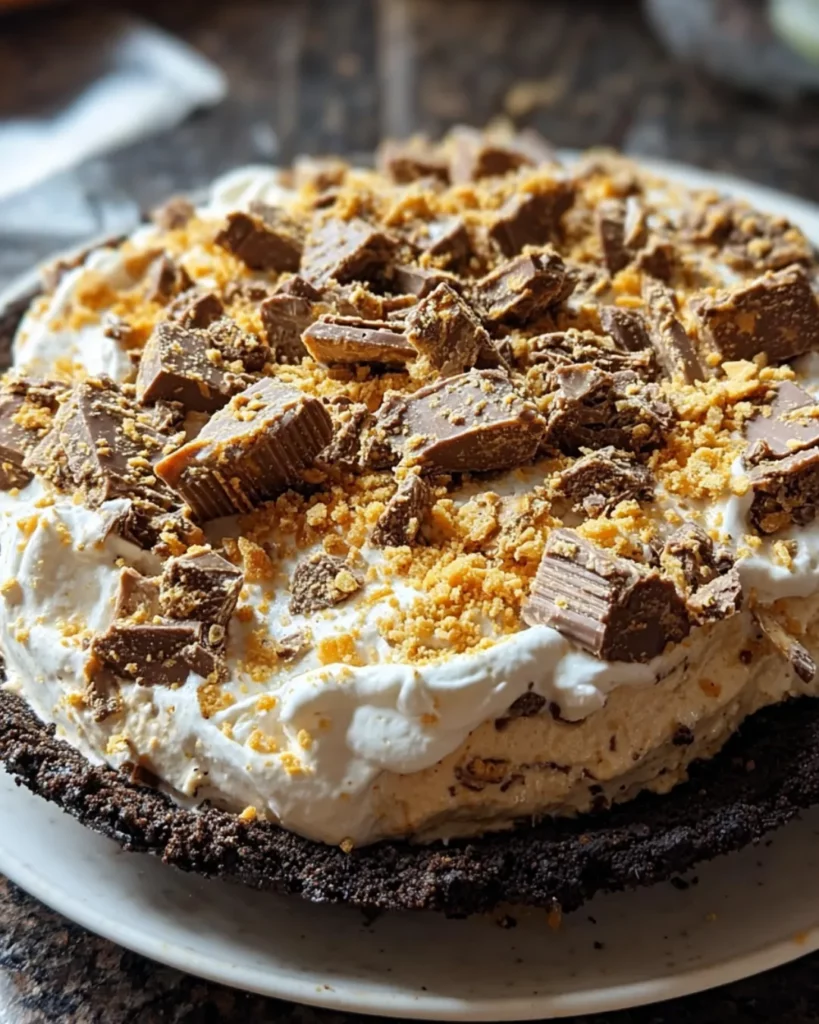
If you’ve been on the hunt for the ultimate crowd-pleasing dessert that requires almost zero effort but delivers maximum flavor, let me introduce you to the magic of Butterfinger Pie. This creamy, crunchy, chocolatey, peanut-buttery dream is the stuff of dessert legends. Imagine smooth cream cheese and peanut butter blended into a silky filling, folded with crushed Butterfinger candy bars, and topped with whipped cream and more candy bits—all nestled inside a chocolatey cookie crust. The best part? It’s completely no-bake.
No oven, no stress, no complicated techniques. Just simple mixing, folding, and chilling. That’s it. Which makes this pie a go-to recipe for busy holidays, potlucks, birthday parties, or even those nights when you just want a little something sweet to indulge in without turning your kitchen into a disaster zone.
It’s creamy. It’s crunchy. It’s sweet with just the right touch of saltiness. And most importantly—it’s dangerously easy to make. One slice in, and you’ll understand why this pie doesn’t last long in anyone’s fridge.
Why You’ll Love This Butterfinger Pie
There are thousands of pie recipes out there, but Butterfinger Pie has that wow factor that keeps people asking for seconds. Here’s why:
- Quick and Easy: With only 15 minutes of prep and a few hours of chilling, it’s practically effortless.
- No-Bake Magic: Forget heating up the oven—this pie sets beautifully in the fridge.
- Perfect Flavor Combo: Peanut butter, chocolate, and Butterfinger crunch? Yes, please!
- Texture Heaven: Smooth, creamy filling contrasted with candy bar chunks and a crunchy crust.
- Crowd Favorite: It’s fun, it’s nostalgic, and both kids and adults adore it.
Think of it as the pie version of your favorite candy bar—familiar, comforting, and delightfully indulgent.
Ingredient Breakdown
The ingredient list is short, but every component is essential to creating the luscious, candy-loaded masterpiece that is Butterfinger Pie. Let’s take a closer look:
Creamy Base
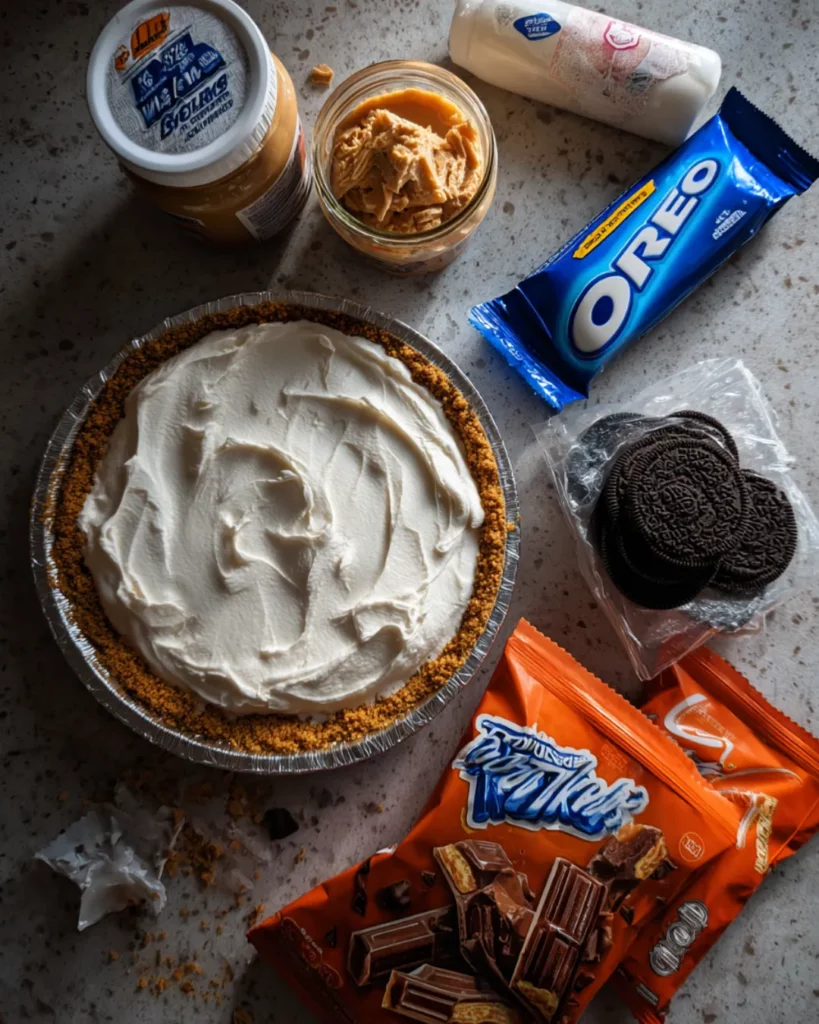
- Cream Cheese (8 oz, softened): This gives the filling body and tangy richness. Room temperature cream cheese is key—it ensures a smooth, lump-free mixture.
- Peanut Butter (½ cup, creamy): Brings nutty flavor and blends seamlessly into the filling. Creamy peanut butter works best, but you can use crunchy if you want extra texture.
- Vanilla Extract (2 tsp): Adds warmth and depth, enhancing the peanut butter flavor.
Sweet Elements
- Powdered Sugar (1 ½ cups): Sweetens the filling while keeping it silky smooth. Granulated sugar won’t dissolve properly here.
- Cool Whip (8 oz container): The secret to a light, fluffy texture. You can swap with homemade whipped cream if you prefer (just stabilize it with a bit of powdered sugar).
The Star Ingredient – Butterfinger Bars
- Fun-Sized Butterfinger Bars (12.5 oz bag, crushed): These are the soul of the pie—crispy, peanut-buttery, chocolatey goodness in every bite.
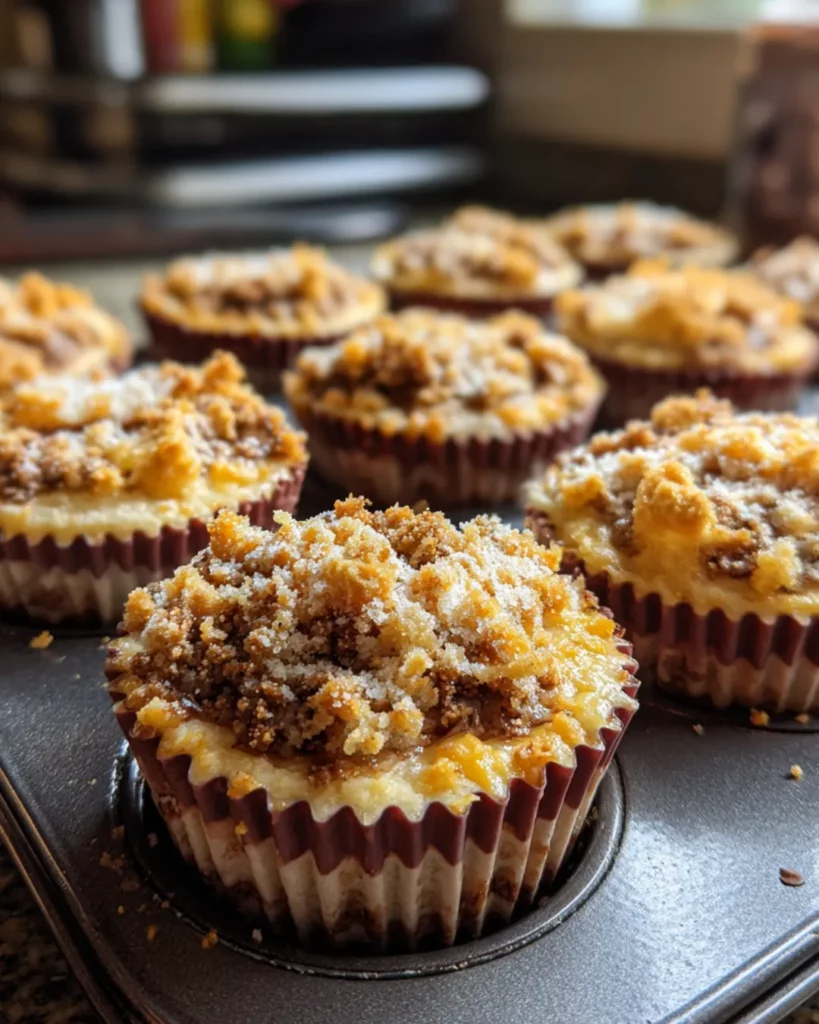
- Reserved Pieces for Topping: Don’t forget to save a couple bars to sprinkle on top for that picture-perfect finish.
Crushing tip: Place them in a zip-top bag and smash with a rolling pin or use a food processor for a finer texture. A mix of chunky and crumbly works best.
The Crust
- Oreo or Chocolate Graham Cracker Crust: This chocolatey foundation ties everything together. Store-bought saves time, but if you want homemade, just blend cookies with melted butter and press into a pie dish.
Step-by-Step Instructions
This recipe is as simple as mix, fold, spread, and chill. But let’s break it down so your pie comes out flawless.
Preparing the Filling
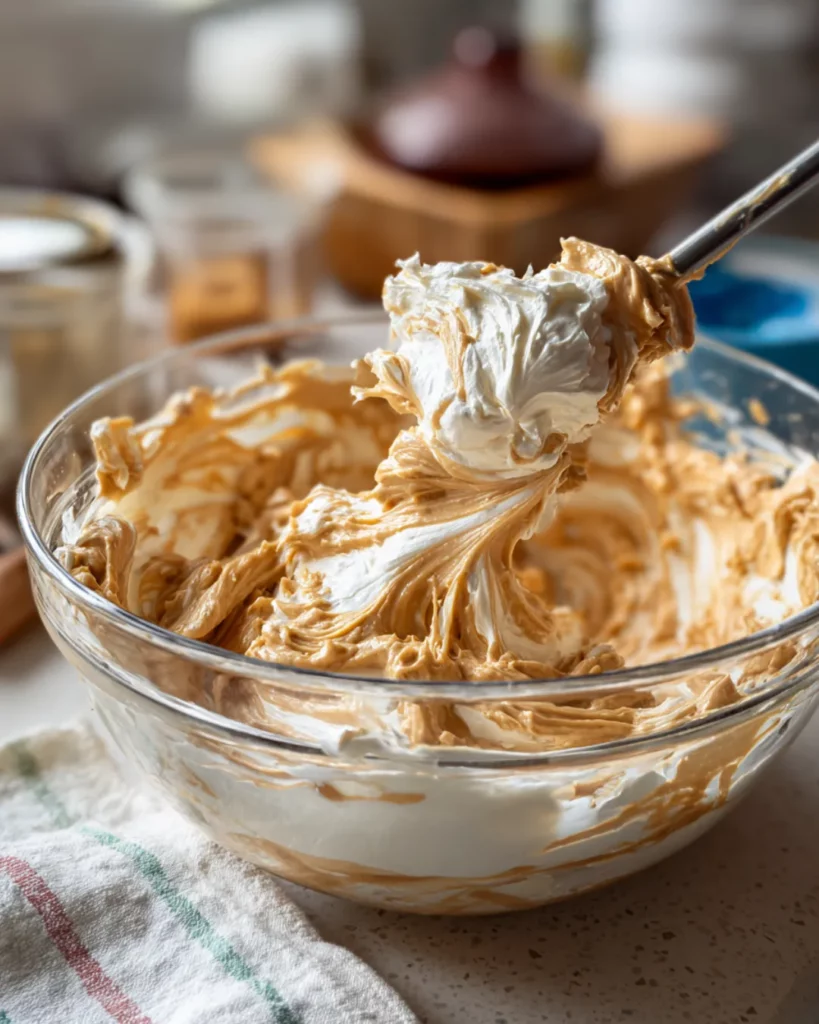
Start with softened cream cheese and peanut butter in a mixing bowl. Beat them together on medium speed until smooth and creamy. Add in the vanilla extract and keep mixing until well combined.
Next, slowly add the powdered sugar. Beat until smooth, making sure no lumps remain. This forms the rich, sweet, and slightly tangy base of your pie filling.
Folding in Butterfingers

Once your base is ready, gently fold in the crushed Butterfinger bars. The goal here is even distribution—so every slice has a little crunch, a little chocolate, and a lot of candy-bar flavor.
After that, fold in the Cool Whip. Do this slowly and gently, so the mixture stays fluffy instead of deflating. It should look light, airy, and speckled with candy pieces.
Assembling the Pie
Spread the filling evenly into your prepared Oreo or chocolate graham cracker crust. Smooth out the top, then sprinkle with the reserved Butterfinger chunks. This not only adds crunch but also makes the pie look irresistible.
Chilling and Serving
Cover and refrigerate the pie for at least 4 hours (overnight is even better). This step is crucial—it allows the filling to firm up and the flavors to meld together.
When ready to serve, slice with a sharp knife, wiping between cuts for neat slices. Each piece should hold together beautifully, showing off the creamy filling and crunchy chunks inside.
Serving Suggestions
One of the best things about Butterfinger Pie is how versatile it is when it comes to serving. You can enjoy it as a casual after-dinner treat or dress it up for a special occasion. Here are some fun ways to elevate it:
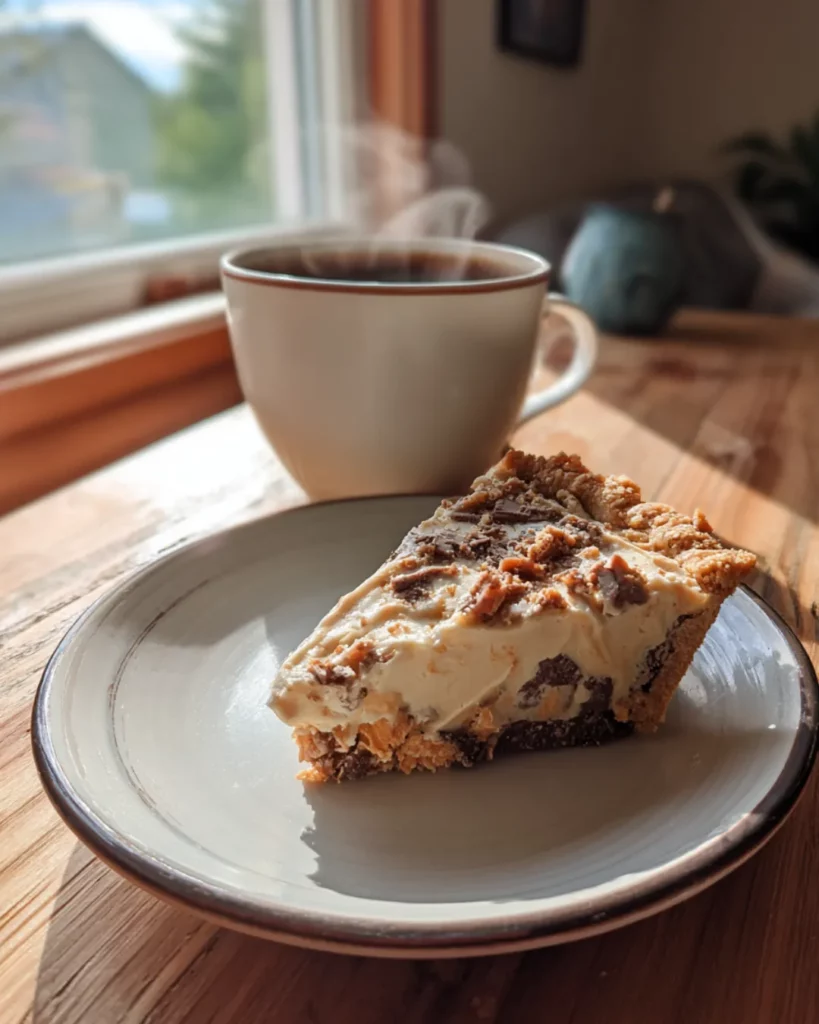
- Classic Slice with Coffee or Milk: A chilled slice pairs perfectly with a hot cup of coffee or a tall glass of cold milk. The sweetness balances out beautifully.
- Holiday Dessert Table Star: Place it alongside pumpkin and pecan pies at Thanksgiving or Christmas, and watch it disappear first.
- Party-Ready Bites: Instead of slicing traditional wedges, cut into small squares for bite-sized portions at potlucks or birthdays.
- Topped with Extra Indulgence: Drizzle with chocolate syrup, caramel sauce, or even a dollop of whipped cream for an over-the-top experience.
- Ice Cream Pairing: Serve with a scoop of vanilla or chocolate ice cream for a decadent treat that tastes like a candy-bar sundae in pie form.
Presentation tip: Add a final sprinkle of crushed Butterfinger right before serving for a fresh crunch and that “wow” factor.
Print
Butterfinger Pie
- Prep Time: 15 minutes
- Total Time: 4 hours 15 minutes
- Category: Dessert
Description
🍫🥜 A dreamy no-bake dessert with layers of creamy peanut butter filling, crunchy Butterfinger pieces, and a chocolatey crust. One bite, and you’ll be hooked! ✨🍰
Ingredients
1 (8-ounce) package cream cheese, room temperature
1/2 cup creamy peanut butter
2 teaspoons vanilla extract
1 1/2 cups powdered sugar
1 (12.5-ounce) bag fun-sized Butterfinger bars, crushed (reserve 2 bars for topping)
1 (8-ounce) container Cool Whip, thawed
1 store-bought Oreo or chocolate graham cracker crust
Instructions
In a large mixing bowl, beat cream cheese and peanut butter until smooth and creamy. (⏱️ 3 minutes)
Add in vanilla extract and continue mixing until well combined. (⏱️ 1 minute)
Gradually add powdered sugar, beating until smooth and fluffy. (⏱️ 4 minutes)
Gently fold in the crushed Butterfinger bars, saving some for topping. (⏱️ 2 minutes)
Fold in the thawed Cool Whip carefully to keep the mixture light and airy. (⏱️ 2 minutes)
Spread the filling evenly into the prepared crust, then sprinkle with the reserved Butterfinger crumbs. (⏱️ 3 minutes)
Notes
Cover and refrigerate for at least 4 hours, or until set. (⏱️ Chill Time: 4 hours)
Nutrition
- Serving Size: 8 slices
- Calories: 420 kcal
Storage Tips
Butterfinger Pie is make-ahead friendly, which makes it even more convenient for parties and busy schedules. Here’s how to store it properly:
- Refrigeration: Keep the pie covered in the fridge for up to 4 days. Plastic wrap or a pie container works best to keep it fresh.
- Freezing: Want to save some for later? Wrap tightly in plastic wrap and aluminum foil, then freeze for up to 1 month. Let it thaw in the fridge overnight before serving.
- Individual Slices: You can also freeze single portions wrapped individually. This makes for an easy grab-and-go dessert when cravings hit.
Pro tip: If you’re freezing, wait to add the final topping of Butterfinger crumbs until after thawing for the best crunch.
Variations and Twists
This recipe is already a winner, but it’s also a great base to play around with. Try some of these creative variations:
- Caramel Drizzle Pie: Add caramel sauce to the filling or drizzle on top before serving.
- Hot Fudge Layer: Spread a thin layer of hot fudge over the crust before adding the filling for extra chocolate goodness.
- Different Candy Bars: Swap Butterfingers with Reese’s, Snickers, or Kit Kats for a fun twist.
- Mini Butterfinger Pies: Make the filling in cupcake liners with mini Oreo crusts for bite-sized party treats.
- Peanut Butter Lovers’ Dream: Add extra peanut butter swirl through the filling before chilling.
- Gluten-Free Version: Use a gluten-free cookie crust and double-check your candy bar ingredients.
These little tweaks keep the dessert exciting while still delivering that creamy, crunchy indulgence.
Nutritional Breakdown
Here’s an approximate breakdown per slice (based on 8 servings):
| Nutrient | Amount per Serving |
|---|---|
| Calories | 520 kcal |
| Carbohydrates | 48 g |
| Protein | 8 g |
| Fat | 32 g |
| Fiber | 2 g |
| Sugar | 35 g |
Yes, it’s rich—but that’s the point! This pie is all about indulgence. If you’d like to lighten it up a little:
- Use reduced-fat cream cheese.
- Swap Cool Whip for light whipped topping.
- Try a smaller slice (hard, but doable 😉).
Tips for Success
Want to make sure your Butterfinger Pie turns out perfect every single time? Keep these tips in mind:
- Soften Cream Cheese Properly: Cold cream cheese won’t mix smoothly. Let it sit at room temperature for 30 minutes before using.
- Don’t Overmix the Cool Whip: Gently fold it in. Overmixing can make the filling dense instead of airy.
- Use a Mix of Chunky and Fine Butterfinger Crumbs: This ensures both texture and flavor in every bite.
- Chill Long Enough: At least 4 hours, but overnight is even better. Patience pays off here.
- Sharp Knife for Slicing: Dip the knife in warm water and wipe clean between slices for neat presentation.
- Customize the Crust: Oreos are classic, but try peanut butter cookies or Nutter Butters for a fun twist.
Why Butterfinger Pie is the Perfect Party Dessert
Some desserts are delicious but fussy. Butterfinger Pie, on the other hand, is everything a party dessert should be:
- Low Effort, High Reward: Quick to make with simple steps.
- Make-Ahead Friendly: Chill in advance, so no last-minute stress.
- Crowd-Pleaser: Combines candy, chocolate, and peanut butter—three things most people love.
- Visually Impressive: The candy topping gives it that “wow” factor without any fancy decorating skills required.
- Versatile: Works for birthdays, holidays, potlucks, or even just a cozy night in.
This pie doesn’t just taste good—it creates smiles, conversation, and that little moment of joy when everyone takes their first bite.
Conclusion
If you’re looking for a dessert that’s simple yet unforgettable, Butterfinger Pie is your answer. Creamy, crunchy, chocolatey, and peanut buttery—it’s the kind of dessert that feels indulgent without the hassle of complicated baking. In just 15 minutes of prep, you’ll have a pie that wows at any gathering and keeps people coming back for seconds.
So grab your Butterfinger bars, whip up this dreamy filling, and let your fridge do the rest of the work. You’re just a few hours away from dessert bliss. 🥜🍫🥧
FAQs
1. Can I make this pie ahead of time?
Yes! In fact, it’s even better when made a day in advance because the flavors have more time to meld.
2. Can I use homemade whipped cream instead of Cool Whip?
Definitely. Just stabilize it with a little powdered sugar so it holds up during chilling.
3. What’s the best way to crush Butterfingers?
A food processor works best for even crumbs, but you can also put them in a zip-top bag and crush with a rolling pin.
4. Can I make it without peanut butter?
You can leave it out, though the pie will lose some richness. Try adding extra cream cheese or whipped cream to balance.
5. Can I turn this into mini desserts?
Yes! Use cupcake liners with mini crusts or small mason jars for adorable single-serving versions.