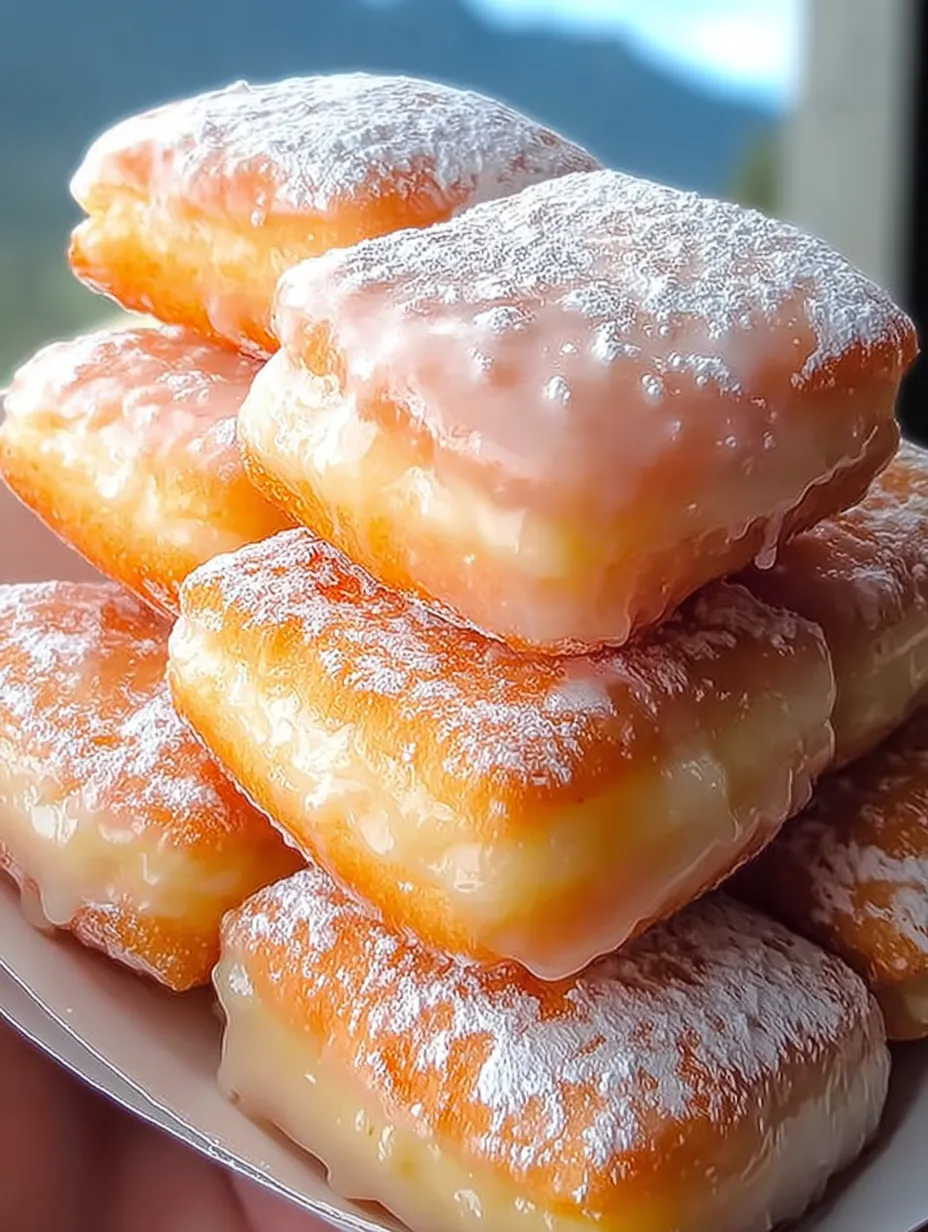
Imagine biting into a warm, thick, golden square of soft dough that’s tender on the inside and kissed with a delicate, sweet glaze on top. No powdered sugar mess, no hollow air pockets — just solid, bakery-style beignets that are exactly like the ones in the photo above. These Glazed Buttermilk Beignet Squares are what cozy mornings, afternoon treats, and “I-need-something-sweet” cravings are made for.
They’re surprisingly easy to make and incredibly rewarding. Whether you’re a seasoned baker or a curious beginner, this recipe will walk you through every step to help you nail that soft, square perfection.
What Makes These Beignets Different?
These aren’t your classic New Orleans-style beignets that puff up and leave your face covered in powdered sugar. Nope — these are rich, bakery-style squares with a comforting buttermilk tang, a soft fluffy bite, and a glossy vanilla glaze that sets into the dreamiest sugar shell.
The texture is fully pillowy all the way through — no air pockets, and no need for filling or fluff. Think: if a glazed donut and a soft yeast roll had the best possible baby. That’s what you’re getting.
And that’s why the photo looks so good — because what you see is what you get!
Why Buttermilk? The Secret Ingredient
Buttermilk is the magic here. It’s the difference between a decent beignet and a mind-blowing one.
Why?
- Tangy richness: Buttermilk brings a subtle acidity that balances the sweetness of the glaze.
- Tender texture: The acid in buttermilk helps break down the gluten just enough to keep the dough soft and fluffy.
- Golden fry: Buttermilk promotes that even golden browning on the outside.
No buttermilk? You can mix milk and a bit of lemon juice, but the flavor won’t be as deep or cozy. For full bakery-style flavor, real buttermilk is worth it.
Let’s Talk Texture: Soft Inside, Lightly Crisp Outside
What sets this recipe apart is the perfect balance between softness and a light outer crisp. We’re rolling the dough thicker than a regular beignet, about ½ inch. That’s how you get that satisfying bite and photo-perfect profile.
Once they hit the hot oil, the outside crisps slightly while the inside steams into a dreamy softness. Not gummy, not doughy — just pure golden fluff.
And the glaze? It seals the deal.
What You’ll Need: Ingredients Breakdown
Here’s the magic formula for 16–18 perfect squares:
Dough
- ¾ cup warm buttermilk – activates yeast, adds softness
- 2¼ tsp active dry yeast – helps it rise nice and tall
- ¼ cup granulated sugar – just enough sweetness
- 1 large egg – binds and enriches
- ¼ cup unsalted butter, melted – makes it tender
- 3¼ cups all-purpose flour – structure without toughness
- ¾ tsp salt – flavor boost
For Frying
- Neutral oil like canola or vegetable – clean taste, high smoke point
Vanilla Glaze (CRITICAL)
- 2 cups powdered sugar
- 3–4 tbsp milk or cream – for thickness and sheen
- 1 tsp vanilla extract – flavor bomb
- Pinch of salt – rounds out sweetness
Tools of the Trade: Equipment You’ll Want
These tools make a huge difference:
- Kitchen thermometer – Essential for keeping oil at 340–350°F
- Rolling pin – For even thickness
- Sharp knife or bench scraper – Clean edges for perfect squares
- Stand mixer (optional) – Speeds up kneading
- Wire rack – Key for draining without ruining glaze
How to Activate Your Yeast Properly
Let’s not mess this up. Yeast is the heartbeat of your beignet.
- Warm your buttermilk to about 105–110°F (warm, not hot).
- Whisk in the sugar and yeast.
- Let it sit for 5–8 minutes until it’s foamy and bubbly.
If it doesn’t foam, your yeast might be dead (expired or killed by heat). Start over — it’s worth it.
Mixing the Dough: Soft, Not Sticky
Once the yeast is activated:
- Add the egg and melted butter, and whisk.
- Stir in the flour and salt, mixing until a soft dough forms.
- Knead (by hand or mixer) for 5–7 minutes, until the dough is smooth and elastic.
You want it soft but not sticky. If it’s clinging to your hands, sprinkle in more flour 1 tbsp at a time — but don’t overdo it.
The First Rise: Let It Puff!
Cover the bowl with a clean towel or plastic wrap. Let it rise somewhere warm (70–75°F) for 1 to 1½ hours, or until doubled in size.
💡 Pro tip: An oven with the light on (but heat off) is the perfect cozy spot.
If your dough doesn’t rise, check:
- Was the yeast expired?
- Was the buttermilk too hot or too cold?
- Is the room too cold?
Shaping Your Squares Like a Pro
After your dough has doubled in size, it’s time to turn that beautiful pillow of dough into those perfectly thick squares, just like in the photo.
Step-by-step shaping:
- Lightly flour your work surface.
- Roll the dough out to exactly ½ inch thickness. This is crucial — not too thin, or you’ll lose that signature puff and softness.
- Use a sharp knife or a dough cutter to slice the dough into 2.5 to 3-inch squares. This size is ideal for that chunky, bakery-style look.
Try to keep your edges clean for that sharp, satisfying square shape. No jagged edges or lopsided cuts here — we’re going for that glazed cube of happiness effect.
Tip: If you want those square layers to puff perfectly, don’t twist the cutter — just press down cleanly.
Time to Fry: Golden and Gorgeous
Now it’s fry time — and this step is where everything transforms.
How to get the perfect fry:
- Heat 2–3 inches of oil in a deep pot to 340–350°F (170–175°C).
- Use a thermometer — temperature accuracy = golden color and no greasiness.
- Carefully drop 3–4 squares in at a time (don’t overcrowd).
- Fry for 2–3 minutes per side, flipping once, until evenly golden.
They’ll puff up slightly and get beautifully golden. You don’t want them too brown — aim for that light amber color you see in the photo.
Remove with a slotted spoon and place directly on a wire rack, not paper towels. Paper towels cause steam and can mess up the texture — especially when glazing. The wire rack keeps the bottom crisp and lets air circulate.
The Glaze: Where the Magic Happens
Now for the best part — that silky vanilla glaze that sets into a glossy, sugary shell just like in the image.
Here’s the perfect glaze recipe:
- 2 cups powdered sugar
- 3 to 4 tablespoons milk or cream (add slowly!)
- 1 teaspoon vanilla extract
- Pinch of salt
Whisk until smooth and pourable — not runny, not stiff. You want it thick enough to coat the top but fluid enough to self-level into that dreamy finish.
Pro tip: Glaze while the beignets are still warm. Either dip the tops or spoon the glaze over them and let it drip down the sides naturally.
Place them back on the wire rack and let them set for 5–10 minutes, until the glaze becomes slightly firm and glossy.
The Final Look: Matching the Image Perfectly
If you’ve followed the steps, your beignets should now look just like the ones in the image:
- Thick and square-shaped, not flat or puffed up like air
- Golden and even color all around
- Smooth vanilla glaze that sets into a gorgeous sheen
- No powdered sugar, just a gentle dusting of powdered sugar optional — but only after glaze sets
To match the image exactly:
- Don’t over-fry
- Roll dough thick
- Use the right glaze thickness
- Let glaze set before stacking or serving
This is how you get that photo-ready finish that screams “fresh from a cozy bakery window.”
Serving Suggestions: Best Ways to Enjoy
These are best served warm and fresh, right after glazing sets. That’s when the inside is softest, and the outside still has that light crisp.
But they’re also:
- Perfect with coffee, tea, or a cold glass of milk
- Amazing warmed slightly in the microwave the next day (10–12 seconds!)
- Great with berries, a drizzle of caramel, or a little cinnamon sugar for a twist
They’re so satisfying on their own, but you can totally jazz them up for brunch spreads, dessert platters, or gifting.
Print
Glazed Buttermilk Beignet Square
- Prep Time: 25 minutes
- Total Time: ~2 hours 15 minutes
- Category: Desserts / Fried Pastries / Bakery-Style Sweets
Description
🍩✨ Soft, thick, bakery-style beignet squares with golden edges and a tender, pillowy center! Finished with a smooth vanilla glaze that sets into a delicate sugary shell — cozy, nostalgic, and picture-perfect with every bite 🤍☕
Ingredients
Dough
¾ cup warm buttermilk (not hot)
2¼ teaspoons active dry yeast
¼ cup granulated sugar
1 large egg
¼ cup unsalted butter, melted
3¼ cups all-purpose flour
¾ teaspoon salt
For Frying
Neutral oil (vegetable or canola)
Vanilla Glaze
2 cups powdered sugar
3–4 tablespoons milk or cream
1 teaspoon vanilla extract
Pinch of salt
Instructions
In a large bowl, whisk warm buttermilk, yeast, and sugar until combined. Let rest until foamy and activated 🫧 (5–8 minutes).
Add the egg and melted butter, then mix gently. Gradually stir in flour and salt until a soft, smooth dough forms — tender but not sticky 🤍 (8–10 minutes).
Cover the bowl and let the dough rise in a warm place until doubled in size ⏳ (1–1½ hours).
Roll the risen dough to about ½-inch thickness for thick, bakery-style squares. Cut into neat squares 🔪 (10 minutes).
Heat oil to 340–350°F (170–175°C). Fry the dough squares in batches, turning once, until evenly golden and puffed ✨ (2–3 minutes per side).
Transfer fried beignets to a wire rack to drain briefly — avoid paper towels to keep the glaze silky 🍩 (2 minutes).
Whisk powdered sugar, milk, vanilla, and salt until smooth and pourable but thick. While beignets are still warm, dip or spoon glaze over the tops only 🤍 (5 minutes).
Allow the glaze to set into a shiny shell before serving ✨ (5–10 minutes).
Notes
These beignet squares are thicker than traditional New Orleans–style beignets, giving them a soft, pillowy interior with no hollow centers.
The vanilla glaze is essential for the bakery-style look and texture; glazing while warm allows it to set into a smooth, delicate shell.
Draining on a wire rack instead of paper towels keeps the glaze clean and glossy.
Best enjoyed fresh, but they can be stored in an airtight container at room temperature for up to 24 hours.
Nutrition
- Serving Size: 16–18 squares
- Calories: 290 kcal
You may also like :
Hawaiian Carrot Pineapple Cake With Cream Cheese Glaze 🍍🥕
Italian Ricotta Cookies Recipe 🍋🍪 – Soft, Pillowy & Perfectly Glazed for the Holidays
Storage and Reheating Tips
If you somehow don’t eat them all in one go (hard to believe), here’s how to keep them fresh:
- Storage: Keep them in an airtight container at room temperature for up to 2 days.
- Reheat: Microwave each square for about 10 seconds — just enough to bring the softness back.
- Do not: Refrigerate them. It dries them out. And skip the toaster oven — it can ruin the glaze.
Want to prep ahead? Make the dough, let it rise once, shape the squares, and freeze them raw. When ready, thaw and let them puff a little, then fry and glaze as normal.
Troubleshooting Guide
Beignets too flat?
- Dough wasn’t thick enough when rolled.
- Oil too hot = cooked too fast on the outside.
Greasy texture?
- Oil was too cold — should be 340–350°F.
- Overcrowded the pot, dropping the temp.
Glaze soaking in?
- Glaze too thin.
- Beignets too hot when glazed — wait 1–2 minutes out of oil.
Glaze sliding off?
- Dough still too oily or glaze too runny.
- Be sure they’re drained on a wire rack, not paper towels.
Conclusion: Bakery-Style Bliss, Made Simple
These Glazed Buttermilk Beignet Squares are everything a cozy treat should be: warm, soft, golden, and sweetly glazed. With simple ingredients, a little love, and the right technique, you can recreate a bakery-level experience in your own kitchen.
From the gentle tang of the buttermilk to the smooth vanilla glaze that hardens just enough to give that satisfying bite — it’s a perfect pairing of flavor and texture. Plus, they look exactly like the image because this recipe was crafted to do just that.
Whether you’re making them for a weekend treat, a family brunch, or just because you deserve something delicious — these beignets will never disappoint.
Similar recipes :
The Ultimate Cinnamon Sugar Biscuit Bites Recipe
Deep Fried Marshmallows Recipe: The Ultimate Gooey, Golden Treat
FAQs
1. Can I bake these instead of frying?
Technically yes, but they won’t have the same texture or golden color. Baking will make them more bread-like than doughnut-soft. Frying is essential to get the iconic outer crust and soft interior.
2. Can I make the dough ahead of time?
Yes! Let it rise once, shape into squares, then refrigerate overnight. Let them come to room temp before frying the next day.
3. Why didn’t my dough rise?
Your yeast may have been old, or your buttermilk could’ve been too hot/cold. Make sure the dough is left in a warm place and always check for foam in the yeast step.
4. Can I use a buttermilk substitute?
In a pinch, mix ¾ cup milk with 2 teaspoons lemon juice or vinegar and let sit for 5 minutes. But for best results, use real buttermilk.
5. How do I double this recipe?
Easy! Just double every ingredient exactly, and use a bigger bowl. Fry in batches and make sure your oil temp doesn’t drop between batches.


