Introduction to Candy Corn Pudding Cups
With the changing leaves and cooler air, I start craving some seasonal treats to get me in the spirit. That is where these fun Candy Corn Pudding Cups come in! This no-bake dessert is the easy-to-make layered dessert that looks as good as it tastes and really delights the young and young at heart. It features a creamy vanilla base and bright pops of color, so it’s sure to bring smiles to whoever sees it – and eats it. Whether you are throwing a Halloween bash or just need a little taste of fall in your home kitchen, these Candy Corn Pudding Cups are perfect for us busy mamas!
Why You’ll Love This Candy Corn Pudding Cups
Let’s be real – life is busy with work, kids, and everything in between so elaborate desserts are not an option in my kitchen which the Candy Corn Pudding Cups just do not require! These take only 15 minutes to assemble so they leave more time for what’s important: the family. And those layers of creamy vanilla pudding and bright colors are pretty darn inviting to even the most selective of eaters. A nice little treat that’s neither here nor there to whip up!
Ingredients for Candy Corn Pudding Cups
Let’s dive into the colorful world of ingredients that make these Candy Corn Pudding Cups a hit! While the exact measurements are at the end of the article for your convenience, here’s a quick overview of what you’ll need.
Pudding Base
For the creamy foundation, you’ll need vanilla instant pudding. This gives you that luscious texture without any cooking. Combine it with cold milk to reach that delightful, smooth consistency. You’ll love how easy it is—no whisking for hours required!
Color and Flavor Enhancers
Orange food coloring adds a playful twist, turning plain pudding into a vibrant autumnal treat. Adjust the number of drops based on your preferred shade of orange. I love a bold hue that captures the festive spirit!
Toppings and Presentation Elements
To finish off your pudding cups, grab some Cool Whip. This fluffy topping adds a light, airy finish that balances the richness of the pudding. Don’t forget the essential candy corn for that seasonal flair, and a sprinkle of orange and yellow sanding sugar to give it a sparkling touch. Presentation is everything!
How to Make Candy Corn Pudding Cups
Now that we have our ingredients ready, let’s get started on creating these Candy Corn Pudding Cups. This is where the fun really begins! Follow these simple steps, and you’ll have a festive treat that impresses everyone.
Prepare the Pudding
Start by breaking open those packages of instant vanilla pudding. Trust me, the aroma alone will put a smile on your face! In a large bowl, combine both packages of pudding with 6 cups of cold milk.
Now, mix according to the package instructions. In just a few minutes, you’ll see it transform into that luxurious pudding consistency. Isn’t instant pudding a miracle? You’ll have about 6 cups ready to work with.
Color the Pudding
Time for a splash of color! Grab a separate bowl and scoop out 4 cups of the pudding mixture. This will be our vibrant orange layer. Add 5 drops of orange food coloring and mix well. It’s like magic watching the pudding turn into a warm autumn hue!
If you’d like a brighter orange, feel free to add more coloring, one drop at a time. Keep mixing until you love the shade. The remaining pudding will stay a cheerful vanilla color.
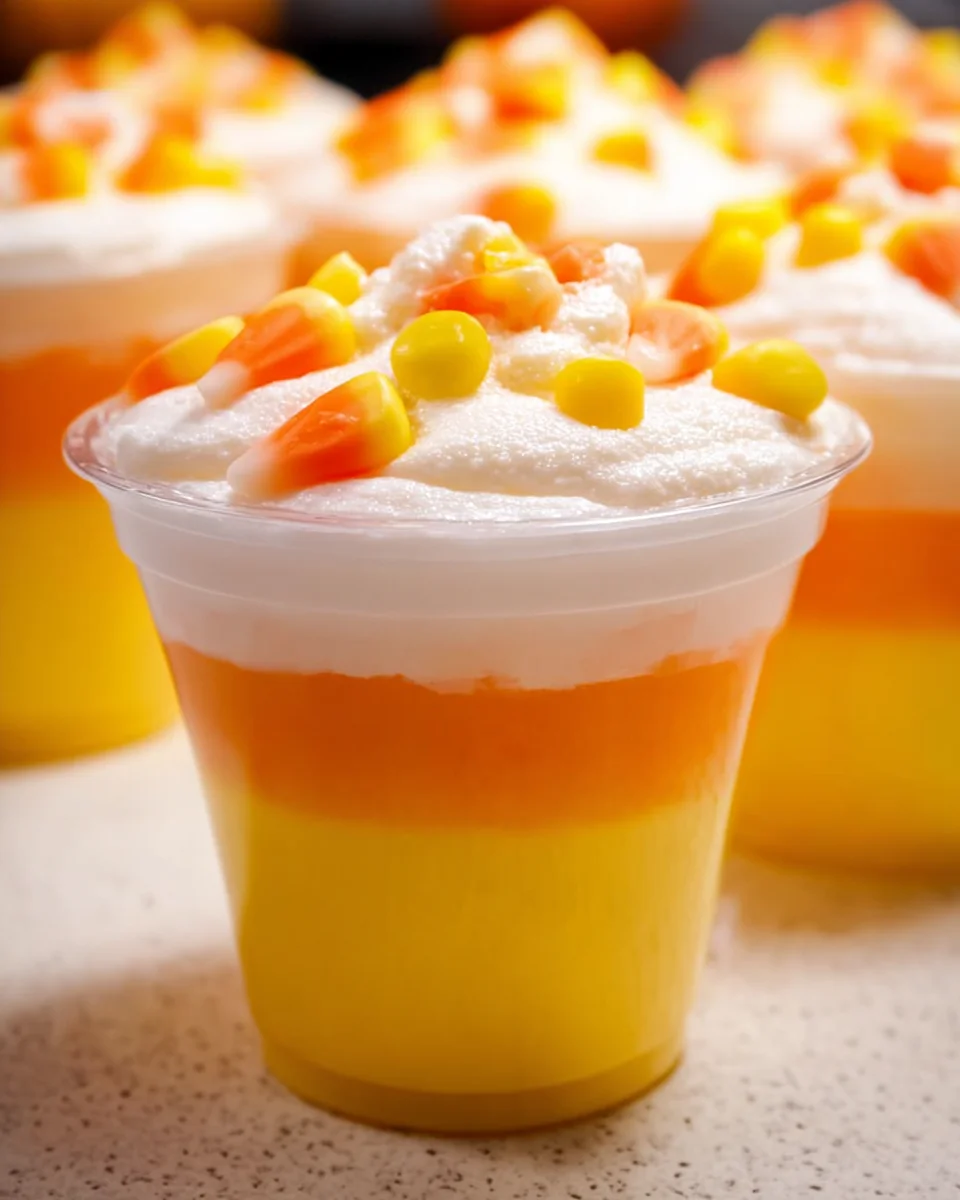
Layering the Cups
Now, let’s get layering! Take your clear plastic cups and begin with the vanilla pudding. Add about 4 spoonfuls to the bottom—this creates a lovely base.
Next, dollop in 8 spoonfuls of the orange pudding. Aim for a ratio of about ⅓ yellow to ⅔ orange, leaving some space for the Cool Whip topping. The layered effect is so pretty, your family will be wowed!
Adding the Toppings
After layering, it’s time to crown your beautiful creations! Gently spread the thawed Cool Whip over the top of the orange pudding. This fluffy layer is like the icing on the cake, or pudding in this case!
For the finishing touch, sprinkle candy corn on top, followed by a dusting of orange and yellow sanding sugar. This adds a festive sparkle that will have everyone reaching for the cups!
Chill or Serve
Now you have two options! Chill the Candy Corn Pudding Cups in the fridge for an hour, or serve them right away. If you decide to chill them, the flavors will meld together beautifully, but they’re pretty amazing straight out of the kitchen too!
Store any extras in an airtight container to keep them fresh for 5-7 days. But believe me, they won’t last long!
Tips for Success
- Don’t rush the mixing—give the pudding time to thicken nicely!
- Experiment with the food coloring until you achieve your perfect shade of orange.
- Use clear cups for the best visual effect; the layers are part of the fun!
- Get the kids involved; they’ll love layering and decorating!
- Store any leftovers in the fridge, but savor the flavor within a week!
Equipment Needed
- Large mixing bowl – A sturdy alternative is a smaller bowl if you mix in batches.
- Whisk or spoon – Either works; just make sure you can stir well.
- Measuring cups – A standard measuring cup or a liquid measuring cup will do the trick.
- Clear plastic cups – You can also use small glass jars for a rustic look!
- Spatula – Great for spreading the Cool Whip evenly.
Variations
- For a chocolate twist, substitute half of the vanilla pudding with chocolate pudding mix.
- Make it pumpkin-flavored by adding pumpkin pie spice to the vanilla pudding.
- Use almond or coconut milk for a dairy-free version that still tastes divine.
- Add crushed Oreos or graham crackers between the layers for a delicious crunch.
- Switch up the toppings with seasonal candies like gummy worms for a spooky effect!
Serving Suggestions
- Pair these Candy Corn Pudding Cups with warm apple cider for a cozy fall vibe.
- Serve alongside a crisp green salad to balance the sweetness.
- For a fun twist, use festive Halloween-themed plates and napkins.
- Consider stacking the cups in a pumpkin centerpiece for an eye-catching display.
- Offer extra candy corn on the side for guests who want more sweetness!
FAQs about Candy Corn Pudding Cups
As we dive into making our delightful Candy Corn Pudding Cups, some questions may pop up. Let’s tackle those common queries to ensure your pudding is a hit!
Can I make Candy Corn Pudding Cups ahead of time?
Absolutely! These pudding cups can be made a day in advance. Just keep them chilled in the fridge until you’re ready to serve. This helps the flavors blend beautifully!
What if I don’t have orange food coloring?
No worries! You can create a similar effect using other colors like yellow or even red and yellow mixed together. Just remember, the key is to have fun and celebrate the season!
Can I use dairy-free alternatives in this recipe?
Of course! Substitute standard milk with almond, oat, or coconut milk and use dairy-free whipped topping. You’ll still enjoy those delicious layers while accommodating dietary needs!
How long can I store the leftovers?
Your Candy Corn Pudding Cups will stay fresh in an airtight container for about 5-7 days. They’re best enjoyed fresh, but you’ll still have some delightful treats if you need to keep them longer!
Can I add more layers or different flavors?
Definitely! Feel free to get creative with more layers. You can add chocolate pudding or even switch up the colorful layers with other seasonal flavors. The world of pudding is your oyster!
Final Thoughts
As I take a moment to reflect on these Candy Corn Pudding Cups, I can’t help but smile. They bring a burst of autumn joy and are a perfect way to create lasting memories with family and friends. Whether it’s enjoying the vibrant layers during a cozy dinner or sharing them at a festive gathering, these pudding cups have a way of brightening any occasion. They remind us that even in our busy lives, we can find time to enjoy sweet moments with those we love. So, roll up your sleeves and dive into this delightful seasonal treat—you won’t regret it!
Print
Candy Corn Pudding Cups
- Prep Time: 15 minutes
- Cook Time: 0 minutes
- Total Time: 15 minutes plus chilling time
- Yield: 7 servings 1x
- Category: Dessert
- Method: No-bake
- Cuisine: American
- Diet: Vegetarian
Description
Candy Corn Pudding Cups are a festive and delicious layered dessert that combines vanilla pudding with vibrant colors and topped with candy corn.
Ingredients
- 2 packages vanilla instant pudding (5.1-ounce each)
- 6 cups cold milk
- Orange food coloring
- 8 ounces Cool Whip (thawed)
- Candy corn
- Orange and yellow sanding sugar
- 7 9-ounce clear plastic cups
Instructions
- In a large bowl, pour both packages of instant vanilla pudding mix and add the milk. Then mix according to package instructions. This will make 6 cups of pudding.
- Divide the pudding so there are 2 cups of pudding in one bowl and 4 cups of pudding in another.
- In the bowl with the 4 cups of pudding, add 5 drops of orange food coloring, mixing between each drop until the desired orange color is achieved. No need to color the pudding in the other bowl.
- In a plastic cup, add 4 spoonfuls of the yellow vanilla pudding for the bottom layer. Then 8 spoonfuls of the orange-colored vanilla pudding for the second layer.
- The pudding ratio should be about ⅓ yellow and ⅔ orange, with a little extra room for the cool whip on top.
- Next, cover the top with the thawed cool whip.
- Finally, add candy corn and sanding sugar on top of the cool whip.
- Serve chilled or at room temperature. Store any leftover pudding in an airtight container for 5-7 days.
Notes
- Adjust the amount of food coloring to achieve your preferred shade of orange.
- For a fun presentation, consider using different types of candies on top.
- This dessert is perfect for Halloween or any fall gatherings.
Nutrition
- Serving Size: 1 cup
- Calories: 200
- Sugar: 20g
- Sodium: 150mg
- Fat: 6g
- Saturated Fat: 2g
- Unsaturated Fat: 0g
- Trans Fat: 0g
- Carbohydrates: 30g
- Fiber: 0g
- Protein: 2g
- Cholesterol: 5mg


