Why Everyone’s Falling in Love with Cherries in the Snow
If you’ve ever craved a dessert that’s light, fluffy, creamy, sweet, and bursting with juicy cherries—all at once—then you’re in for a treat. Cherries in the Snow is a vintage dessert that’s made a massive comeback, and for good reason. It’s ridiculously easy to make (no baking involved!), stunning to look at, and tastes like a dream in every bite.
This dessert is like a cozy holiday memory and a summer picnic rolled into one. Whether you’re serving it up at a family get-together, church potluck, or a casual dinner party, it always brings smiles and second servings. One spoonful and you’ll know why it’s called Cherries in the Snow—the creamy white layers look like snowflakes while the glossy red cherries look like little ruby jewels on top.
What is Cherries in the Snow?
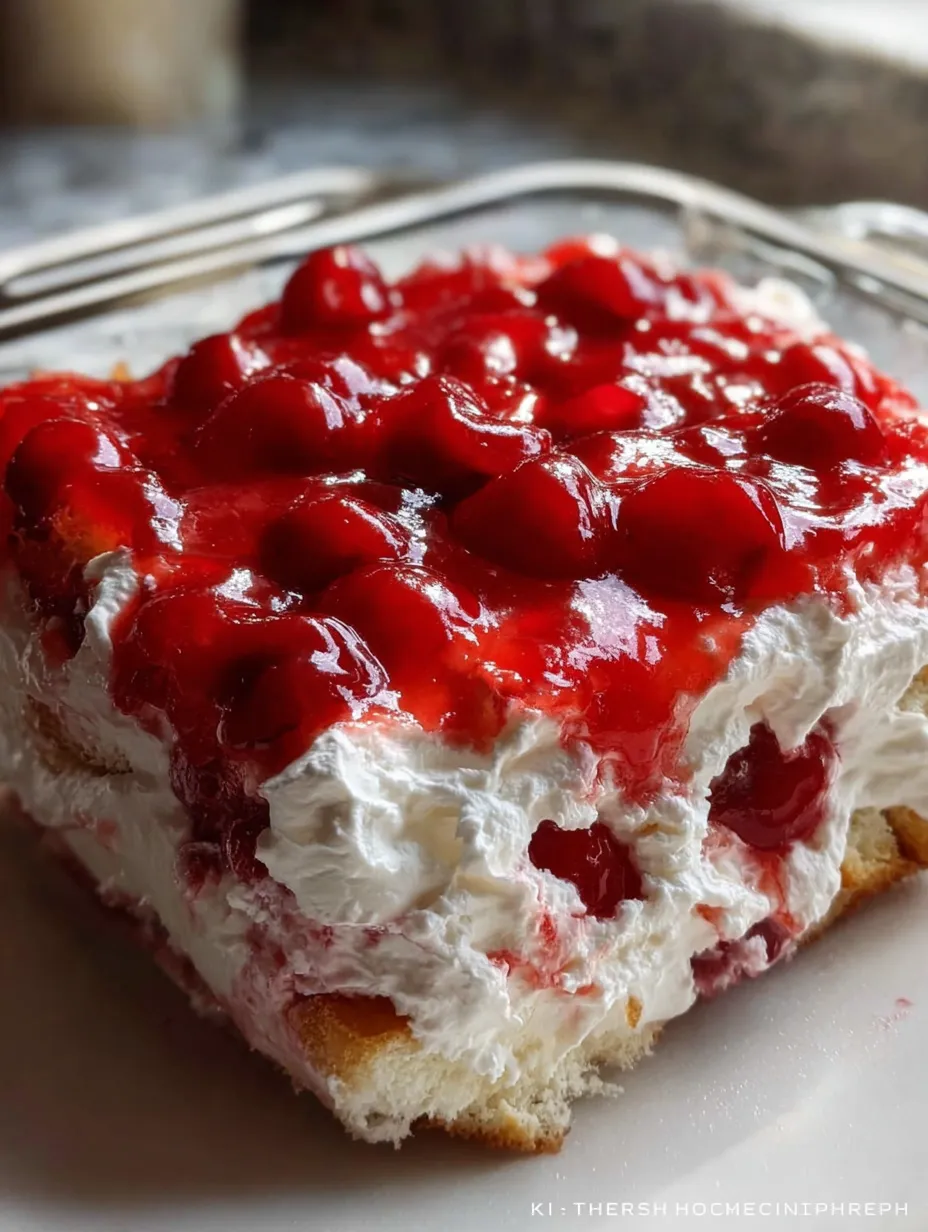
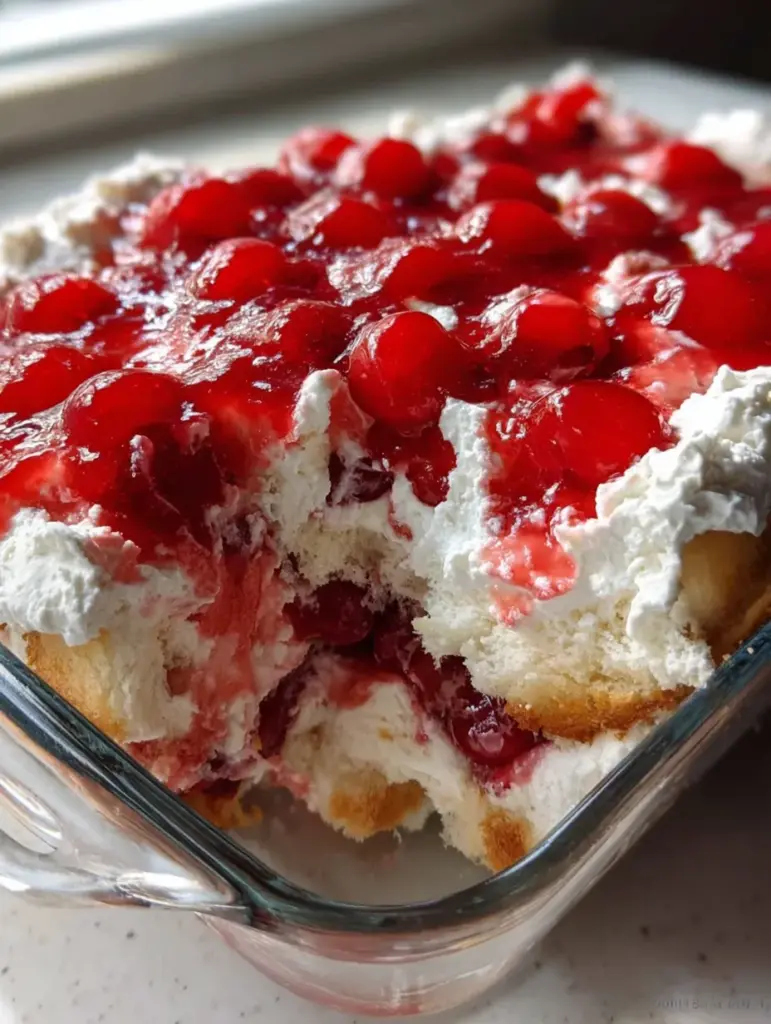
Cherries in the Snow is a no-bake layered dessert featuring angel food cake, a creamy whipped cheese mixture, and a topping of cherry pie filling. It’s served chilled and best eaten with a big spoon (and possibly a second helping on standby).
The combination of textures and flavors is what makes this dessert magical:
- The angel food cake provides a light, spongey base.
- The cream cheese filling adds a sweet, tangy richness.
- And the cherry topping offers juicy brightness that ties it all together.
It’s a dessert that looks extravagant but comes together in under 20 minutes of prep time. The hardest part? Waiting while it chills in the fridge.
A Brief History of Cherries in the Snow Dessert
This dessert has roots in mid-century American kitchens, where gelatin molds, layered desserts, and canned fruit fillings reigned supreme. But unlike some of those bygone dishes, Cherries in the Snow stuck around—because it’s just that good.
Grandmas across the country passed down their versions of this sweet treat, usually made with simple pantry staples. Over the years, the recipe has evolved with whipped toppings and store-bought cakes for even easier prep. But the heart of it—the layers, the cherries, and that fluffy goodness—has stayed the same.
What Makes This Version So Special?
Let’s be real: not all versions of Cherries in the Snow are created equal. What sets this one apart?
- Velvety Smooth Cream Cheese Layer: Thanks to proper mixing and the right ratio of ingredients.
- Fluffy but Stable: We use frozen whipped topping for structure, and it holds up beautifully.
- Perfect Cake Texture: Using angel food cake keeps things light, not soggy.
- Cherry Crown: The thick, glossy cherry pie filling sits beautifully on top—just like in the photo.
Plus, this version requires no gelatin, no baking, and minimal cleanup. Just mix, layer, chill, and serve.
Essential Ingredients You’ll Need
Let’s break down the magic behind each ingredient in this snowy, cherry-filled dream:
Cream Cheese (12 oz)
Use full-fat, block-style cream cheese. It gives the filling that rich, velvety base that you can’t skip.
Powdered Sugar (¾ cup, sifted)
Adds sweetness while keeping the texture smooth. Sifting ensures no clumps sneak into your creamy layer.
Whole Milk (⅓ cup)
Thins the cream cheese slightly and makes the filling easier to spread. Avoid skim milk—it’ll water it down too much.
Vanilla Extract (½ tsp)
Don’t underestimate this little splash—it enhances the flavor and adds warmth.
Frozen Whipped Topping (8 oz, thawed)
Cool Whip is your best friend here. Once folded in, it makes the cream layer light and fluffy.
Pre-Baked Angel Food Cake (15 oz)
Tear it into ¾ to 1-inch pieces. Store-bought is fine and saves time. Make sure it’s airy and fresh.
Cherry Pie Filling (2 cans, 21 oz each)
Look for a quality brand like Comstock. You want whole cherries suspended in a thick, glossy gel—just like in the image.
Kitchen Tools You’ll Need
- Electric hand mixer or stand mixer
- Large mixing bowl
- Spatula
- Trifle dish or 9×13 baking dish
- Measuring cups and spoons
- Spoon for layering
Step-by-Step Recipe Instructions
Let’s walk through how to make this show-stopping dessert.
Step 1: Whipping the Cream Cheese Base
In a large mixing bowl, beat the cream cheese until completely smooth. This is important—no one likes lumpy filling! Take your time here and make sure it’s soft and creamy before moving on.
Step 2: Adding Sweetness and Flavor
Gradually add the sifted powdered sugar. Beat until fully incorporated, then add the whole milk and vanilla extract. Mix again until everything is velvety and pourable but not runny.
Step 3: Making It Fluffy
Gently fold in the thawed whipped topping using a spatula. The goal here is to keep as much air in the mixture as possible. You’re aiming for a cloud-like texture, not soup.
Step 4: Building the Layers
In your trifle bowl or dish, start with a layer of torn angel food cake. Use half of the cake and spread it evenly.
Next, spread half of the cream cheese mixture over the cake layer. Use a spatula to smooth it out.
Then, spoon on one can of cherry pie filling. Be generous—it’s the star of the show!
Repeat all three layers again: cake, cream cheese mixture, and the second can of cherry pie filling.
Step 5: Final Touch and Chill Time
Cover the dish with plastic wrap and refrigerate for at least 3 hours—overnight is even better. This gives the flavors time to marry and the layers to firm up beautifully.
Tips for the Best Cherries in the Snow
Use High-Quality Ingredients
The flavor of this dessert rests heavily on the cherry pie filling and cream cheese. Don’t cheap out—use the good stuff.
Don’t Skip the Chill Time
This step is essential. If served too soon, the layers won’t hold and the texture won’t be right.
Use a Clear Dish
Part of this dessert’s charm is how it looks. A glass trifle bowl shows off those gorgeous layers.
How to Customize Cherries in the Snow
Want to put your own spin on this classic? Go for it!
Add Crunch with Nuts
Sprinkle some chopped pecans or walnuts between layers for a little texture surprise.
Try Other Fruit Toppings
Not a cherry fan? Use blueberry, strawberry, or even peach pie filling.
Make It in Mini Cups
Layer it into clear cups or mason jars for a perfect party dessert.
Nutritional Info Breakdown (Approximate Per Serving)
| Nutrient | Amount |
|---|---|
| Calories | 320 kcal |
| Carbohydrates | 40g |
| Sugar | 26g |
| Protein | 4g |
| Fat | 16g |
| Fiber | 1g |
Not exactly diet food, but totally worth every spoonful.
How to Store Leftovers (If You Have Any!)
Let’s be honest—leftovers of Cherries in the Snow are rare, but just in case your guests managed a little restraint, here’s how to keep the rest tasting as fresh as the first bite.
Store any remaining dessert in an airtight container or cover your serving dish tightly with plastic wrap. Refrigerate it immediately after serving. It should stay delicious for up to 3–4 days. In fact, some say it tastes even better the next day once the flavors have had more time to meld.
Just be cautious: the cherry topping can start to bleed into the cream layer the longer it sits. It’s not a bad thing flavor-wise, but it might not look as crisp and layered. If you’re prepping for a party, keep this in mind and don’t assemble too far in advance.
Pro Tip: Avoid freezing this dessert. The whipped topping and cream cheese mixture can separate when thawed, which messes with the texture and presentation.
Can You Make It Ahead of Time?
Absolutely, and that’s one of the best things about this dessert! It’s practically begging to be made the night before your event.
Here’s how to do it right:
- Assemble the entire dessert in your serving dish.
- Cover it tightly and refrigerate overnight.
- Don’t try to rush the chilling—it really needs those few hours to firm up and taste just right.
If you’re prepping for a big crowd, you can even double the recipe and use a larger dish or two separate pans.
Perfect Occasions to Serve This Dessert
Cherries in the Snow isn’t just for Christmas (though that red-and-white look is perfect for it!). It’s an all-season winner. Here are some of the best times to serve it:
- Holiday Dinners – Festive, pretty, and crowd-pleasing.
- Baby or Bridal Showers – Light, elegant, and not too heavy.
- Valentine’s Day – Those cherries bring the romance.
- Summer Picnics – Refreshing and cool right from the fridge.
- Sunday Family Dinners – A sweet way to end a cozy meal.
Basically, if people are coming over and you want them to love you forever—serve this.
Print
Cherries in the Snow
- Prep Time: 15 minutes
- Total Time: 3 hours 15 minutes
- Category: Holiday Desserts / No-Bake Layered Desserts
Description
🍒❄️ A dreamy, creamy, cloud-like dessert layered with cherries and fluffy angel food cake—perfect for holidays, potlucks, and sweet cravings! Light, smooth, and absolutely irresistible. ✨🍰
Ingredients
12 oz cream cheese, room temperature
¾ cup powdered sugar, sifted
⅓ cup whole milk
½ tsp vanilla extract
8 oz frozen whipped topping, thawed
1 pre-baked angel food cake, torn into ¾–1 inch pieces
42 oz cherry pie filling (2 cans)
Instructions
Beat the cream cheese in a large bowl until smooth and creamy. (⏱️ 2 minutes)
Add the powdered sugar gradually, mixing until fully incorporated. (⏱️ 1 minute)
Slowly pour in the milk and vanilla, beating until smooth and velvety. (⏱️ 2 minutes)
Gently fold in the whipped topping to create a light, fluffy mixture. (⏱️ 1 minute)
Layer half of the angel food cake pieces in a trifle bowl or large dish. (⏱️ 1 minute)
Spread half of the cream cheese mixture evenly over the cake layer. (⏱️ 1 minute)
Spoon half of the cherry pie filling over the creamy layer. (⏱️ 1 minute)
Repeat the layers with remaining cake, cream mixture, and cherry filling. (⏱️ 3 minutes)
Cover and refrigerate to allow the dessert to set and flavors to blend beautifully. (⏱️ 3 hours)
Serve chilled and enjoy this luscious cherry delight! 🍒❄️ (⏱️ 1 minute)
Notes
This is a no-bake, crowd-pleasing dessert that’s perfect for Christmas, Thanksgiving, or any potluck.
Using a store-bought angel food cake keeps it light, fluffy, and super easy to assemble.
Make sure the cream cheese is fully softened to avoid lumps in the creamy layer.
Chill for the full 3 hours—this helps the layers set and the flavors blend beautifully.
You can add chopped pecans or shaved white chocolate on top for extra texture and decoration.
Nutrition
- Serving Size: 8
- Calories: ~320 kcal
Why Kids and Adults Both Love It
This is one of those rare desserts that checks every box:
- It’s creamy and sweet—which kids adore.
- It’s nostalgic and light—which adults appreciate.
- It’s not too rich, so you don’t get that “ugh, I’m too full” feeling.
- And it’s red and white—a color combo that looks fancy without trying.
Also, it’s served cold, which gives it that ice-cream-ish comfort, especially in warmer months. It’s like a trifle, cheesecake, and shortcake all had a delicious baby.
You may also like :
Apple Pecan Cranberry Holiday Cheese Ball Recipe: A Festive, Flavor-Packed Crowd-Pleaser! 🎄
Christmas Fluff Recipe: The Ultimate Festive Dessert for the Holidays
Common Mistakes to Avoid
Even though this recipe is super beginner-friendly, here are a few traps you’ll want to steer clear of:
- Using cold cream cheese: If it’s not fully softened, you’ll get lumps that are impossible to beat out. Always let it sit at room temp for at least 30 minutes.
- Overmixing the whipped topping: Folding is key! If you stir too hard, you’ll knock the air right out and lose the fluffy texture.
- Too small cake chunks: The cake should be torn into ¾- to 1-inch pieces. If you make them too small, they can get mushy.
- Not enough chill time: We can’t stress this enough. Refrigerate it for at least 3 hours—or even better, overnight.
- Poor-quality cherry pie filling: The cherries are the visual star. Go with a thick, vibrant, whole-fruit filling for best results (like Comstock).
Final Thoughts: A Dreamy Dessert for All Seasons
Cherries in the Snow is one of those timeless recipes that brings joy in every bite. It’s light, creamy, and just sweet enough to feel like a treat without being overpowering. The blend of textures—fluffy cake, velvety cream, and juicy cherries—makes every spoonful a mini celebration.
And the best part? It’s foolproof. Whether you’re a seasoned baker or a total newbie, this dessert is easy to pull off with minimal stress and maximum flavor.
So, go ahead—grab that trifle dish, crack open those cherry cans, and make something magical. Trust me, your guests will be asking for seconds… and the recipe.
Similar recipes : 10 Delicious Cherry Recipes You’ll Love Creating at Home
FAQs
1. Can I use homemade whipped cream instead of Cool Whip?
Yes, but keep in mind that homemade whipped cream won’t hold its structure as long. If you go this route, stabilize it with a bit of gelatin or powdered sugar.
2. Can I substitute strawberries or blueberries for cherries?
Definitely! Just make sure the fruit pie filling is thick and not too runny. Blueberry pie filling works great.
3. Is this dessert gluten-free?
Not by default, because angel food cake usually contains wheat. But you can easily swap in a gluten-free angel food cake or pound cake to make it suitable.
4. How long can it sit out at room temperature?
Since it contains dairy, don’t leave it out for more than 1-2 hours. Always serve it chilled and pop leftovers back in the fridge ASAP.
5. Can I use pound cake instead of angel food cake?
Yes! Pound cake will give it a denser, richer texture. Angel food cake keeps it lighter, but pound cake is a delicious variation if you’re going for something more decadent.


