Why Chocolate-Covered Pretzel Nests Are So Popular
Chocolate-covered pretzel nests have quietly become one of those treats that people instantly fall in love with—and honestly, it’s not hard to see why. They’re ridiculously easy to make, require no baking, and somehow manage to look like you spent hours crafting them. But the real magic lies in the experience. The moment you bite into one, you get that satisfying crunch from the pretzel, followed by the smooth richness of chocolate, and then a little pop of sweetness from the candy eggs. It’s like a mini flavor adventure in every bite.
What makes these treats even more appealing is how versatile they are. Whether it’s Easter, a birthday party, or just a random weekend craving, chocolate pretzel nests fit right in. You don’t need to be a professional baker or even particularly skilled in the kitchen. If you can melt chocolate and place candy on top, you’re already halfway there. That accessibility is a huge part of their charm.
The Perfect Balance of Sweet and Salty
There’s something almost addictive about the combination of sweet and salty flavors, and chocolate-covered pretzel nests absolutely nail this balance. Think about it—pretzels bring that subtle saltiness and crunch, while chocolate adds a creamy, sweet richness. When those two elements come together, they create a contrast that keeps your taste buds engaged rather than overwhelmed.
This balance isn’t just a happy accident; it’s actually rooted in how our brains respond to flavor. Studies have shown that combining sweet and salty can enhance overall taste satisfaction, making foods more enjoyable and memorable. That’s why snacks like chocolate-covered pretzels or salted caramel desserts are so popular—they hit multiple flavor notes at once.
In the case of pretzel nests, the saltiness of the pretzel acts like a counterweight to the sweetness of the chocolate and candy eggs. Without it, the treat might feel overly sugary. But with it, every bite feels complete and satisfying. It’s like a well-balanced song where no single instrument overpowers the others.
A Visually Stunning Dessert for Any Occasion
One of the biggest reasons chocolate-covered pretzel nests stand out is their appearance. They look like tiny edible works of art, and yet they require minimal effort to create. That’s a rare combination in the world of desserts. Usually, the prettier something looks, the more complicated it is to make—but not here.
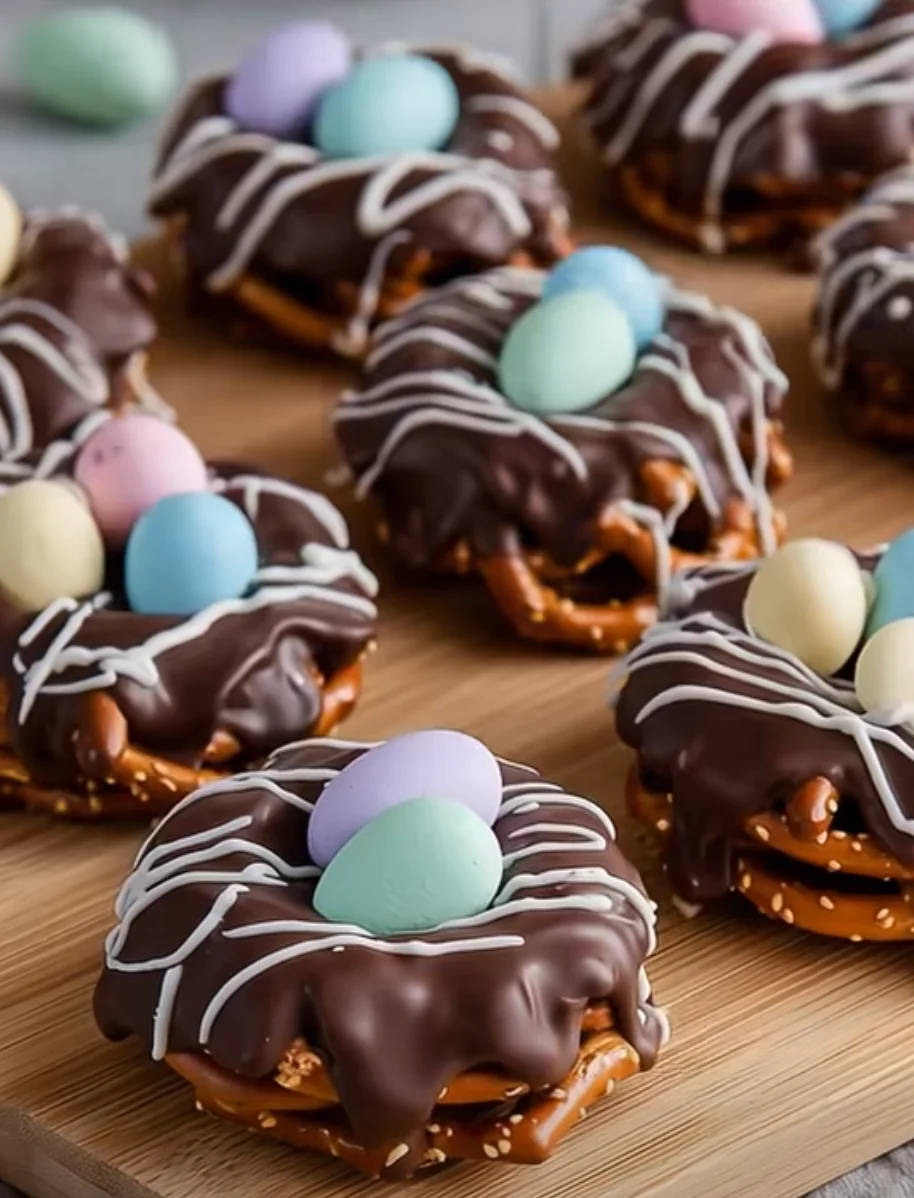
The nest shape itself is what gives this treat its charm. By simply spooning melted chocolate over pretzels and creating a small indentation in the center, you instantly get that “nest” effect. Add a few pastel candy eggs, and suddenly it looks like something straight out of a bakery display window. It’s almost surprising how something so simple can look so polished.
These treats are especially popular during springtime celebrations like Easter. The pastel colors of the candy eggs combined with the rustic look of the chocolate and pretzels create a seasonal aesthetic that people love. But don’t let that limit you—swap the eggs for red and green candies, and you’ve got a Christmas version. Use gold and silver for a more elegant, party-ready look.
Ingredients Breakdown and Their Role
Understanding the ingredients in chocolate-covered pretzel nests is where things start to get interesting. At first glance, the recipe looks incredibly simple—and it is—but each component plays a specific role that affects taste, texture, and even appearance. When you really get what each ingredient brings to the table, you can start tweaking the recipe like a pro instead of just following it blindly.
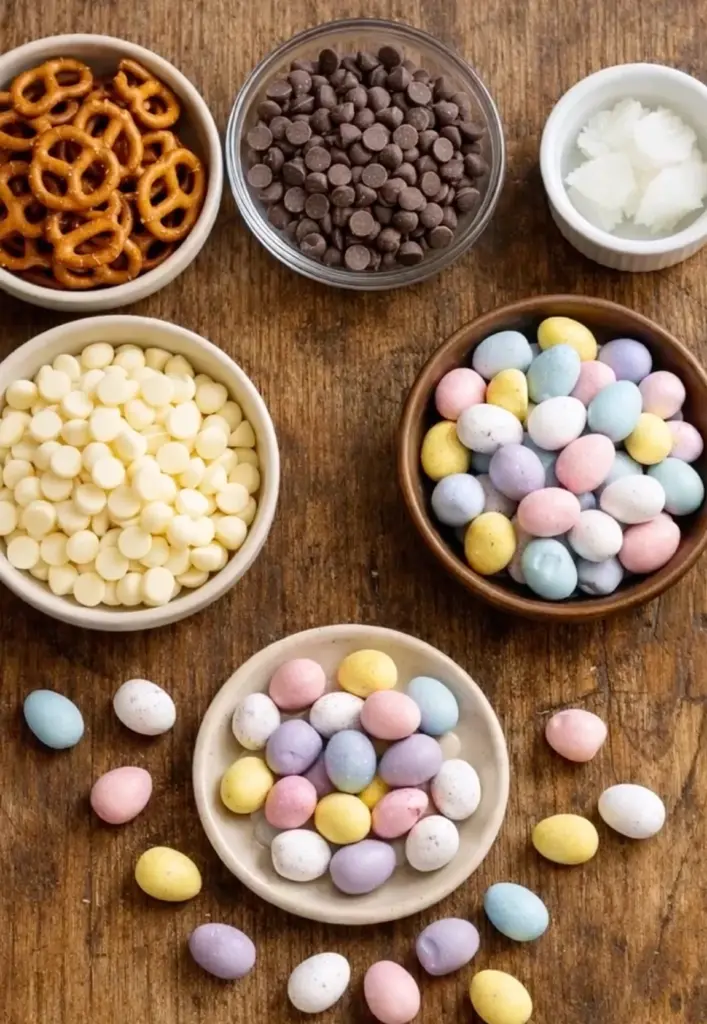
Let’s start with the backbone of the recipe: pretzels. These aren’t just there to hold everything together—they provide that signature crunch and subtle saltiness that makes the dessert addictive. Without them, you’d essentially just have a pile of chocolate and candy. Then comes the chocolate itself, which acts as both flavor and structure. Once melted and set, it binds the pretzels into that nest shape while delivering richness in every bite.
The optional coconut oil might seem like a minor addition, but it can make a noticeable difference. It helps the chocolate melt more smoothly and gives it a slightly glossy finish when it hardens. If you’ve ever had chocolate that looked dull or felt a bit grainy, chances are it wasn’t tempered or smoothed properly—this is where coconut oil quietly saves the day.
White chocolate plays more of a decorative role, but don’t underestimate it. That drizzle adds visual contrast and a touch of extra sweetness that balances the darker semi-sweet base. And finally, the candy-coated eggs bring everything to life. They add color, crunch, and a playful vibe that transforms these treats into something festive and memorable.
When all these ingredients come together, it’s like a small ecosystem where each part supports the others. Remove one element, and the whole experience changes. That’s what makes this recipe both simple and surprisingly sophisticated at the same time.
Choosing the Right Pretzels
Not all pretzels are created equal, and your choice here can seriously impact the final result. You might think, “A pretzel is a pretzel, right?”—but that’s not quite true when you’re making something as specific as chocolate nests.
Mini pretzel twists are a popular option because their shape naturally mimics a nest. The loops and curves give the melted chocolate something to cling to, which helps create that layered, textured look. On the other hand, pretzel squares offer a sturdier base. If you’re aiming for uniformity or planning to transport your treats, squares can be a safer bet because they’re less likely to break.
Texture is another factor to consider. You want pretzels that are crisp and fresh, not stale or overly hard. A stale pretzel can ruin the entire bite, making it feel dry instead of crunchy. It’s a small detail, but it makes a big difference.
Salt level also matters. Some pretzels come heavily salted, while others are more subtle. If your chocolate is on the sweeter side, a slightly saltier pretzel can help balance things out. But if you’re using milk chocolate or adding extra sweet toppings, you might want to go with a lighter salt coating to avoid overpowering the flavor.
There’s also room for experimentation. Whole grain pretzels can add a nuttier flavor, while gluten-free options make the recipe accessible to more people. You can even break larger pretzels into pieces to create a more rustic, “twig-like” nest appearance.
At the end of the day, the best pretzel is the one that fits your taste and purpose. But once you find the right match, you’ll notice how much it elevates the entire dessert.
Best Chocolate Options for Melting
Chocolate is the heart of this recipe, so choosing the right type is crucial. You might be tempted to grab whatever chocolate chips you have lying around, but not all chocolate melts the same way—or tastes the same once it sets.
Semi-sweet chocolate chips are the go-to choice for a reason. They strike a nice balance between sweetness and richness, making them versatile and crowd-pleasing. They also melt relatively easily, especially when combined with a bit of coconut oil. But if you’re someone who prefers a deeper, more intense flavor, dark chocolate is a fantastic alternative. It adds a slightly bitter edge that contrasts beautifully with the candy eggs.
Milk chocolate, on the other hand, leans sweeter and creamier. It’s a great option if you’re making these for kids or anyone with a sweet tooth. Just keep in mind that it can make the overall dessert a bit more sugary, so balancing it with saltier pretzels becomes even more important.
One thing many people overlook is the quality of the chocolate. Higher-quality chocolate tends to melt more smoothly and set with a better texture. It also has a richer flavor, which can elevate your pretzel nests from “good” to “wow.”
If you want to take things up a notch, you can even mix different types of chocolate. Imagine a base of semi-sweet chocolate with a drizzle of white and dark chocolate on top. Not only does it look stunning, but it also creates layers of flavor that make each bite more interesting.
Melting technique matters too. Using short microwave intervals and stirring frequently helps prevent burning and ensures a silky consistency. Chocolate can be a bit sensitive, but once you get the hang of it, it becomes second nature.
Decorative Elements That Elevate the Look
This is where creativity really shines. The decorative elements in chocolate-covered pretzel nests are what transform them from a simple snack into something that feels special and occasion-worthy.
The classic choice—pastel candy-coated chocolate eggs—is popular for a reason. They instantly give the nests a seasonal, springtime vibe that’s perfect for Easter or themed parties. Their bright colors contrast beautifully with the dark chocolate, making the whole dessert pop visually.
But you don’t have to stick with tradition. Swap the eggs for mini marshmallows, jelly beans, or even dried fruit for a completely different look and taste. Want something more elegant? Try using gold-dusted candies or edible pearls. The possibilities are endless, and that’s what makes this part so fun.
The white chocolate drizzle is another small detail that makes a big impact. It adds a sense of movement and texture to the nests, almost like delicate threads woven across the top. You don’t need to be precise here—in fact, a slightly messy drizzle often looks more natural and appealing.
You can also play with color by adding food coloring to white chocolate. Imagine pastel pink or light blue drizzles for a more vibrant presentation. Just a small tweak like this can completely change the mood of your dessert.
Even the way you place the toppings matters. Arranging the eggs neatly in the center creates a polished look, while scattering them slightly can make the nests feel more rustic and organic. It’s like styling a photo—small choices can have a big impact.
In the end, decorating these pretzel nests is less about following rules and more about expressing your creativity. And honestly, that’s one of the most enjoyable parts of the whole process.
Step-by-Step Guide to Making Pretzel Nests
Making chocolate-covered pretzel nests might look like something straight out of a bakery window, but the process behind it is surprisingly relaxed and beginner-friendly. This is one of those recipes where you don’t need fancy tools or years of baking experience—you just need a little patience and a willingness to get a bit messy with melted chocolate. Think of it less like baking and more like assembling edible art.
The beauty of this process is how forgiving it is. Your nests don’t have to look identical. In fact, the slight variations in shape and texture are what make them feel homemade and authentic. Each one ends up with its own personality, which is part of the charm. You’re not aiming for perfection here—you’re aiming for something delicious and visually appealing.
Timing also works in your favor. With a prep time of about 20 minutes and no actual baking required, this recipe fits easily into a busy day. The only waiting involved is letting the chocolate set, which gives you a chance to clean up or, let’s be honest, sneak a taste of the leftover chocolate.
Before diving into the detailed steps, it helps to think of the process in phases: preparing your setup, melting the chocolate, shaping the nests, decorating them, and finally letting them set. Each phase builds on the previous one, and once you get into the rhythm, it all flows naturally.
Preparing Your Workspace
Before you even touch the chocolate, setting up your workspace can make a huge difference. It might sound like a small step, but it’s the kind of thing that separates a smooth, enjoyable cooking experience from a chaotic one.
Start by lining a baking sheet with parchment paper. This prevents the chocolate from sticking and makes cleanup much easier. Trust me, trying to peel hardened chocolate off a bare tray is not fun. Arrange your pretzels in a single layer, leaving a bit of space between each one. This spacing gives you room to work when you start adding the melted chocolate.
Next, gather all your ingredients and tools. You’ll need microwave-safe bowls, a spoon for spreading chocolate, and a small piping bag or zip-top bag for the white chocolate drizzle. Having everything within reach saves you from scrambling around while your chocolate is cooling or setting.
Temperature matters more than you might think. If your kitchen is too warm, the chocolate might take longer to set. If it’s too cold, it could harden too quickly while you’re still working. Aim for a comfortable, room-temperature environment where you can take your time.
This step might not be the most exciting part of the process, but it sets the tone for everything that follows. A well-prepared workspace makes the entire experience smoother and more enjoyable.
Melting Chocolate the Right Way
Melting chocolate seems simple, but it’s one of those steps where things can go wrong quickly if you’re not careful. The goal is to achieve a smooth, glossy consistency without burning or seizing the chocolate.
Using a microwave is the easiest method. Place your semi-sweet chocolate chips in a microwave-safe bowl and heat them in 30-second intervals. After each interval, give the chocolate a good stir. This helps distribute the heat evenly and prevents hot spots that can burn the chocolate. Adding a teaspoon of coconut oil at this stage can make the melting process smoother and give the chocolate a silky finish.
Patience is key here. It might be tempting to rush the process by increasing the heat or skipping the stirring, but that’s how you end up with clumpy or scorched chocolate. Think of it like melting ice—you want it to happen धीरे-धीरे (slowly and steadily), not all at once.
If you notice the chocolate starting to thicken or lose its shine, stop heating immediately and stir. Often, the residual heat is enough to finish the melting process. Overheating is the most common mistake, and once chocolate burns, there’s no going back.
For the white chocolate, repeat the same process in a separate bowl. White chocolate can be even more sensitive than dark or semi-sweet varieties, so keep a close eye on it. Stirring frequently is your best friend here.
When done correctly, your melted chocolate should be smooth, glossy, and easy to work with. It should flow off your spoon like a ribbon, not clump or break apart.
Shaping the Perfect Nest
Now comes the fun part—turning your ingredients into something that actually looks like a nest. This is where creativity meets technique, and honestly, it’s hard to mess up.
Take about a tablespoon of melted chocolate and spoon it over each pretzel. Use the back of your spoon to gently spread it out, covering the pretzel while leaving some of its shape visible. The goal is to create a slightly uneven, textured surface that mimics the look of a real nest.
As you spread the chocolate, create a small indentation in the center. This is where your candy eggs will sit, so make sure it’s deep enough to hold them in place but not so deep that it flattens the entire structure. Think of it like shaping a tiny bowl.
Don’t worry if your nests don’t look identical. In fact, a bit of variation makes them more visually appealing. Some can be slightly wider, others a bit taller—it all adds to the handmade feel.
Work quickly but not frantically. The chocolate will start to set over time, especially if your room is cool. If it becomes too thick to spread, you can gently reheat it for a few seconds.
This step is where your pretzel nests really start to come to life. It’s also the part where you can start to see your effort paying off, which makes the whole process even more satisfying.
Adding Toppings and Decorations
Once your nests are shaped, it’s time to bring them to life with toppings. This step is all about timing—your chocolate needs to be soft enough to hold the decorations but not so runny that everything slides around.
Place 2–3 pastel candy eggs in the center of each nest. Press them in gently so they stay in place as the chocolate sets. This is the moment where your nests really start to look like, well, nests.
Next comes the white chocolate drizzle. Transfer your melted white chocolate into a piping bag or a zip-top bag with a small corner snipped off. Then, lightly drizzle it over each nest in a back-and-forth motion. There’s no need for precision here—a slightly messy drizzle often looks more natural and appealing.
If you want to get creative, you can add extra toppings at this stage. Sprinkles, crushed nuts, or even a pinch of sea salt can add both flavor and visual interest. Just be careful not to overload the nests—you still want the original design to shine through.
This step is where your personality can really come through. Whether you keep it simple or go all out with decorations, each nest becomes a small reflection of your style.
Setting and Storing Your Nests
After all the shaping and decorating, the final step is letting your nests set properly. This is where patience comes back into play.
Place the baking sheet in the refrigerator for about 20–30 minutes, or until the chocolate is fully hardened. You’ll know they’re ready when the chocolate feels firm to the touch and no longer looks glossy.
Once set, carefully remove the nests from the parchment paper. They should lift off easily if everything was prepared correctly. If you encounter any sticking, gently peel the paper away rather than pulling on the nest itself.
For storage, keep your pretzel nests in an airtight container. At room temperature, they’ll stay fresh for up to three days. If you want them to last longer, you can refrigerate them, but be aware that this might slightly alter the texture of the chocolate.
These treats are best enjoyed fresh, when the pretzels are still crisp and the chocolate has that perfect snap. Whether you’re serving them at a party or enjoying them as a personal snack, they’re guaranteed to disappear quickly.
Expert Tips for Perfect Results Every Time
Getting chocolate-covered pretzel nests right isn’t difficult, but getting them consistently perfect? That’s where a few expert tricks come into play. The difference between “these are good” and “wow, these are amazing” often comes down to small details that many people overlook. Think of this section as your shortcut to leveling up your results without adding extra complexity.
One of the biggest game-changers is controlling moisture. Chocolate and water are not friends—just a tiny drop of water can cause melted chocolate to seize and turn grainy. So make sure your bowls and utensils are completely dry before you start. It sounds basic, but it’s one of the most common mistakes people make.
Another tip is to work in batches if needed. If you try to do everything at once, your chocolate might start to set before you finish shaping all the nests. By working in smaller groups, you keep everything manageable and maintain that smooth, spreadable texture.
Temperature control also plays a quiet but powerful role. If your kitchen is too warm, your nests might take forever to set—or worse, lose their shape. If it’s too cold, the chocolate may harden before you’ve finished decorating. A stable, room-temperature environment is ideal.
And here’s a pro move: lightly toast your pretzels for a few minutes before using them. This enhances their crunch and adds a subtle depth of flavor that makes a noticeable difference. It’s a small extra step, but it gives your nests a more refined taste.
Common Mistakes to Avoid
Even with a simple recipe, a few missteps can affect the final result. The good news? Most of these mistakes are easy to avoid once you know what to watch for.
One of the most common issues is overheating the chocolate. When chocolate gets too hot, it can become thick, clumpy, or even burnt. This not only affects the texture but also the taste. The solution is simple: heat in short intervals and stir frequently. Patience here pays off big time.
Another mistake is adding toppings too late. If your chocolate has already started to set, the candy eggs won’t stick properly. You might end up with decorations that fall off or look uneven. Always add your toppings while the chocolate is still soft and workable.
Spacing is another overlooked detail. Placing pretzels too close together can make shaping difficult and lead to nests merging into each other. Giving each one enough room ensures clean, distinct shapes.
Some people also go overboard with chocolate, thinking more is better. But too much chocolate can overwhelm the pretzel and make the nests overly rich. Aim for balance—you want to taste both the crunch of the pretzel and the smoothness of the chocolate.
Pro Techniques for Smooth Chocolate
If you’ve ever wondered why some chocolate desserts look glossy and professional while others look dull or streaky, the answer usually comes down to technique. Even without formal tempering, you can still achieve a smooth, attractive finish with a few smart methods.
First, always stir your chocolate thoroughly as it melts. Stirring doesn’t just mix—it actually helps distribute heat and break down any remaining solid pieces. This leads to a smoother consistency overall.
Adding a small amount of coconut oil or even a neutral oil can improve the texture significantly. It makes the chocolate easier to spread and gives it that slight sheen once it sets. Just don’t overdo it—a little goes a long way.
Another technique is to let the melted chocolate cool slightly before using it. If it’s too hot, it can be overly runny and harder to control. Letting it sit for a minute or two gives you better control when shaping your nests.
For the drizzle, keep your hand moving steadily and don’t overthink the pattern. A natural, slightly uneven drizzle often looks better than something overly precise. It adds character and makes the nests feel less mechanical.
These small adjustments might seem minor, but together they create a noticeable difference in both appearance and texture.
Creative Variations to Try
Once you’ve mastered the basic recipe, it’s hard not to start experimenting. That’s where chocolate-covered pretzel nests really shine—they’re incredibly adaptable. You can tweak flavors, colors, and textures to match almost any theme or preference.
Think of the base recipe as your foundation. From there, you can build in any direction you like. Want something more indulgent? Add caramel drizzle. Looking for a festive twist? Change the toppings and colors. Trying to make a slightly lighter version? Swap out ingredients strategically.
This flexibility is what keeps the recipe interesting. You’re not stuck making the same thing every time—you can reinvent it depending on your mood or the occasion.
Holiday-Themed Pretzel Nests
One of the easiest ways to switch things up is by adapting your pretzel nests to different holidays. The structure stays the same, but the colors and decorations do all the talking.
For Easter, pastel eggs are the classic choice, giving that soft, springtime feel. For Christmas, you can swap in red and green candies or even صغيرة chocolate balls that resemble ornaments. Add a touch of white drizzle, and suddenly your nests look like they’ve been dusted with snow.
Halloween opens up even more creative options. Use orange and black candies, or turn your nests into “spider nests” by adding candy spiders. It’s a fun, slightly spooky twist that’s perfect for parties.
Even for birthdays or celebrations, you can customize the colors to match a theme. It’s like dressing up your dessert for the occasion.
Healthier Ingredient Swaps
If you’re looking to make your pretzel nests a bit lighter or more mindful, there are several easy swaps you can try without sacrificing too much flavor.
For starters, you can use dark chocolate with a higher cocoa percentage, which typically contains less sugar than milk chocolate. It also adds a richer, more intense flavor that many people enjoy.
You can also look for pretzels with reduced sodium or made from whole grains. These options maintain the crunch while offering a slightly better nutritional profile.
Instead of candy-coated eggs, consider using dried fruits like raisins or cranberries. They add natural sweetness and a chewy texture that contrasts nicely with the crunchy pretzels.
These swaps won’t turn the dessert into a health food, but they can make it feel a bit more balanced—especially if you’re planning to enjoy more than one.
Serving Ideas and Presentation Tips
Presentation can completely change how your chocolate-covered pretzel nests are perceived. Even though they’re simple to make, the way you serve them can make them feel elegant, playful, or even gourmet.
Arranging them on a decorative tray is a great starting point. You can line the tray with parchment paper, a pastel napkin, or even edible grass for a seasonal touch. Small details like this create a cohesive look that makes your dessert stand out.
If you’re serving them at a party, consider grouping them in clusters rather than spreading them out evenly. This creates a more dynamic and visually interesting display. You can also vary the heights using stands or layered trays.
Packaging is another fun angle. Place a few nests in a small box or wrap them in clear bags tied with ribbon. They make great homemade gifts that feel thoughtful and personal.
Making Your Dessert Instagram-Worthy
Let’s be honest—part of the fun is showing off your creations. And these pretzel nests are practically made for photos.
Good lighting is key. Natural light works best, especially near a window. It highlights the shine of the chocolate and the colors of the toppings. Avoid harsh shadows or overly bright artificial light.
Background matters too. A simple, clean background keeps the focus on your dessert. Wooden surfaces, marble countertops, or pastel backdrops work beautifully.
Angles can make a big difference. Try shooting from slightly above to capture the nest shape and toppings clearly. Close-up shots can highlight texture, while wider shots show the overall arrangement.
Pairing Ideas for Different Occasions
Pairing your pretzel nests with the right drinks or other treats can elevate the entire experience.
For a cozy setting, serve them with hot chocolate or coffee. The warmth of the drink complements the richness of the chocolate perfectly. For kids or casual gatherings, milk is always a classic choice.
If you’re hosting a party, consider pairing them with other small desserts like cookies or brownies. This creates a dessert spread that feels abundant and inviting.
Nutritional Insights and Storage Guidelines
When enjoying chocolate-covered pretzel nests, it’s easy to get caught up in the taste and forget to think about what’s actually going into each bite. While this isn’t exactly a “health food,” understanding the nutritional side helps you enjoy it more mindfully—and maybe even make a few smart adjustments along the way.
Let’s break it down in a realistic way. Each nest typically contains pretzels, chocolate, and candy-coated eggs. That means you’re getting a mix of carbohydrates (from pretzels and sugar), fats (from chocolate), and a small amount of protein. On average, one nest can range between 120–180 calories, depending on how much chocolate and how many toppings you use. It’s not extreme, but it can add up quickly if you keep reaching for more—which, let’s be honest, is very easy to do.
Sugar is the main thing to watch here. Between the semi-sweet chocolate, white chocolate drizzle, and candy eggs, the sugar content can be fairly high. That’s why portion control matters. Instead of mindlessly snacking, try serving them in small batches or pairing them with something less sweet, like coffee or milk, to balance things out.
If you’re looking to tweak the nutritional profile slightly, small changes can go a long way. Using dark chocolate (70% or higher cocoa) can reduce sugar while adding antioxidants. Choosing pretzels with lower sodium can help balance the salt content. Even swapping candy eggs for nuts or dried fruit can introduce more fiber and reduce processed sugar.
Now let’s talk storage—because keeping these treats fresh is just as important as making them. At room temperature, stored in an airtight container, pretzel nests will stay fresh for about 3 days. Make sure they’re kept in a cool, dry place away from direct sunlight, as heat can cause the chocolate to soften or melt.
If you want them to last longer, refrigeration is an option. In the fridge, they can stay fresh for up to a week, but there’s a small trade-off: the chocolate may lose a bit of its snap, and condensation can sometimes affect the texture when brought back to room temperature. To avoid this, let them sit out for a few minutes before serving.
Freezing is possible, but not ideal. While it extends shelf life, it can alter both the texture of the pretzels and the appearance of the chocolate. If presentation matters—and with these nests, it usually does—it’s better to stick with short-term storage.
Understanding both nutrition and storage helps you get the most out of your pretzel nests—not just in taste, but in overall experience.
Conclusion
Chocolate-covered pretzel nests are one of those rare treats that check every box. They’re easy to make, visually appealing, customizable, and incredibly satisfying to eat. Whether you’re preparing them for a holiday, a party, or just a quiet moment at home, they bring a sense of fun and creativity to the table.
What makes them truly special isn’t just the flavor—it’s the experience of making them. From melting the chocolate to shaping each nest and adding the final decorative touches, every step feels hands-on and rewarding. It’s the kind of recipe that invites you to slow down just enough to enjoy the process without feeling overwhelmed.
They also strike that perfect balance between simplicity and sophistication. You don’t need advanced skills or expensive ingredients, yet the final result looks like something you’d find in a boutique bakery. That contrast is part of their magic.
And then there’s the versatility. You can adapt them for any season, experiment with flavors, or make small tweaks to suit your preferences. It’s a recipe that grows with you the more you make it.
At the end of the day, these pretzel nests are more than just a dessert—they’re a small, creative project that happens to be delicious. And once you’ve made them once, chances are they’ll become a go-to favorite you’ll keep coming back to.
FAQs
1. Can I make chocolate-covered pretzel nests without coconut oil?
Yes, you absolutely can. Coconut oil is optional and mainly helps create a smoother, glossier texture when melting chocolate. If you skip it, your chocolate may be slightly thicker, but it will still work perfectly fine. Just be extra careful while melting to avoid clumping or overheating.
2. What’s the best way to prevent chocolate from burning?
The key is to melt it slowly using short microwave intervals (about 30 seconds) and stir in between each round. Chocolate holds heat well, so even if it doesn’t look fully melted, stirring can finish the job. Avoid rushing the process, as high heat is the main cause of burning.
3. Can I use other types of candy instead of mini eggs?
Definitely. Mini eggs are popular בגלל their look and crunch, but you can easily swap them for M&Ms, jelly beans, marshmallows, or even dried fruits. This makes the recipe flexible for different occasions and personal tastes.
4. How do I keep the pretzels from getting soggy?
Make sure your pretzels are fresh and store the finished nests in a dry, airtight container. Moisture is the main reason pretzels lose their crunch. Avoid refrigerating them for too long unless necessary, as condensation can affect texture.
5. Can I make these ahead of time for an event?
Yes, these are great for prepping in advance. You can make them up to 2–3 days ahead and store them at room temperature in an airtight container. If you need a longer shelf life, refrigerate them and bring them back to room temperature before serving for the best taste and texture.
Print
Chocolate-Covered Pretzel Nests
Description
Chocolate-Covered Pretzel Nests — sweet and salty no-bake Easter treats with crunchy pretzels, melted chocolate, and candy eggs that come together fast and disappear even faster
Ingredients
12 mini pretzel twists or square pretzels
1 1/2 cups semi-sweet chocolate chips
1 teaspoon coconut oil (optional, for smoother melting)
1/2 cup white chocolate chips
36 pastel candy-coated chocolate eggs (such as mini eggs)
Instructions
Step 1: Line a baking sheet with parchment paper. Arrange the pretzels in a single layer, leaving space between each.
Step 2: In a microwave-safe bowl, melt the semi-sweet chocolate chips with the coconut oil in 30-second intervals, stirring between each, until smooth.
Step 3: Spoon about 1 tablespoon of melted chocolate onto each pretzel, gently spreading it to form a nest shape with a slight indentation in the center.
Step 4: Place 2–3 pastel candy eggs in the center of each chocolate nest while the chocolate is still soft.
Step 5: Melt the white chocolate chips in a separate bowl using the same method. Transfer to a small piping bag or zip-top bag with the corner snipped.
Step 6: Drizzle the white chocolate over each nest for a decorative finish.
Step 7: Refrigerate the nests for 20–30 minutes, or until the chocolate is fully set.
Step 8: Carefully remove from the parchment paper and serve.
Notes
Use pretzel squares for a sturdier base and easier shaping.
If you prefer, you can use milk chocolate or dark chocolate instead of semi-sweet.
Store in an airtight container at room temperature for up to 3 days or refrigerate for longer freshness.