Introduction to Chocolate Peanut Butter Snowballs
When life gets hectic and your sweet tooth calls, there’s nothing quite like a batch of Chocolate Peanut Butter Snowballs to save the day! These delightful bites are bursting with creamy peanut butter goodness, perfectly coated in rich chocolate. They’re not just a treat; they’re an indulgence that can turn any busy moment into a sweet escape. Whether you’re hosting friends, treating the kids after school, or simply craving something special for yourself, these snowballs are a quick solution. Trust me, a plate of these beauties will impress your loved ones and bring smiles all around!
Why You’ll Love This Chocolate Peanut Butter Snowballs
These Chocolate Peanut Butter Snowballs are the ultimate convenience in dessert-making. They come together in just about 45 minutes, making them perfect for busy moms and professionals like us. The delightful combination of creamy peanut butter and luscious chocolate creates a flavor harmony that simply can’t be resisted. Plus, with a recipe that allows for easy customization, you can make them just the way your family likes, turning them into a beloved treat!
Ingredients for Chocolate Peanut Butter Snowballs
Gathering the right ingredients is key to achieving those perfect Chocolate Peanut Butter Snowballs. Here’s what you’ll need to create these luscious treats:
- Creamy peanut butter: The star of the show! It provides that rich, nutty flavor we all crave.
- Unsalted butter: A touch of melted butter adds creaminess and ensures the dough holds together well.
- Powdered sugar: This sweet ingredient gives the stuffing its delightful sweetness and thickens the dough to the right consistency.
- Vanilla extract: Just a splash enhances the overall flavor with a warm, aromatic touch.
- Fine salt: A pinch can elevate the taste, balancing the sweetness; it’s optional, but I recommend it!
- Crushed graham crackers, vanilla wafers, or powdered milk: These are optional add-ins. They change the texture and enhance the flavor, making each bite even more enjoyable.
- Semi-sweet or milk chocolate melting wafers or chips: The perfect coating for a beautiful, glossy finish — choose your favorite for a richer flavor!
- Vegetable or coconut oil: Optional, but mixing in a bit of oil helps to achieve a smoother melting chocolate.
- Soft caramel candies or caramel sauce: Drizzle some over the finished product for an added indulgent layer of flavor!
- Heavy cream or milk: Used for melting the caramel, making it easy to drizzle while still maintaining a luscious consistency.
- Sea salt flakes: For decoration, these little gems add a delightful salty crunch that pairs perfectly with sweet.
- Crushed peanuts, sprinkles, or white chocolate drizzle: Decorative touches that can make your snowballs festive and fun!
For exact measurements, you’ll find everything listed at the bottom of the article, available for printing. Gather these ingredients, and let’s start creating some sweet memories!
How to Make Chocolate Peanut Butter Snowballs
Now that we have our ingredients ready, let’s dive into making those oh-so-delicious Chocolate Peanut Butter Snowballs! Follow these simple steps, and you’ll be on your way to creating a delightful treat that has everyone asking for seconds.
Step 1: Prepare the Peanut Butter Mixture
Start by grabbing a medium mixing bowl. In it, combine the creamy peanut butter, melted butter, vanilla extract, and a pinch of salt. Using a spatula or a fork, mix everything until it’s perfectly smooth and well blended.
Now, it’s time for the powdered sugar to join the party! Gradually add it in, mixing until a thick and pliable dough forms. If you feel it’s too sticky, don’t hesitate to add a bit more powdered sugar until it reaches the right consistency.
Step 2: Optional Ingredients Add-Ins
This is where you can get a little creative! If you want to enhance the flavor and texture, consider mixing in some crushed graham crackers, vanilla wafers, or even powdered milk. Each of these options will add a special twist and make your snowballs even more scrumptious. Just fold them gently into the mixture until evenly distributed.
Step 3: Shape the Snowballs
Now for the fun part—shaping! Take a teaspoon or a small scoop and portion out the dough. Roll each portion between your palms to form smooth balls, about one inch in diameter. It’s like creating tiny edible snowballs! Place your beautifully shaped snowballs on a parchment-lined baking sheet.
Step 4: Chill the Snowballs
To ensure our lovely little treats maintain their shape, they’re going to need a chill session. Pop the baking sheet in the refrigerator for at least 25 minutes. If you’re in a hurry, you can use the freezer for about 10 to 15 minutes instead. This step is crucial for helping the snowballs firm up before we coat them in chocolate.
Step 5: Melt the Chocolate
As the snowballs chill, let’s melt the chocolate! In a microwave-safe bowl, slowly melt the semi-sweet or milk chocolate wafers in 20 to 30-second intervals. Stir after each round to help keep it smooth. If you’d like a thinner consistency, consider blending in a teaspoon of vegetable or coconut oil.
Step 6: Coat the Snowballs
When the chocolate is perfectly melted and glossy, it’s time to coat those snowballs! Using a fork or a dipping tool, carefully submerge each ball into the melted chocolate. Ensure each snowball is fully coated, then gently shake off any excess chocolate before placing them back on the parchment-lined tray.
Step 7: Add a Caramel Drizzle
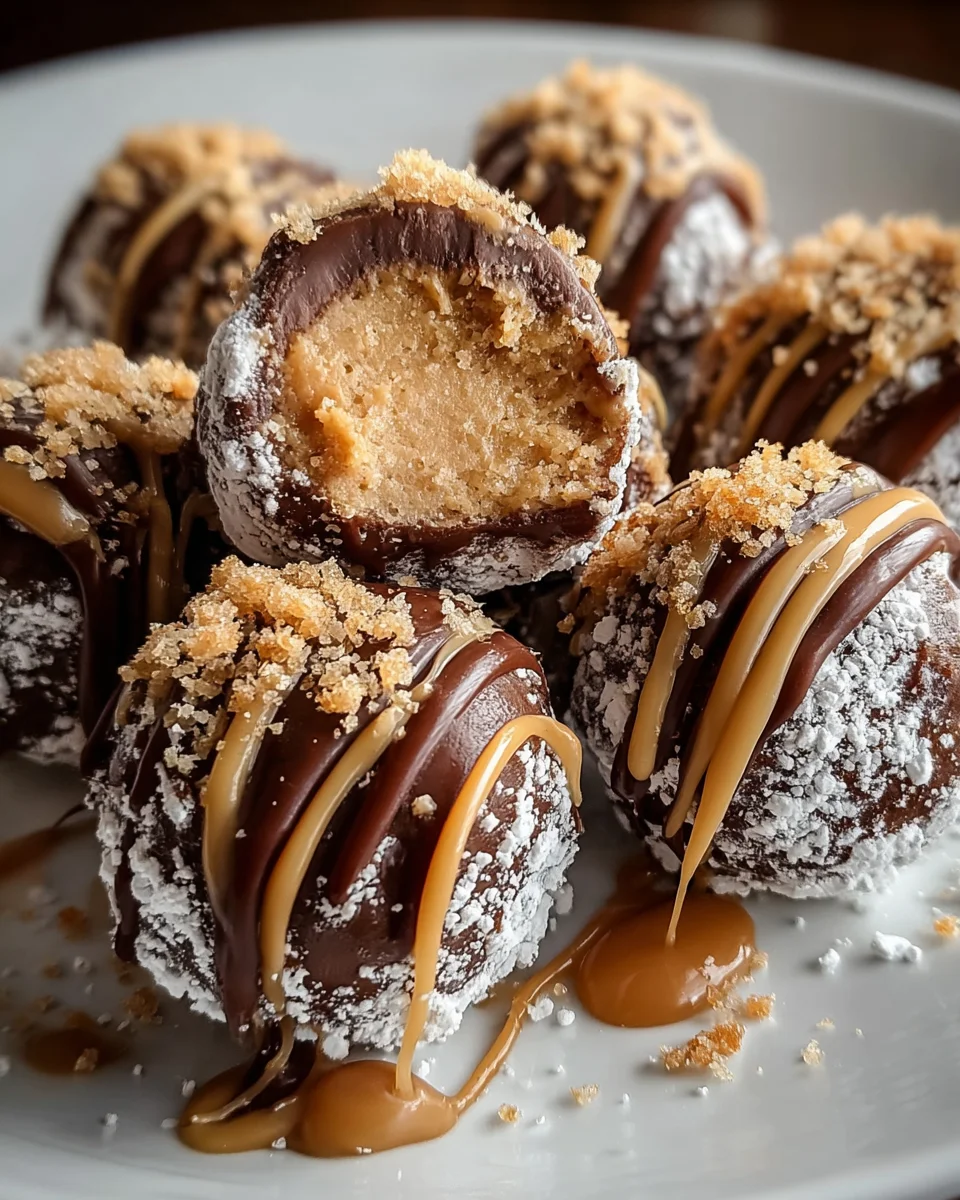
What’s a Chocolate Peanut Butter Snowball without a little caramel love? In another microwave-safe bowl, melt the soft caramel candies with a splash of heavy cream or milk, warming it in 10 to 15-second intervals. Once smooth, use a piping bag or a spoon to drizzle the luscious caramel over your chocolate-coated balls generously. You can sprinkle sea salt flakes immediately afterward for an added crunch and flavor explosion!
Step 8: Set and Store
Finally, it’s time to let everything set! Return the tray to the refrigerator for 15 to 20 minutes until everything is fully firm. Once they’re ready, transfer your finished snowballs into an airtight container. They can be stored in the refrigerator for up to a week, though I doubt they’ll last that long!
And there you have it—irresistible Chocolate Peanut Butter Snowballs that are the perfect combination of flavor and fun!
Tips for Success
- Use room temperature ingredients for better mixing, especially the peanut butter and butter.
- If the dough is too sticky, gradually add more powdered sugar until you achieve a workable consistency.
- Don’t rush the chilling process; it helps the snowballs hold their shape during coating.
- Keep the melted chocolate warm as you work to maintain its smoothness.
- Experiment with toppings to make your snowballs uniquely yours!
Equipment Needed
- Mixing bowl: A medium bowl for combining ingredients; a large bowl works too!
- Spatula or fork: For mixing the dough; any sturdy utensil will do.
- Parchment paper: Line your baking sheet; alternatively, use a silicone mat.
- Baking sheet: Any flat tray will work for chilling the snowballs.
- Microwave-safe bowl: For melting chocolate and caramels; glass or ceramic is perfect.
Variations
- Nut Butter Swap: Try almond butter or cashew butter for a different nutty flavor profile.
- Dairy-Free Option: Use dairy-free chocolate chips and coconut oil for a vegan version of these snowballs.
- Gluten-Free Twist: Substitute crushed graham crackers with gluten-free alternatives or use gluten-free cookies for the base.
- Flavor Infusion: Add a dash of cinnamon or a spoonful of espresso powder for a delightful twist to the filling.
- Fruit Add-Ins: Blend in bits of dried fruit like cranberries or raisins for a surprise burst of sweetness.
Serving Suggestions for Chocolate Peanut Butter Snowballs
- Pair with a warm cup of coffee or hot chocolate for a comforting treat.
- Serve alongside fresh fruit such as strawberries or banana slices for a refreshing contrast.
- Present on a beautiful platter sprinkled with crushed peanuts and colorful sprinkles for an eye-catching display.
- Wrap individual snowballs in cute little bags for delightful party favors!
FAQs about Chocolate Peanut Butter Snowballs
Can I make these snowballs ahead of time?
Absolutely! Chocolate Peanut Butter Snowballs can be prepared a few days in advance. Just store them in an airtight container in the refrigerator, and they’ll be ready to enjoy when you need a sweet treat.
Can I freeze the snowballs?
Yes, you can freeze these treats! Simply place them in a single layer on a baking sheet until frozen, then transfer to a freezer-safe container or bag. They can be enjoyed straight from the freezer, making them a handy snack.
What can I use instead of powdered sugar?
If you’re out of powdered sugar, you can blend regular granulated sugar in a blender or food processor until it becomes powdery. Alternatively, you can use a sugar substitute designed for baking, but be sure to check if it provides sweetness and texture equivalent to powdered sugar.
Are there nut-free options for this recipe?
You bet! For a nut-free version, use sunbutter or a similar seed butter. The taste will differ, but it still results in a delicious treat without the nuts!
What if my chocolate coating isn’t smooth?
If your melted chocolate isn’t smooth, it could be due to overheating. Always melt in small intervals and stir well. If it thickens too much, blend in a little coconut or vegetable oil to regain that silky consistency!
Final Thoughts
As you whip up your Chocolate Peanut Butter Snowballs, remember it’s not just about the treats, but the joy of creating something special for yourself and your loved ones. Each bite captures a blend of nostalgia and warmth, turning ordinary moments into sweet memories. The smiles they bring are simply priceless, just like the laughter shared around the table. So, embrace the joy of baking and enjoy the little victories in your busy life. These delightful bites are more than a dessert; they’re a reminder that sweetness is always within reach!
Print
Chocolate Peanut Butter Snowballs
- Prep Time: 30 minutes
- Cook Time: 15 minutes
- Total Time: 45 minutes
- Yield: 24 snowballs 1x
- Category: Dessert
- Method: Refrigeration and Melting
- Cuisine: American
- Diet: Vegetarian
Description
Delightful chocolate-covered peanut butter snowballs filled with creamy goodness, perfect for any indulgent occasion.
Ingredients
- 1 cup creamy peanut butter
- 2 tablespoons unsalted butter, melted
- 1 1/2 to 2 cups powdered sugar, sifted
- 1/4 teaspoon vanilla extract
- Pinch fine salt (optional)
- 1/2 cup finely crushed graham crackers (optional)
- 1/2 cup crushed vanilla wafers (optional)
- 1/4 cup powdered milk (optional)
- 12 ounces semi-sweet or milk chocolate melting wafers or chips
- 1 teaspoon vegetable or coconut oil (optional)
- 1/4 cup soft caramel candies or caramel sauce
- 1 teaspoon heavy cream or milk
- Sea salt flakes (for decoration)
- Crushed peanuts (for decoration)
- Sprinkles (for decoration)
- White chocolate drizzle (for decoration)
Instructions
- In a medium mixing bowl, blend peanut butter, melted butter, vanilla extract, and a pinch of salt until smooth. Gradually incorporate sifted powdered sugar until a thick, pliable dough forms, adjusting powder as needed for a firm, non-sticky texture.
- If desired, mix in crushed graham crackers, vanilla wafers, or powdered milk for added structure and flavor.
- Line a baking sheet with parchment paper. Portion dough using a teaspoon or small scoop, then roll between palms to form smooth balls, approximately 1 inch in diameter. Arrange on prepared tray.
- Place tray in the refrigerator for a minimum of 25 minutes, or freeze for 10 to 15 minutes, to ensure centers are firm before coating.
- In a microwave-safe bowl, melt chocolate in 20 to 30 second intervals, stirring after each, until fully smooth. Blend in oil if a thinner consistency is preferred.
- Remove centers from refrigeration. Using a fork or dipping tool, submerge each ball in melted chocolate, allowing excess to drip off. Place coated balls back on parchment-lined tray.
- Melt caramels with heavy cream or milk in a microwave-safe bowl, heating in 10 to 15 second intervals and stirring until fluid and smooth.
- Pipe or spoon melted caramel in thin lines over the chocolate-coated balls. If using, immediately add sea salt flakes, crushed peanuts, sprinkles, or white chocolate drizzle before coatings set.
- Return tray to the refrigerator for 15 to 20 minutes until chocolate and caramel are fully firm. Transfer finished snowballs to an airtight container for storage.
Notes
- Adjust the amount of powdered sugar for desired dough consistency.
- For a richer flavor, consider using dark chocolate for the coating.
- These snowballs can be stored in the refrigerator for up to a week.
Nutrition
- Serving Size: 1 snowball
- Calories: 150
- Sugar: 12g
- Sodium: 50mg
- Fat: 9g
- Saturated Fat: 3g
- Unsaturated Fat: 4g
- Trans Fat: 0g
- Carbohydrates: 15g
- Fiber: 1g
- Protein: 3g
- Cholesterol: 5mg


