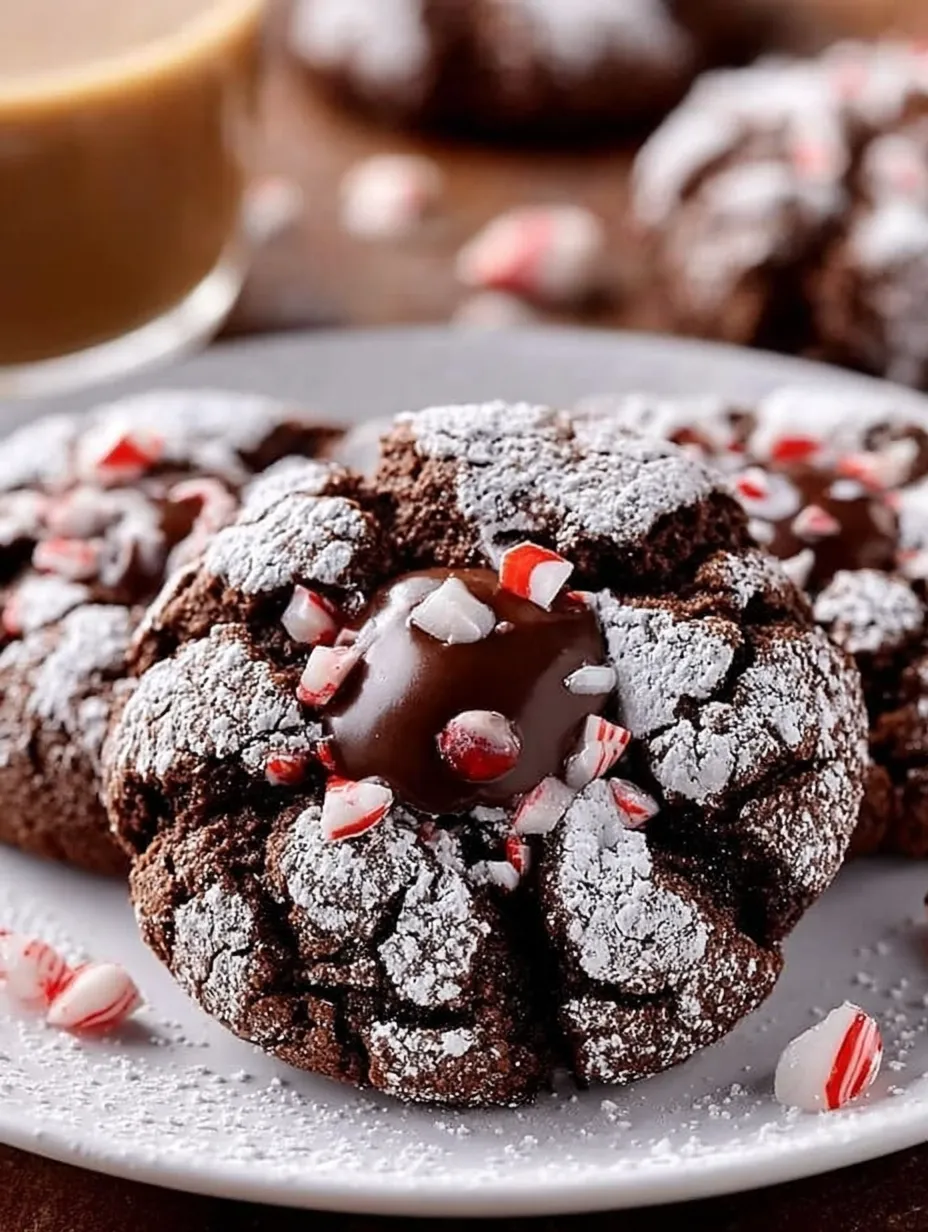
There’s something about baking cookies during the holidays that just feels magical, right? It fills the house with warm, sweet scents. It brings people together. And let’s be honest—it gives us an excuse to eat way more sugar than usual. One of the stars of the season? Chocolate Peppermint Crinkle Blossoms. These beauties combine the deep, fudgy richness of chocolate with cool peppermint, snowy powdered sugar, and the perfect kiss of chocolate right in the center. Think brownie meets crinkle cookie, with a festive peppermint twist. 🎄💖
These aren’t just cookies—they’re holiday joy in edible form.
What Are Chocolate Peppermint Crinkle Blossoms?
Imagine the softest, chewiest, most chocolatey cookie you can think of. Now roll it in sugar until it looks like it just came in from a snowstorm. Add a chocolate kiss on top, and sprinkle crushed candy cane for sparkle and crunch. That’s a Chocolate Peppermint Crinkle Blossom.
They’re a mash-up of a classic chocolate crinkle cookie and a blossom cookie (the ones with a chocolate kiss on top). The peppermint extract and crushed candy canes give it that holiday flair that makes them feel super special—and they look as good as they taste.
This is the cookie that will stand out on your holiday dessert table. People will ask for the recipe. Promise.
Ingredients Breakdown (And Why Each One Matters)
Here’s what you’ll need to make a batch of these festive treats:
- 2 cups all-purpose flour – The base. Gives the cookies structure.
- 2 tsp baking powder – Helps them rise just a touch and gives a soft texture.
- ½ tsp salt – Balances the sweetness and enhances flavor.
- ¼ cup unsalted butter, melted – Fat = flavor and softness.
- 4 oz unsweetened baking chocolate, melted – Deep, rich chocolate base.
- 2 cups granulated sugar – Sweetens and gives that slight crunch.
- 4 eggs, room temperature – Adds moisture and binds the dough.
- 1½ tsp peppermint extract – That holiday zing. You’ll smell it before you even bake.
- ½ cup mini chocolate chips (optional) – Extra gooeyness.
- ¼–½ cup crushed candy canes – Peppermint crunch and sparkle.
- ½ cup granulated sugar (for coating) – First coating helps the powdered sugar stick.
- 1 cup powdered sugar (for second coating) – That iconic snowy look.
- 36 Hershey’s Kisses, unwrapped – The cherry on top (well, chocolate kiss, but you get it).
Want a shortcut? Use peppermint Hershey’s Kisses for an even more festive twist!
Why These Cookies Just Work
It’s the contrast that makes them amazing.
You’ve got fudgy chocolate inside and a slightly crisp, sugary crust on the outside. That crackled powdered sugar top is not just pretty—it’s the sign of a well-made crinkle cookie. The peppermint brings brightness, while the melted chocolate kiss gives it richness.
And let’s not forget—they look like they came straight from a holiday postcard.
Kitchen Tools You’ll Need
You don’t need a ton of fancy tools, just the basics:
- Mixing bowls (one large, one medium)
- Whisk and rubber spatula
- Electric mixer (hand or stand—optional but helpful)
- Cookie scoop or tablespoon
- Parchment paper or silicone baking mats
- Cooling racks
- Two small bowls for rolling sugars
That’s it! And if you’ve got kids or holiday guests around, they can totally help with the rolling and kissing part (cookie kissing, of course 😉).
Step-by-Step Recipe: From Mixing Bowl to Magic
Let’s walk through it so you don’t miss a beat.
1. Prep and Preheat
Preheat your oven to 350°F (175°C). Line two baking sheets with parchment paper. Unwrap all your Hershey’s Kisses now—it’ll save you a mess later.
2. Mix Dry Ingredients
In a medium bowl, whisk:
- 2 cups flour
- 2 tsp baking powder
- ½ tsp salt
Set aside.
3. Make the Chocolate Base
In a large bowl, mix together:
- ¼ cup melted butter
- 4 oz melted unsweetened chocolate
- 2 cups granulated sugar
Stir until glossy and smooth. Add in the 4 eggs, one at a time, mixing well after each. Stir in the peppermint extract.
4. Combine Wet and Dry
Slowly add the dry mix to the chocolate mix. Fold gently—don’t overwork the dough. Add in:
- Optional: ½ cup mini chocolate chips
- 3 tbsp crushed candy cane
The dough will be sticky. That’s good.
5. Chill the Dough
Cover the bowl and refrigerate for at least 1 hour. It firms up the dough so it’s easier to roll and gives the cookies their perfect crinkle.
6. Roll and Sugar-Coat
Scoop out 1-inch balls. Roll each one in granulated sugar, then heavily in powdered sugar. You want them fully coated for that beautiful crackle.
Place them on the baking sheet, 2 inches apart.
7. Bake to Perfection
Bake for 10–12 minutes until the cookies puff and crackle but are still soft in the center. Watch for those signature cracks!
8. Add the Kiss!
As soon as the cookies come out, gently press a Hershey’s Kiss into the center. Sprinkle a pinch of crushed candy cane on top while the cookie is still warm. It’ll melt just enough to help it stick.
9. Let Them Cool
Let the cookies cool completely on the baking sheet. The chocolate will set beautifully, and the cookies will firm up without losing their fudginess.
Secrets to Perfect Crinkles Every Time
Let’s face it: the crinkle look is what sets these cookies apart. But how do you get that perfect snowy, cracked top that looks like it belongs on a holiday card?
Here are a few secrets:
- Chill That Dough: This step is non-negotiable. Chilling the dough for at least an hour allows the fats to solidify. When they hit the oven, the outside bakes and cracks while the inside stays fudgy. Skipping this? Expect flat, sad cookies.
- Double Sugar Roll = Crinkle Magic: First, roll the dough in granulated sugar. This creates a dry layer that keeps the powdered sugar from melting. Then coat it generously in powdered sugar. Like, snowstorm levels of powdered sugar. The more you use, the more beautiful the cracks.
- Don’t Overbake: 10–12 minutes max. The edges should be set, but the centers should still look soft. They’ll continue to cook as they cool.
- Use Room Temp Eggs: This helps the ingredients combine smoothly and adds to the soft texture.
- Use a Cookie Scoop: For evenly sized cookies that bake evenly—and they’ll all look like twins (in the best way).

Let’s Talk About That Kiss on Top 🍫
The Hershey’s Kiss isn’t just decoration—it’s the final flavor bomb. That velvety chocolate center adds a creamy, indulgent bite to balance the sugary crust and peppermint snap.
Here’s how to make it perfect:
- Unwrap them ahead of time – Because once the cookies are hot out of the oven, time is of the essence.
- Press gently – You want the kiss to sink into the cookie without cracking it apart.
- Sprinkle crushed candy canes immediately – The residual heat will soften the chocolate just enough for the peppermint bits to stick and set as it cools.
The result? A glossy, melty, chocolate-kissed centerpiece that looks just like the image you see at the top of this page.
Candy Cane Crumble: Sweet, Crunchy Snowflakes
Don’t sleep on the crushed candy canes. They’re more than a garnish—they bring texture, color, and that fresh peppermint crunch.
Tips for Crushing:
- Toss them in a zip-top bag and gently pound with a rolling pin.
- Avoid turning them into dust—you want small shards, like sparkly red and white glass.
- Store any extra in a jar for topping hot cocoa, brownies, or pancakes.
They melt slightly into the warm kiss and harden back into a crunchy topping. That combo of smooth chocolate and peppermint crunch? Chef’s kiss. 👩🍳💋
Storing and Keeping Them Fresh
The great news? These cookies store beautifully. If you don’t eat them all the first day (good luck), here’s how to keep them tasting fresh:
- Room Temp Storage: Store in an airtight container for up to 5 days. Layer with wax or parchment paper to avoid sticking.
- Freezing Baked Cookies: Cool completely, then freeze in single layers with parchment between. They’ll keep for up to 3 months.
- Freezing Dough: Chill the dough, scoop and roll into balls, freeze on a tray, then transfer to a zip-top freezer bag. When ready to bake, roll in sugars and bake straight from frozen—just add 1-2 minutes to the baking time.
Bonus tip: Add a slice of bread to the cookie container to help keep them soft.
Make-Ahead Tips for Busy Bakers
The holidays can get hectic, right? Here’s how to prep ahead so you’re never without a festive treat when guests drop by:
- Prep dough up to 3 days ahead – Keep it tightly wrapped in the fridge.
- Pre-scoop and freeze dough balls – Makes last-minute baking a breeze.
- Pre-roll in granulated sugar only – Then roll in powdered sugar just before baking for best crinkles.
You can also fully bake a batch, freeze them, and reheat in a low oven (300°F for 5 minutes) just to refresh them before serving. No one will know they weren’t fresh out of the oven.
Print
Chocolate Peppermint Crinkle Blossoms Recipe
- Prep Time: 15 minutes
- Total Time: 1 hour 27 minutes
- Category: Holiday Cookies / Christmas Treats
Description
🍫❄️ Fudgy, crackled, and kissed with cool peppermint—these blossoms feel like a cozy December night wrapped in sweetness. Every bite brings that magical mix of chocolate warmth and snowy sparkle. 🎄💖
Ingredients
2 cups all-purpose flour
2 tsp baking powder
½ tsp salt
¼ cup unsalted butter, melted
4 oz unsweetened baking chocolate, melted
2 cups granulated sugar
4 eggs, lightly beaten, room temperature
1½ tsp peppermint extract
½ cup mini chocolate chips (optional)
¼–½ cup crushed candy canes
½ cup granulated sugar (for first coating)
1 cup powdered sugar (for second coating)
36 Hershey’s Kisses, unwrapped
Instructions
Preheat the oven to 350°F (175°C), line baking sheets, and unwrap all Kisses. 🎄 (⏱️ 5 minutes)
Whisk the flour, baking powder, and salt in a medium bowl. 🥣 (⏱️ 1 minute)
In a large bowl, mix the melted butter, melted chocolate, and granulated sugar until glossy. Add eggs gradually, then stir in peppermint extract. 🍫✨ (⏱️ 4 minutes)
Fold in the dry ingredients, then add chocolate chips and 3 tbsp crushed candy cane. Dough will be sticky. 🎁 (⏱️ 2 minutes)
Cover and chill the dough until firm enough to scoop. ❄️ (⏱️ 1 hour)
Prepare two bowls: one with granulated sugar, one with powdered sugar. Roll 1-inch dough balls first in granulated sugar, then heavily in powdered sugar. ⛄ (⏱️ 6 minutes)
Bake for 10–12 minutes until cracked and soft in the center. 🍥 (⏱️ 12 minutes)
Gently press a Hershey’s Kiss into each warm cookie and sprinkle with extra crushed candy cane. ❤️ (⏱️ 1 minute)
Allow cookies to cool completely on the baking sheet to set the chocolate. ❄️ (⏱️ 15 minutes)
Notes
Nutrition
- Serving Size: 36 blossoms
- Calories: Approx. 160 kcal
Holiday Variations to Try
Feeling creative? This base recipe is flexible. Try these festive spins:
- Use peppermint or candy cane Hershey’s Kisses – Super minty!
- Swap the peppermint extract for vanilla or almond – If peppermint isn’t your jam.
- Add chopped Andes mints instead of mini chocolate chips – Extra mint chocolate goodness.
- Use white chocolate kisses – For a snowier look.
- Add a pinch of espresso powder – To deepen the chocolate flavor.
Want to go full holiday overload? Dip the bottoms in melted chocolate and add festive sprinkles. Extra? Yes. Worth it? Also yes.
You may also like :
Peppermint Dessert Lasagna: The Ultimate No-Bake Holiday Treat!
No-Bake Peppermint Bark Snowballs: A Chilly Holiday Delight
Perfect Pairings: What to Serve With These Cookies
Cookies are good on their own—but they’re even better with something to sip.
Try pairing them with:
- Hot chocolate – Especially with a peppermint stick stirrer!
- Eggnog – Classic holiday combo.
- Peppermint mocha – Triple threat of chocolate, peppermint, and coffee.
- Cold milk – Because some traditions are worth keeping.
Make a holiday dessert board with a few different cookie varieties, candies, and fruits. These crinkle blossoms will be the sparkly star of the show.
Common Mistakes to Avoid
Even the best recipes can go sideways. Don’t fall for these classic cookie traps:
- Not chilling the dough – Leads to flat, greasy cookies.
- Skimping on powdered sugar – No snow, no crinkle.
- Overbaking – The cookies should look soft in the center when pulled from the oven.
- Adding the kiss too late – If the cookies cool too much, the chocolate won’t melt in and might fall off.
- Not unwrapping Kisses in advance – You’ll be scrambling with hot cookies on the tray. Do it first.
Why These Cookies Are a Holiday Favorite
Let’s be real—everyone has a holiday cookie that brings back memories. These Chocolate Peppermint Crinkle Blossoms have all the markers of a new classic:
- Easy enough to make with kids
- Fancy enough to gift
- Festive enough to shine on any cookie platter
- Delicious enough that people always ask for the recipe
They look like winter wonderland dreams and taste like Christmas. What more could you ask for?
Conclusion
Whether you’re baking for a holiday party, gifting to friends, or just treating yourself by the fire with a warm drink, these Chocolate Peppermint Crinkle Blossoms are a must-make this season.
They’re rich, fudgy, pepperminty, and absolutely beautiful. Plus, with that snowy sugar crust and melty chocolate kiss, they hit all the right notes of nostalgia and celebration.
So go ahead—make a double batch. You’ll need it. 🎄🍫❄️
Similar recipes :
No-Bake Christmas Oreo Lasagna
Peppermint Chocolate-Dipped Sandwich Cookies
FAQs
1. Can I use regular chocolate chips instead of mini ones?
Yes! Just be sure to fold them in gently. Minis mix more evenly, but regular chips work just fine.
2. How do I keep the cookies soft for days?
Store in an airtight container with a slice of bread. It keeps them moist and chewy.
3. Can I make these gluten-free?
Absolutely! Use a good 1:1 gluten-free baking flour. Just be aware they may spread a little differently.
4. What if I don’t have peppermint extract?
You can substitute vanilla or almond extract. The flavor will be slightly different but still delicious.
5. Can kids help make these?
Yes, and they’ll love it! Rolling the dough balls and placing the kisses is a perfect job for little hands.