Let’s be honest—when it comes to holiday treats, it’s not just about taste; it’s about vibes. And these Chocolate Pretzel Christmas Trees bring maximum holiday joy with zero stress. They’re no-bake, adorable, and totally festive. You get that perfect blend of sweet and salty, crunchy and smooth, and they look like something straight out of Santa’s kitchen.
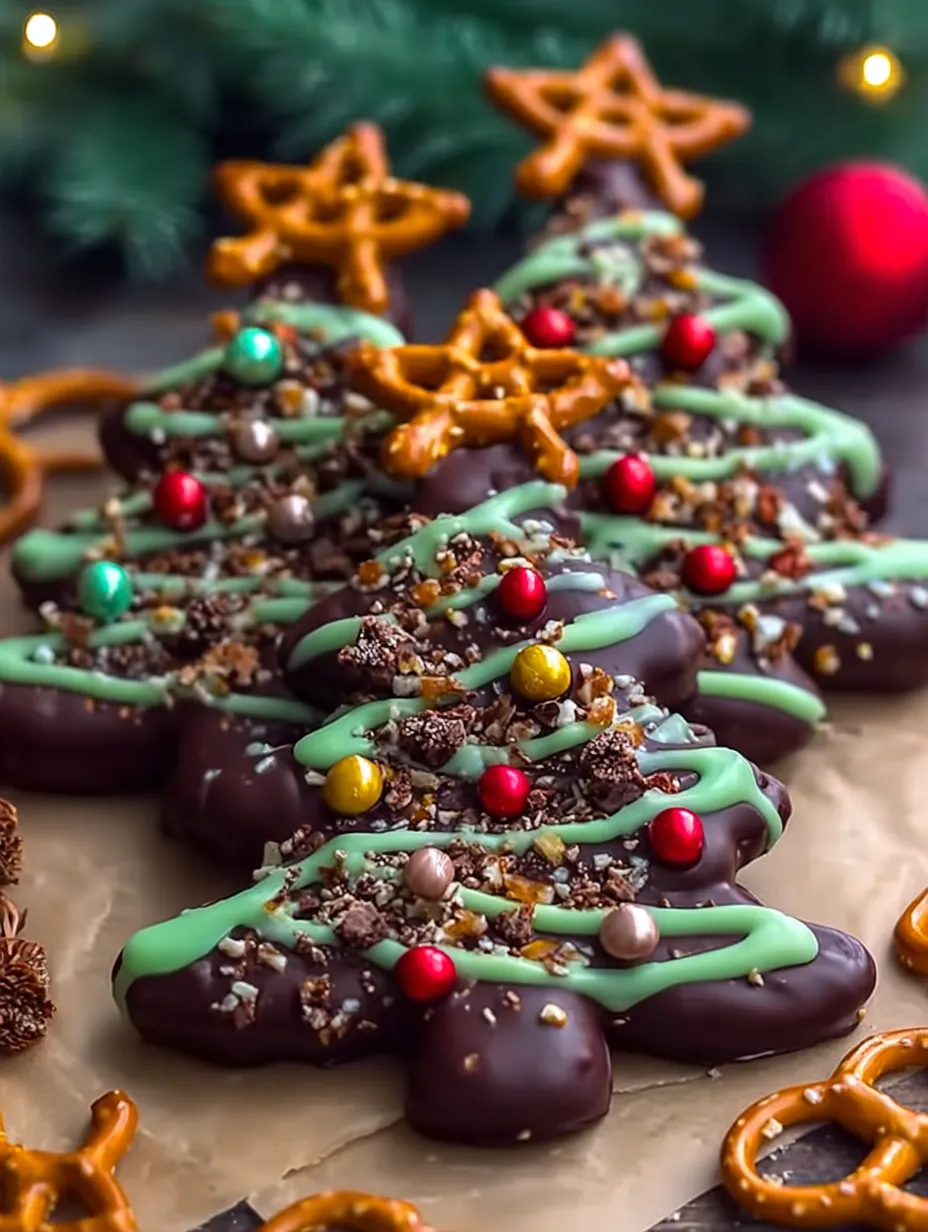
If you’re building a cookie tray, need a quick DIY food gift, or just want to keep the kids occupied on a snow day, this recipe is your new BFF. And best of all? These treats look EXACTLY like the ones you see in the image above—tree-shaped pretzels drizzled with green garland, topped with M&M ornaments and golden sparkle. Perfection.
Why You’ll Love This Recipe
Perfect for Gifting
Wrap these little trees in clear bags with a festive ribbon and boom—instant neighbor gift, teacher appreciation, or sweet stocking stuffer. They hold up great and look so impressive.
Great for Holiday Cookie Trays
Looking to fill out your Christmas cookie platter with something that pops? These chocolate pretzel trees add texture, color, and variety without needing an oven. People will reach for these first.
Kid-Friendly and Fun
No knives, no hot pans, no baking—just melt, drizzle, and decorate. Kids can get creative with the toppings, and you won’t stress about a messy kitchen. It’s win-win!
What You Need to Make These Christmas Tree Pretzels
Let’s break it down. Here’s everything you’ll need to make 12 chocolate pretzel Christmas trees:
Ingredients:
- 48 mini pretzel twists (3–4 per tree depending on the size)
- 12 extra pretzels (for the stars on top)
- 2 cups dark or milk chocolate melting wafers (choose your fave!)
- 1 cup green candy melts (for the garland drizzle)
- ¼ cup mini red & green M&M’s (ornaments)
- 2 tbsp gold or silver nonpareils/sprinkles (sparkly touch!)
Tools & Equipment:
- Parchment paper
- Baking sheet
- Microwave-safe bowls
- Spoon or piping bag
- Optional: squeeze bottle for green drizzle
Let’s Talk Chocolate: Choosing the Right Base
Your base chocolate matters here because it’s what holds the whole tree together. You’ve got two great options:
Dark or Milk Chocolate?
- Milk chocolate is sweeter and a hit with kids.
- Dark chocolate gives that bittersweet contrast and feels a little fancier.
Either works—just pick the one you like best.
Melting Wafers vs Regular Chocolate
- Melting wafers are super easy to use and set up firm and shiny.
- Real chocolate (like chocolate chips) can work but may need a little coconut oil or shortening to smooth it out.
For the best result (and fewer headaches), go with melting wafers.
Green Candy Melts – Bringing the Festive Vibes
This is where your Christmas trees start to look like actual trees. That green drizzle mimics garland or ribbon, adding color and depth.
Want a Brighter Green?
Use neon green candy melts! You can find them online or in craft stores like Michaels or Joann’s. They pop more in photos and bring out that true festive look, like you see in the image.
Can’t Find Green Melts?
- Mix white melts with green food coloring (oil-based only!)
- Use white chocolate with green matcha (natural and tasty)
- Skip the green and go red, white, or gold!
How to Create the Perfect Pretzel Tree Shape
The structure is key to making these look like trees. Here’s how to stack:
- Bottom row: 3 or 4 pretzels across (this is your widest point)
- Middle row: 2 or 3 pretzels
- Top row: 1 or 2 pretzels
Stack each row to taper in like a tree. Leave a little space between rows for the chocolate to drip and fill in.
The Star Topper – A Simple but Sweet Detail
What’s a Christmas tree without a star? For the star, just turn a mini pretzel upright on top of the tree. The triangle shape naturally looks like a starburst, especially once drizzled with green and dusted in gold sprinkles.
Feeling Extra?
You can also:
- Use gold star-shaped sprinkles
- Pipe a yellow chocolate star
- Top with a gumdrop or golden candy
Melting Chocolate Like a Pro
You don’t need any fancy tools here. Just a microwave and a spoon.
Microwave Method:
- Add wafers to a bowl.
- Heat in 30-second bursts.
- Stir between each round until smooth.
Double Boiler Option:
- Heat water in a saucepan.
- Place chocolate in a heatproof bowl over it.
- Stir until melted.
Tip: Don’t get water in your chocolate. It’ll seize and turn clumpy.
Assembling the Chocolate Pretzel Trees Step by Step
Here’s where the magic happens. Make sure your baking sheet is lined with parchment before you begin.
Steps:
- Lay out 3–4 pretzels on the sheet in the tree shape.
- Add one pretzel standing upright at the top (this is your star).
- Spoon chocolate over the stack—make sure it covers the gaps!
- Tap the tray gently to help the chocolate settle.
You want the chocolate to glue everything together while showing off those pretzel curves.
The Drizzle Effect – Creating “Garlands” with Green Candy
Time to decorate! Melt the green candy melts and load them into a small piping bag or use a spoon to drizzle.
Technique Tips:
- Drizzle in a zig-zag motion like real garland.
- Make it random—trees aren’t perfect!
Let the green set just a little before moving to the next step, or jump right into the next part if you want the candies to stick into the drizzle.
Decorating Your Christmas Trees
This is the fun part where the whole treat comes to life!
Add:
- Mini M&M’s (red and green) – these are your ornaments.
- Gold/silver sprinkles – they add sparkle and texture.
Try clustering the M&M’s in 3’s or spacing them out evenly like ornaments. Use tweezers for precision or let the kids go wild.
Letting Them Set – Patience Pays Off
After decorating, it’s tempting to grab one right away—but hold on! The chocolate needs time to firm up so your trees don’t fall apart the moment you pick them up.
Two Options to Set:
- Refrigerate for 10–15 minutes: Quick and easy. The cold helps the chocolate harden fast, especially if you’re in a rush.
- Room temperature for 30–45 minutes: Ideal if you’re making large batches or don’t have fridge space.
Make sure they’re completely solid before handling or packing. You’ll know they’re ready when you can gently peel one off the parchment and it stays in one piece.
Pro Tip: Don’t stack them until they’re fully set or you risk smudging your decorations.

Storing and Shelf Life
These pretzel trees are surprisingly sturdy and store like champs.
Storage Tips:
- Keep in an airtight container
- Layer with parchment paper if stacking
- Store at room temp (cool area) for up to 2 weeks
Avoid humid or hot environments—chocolate can “bloom” (get white spots) if exposed to heat or moisture. But even if it does, they’re still safe to eat!
You can also refrigerate them, but that might cause condensation when you bring them out. If you do chill, let them come to room temp before opening the container.
You may like as well :
🍫🥨 Chocolate Pretzel Crunch Clusters: The Ultimate Sweet & Salty Snack!
Pretzel Toffee Chocolate Bark Recipe: A Sweet and Salty Holiday Favorite
Fun Variations to Try
Want to make these your own? Here are some fun, creative twists:
1. White Chocolate Wonderland
Use white chocolate for a snowy tree look. Pair with blue and silver decorations for a winter wonderland theme.
2. Peppermint Forest
Add crushed candy canes to the top of the chocolate before it sets. The crunch + cool mint makes it extra festive.
3. Caramel Drizzle Magic
Drizzle some melted caramel over the trees for a sticky-sweet layer. Works especially well with dark chocolate.
4. Peanut Butter Pretzel Trees
Mix a little peanut butter into your melted chocolate or drizzle on top. Classic combo that everyone loves.
5. Nutty Decorations
Sprinkle crushed almonds, walnuts, or pecans for a rustic holiday feel.
The possibilities are endless—and that’s what makes this recipe so fun.
Pro Tips for Pretzel Tree Perfection
Want to nail these like a pro on your first try? Here are some bonus tips:
Work in Small Batches
Don’t melt all your chocolate at once unless you’re super fast. Chocolate hardens as it sits, so it’s better to melt in portions.
Use Squeeze Bottles or Piping Bags
For cleaner, more controlled drizzles, transfer your melted green candy to a bottle or small bag. Snip the end and zig-zag away!
Don’t Over-Decorate
Too many M&M’s or heavy sprinkles can make your tree top-heavy. Stick to 4–6 M&M’s per tree and a light dusting of sprinkles.
Use Tweezers or Toothpicks
Precision tools help when placing tiny decorations. Especially great for perfectionists or kids with small fingers.
Print
Chocolate Pretzel Christmas Trees
- Prep Time: 10 minutes
- Total Time: 20 minutes
- Category: No-Bake Christmas Treats / Holiday Desserts / Kid-Friendly Snacks
Description
🎄✨ The cutest salty-sweet Christmas treat ever! These chocolate-covered pretzel trees look like they came straight from Santa’s workshop — crunchy, festive, and perfect for gifting, cookie trays, or fun holiday activities with kids. 🍫💚❤️
Ingredients
48 mini pretzel twists (3–4 per tree)
12 extra pretzel twists (for stars)
2 cups dark or milk chocolate melting wafers
1 cup green candy melts
¼ cup mini red & green M&M’s
2 tbsp gold or silver nonpareils/sprinkles
Instructions
Prep the base
Line a baking sheet with parchment paper.
⏱️ 1 minuteMelt the chocolate
Place chocolate wafers in a microwave-safe bowl and heat in 30-second intervals, stirring until smooth and fully melted.
⏱️ 2 minutesAssemble the pretzel trees
Arrange 3–4 pretzel twists in rows (largest at the bottom, smallest at the top) to form a tree shape.
Add one pretzel twist at the very top as the star. ⭐
⏱️ 2 minutesCoat with chocolate
Spoon or drizzle the melted chocolate generously over each tree, making sure the gaps fill in so the tree stays together.
Tap the tray lightly to smooth the chocolate.
⏱️ 3 minutesAdd the green drizzle
Melt the green candy melts and create zig-zag drizzles over each tree to resemble garlands. 💚
⏱️ 2 minutesDecorate
While the chocolate is still wet, sprinkle on:
✔ mini red & green M&M’s (ornaments)
✔ gold/silver sprinkles (sparkle) ✨
⏱️ 2 minutesLet them set
Chill the tray in the refrigerator until firm, or let them set at room temperature.
⏱️ 10 minutes
Notes
These are perfect for cookie trays, classroom treats, party platters, or gifting.
No baking needed — great for making with kids or in big batches.
Use any type of chocolate you like: milk, dark, or white.
Green candy melts create the cutest “garland” effect, but you can also use colored icing.
Store in an airtight container for up to 2 weeks; avoid heat to prevent melting.
For extra sparkle, add edible glitter or metallic star sprinkles.
Nutrition
- Serving Size: 12 trees
- Calories: ~140 kcal
Make-Ahead and Gifting Ideas
Chocolate Pretzel Trees are the perfect make-ahead holiday treat.
Make-Ahead Tips:
- Make them 1–2 weeks before Christmas
- Store in cool, dry place
- Decorate closer to gifting if you’re using delicate toppings
Gifting Tips:
- Wrap individually in clear cellophane bags
- Tie with red & green ribbon
- Add a festive gift tag with a handwritten message
They also make fantastic additions to:
- Holiday charcuterie boards
- Cookie exchanges
- Christmas classroom parties
- Neighbor gifts
Everyone loves getting something cute and delicious!
Troubleshooting: What to Do If…
My Chocolate Won’t Melt Smoothly
- Use melting wafers or add a teaspoon of coconut oil
- Don’t overheat; 30-second intervals are key
The Pretzels Keep Sliding
- Let the chocolate sit for 20 seconds before stacking the next row
- Use less chocolate per layer to keep things tidy
The Drizzle Looks Messy
- Use a piping bag or bottle
- Practice on a piece of parchment first
The Trees Won’t Hold Together
- Make sure your chocolate is warm and fluid
- Fully cover the pretzels to bond them together
Chocolate Bloomed (White Spots)
- Still edible! Just a sign of temperature change. Store better next time.
Wrapping It Up – A Holiday Tradition You’ll Crave Every Year
There’s something incredibly joyful about making these Chocolate Pretzel Christmas Trees. They’re festive, easy, and a guaranteed hit with every age group. Whether you’re decking out your cookie tray, surprising a neighbor with a sweet treat, or having a snowy afternoon craft session with the kids, these trees deliver big holiday magic in every bite.
They’re salty, sweet, crunchy, melty, colorful, and downright adorable. And the best part? You don’t even have to turn on your oven. 🎄
So melt that chocolate, grab those pretzels, and start building your edible forest. Santa would definitely approve.
Similar recipes :
Chocolate-Covered Pretzel Caramel Bites with Sea Salt
Church Lady Butter Toffee Pretzels
FAQs
1. Can I use regular chocolate chips instead of melting wafers?
Yes, but you’ll want to add a small amount of coconut oil or shortening to help the chocolate melt smoothly and set properly.
2. How do I keep the chocolate from seizing while melting?
Avoid letting water get into your chocolate bowl. Also, don’t overheat—always stir between intervals and stop once it’s smooth.
3. Are these gluten-free?
Standard pretzels usually contain gluten, but you can easily make these gluten-free by using GF-certified mini pretzels.
4. Can I freeze these pretzel trees?
Yes, but it’s best to freeze them in a single layer inside a sealed container. Defrost at room temp without opening the container to avoid condensation.
5. How do I make these with kids?
Let them drizzle the green candy melts and add decorations! You can prep the chocolate coating part in advance to make it easier (and less messy).


