
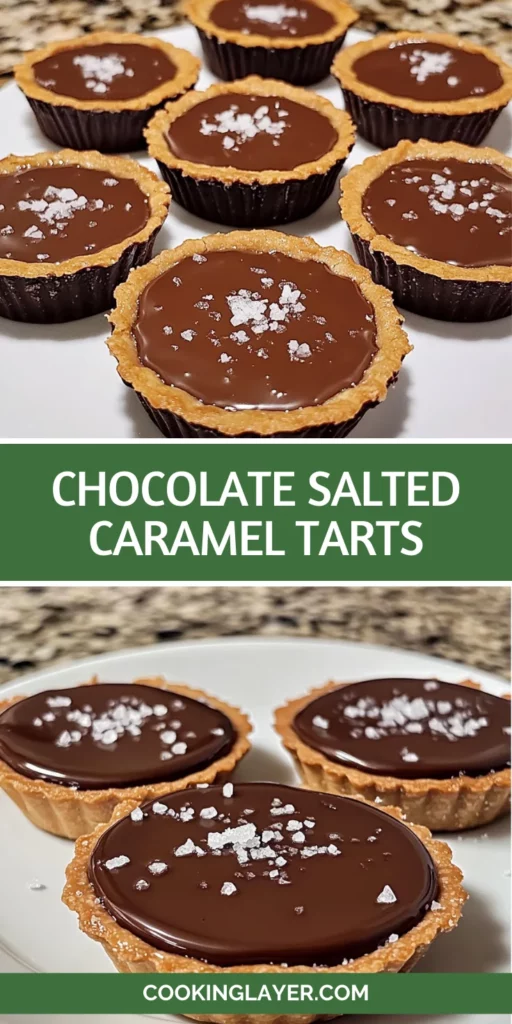
Introduction to Chocolate Salted Caramel Tarts
Welcome to the world of indulgence with my Chocolate Salted Caramel Tarts! If you’re like me, juggling a busy life while trying to whip up something special can feel overwhelming. But fear not! These tarts are the perfect solution for a quick yet impressive dessert. Imagine buttery crusts filled with luscious salted caramel and silky chocolate ganache, all topped with a sprinkle of flaky sea salt. It’s a delightful treat that will make your loved ones swoon. Trust me, you’ll want to keep this recipe close at hand for those moments when you need a little sweetness in your life!
Why You’ll Love This Chocolate Salted Caramel Tarts
These Chocolate Salted Caramel Tarts are a dream come true for busy moms and professionals alike. They’re quick to prepare, taking just under three hours from start to finish, including chilling time. The combination of rich chocolate and sweet, salty caramel creates a flavor explosion that’s simply irresistible. Plus, they’re perfect for impressing guests or treating yourself after a long day. Who wouldn’t love a little slice of heaven?
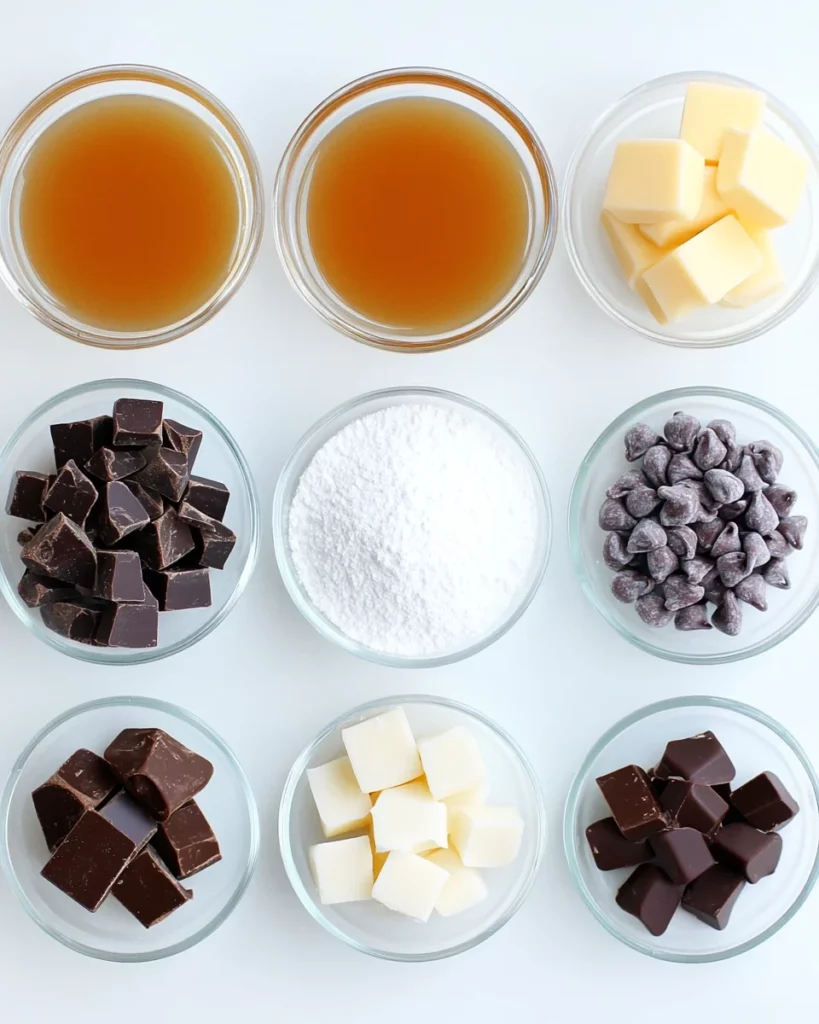
Ingredients for Chocolate Salted Caramel Tarts
Let’s gather the magic ingredients for these Chocolate Salted Caramel Tarts! Each component plays a vital role in creating that perfect balance of flavors and textures. Here’s what you’ll need:
- All-purpose flour: This is the backbone of your tart crust, providing structure and a tender bite.
- Powdered sugar: It sweetens the crust and gives it a delicate texture, making it melt in your mouth.
- Unsalted butter: Cold and cubed, it’s essential for a flaky crust. You can substitute with vegan butter for a dairy-free option.
- Egg yolk: This adds richness and helps bind the crust together. If you’re avoiding eggs, a flaxseed egg can work as a substitute.
- Ice water: Just a splash helps bring the dough together without warming the butter.
- Granulated sugar: The star of the salted caramel, it transforms into a beautiful amber syrup when melted.
- Heavy cream: This adds creaminess to the caramel and ganache. You can use coconut cream for a dairy-free version.
- Unsalted butter (for caramel): It enriches the caramel, making it smooth and luscious.
- Sea salt: A pinch enhances the flavor of the caramel, creating that delightful sweet-salty contrast.
- Vanilla extract: This adds a warm, aromatic note to the caramel, elevating its flavor.
- Chocolate chips: Semi-sweet or dark, they create the silky ganache that tops the tarts. Choose your favorite for a personal touch.
- Flaky sea salt: For garnish, it adds a finishing touch that makes each bite pop with flavor.
For exact measurements, check the bottom of the article where you can find everything listed for easy printing. Now, let’s get ready to create some deliciousness!

How to Make Chocolate Salted Caramel Tarts
Step 1: Make the Tart Shells
Let’s kick things off by making the tart shells! In a mixing bowl, combine the all-purpose flour and powdered sugar. This sweet duo is the foundation of your crust. Next, add the cold, cubed unsalted butter. Using a pastry cutter or your fingers, work the butter into the flour mixture until it resembles coarse crumbs. It should feel like sand between your fingers. Now, add the egg yolk and a tablespoon of ice water. Mix gently until a dough forms. Don’t overwork it! Once it’s ready, press the dough into your tart pans, making sure to cover the bottom and sides evenly. Cover with plastic wrap and pop them in the fridge for about 30 minutes. This chilling time is crucial for a flaky crust!
Step 2: Bake the Crusts
Now that your tart shells are chilled, it’s time to bake! Preheat your oven to 350°F (175°C). Remove the tart pans from the fridge and place them on a baking sheet for easy handling. Bake the crusts for 15 to 20 minutes, or until they turn a lovely golden brown. Keep an eye on them; you want them just right! When they’re done, take them out and let them cool completely. This cooling step is essential before adding the delicious fillings.
Step 3: Prepare the Salted Caramel
Let’s dive into the magic of salted caramel! In a medium saucepan over medium heat, add the granulated sugar. Stir it occasionally as it melts. Watch closely as it transforms into a rich amber color. This is where the magic happens! Once it’s melted, carefully whisk in the heavy cream. Be cautious; it will bubble up! After that, add the unsalted butter, stirring until it’s smooth and glossy. Remove the pan from the heat and mix in the vanilla extract and sea salt. This combination creates that irresistible sweet-salty flavor. Let the caramel cool slightly before using it in your tarts. Trust me, the aroma alone will have you swooning!
Step 4: Make the Chocolate Ganache
Now, let’s create the silky chocolate ganache! In a small saucepan, heat the heavy cream over medium heat until it just begins to simmer. Remove it from the heat and pour it over the chocolate chips in a heatproof bowl. Let it sit for about 2 minutes. This waiting time allows the chocolate to soften beautifully. After that, stir the mixture until it’s smooth and glossy. If it feels a bit thick, you can add a splash more cream to reach your desired consistency. This ganache is the crowning glory of your tarts!
Step 5: Assemble the Tarts
It’s time to bring everything together! Start by spooning the cooled salted caramel into each tart shell, filling them halfway. This layer is where the magic begins! Chill the tarts in the fridge for about 20 to 30 minutes, allowing the caramel to set. Once it’s firm, pour the luscious chocolate ganache over the caramel layer, filling the tarts to the top. Don’t forget to sprinkle a little flaky sea salt on top for that perfect finishing touch! Now, refrigerate the tarts for at least 2 hours before serving. This chilling time helps everything set beautifully, making each bite a heavenly experience!
Tips for Success
- Use cold butter for a flaky crust; it makes all the difference!
- Don’t rush the caramel; patience is key for that perfect amber color.
- Chill the tarts adequately to ensure the layers set beautifully.
- For a fun twist, try adding a splash of espresso to the ganache.
- Keep an eye on the baking time; every oven is a little different!
Equipment Needed
- Tart pans: You can use individual tartlet pans or a larger tart pan.
- Mixing bowls: A medium bowl for the crust and a small one for the ganache.
- Whisk: A simple whisk works wonders for mixing the caramel and ganache.
- Pastry cutter: If you don’t have one, your fingers will do just fine!
- Spatula: A silicone spatula is great for scraping every last bit of goodness.
Variations
- Nutty Delight: Add crushed nuts like pecans or hazelnuts to the caramel layer for a delightful crunch.
- Fruit Fusion: Top the tarts with fresh berries or sliced bananas for a fruity twist that complements the chocolate and caramel.
- Spicy Kick: Incorporate a pinch of cayenne pepper or chili powder into the ganache for a surprising heat that balances the sweetness.
- Vegan Version: Substitute the butter with coconut oil and use dairy-free chocolate chips and coconut cream for a delicious vegan treat.
- Gluten-Free Option: Use a gluten-free flour blend in place of all-purpose flour for a gluten-free crust that everyone can enjoy.
Serving Suggestions
- Pair these tarts with a dollop of whipped cream for added creaminess.
- Serve alongside a scoop of vanilla ice cream for a delightful contrast.
- Drizzle with extra salted caramel sauce for an indulgent touch.
- Accompany with a rich cup of coffee or a glass of dessert wine.
- Garnish with fresh berries for a pop of color and freshness.
FAQs about Chocolate Salted Caramel Tarts
Can I make the tart shells ahead of time?
Absolutely! You can prepare the tart shells a day in advance. Just store them in an airtight container at room temperature. This way, you can save time when you’re ready to assemble your Chocolate Salted Caramel Tarts.
What can I substitute for heavy cream in the ganache?
If you’re looking for a lighter option, you can use half-and-half or even coconut cream for a dairy-free alternative. Just keep in mind that the texture may vary slightly, but it will still be delicious!
How do I store leftover tarts?
Store any leftover Chocolate Salted Caramel Tarts in the refrigerator, covered with plastic wrap or in an airtight container. They should stay fresh for up to three days, but trust me, they won’t last that long!
Can I freeze these tarts?
Yes, you can freeze the tarts! Just make sure they are well-wrapped in plastic wrap and then placed in a freezer-safe container. They can be frozen for up to a month. Thaw them in the fridge before serving for the best texture.
What’s the best way to serve these tarts?
For a stunning presentation, serve your Chocolate Salted Caramel Tarts with a dollop of whipped cream and a sprinkle of flaky sea salt. You can also add fresh berries for a pop of color and flavor!
Final Thoughts
Creating these Chocolate Salted Caramel Tarts is more than just baking; it’s an experience filled with joy and indulgence. Each layer tells a story, from the buttery crust to the rich caramel and silky ganache. I love how this recipe brings people together, whether it’s a family gathering or a quiet evening treat. The smiles on my loved ones’ faces as they take that first bite are priceless. So, roll up your sleeves and dive into this delightful adventure. You’ll find that a little sweetness can brighten even the busiest of days!
Print
Chocolate Salted Caramel Tarts: Indulge in Pure Bliss!
- Prep Time: 30 minutes
- Cook Time: 20 minutes
- Total Time: 2 hours 50 minutes
- Yield: 6 tarts 1x
- Category: Dessert
- Method: Baking
- Cuisine: American
- Diet: Vegetarian
Description
Indulge in these rich and decadent Chocolate Salted Caramel Tarts, featuring a buttery crust, luscious salted caramel, and silky chocolate ganache.
Ingredients
- 1¼ cups all-purpose flour
- ¼ cup powdered sugar
- ½ cup unsalted butter, cold and cubed
- 1 egg yolk
- 1 tablespoon ice water
- 1 cup granulated sugar
- ½ cup heavy cream (for caramel)
- 2 tablespoons unsalted butter (for caramel)
- ½ teaspoon sea salt (for caramel)
- 1 teaspoon vanilla extract (for caramel)
- ½ cup heavy cream (for ganache)
- 1 cup semi-sweet or dark chocolate chips
- Flaky sea salt for garnish
Instructions
- Make the tart shells: Mix flour and powdered sugar in a bowl. Add cold butter and cut it into the dry ingredients until the mixture resembles coarse crumbs. Add the egg yolk and ice water, mixing until a dough forms. Press the dough into your tart pans and refrigerate for 30 minutes.
- Preheat your oven to 350°F (175°C) and bake the crusts for 15 to 20 minutes, or until golden brown. Let them cool completely.
- Prepare the salted caramel: In a saucepan over medium heat, melt the sugar while stirring occasionally until it turns a rich amber color. Carefully whisk in the heavy cream—be cautious of bubbling. Add the butter and stir until smooth. Remove from heat and mix in the vanilla extract and sea salt. Set aside to cool slightly.
- Make the chocolate ganache: Heat the cream in a saucepan until it just begins to simmer. Pour it over the chocolate chips in a heatproof bowl. Let it sit for 2 minutes, then stir until the ganache is silky and smooth.
- Assemble the tarts: Spoon the cooled caramel into each tart shell, filling them halfway. Chill the tarts for 20 to 30 minutes until the caramel sets. Then, pour the chocolate ganache on top of the caramel layer. Finish with a sprinkle of flaky sea salt. Refrigerate for at least 2 hours before serving to let everything set beautifully.
Notes
- Ensure the butter is cold for a flaky crust.
- Be cautious when adding cream to the caramel as it can bubble up.
- Let the tarts chill adequately for the best texture.
Nutrition
- Serving Size: 1 tart
- Calories: 350
- Sugar: 25g
- Sodium: 150mg
- Fat: 20g
- Saturated Fat: 10g
- Unsaturated Fat: 8g
- Trans Fat: 0g
- Carbohydrates: 35g
- Fiber: 2g
- Protein: 3g
- Cholesterol: 50mg


