There’s something almost whimsical about holiday desserts. You want them to be pretty, delicious, and just the right amount of festive. That’s exactly what you get with these Christmas Cherry Balls — a no-bake, bite-sized treat that tastes like a cherry almond dream and looks like it came straight out of Santa’s workshop.
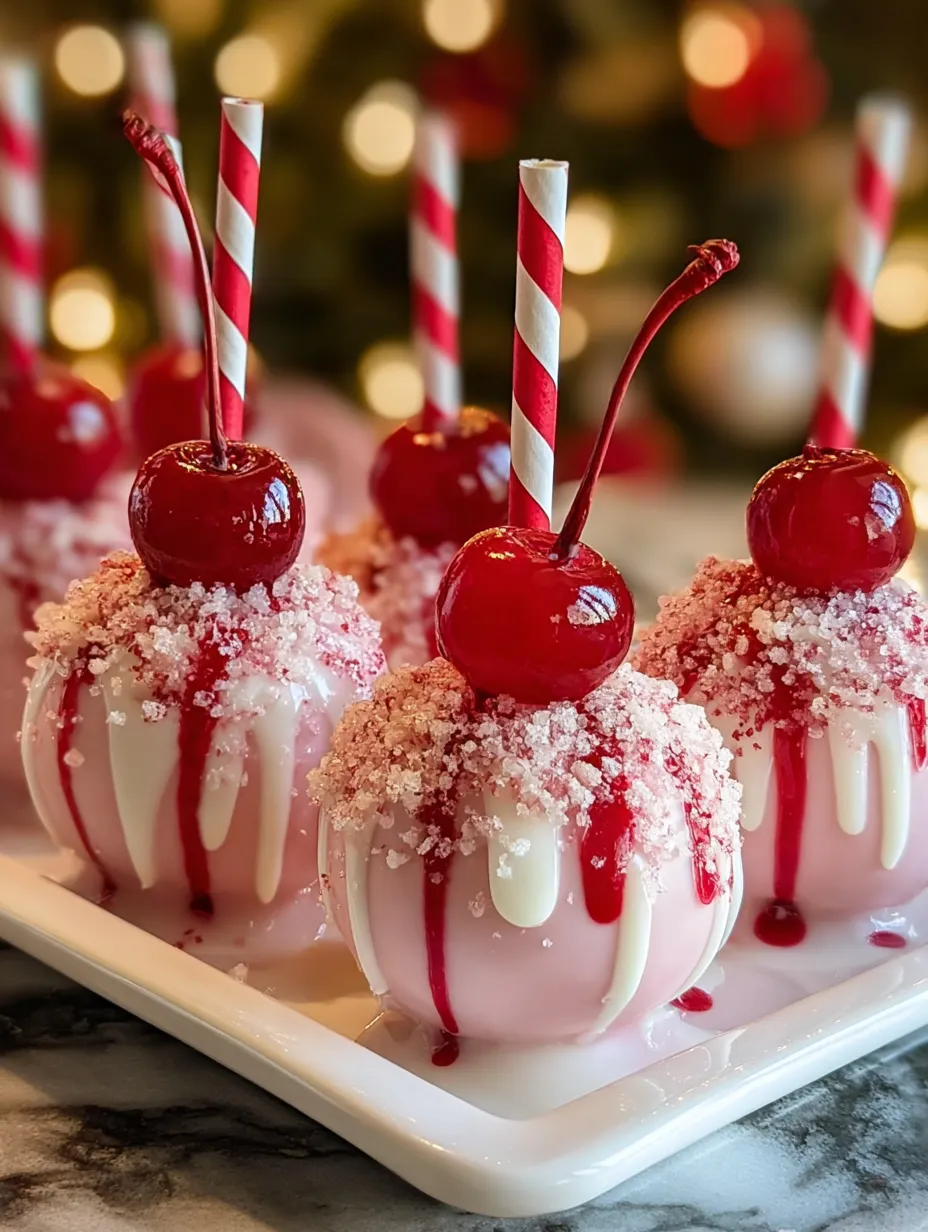
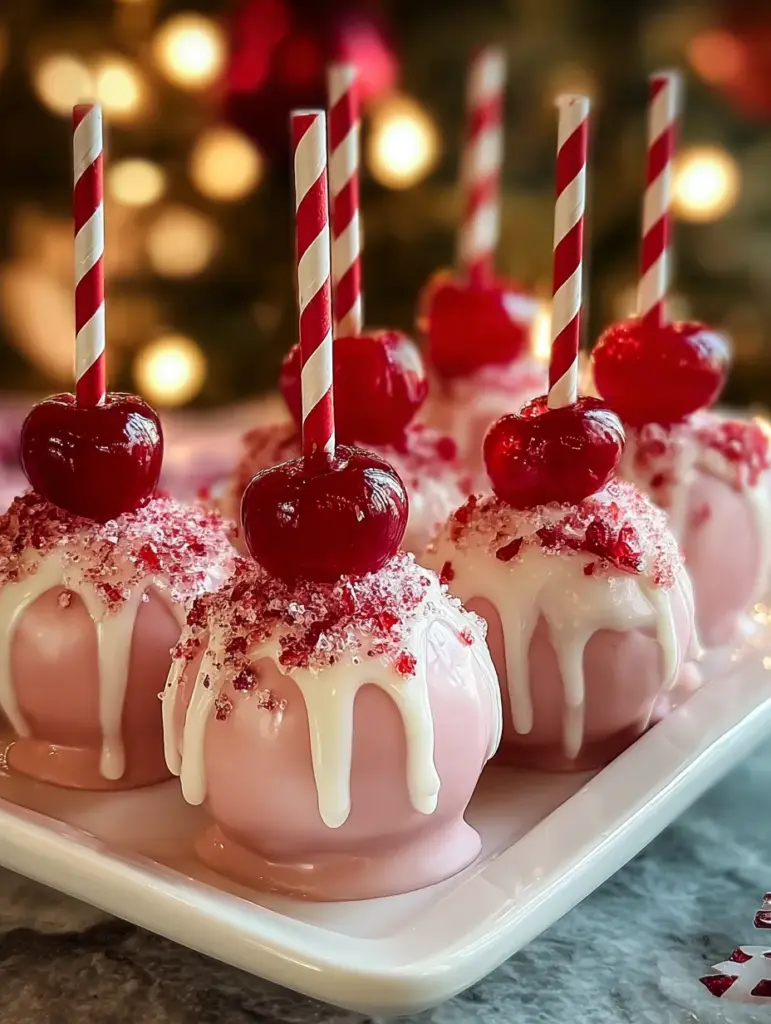
Imagine biting into a soft, sweet cherry center wrapped in crushed vanilla wafers and sugar, topped with a dreamy white chocolate drip, a sprinkle of frosted cherry sugar, and finally crowned with a glossy maraschino cherry and a candy-striped straw. Sound magical? It is.
Let’s walk through how to make these show-stopping Christmas Cherry Balls that not only taste amazing but will absolutely steal the show on your holiday dessert table.
What Are Christmas Cherry Balls?
Christmas Cherry Balls are a holiday dessert that brings together flavor, texture, and presentation in one gorgeous little bite. Think of them as the glamorous cousin of traditional no-bake cookie balls — they’re soft, chewy, and sweet, but with an extra layer of charm.
Each ball is made from a base of sweetened condensed milk, powdered sugar, and vanilla wafers, giving it that rich, soft interior. Chopped maraschino cherries add little pops of fruity flavor and color throughout, while a splash of cherry juice and almond extract brings it all together. They’re then dipped in white chocolate (just on top), dusted with sparkling cherry sugar, and topped with a whole cherry and festive straw — perfect for the holidays.
They’re colorful. They’re joyful. And yes, they taste as good as they look.
Why You’ll Love This Recipe
Let’s be honest — the holiday season can get hectic, and sometimes you need a recipe that looks like it took all day but didn’t. This one checks all the boxes:
- No baking required – no need to turn on the oven!
- Kid-friendly – perfect to make with your little elves.
- Make ahead and refrigerate – even better the next day.
- Absolutely adorable – they’re a decoration and a dessert.
- Great for gifting – wrap them up in treat boxes for friends or neighbors.
Whether you’re throwing a holiday party or just want something festive to nibble on while watching Christmas movies, these cherry balls will bring the cheer.
Ingredients You’ll Need
Here’s what goes into each component of the Christmas Cherry Balls:
Cherry Ball Base
- 1 (14-ounce) can sweetened condensed milk
- 3 cups powdered sugar
- 1 cup finely crushed vanilla wafer crumbs
- ½ cup finely chopped maraschino cherries (drained + patted dry)
- 3 tablespoons maraschino cherry juice
- 1 teaspoon almond extract
- Pink gel food coloring (optional but highly recommended for the pop!)
White Drip Coating
- 1½ cups white chocolate chips or white melting wafers
- 2 teaspoons vegetable oil (helps with smooth melting)
Cherry Sugar Topping
- ½ cup granulated sugar
- ¼ cup finely chopped maraschino cherries (well drained + patted dry)
Decoration
- Whole maraschino cherries (patted dry!)
- Mini red & white striped straws or festive sticks (cut in half)
Pro Tip: Drain and pat dry all your cherries very well. Extra moisture will mess with your dough and prevent the sugar from crisping.
The Magic Behind the Layers
Let’s break down what makes each layer of this dessert so special:
- Cherry Ball Base – Sweet, chewy, with real cherry flavor and a subtle almond back note. The crushed vanilla wafers give a cookie dough vibe but hold together beautifully.
- White Chocolate Drip – Just the right amount of sweetness and drama, cascading down like fresh snow.
- Cherry Sugar Topping – A sparkling, crunchy contrast with a candy-like texture.
- Whole Cherry & Straw – The finishing touch. You get that retro soda-shop look, and the straw makes them easy to pick up.
It’s not just about flavor; it’s about texture, presentation, and total holiday magic.
Let’s Talk Cherries
Maraschino cherries are the MVP here. They’re sweet, bright, and candy-like — ideal for holiday treats. But here’s the secret: dry them thoroughly. Lay them on paper towels, and press gently until they’re no longer wet. Any moisture can ruin your dough texture or cause your sugar topping to get sticky instead of crisp.
Also, don’t skip the cherry juice. It adds color and flavor that can’t be replicated with extract alone.
Vanilla Wafer Crumbs: The Secret Hero
You might be wondering: why vanilla wafers?
Because they’re the ultimate binding agent here. They help thicken the mixture without baking and add a mellow, buttery vanilla flavor that doesn’t overpower the cherries. Don’t substitute with graham crackers or other cookies — vanilla wafers are just perfect for this festive treat.
Crush them very finely (a food processor works great), or throw them in a ziplock and smash with a rolling pin. We want fine crumbs, not chunky bits.
Step-by-Step Instructions
Let’s break it down so you can follow along easily.
Step 1: Making the Cherry Sugar Topping
Start with this step, because it needs time to dry. Mix granulated sugar and finely chopped, dried maraschino cherries until the sugar looks evenly pink and everything’s coated.
Spread it on a plate and let it air-dry for 30–45 minutes, stirring occasionally. You’re aiming for a frosted, sandy texture. It will feel a bit crunchy — that’s perfect. If it’s still sticky, it needs to dry longer.
Step 2: Creating the Cherry Ball Dough
In a large bowl, mix:
- Sweetened condensed milk
- Powdered sugar
- Crushed vanilla wafers
- Chopped maraschino cherries
- Cherry juice
- Almond extract
The mix should be soft but workable. If it feels too sticky, add more powdered sugar, a tablespoon at a time. Add a drop or two of pink gel food coloring for that rich, candy-pink look like in the photo.
Mix well until everything is fully incorporated. It’ll look and smell amazing.
Step 3: Shaping the Balls
Scoop out portions and roll into firm, smooth balls about the size of a golf ball.
Line a tray with parchment and place each ball on it. Once they’re all rolled, pop them in the freezer for 20–25 minutes to firm up before dipping.
This makes coating them much easier and keeps their shape.
Step 4: The White Chocolate Drip
Here’s where the magic really happens — the snowy white “icing” that drips beautifully down each pink cherry ball. It looks like frosting, but it’s really just smooth, glossy melted white chocolate.
How to Do It Right:
- In a microwave-safe bowl, add the white chocolate chips (or melting wafers) and vegetable oil.
- Microwave in 20–30 second bursts, stirring well between each, until melted and smooth.
- Be careful not to overheat or it will seize. Stirring is your best friend here.
- Let the chocolate cool slightly — it should still be fluid but not piping hot.
Once ready, dip only the tops of the chilled cherry balls into the white chocolate. Gently tilt the ball side to side to let it drip naturally for that frosty “melted icing” effect like in the photo.
Do not cover the entire ball — we want that vibrant pink base to shine underneath.
Step 5: Dipping and Decorating
While the white chocolate is still wet (and before it sets), sprinkle your cherry sugar topping all around the top. This gives it that frosted, glistening look you see in the picture.
Timing matters: If you wait too long, the coating will harden and the sugar won’t stick.
Be generous with the sugar topping — it adds crunch, color, and that snowy effect.
Step 6: Final Assembly
Now for the crown jewel — literally.
- Press one whole maraschino cherry into the center top of each ball, right over the white chocolate and sugar.
- Then, insert a mini striped straw or decorative stick just behind the cherry. Make sure it goes in deep enough to hold, but not through the bottom.
This is what transforms your treat into something truly magical — like a tiny holiday sundae or ornament you can eat!
Tip: Gently twist the straw as you insert to avoid cracking the coating.
Step 7: Setting & Serving
Let the cherry balls sit at room temperature for 20–30 minutes or refrigerate them for 10–15 minutes until the chocolate is fully set.
Once firm, they’re ready to serve!
Serving Suggestions:
- Place them on a white platter with greenery or faux snow for a festive look.
- Add edible glitter or gold dust for extra glam.
- Use cupcake liners for easy serving at parties.
Keep them stored in the refrigerator until ready to enjoy. These hold up beautifully for several days, making them perfect for advance prep.
Variations & Customizations
Want to make these your own? Here are a few fun ways to remix this recipe:
- Add a bit of coconut to the dough for a tropical twist.
- Swap almond extract for vanilla or cherry extract.
- Use milk or dark chocolate instead of white for a different look.
- Dip the whole ball for a “truffle” style version.
- Sprinkle with crushed peppermint or edible glitter instead of cherry sugar for a wintry twist.
Let your creativity shine!
Make It Ahead
These cherry balls are ideal for make-ahead treats.
- Store in an airtight container in the fridge for up to 5 days.
- Want to freeze them? Yes, you can — just freeze without the cherry/straw topping, then decorate after thawing.
They actually taste even better after a day or two in the fridge, as the flavors meld and the texture settles in perfectly.
Print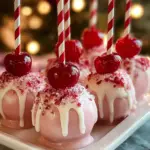
Christmas Cherry Balls
- Prep Time: 20 minutes
- Total Time: 1 hour 15 minutes
- Category: Christmas • No-Bake Desserts • Holiday Treats • Party Sweets
Description
🍒✨ Festive, sweet, and oh-so-cute! These Christmas Cherry Balls are bursting with cherry flavor, coated with a snowy white drip, and topped with the perfect holiday cherry. A merry little treat everyone will love! 🎄😍
Ingredients
Cherry Ball Base:
1 (14-ounce) can sweetened condensed milk
3 cups powdered sugar
1 cup finely crushed vanilla wafer crumbs
½ cup finely chopped maraschino cherries (well-drained & patted dry)
3 tbsp maraschino cherry juice
1 tsp almond extract
Pink gel food coloring (optional)
White Drip Coating:
1 ½ cups white chocolate chips or white melting wafers
2 tsp vegetable oil
Cherry Sugar Topping:
½ cup granulated sugar
¼ cup finely chopped maraschino cherries (patted dry very well)
Decoration:
Whole maraschino cherries
Mini striped straws or decorative sticks, cut in half
Instructions
Make the cherry sugar topping by mixing granulated sugar and finely chopped cherries. Spread on a plate to air-dry for 30–45 minutes, stirring occasionally, until sandy and crisp. 🍒✨
⏱️ Duration: 30–45 minutesIn a large bowl, combine sweetened condensed milk, powdered sugar, vanilla wafer crumbs, chopped cherries, cherry juice, and almond extract to form a thick dough. Add extra powdered sugar if too soft. Tint with pink gel if desired. 💗
⏱️ Duration: 8 minutesRoll the mixture into smooth golf-ball-sized balls and place on a parchment-lined tray. Freeze for 20–25 minutes to firm up. ❄️
⏱️ Duration: 25 minutesMelt white chocolate chips and vegetable oil in the microwave in 20–30 second intervals until smooth and glossy. 🍫
⏱️ Duration: 2–3 minutesDip the top of each chilled cherry ball into the melted white chocolate, letting it drip naturally. Immediately sprinkle cherry sugar around the wet coating. 😍
⏱️ Duration: 10 minutesTop each ball with a whole maraschino cherry and insert a mini striped straw before the coating sets. 🎄🍒
⏱️ Duration: 5 minutesAllow the balls to set for 20–30 minutes at room temperature or refrigerate for 10–15 minutes. Keep chilled until serving. ❄️✨
⏱️ Duration: 20–30 minutes
Notes
These Christmas Cherry Balls are no-bake, festive, and incredibly easy to prepare — perfect for holiday parties or gifting.
Make sure the cherries are very well-drained and patted dry. Extra moisture can make the dough too soft or cause the coating to slide.
Freezing the balls before dipping helps create that beautiful smooth white drip effect.
You can make them 48 hours ahead and keep them chilled; they taste even better the next day as the flavors blend.
For extra flair, use striped holiday straws and bright pink coloring to make them more eye-catching for social media posts.
Nutrition
- Serving Size: 18 balls
- Calories: 210 kcal
How to Serve These at a Holiday Party
These deserve a proper stage! Try:
- Placing them on a tiered dessert tray.
- Serving alongside hot cocoa or mulled wine.
- Wrapping them in cellophane bags for edible gifts.
- Adding a gift tag or name card tied to the straw as a place setting.
They’re guaranteed to be the most photographed dessert of the evening.
You may also like :
Christmas Cherry Bombs – A Festive No-Bake Delight
Christmas Cherry Fluff Recipe – A No-Bake Holiday Classic Full of Cheer
Common Mistakes to Avoid
- Skipping the drying step for cherries or sugar – Too much moisture will ruin the texture.
- Using too much cherry juice – It makes the dough too soft.
- Overheating the chocolate – Causes it to seize and clump.
- Not freezing the balls before dipping – Makes them harder to coat neatly.
- Forgetting to press the cherry in before the chocolate sets – It won’t stick afterward!
Conclusion
If you’re looking to add a wow-worthy dessert to your Christmas spread this year, these Christmas Cherry Balls are it. They’re festive, fun, and surprisingly easy to make — no oven needed. With their bright pink hue, glossy cherries, snowy white chocolate drip, and candy cane straws, they’ll charm everyone at the table.
From the soft cherry-almond interior to the crunchy cherry sugar topping, every bite is pure holiday magic. So gather your ingredients, cue up your favorite Christmas playlist, and let’s make some sweet memories one cherry ball at a time.
Similar recipes :
Cherries in the Snow: A Heavenly No-Bake Cherry Dessert That Melts in Your Mouth
Oreo Cherry Chocolate Chip No-Bake Cheesecake
FAQs
1. Can I make these ahead of time?
Yes! You can make and decorate them up to 5 days in advance. Store them in the fridge in a covered container.
2. My dough is too sticky. What should I do?
Add more powdered sugar a tablespoon at a time until it’s firm enough to roll. Make sure your cherries are well-drained and patted dry.
3. Can I use different chocolate for the topping?
Absolutely! Milk or dark chocolate would work, though it will change the look from snowy to more decadent.
4. Can I freeze these?
Yes, freeze the undipped balls. When ready to serve, thaw and finish decorating with chocolate, sugar, and cherries.
5. What’s the best way to crush vanilla wafers?
A food processor works best, but you can also place them in a sealed plastic bag and roll with a pin until very fine.