
Introduction to Christmas Cherry Fluff
Ah, the holiday season. That time when people can enjoy having their families over, have a little bit of chaos and of course, joy. Oh-so-happy schedules and endless to-do lists call for simple yet delightful desserts to end what’s generally a crazy day. Enter Christmas Cherry Fluff, this no-bake treasure that marries sweet cherry pie filling with fluffy whipped cream and a hint of tropical pineapple…it takes just minutes to whip up and really brightens any spread with some holiday cheer. Your friends and family sure will have their jaws dropped as they dig into this scrumptious dessert!
Why You’ll Love This Christmas Cherry Fluff
Christmas Cherry Fluff is a perfect time-saving option for moms and working professionals like us. Very little preparation time is required in assembling it! A festive surprise that will be adored by children and grownups – this cherry fluff is a total salver. Most of the time, it’s a no-bake wonder that lets you spend maximum time with loved ones, not in the kitchen. This dessert is going to go into rotation for holiday dinners.
Ingredients for Christmas Cherry Fluff
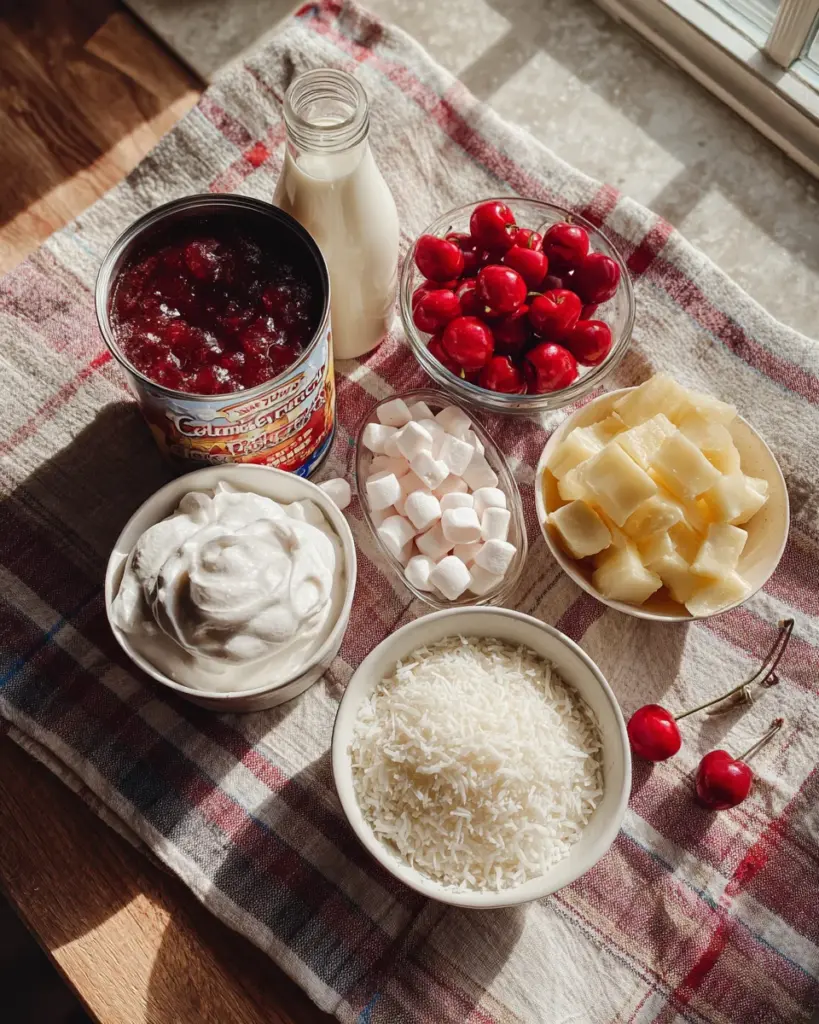
To create this festive dessert, you’ll need a few simple ingredients that come together in perfect harmony. Here’s what you’ll need:
- Cherry Pie Filling: The star of the show! This sweet and tangy filling provides that signature cherry flavor that brightens up your holiday table.
- Sweetened Condensed Milk: This creamy addition adds richness and sweetness, transforming the fluff into a dreamy, luscious dessert.
- Crushed Pineapple: Make sure to drain it well! This juicy fruit adds a lovely tropical twist and balances the cherry’s sweetness.
- Whipped Topping: Whether you choose Cool Whip or homemade whipped cream, this provides lightness and fluffiness to the dessert.
- Mini Marshmallows: These little puffs bring texture and a soft chewiness that everyone loves; they add a bit of nostalgia, too!
- Shredded Coconut (optional): A sprinkle of coconut adds an extra layer of flavor and a tropical flair; feel free to skip it if you’re not a fan.
- Chopped Pecans or Walnuts (optional): These nuts add a delightful crunch that contrasts beautifully with the creaminess if you desire that extra texture.
- Extra Cherry Pie Filling for Garnish: A spoonful on top elevates the presentation and makes your dish look even more appetizing.
- Whipped Cream for Garnish: A dollop of this on top adds a touch of elegance and a fluffy finish!
- Holiday Sprinkles or Crushed Candy Canes (optional): Use these for a festive touch; they’re like the cherry on top of this holiday delight!
For specific quantities of each ingredient, check out the complete list at the bottom of the article. Happy cooking!

How to Make Christmas Cherry Fluff
Now that we have our ingredients, let’s dive into how to make this festive treat! Follow these simple steps for a delicious Christmas Cherry Fluff that will have everyone coming back for seconds.
Step 1: Mix Cherry Pie Filling
Start by grabbing a large mixing bowl. Add the cherry pie filling right in. Gently stir it to break up any larger cherries. This helps distribute that sweet cherry flavor throughout the fluff. Trust me, it’ll make a difference!
Step 2: Combine Sweetened Condensed Milk
Next, it’s time for the sweetened condensed milk. Pour it into the bowl with your cherry filling. Stir until everything is glossy and well combined. The rich creaminess from this ingredient is what makes this dessert truly indulgent!
Step 3: Add Crushed Pineapple
Now, grab your drained crushed pineapple and toss it into the mix. This juicy fruit adds a lovely tropical note to balance the cherry flavors. Just give it a gentle stir to ensure it’s evenly distributed. No one wants a clump of pineapple in one bite!
Step 4: Fold in Whipped Topping
Here comes the magic—fold in the whipped topping! Using a spatula, gently combine it with the cherry and pineapple mixture. This step is crucial! Folding helps keep the fluff light and airy. We want it to feel like a cloud on your tongue!
Step 5: Incorporate Mini Marshmallows
Next, fold in those cute mini marshmallows. They bring a lovely texture and a touch of nostalgia. Stir them gently to avoid crushing them. If you’re feeling adventurous, go ahead and add the optional shredded coconut and chopped nuts for extra texture!
Step 6: Chill and Serve
Transfer your mixture to a serving bowl or dessert cups. Cover it up and pop it into the fridge for at least 2–3 hours. Chilling allows the flavors to mingle and develop. For the best results, I recommend letting it sit overnight. Serve it chilled and enjoy the festive cheer!
Tips for Success
- Make sure to drain the crushed pineapple thoroughly. You don’t want excess juice altering the fluff’s texture.
- For a lighter version, use a low-fat whipped topping. It still tastes dreamy!
- Experiment with additional mix-ins like chocolate chips or different nuts for a twist.
- Chill the dessert overnight for the best flavor development.
- Feel free to customize toppings based on what your family loves!
Equipment Needed
- Large Mixing Bowl: Perfect for combining all your ingredients together. A sturdy one will do the trick.
- Spatula: Ideal for gently folding in whipped topping and other delicate ingredients. A silicone spatula works wonders.
- Serving Bowl or Dessert Cups: Choose whichever suits your occasion best—both work well for presenting this delightful fluff!
Variations of Christmas Cherry Fluff
- Chocolate Cherry Fluff: Add a layer of chocolate pudding mix and chocolate chips for a delicious twist on the classic cherry flavor.
- Pineapple Cherry Fluff: Replace half of the cherry pie filling with crushed fresh or canned pineapple for a fruity explosion.
- Nut-Free Version: Simply omit the chopped nuts to make this dessert safe for nut allergies while still keeping that irresistible texture!
- Low-Sugar Option: Use sugar-free cherry pie filling and a reduced-fat whipped topping to create a lighter dessert without sacrificing flavor.
- Vegan Friendly: Substitute the whipped topping with a vegan alternative and choose dairy-free condensed milk for a tasty plant-based version!
Serving Suggestions for Christmas Cherry Fluff
- Serve with Vanilla Ice Cream: A scoop of vanilla ice cream on the side takes the fluff to a whole new level of indulgence.
- Pair with Coffee or Hot Chocolate: The rich flavors complement warm beverages perfectly for a cozy gathering.
- Garnish with Mint Leaves: Fresh mint makes for a beautiful and fragrant touch on each serving.
- Present in Festive Bowls: Choose holiday-themed bowls or cups for a cheerful presentation that adds to the festive atmosphere.
FAQs about Christmas Cherry Fluff
Can I use fresh cherries instead of cherry pie filling?
Absolutely! Fresh cherries can be a wonderful alternative. Just make sure to pit and chop them and add some sugar for sweetness. This will give your fluff a lovely, homemade touch!
How long can I store Christmas Cherry Fluff in the fridge?
You can keep it in the fridge for up to 3–4 days. Just be sure to cover it well to maintain its freshness. However, you may want to add any crunchy toppings just before serving!
Can I make this dessert ahead of time?
Yes! In fact, I recommend preparing Christmas Cherry Fluff a day in advance. This allows flavors to meld beautifully, making every bite even more delightful!
Is Christmas Cherry Fluff suitable for vegetarians?
Yes, this dessert is vegetarian-friendly! Simply ensure that your whipped topping does not contain gelatin if you’re looking for a fully vegetarian option.
Can I freeze Christmas Cherry Fluff?
While it’s best enjoyed fresh, you can freeze it if needed. Just know the texture might change a bit. Thaw it in the fridge when you’re ready to enjoy it again!
Final Thoughts on Christmas Cherry Fluff
Christmas Cherry Fluff is more than just a dessert; it’s a delightful experience that brings smiles to the table. The combination of flavors and textures creates a symphony of festive joy that resonates with both young and old. I love how easy it is to prepare, allowing me to focus on what truly matters—spending time with family and friends.
When I see the delight in my loved ones’ faces as they indulge in this treat, my heart is full. This dessert is a holiday tradition waiting to happen in your home, creating lasting memories with every fluffy bite!
Print
Christmas Cherry Fluff
- Prep Time: 15 minutes
- Cook Time: 0 minutes
- Total Time: 2 hours 15 minutes
- Yield: 8 servings 1x
- Category: Dessert
- Method: No-Bake
- Cuisine: American
- Diet: Vegetarian
Description
A festive and delightful no-bake dessert combining cherry pie filling, sweetened condensed milk, crushed pineapple, and whipped topping, perfect for Christmas celebrations.
Ingredients
- 1 can (20 oz / 560 g) cherry pie filling
- 1 can (14 oz / 395 g) sweetened condensed milk
- 1 cup (250 g) crushed pineapple, drained
- 1 ½ cups (375 mL) whipped topping (such as Cool Whip or whipped cream)
- 2 cups (100 g) mini marshmallows
- ½ cup (40 g) shredded coconut (optional)
- ½ cup (60 g) chopped pecans or walnuts (optional)
- Extra cherry pie filling for garnish
- Whipped cream for garnish
- Holiday sprinkles or crushed candy canes (optional)
Instructions
- In a large mixing bowl, add the cherry pie filling and stir gently to break up some larger cherries.
- Pour in the sweetened condensed milk and stir until glossy and evenly combined.
- Thoroughly drain crushed pineapple and stir it into the cherry mixture.
- Add the whipped topping and gently fold it in with a spatula to maintain a light texture.
- Fold in the mini marshmallows and optional shredded coconut and chopped nuts.
- Transfer to a serving bowl or dessert cups, cover, and refrigerate for at least 2–3 hours.
- Before serving, garnish with extra cherry pie filling, whipped cream, and festive toppings like crushed candy canes or sprinkles.
Notes
- For best results, chill the dessert overnight to enhance flavors.
- This dessert can be prepared ahead of time, making it ideal for holiday gatherings.
- Feel free to customize with your favorite nuts or omit them for a nut-free version.
Nutrition
- Serving Size: 1 cup
- Calories: 300
- Sugar: 30g
- Sodium: 200mg
- Fat: 10g
- Saturated Fat: 5g
- Unsaturated Fat: 3g
- Trans Fat: 0g
- Carbohydrates: 50g
- Fiber: 1g
- Protein: 3g
- Cholesterol: 15mg


