Let’s be honest—Christmas desserts are the grand finale of any holiday celebration. From frosted cookies to pies and trifles, they’re the sweet punctuation mark after the main event. But this year, let’s bring something new (and incredibly festive) to the dessert table—the Christmas Cranberry Poke Cake.
Not only is this cake drop-dead gorgeous (just look at that holiday sparkle), but it also delivers a flavor punch with every moist, tangy, and creamy bite. It’s festive. It’s fun. And yes, it tastes even better than it looks. So grab your mixing bowl, and let’s dive into making the most Instagram-worthy holiday dessert you’ll serve this season.
What is a Poke Cake?
You may have seen poke cakes floating around Pinterest or at potlucks, but what exactly are they?
Poke cakes are sheet cakes that are “poked” all over after baking, and then filled with some sort of liquid or filling—pudding, jello, fruit sauce, or in our case, a glorious cranberry mix. These little holes soak up the filling, creating pockets of flavor and extra moisture throughout the cake.
It’s an old-school dessert trick with a modern twist, and it turns even a simple cake mix into something magical. Perfect for Christmas, right?
Why Cranberry?
Cranberries are like the sparkle lights of the berry world—vibrant, tart, and totally on theme for winter. They pair beautifully with sweet cakes and creamy toppings, creating that ideal sweet-tart combo that balances out all the richness of your holiday feast.
In this poke cake, cranberries aren’t just a topping. They’re the star. That cranberry layer seeps into the cake, turning it into a moist, jewel-toned slice of Christmas joy.
A Peek at the Final Dessert
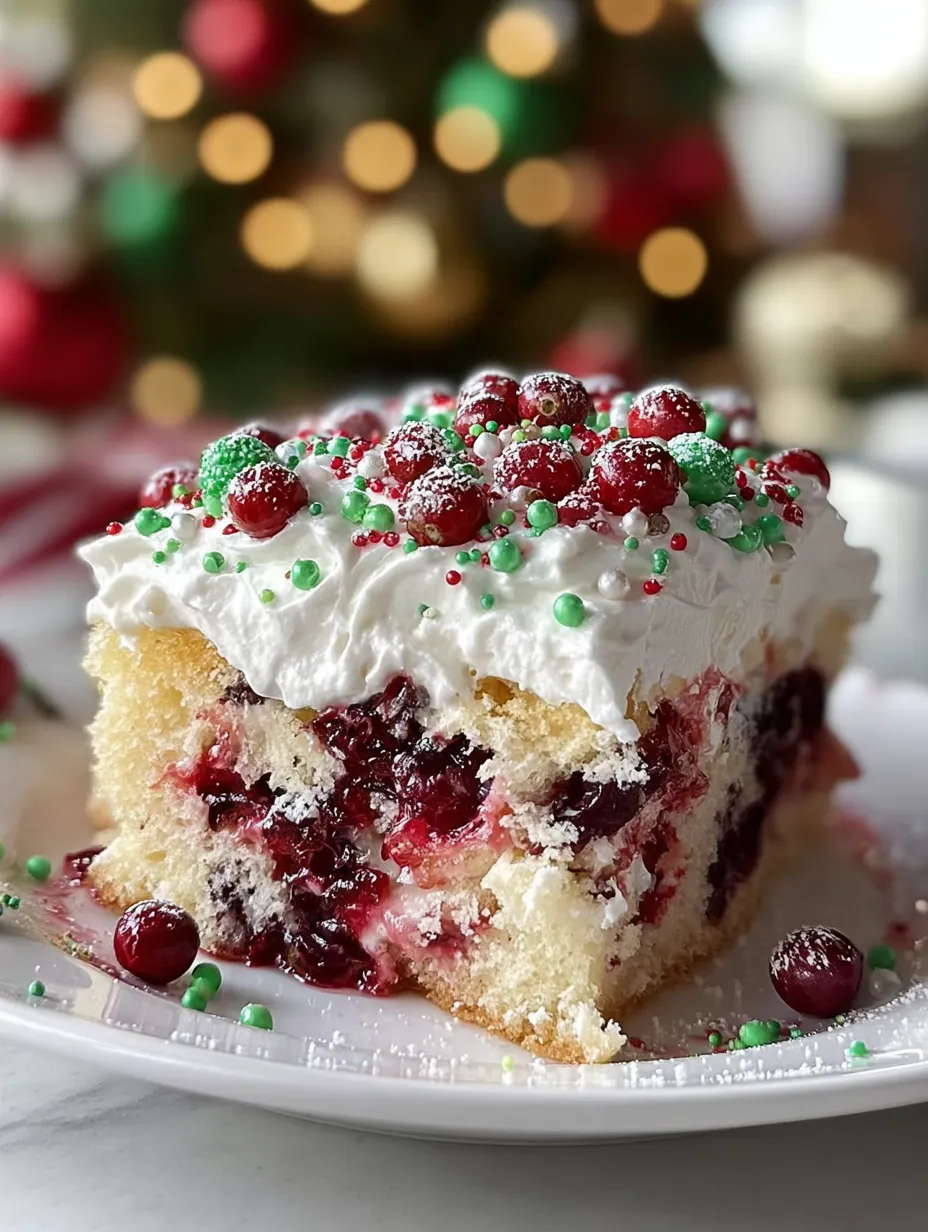
Let’s take a moment to appreciate what we’re creating here. If you look at the image, this cake isn’t just food—it’s festive art.
We’ve got:
- A soft, fluffy white cake base
- Swirls of ruby-red cranberry sauce soaked into every bite
- A thick, creamy layer of whipped topping
- And a snowfall of red and green sprinkles, and even some metallic green sugar pearls for that ornament-on-a-tree vibe
This isn’t just dessert—it’s the centerpiece of your Christmas dessert table.
Ingredients Overview
For the Cake:
- 1 box (15.25 oz) white cake mix
- 3 large eggs
- 1 cup water
- 1/4 cup vegetable oil
For the Cranberry Layer:
- 1 can (14 oz) cranberry sauce (whole berry recommended for texture)
- 1/2 cup water
- 1/4 cup granulated sugar
For the Whipped Topping:
- 1 container (8 oz) whipped topping (Cool Whip or similar)
- 1 teaspoon vanilla extract
- Red and green sprinkles (use sugar pearls for visual pop)
Optional Garnishes:
- Powdered sugar dusting
- Fresh cranberries dipped in sugar
- Edible glitter
Tools You’ll Need
- 9×13 inch baking dish
- Mixing bowls
- Whisk or electric mixer
- Wooden spoon or straw for poking
- Small saucepan
- Spatula for spreading topping
Nothing fancy, just your standard holiday baking tools. Let’s get into it!
Making the White Cake Base
Start by preheating your oven to 350°F (175°C). Grease and lightly flour your 9×13-inch pan. This helps with easy removal later—and makes clean-up easier.
In a large bowl, combine:
- Cake mix
- 3 eggs
- 1 cup water
- 1/4 cup vegetable oil
Mix it according to the box instructions—usually about 2 minutes on medium with an electric mixer. You want the batter to be smooth and slightly fluffy.
Pour it into your prepared dish and smooth out the top.
Bake for 25–30 minutes or until a toothpick comes out clean. Let it cool for 10–15 minutes in the pan.
Pro tip: Don’t overbake! The cranberry sauce needs something moist to soak into.
Creating the Cranberry Filling
While your cake cools slightly, grab a small saucepan.
Add:
- 1 can of cranberry sauce
- 1/2 cup water
- 1/4 cup granulated sugar
Heat it over medium, stirring until the mixture is smooth and the sugar dissolves. You’re aiming for a pourable consistency that still has some berry texture.
Remove from heat and let it cool just enough so it’s warm—not hot.
Want it tangier? Add a teaspoon of lemon juice. Want it smoother? Use an immersion blender briefly.
Poking the Cake Like a Pro
Once your cake has cooled a bit (but is still slightly warm), it’s time to poke.
Use the handle of a wooden spoon or a straw to make holes all over the top of the cake—about 1 inch apart. Don’t go all the way to the bottom—about 2/3 of the way is perfect.
These holes are where the cranberry magic happens.
The more evenly spaced the holes, the more beautiful the cranberry streaks will look when you slice into it.
Layering the Cranberry Sauce
Pour your warm cranberry sauce mixture slowly over the cake, letting it seep into the holes. Use a spatula to spread it gently and help push it into the poked holes.
Let it cool to room temperature. This lets the sauce settle into the cake without melting the whipped topping later.
Then? Into the fridge it goes for at least 2 hours (overnight is even better).
Whipped Topping Magic
Now for the dreamy, cloud-like topping that makes this cake feel like a snowy Christmas morning.
Grab your 8 oz container of whipped topping (Cool Whip works perfectly here). In a medium bowl, gently fold in 1 teaspoon of vanilla extract. This adds a subtle flavor boost that keeps things from tasting too artificial.
Don’t overmix it—just enough to combine and fluff it up slightly.
Once your cake is completely chilled and the cranberry layer has settled beautifully into those little poke holes, spread the whipped topping evenly over the entire surface.
Use a spatula to create soft swirls or keep it smooth and flat—your call!
Want to go homemade? You can whip 1 cup of heavy cream with 2 tablespoons of powdered sugar and 1 teaspoon of vanilla until stiff peaks form.
Decorating the Cake
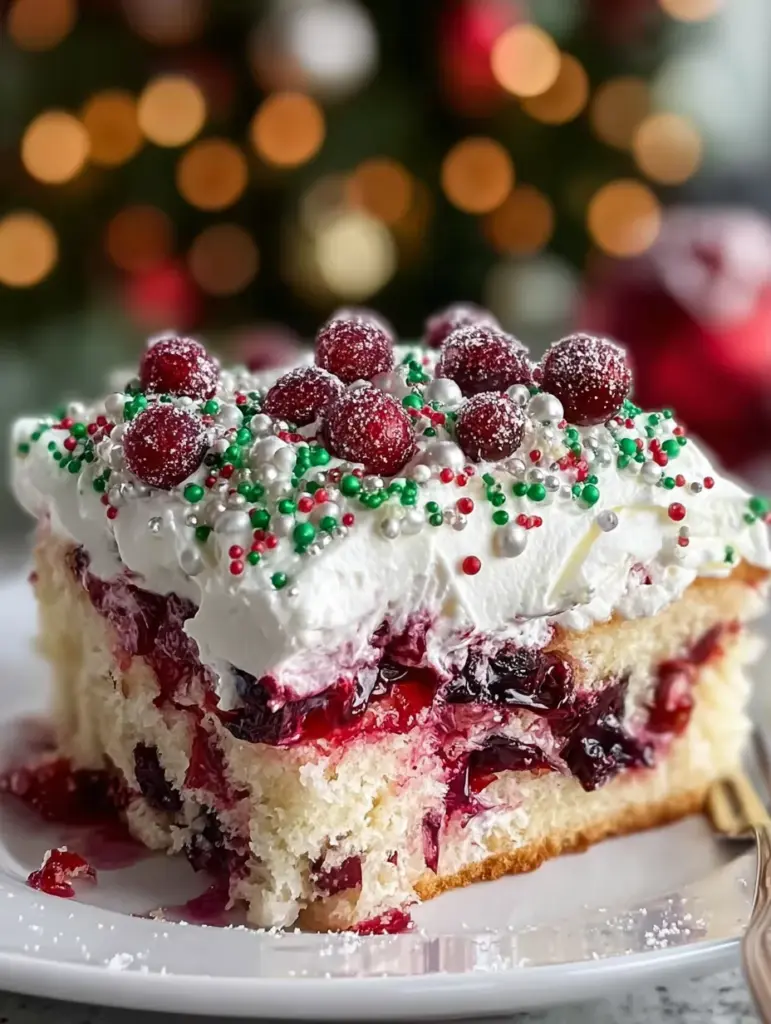
Here’s where you make the cake look as festive as it tastes.
From the photo, we can clearly see:
- Red and green round sprinkles
- Shiny green sugar pearls (which look like mini ornaments!)
- A dusting of powdered sugar like fresh snow
- Optional: small dollops of extra whipped cream or even sugared cranberries for garnish
Sprinkle generously and be creative—this is your Christmas masterpiece. You could even use a stencil to dust a snowflake shape with powdered sugar for extra flair.
Remember: presentation sells the dessert, especially at holiday gatherings.
Chilling the Cake: Why It Matters
This cake is good right after topping it, but it’s amazing once chilled. Why?
Because chilling helps the cranberry sauce fully meld with the cake, softening it into a moist, flavor-packed base. Plus, it firms up the whipped topping so you get clean, picture-perfect slices.
Minimum chill time: 2 hours
Ideal: Overnight
Cover it loosely with plastic wrap or foil and let your fridge do the rest.
Serving Suggestions
When you’re ready to serve, use a sharp knife to cut clean squares. Wipe the blade between slices for bakery-quality presentation.
This cake pairs beautifully with:
- Hot cocoa with marshmallows
- A spiced apple cider
- Eggnog (for the brave!)
- Or just a cup of coffee by the fire
Make it the showstopper of your dessert table by serving on a white platter and garnishing with a few fresh cranberries or mint leaves.
Storage Tips
- Fridge: Keep covered in the refrigerator for up to 4–5 days. The cake will stay moist and delicious!
- Freezing: Not ideal once topped with whipped cream. But you can freeze the cake after the cranberry layer and before the whipped topping. Just add the topping fresh after thawing.
Christmas Cranberry Poke Cake Recipe
- Prep Time: 20 minutes
- Cook Time: 30 minutes
- Total Time: 2 hours 50 minutes
- Category: Christmas Cranberry Poke Cake
Description
🎄 A bright, festive delight that brings the magic of Christmas right to your table! 🍰💫 Moist, sweet, and kissed with cranberry goodness—this one always reminds me of cozy holiday evenings with family gathered close. ❄️❤️
Ingredients
1 box (15.25 oz) white cake mix
3 large eggs
1 cup water
1/4 cup vegetable oil
For the Cranberry Layer:
1 can (14 oz) cranberry sauce (whole berry or jellied)
1/2 cup water
1/4 cup granulated sugar
For the Whipped Topping:
1 container (8 oz) whipped topping
1 teaspoon vanilla extract
Red & green sprinkles
Instructions
Preheat oven to 350°F (175°C). Grease a 9×13-inch pan. ⏱️ 1 minute
In a bowl, mix cake mix, eggs, water, and oil until smooth. ⏱️ 3 minutes
Pour into the pan and bake for 25–30 minutes until a toothpick comes out clean. ⏱️ 25–30 minutes
Cool the cake for 10–15 minutes. ⏱️ 15 minutes
In a saucepan, heat cranberry sauce, water, and sugar until blended and smooth, then remove from heat. ⏱️ 8 minutes
Use a wooden spoon handle to poke holes all over the cake. ⏱️ 2 minutes
Pour the warm cranberry mixture over the cake, letting it sink into the holes. ⏱️ 2 minutes
Cool completely, then refrigerate for 2 hours to set the flavor. ⏱️ 2 hours
Mix whipped topping with vanilla, then spread over chilled cake. ⏱️ 2 minutes
Garnish with festive sprinkles and slice to serve. 🎅✨ ⏱️ 1 minute
Notes
• This pie sets beautifully when given enough chill time, so if you’ve ever had family hovering around the fridge like mine does, you’ll understand the quiet joy of slicing into a perfectly firm, creamy piece.
• Lightly crushing the candy canes keeps the filling smooth while still giving those bright little peppermint sparkles that always remind me of childhood winters.
• If you’ve ever watched your loved ones’ eyes widen at the first cool, minty bite of a holiday dessert, you’ll feel that same little flutter with this one — something about it just brings the season right into the kitchen.
• A chocolate crust makes the peppermint flavor feel extra festive, almost like a sweet whisper of hot cocoa nights.
Nutrition
- Serving Size: 12–15
- Calories: 220 kcal
Variations to Try
Want to customize your cake? Try these variations:
1. Chocolate Drizzle
Drizzle melted dark chocolate over the whipped topping for a rich, elegant twist.
2. Cream Cheese Frosting
Replace whipped topping with a sweetened cream cheese layer for a denser, more decadent flavor.
3. Orange-Cranberry
Add 1 tablespoon of orange zest to your cranberry sauce for a citrusy kick.
4. White Chocolate Chips
Sprinkle mini white chocolate chips under the whipped topping for a surprise bite.
5. Cake Mix Swap
Try vanilla or even a spice cake mix for a different flavor profile.
You may also like : Christmas Red Velvet Poke Cake Recipe: A Festive Showstopper You’ll Make Every Year
Troubleshooting Common Issues
Let’s tackle a few “uh-oh” moments:
Cake too soggy?
- You might have added cranberry sauce while the cake was too hot or poured too much liquid. Try cooling the sauce slightly before pouring.
Whipped topping melting?
- Make sure your cake is completely cool before adding it. Keep it refrigerated afterward.
Holes too small or too close?
- Use a spoon handle, not a fork. Fork holes don’t hold much filling. Space them about 1 inch apart.
Sprinkles bleeding into topping?
- Add sprinkles just before serving for the best appearance.
Conclusion
The Christmas Cranberry Poke Cake is more than just a dessert—it’s a joyful celebration on a plate. From the light and fluffy white cake to the ruby red cranberry ribbons soaked into every bite, topped with snow-like whipped cream and festive sprinkles, it’s the embodiment of holiday cheer.
Whether you’re hosting a party, bringing a dish to the office, or just want something special for the family after dinner, this cake is guaranteed to wow.
And don’t be surprised if it becomes a new tradition—one of those “must-haves” every December!
Similar recipes :
5 Reasons You’ll Fall in Love with Butter Pecan Praline Poke Cake
Pineapple Coconut Dream Cake
FAQs
1. Can I use homemade cranberry sauce instead of canned?
Absolutely! Just make sure it’s not too thick. You’ll want it slightly pourable, so add a little water if needed.
2. Can I make this cake the night before?
Yes! In fact, it’s even better. The cranberry sauce soaks into the cake overnight, and the flavors become richer.
3. What if I don’t like Cool Whip?
Use homemade whipped cream or a cream cheese-based topping. Just be sure it’s stable and not too runny.
4. Can I use a different type of cake mix?
Sure! Vanilla, yellow, or even spice cake mix works great. White cake gives the cleanest contrast in color.
5. How do I make this cake kid-friendly for decorating?
Set up a “sprinkle station” and let the kids decorate their own slices. You can also use mini candy canes or red/green M&Ms for toppings.