Let’s face it—when the holidays roll around, we all want that one recipe that screams Christmas the second you bite into it. If you’re looking for a treat that’s not only drop-dead gorgeous but also melt-in-your-mouth delicious, you’ve hit the jackpot. These Christmas Peppermint Meltaway Candy Blossoms are everything: pastel perfection, a smooth chocolatey finish, a cool peppermint kick, and the cutest floral shape that makes them look like they belong on a dessert table in Santa’s own kitchen.
Whether you’re making them for your holiday cookie swap, packaging them as edible gifts, or just indulging in a seasonal sweet-tooth moment (no judgment here), these candies are as easy to make as they are fun to eat. Oh, and that fancy speckled finish? Way simpler than it looks.
So, tie on that apron, grab your molds, and let’s make the prettiest peppermint treats this side of the North Pole.
What Are Christmas Peppermint Meltaway Candy Blossoms?
These beauties are essentially soft, creamy peppermint-infused candies made from melted white chocolate or candy melts, poured into festive silicone molds. What sets them apart? It’s all in the melting texture—they don’t crunch or snap like traditional chocolate bark. Instead, they melt away on your tongue with the silky smoothness of a truffle, minus the filling. They’re called “meltaways” for a reason.
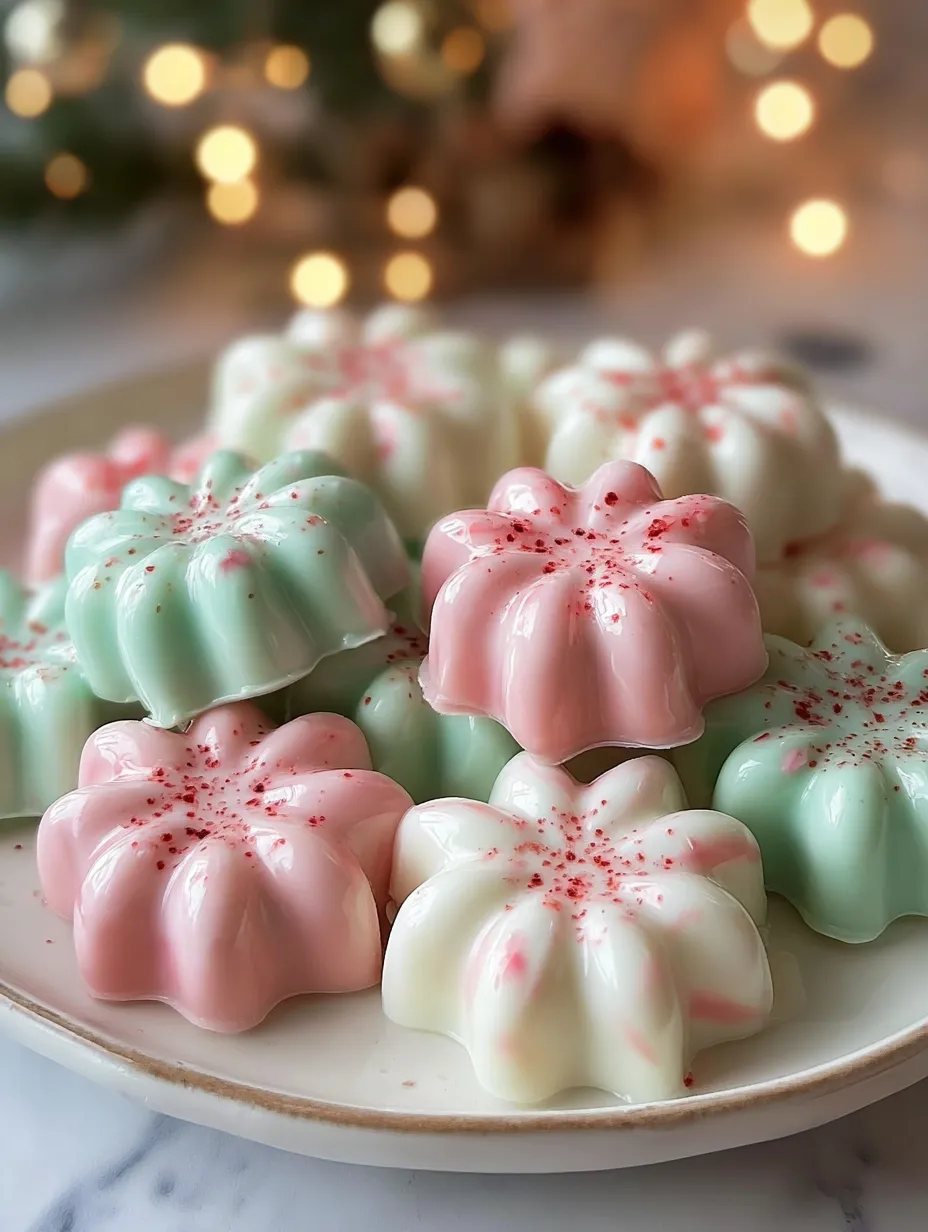
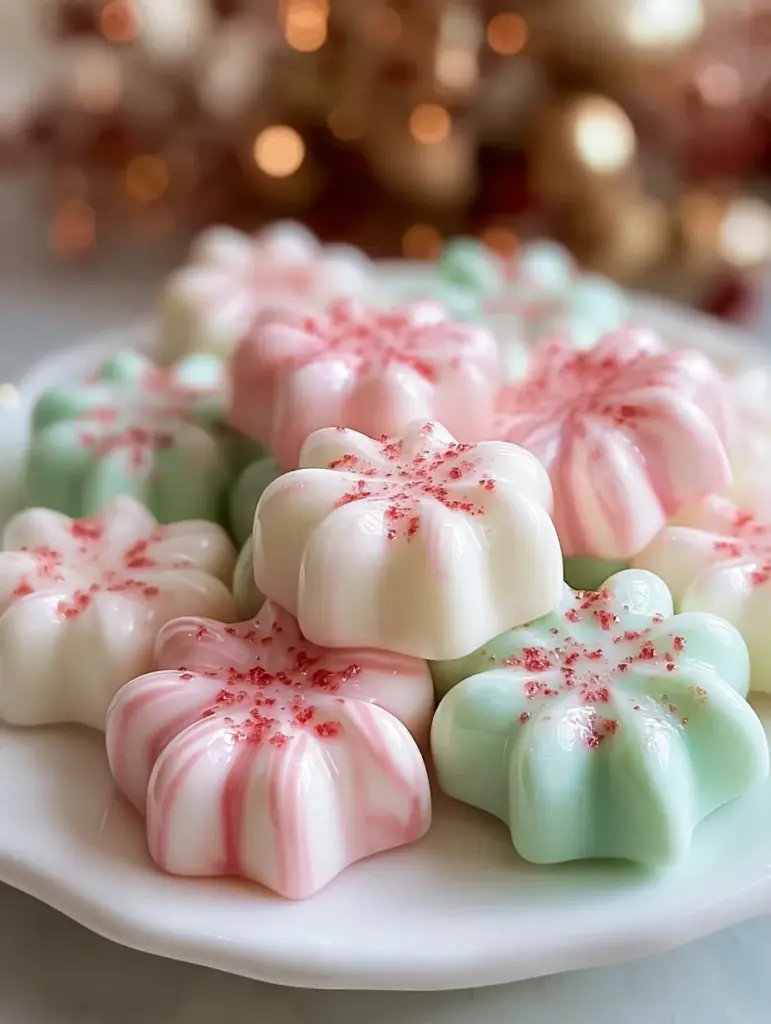
And let’s talk about the flavor. A delicate hint of peppermint cuts through the sweet white chocolate base, giving them that unmistakable holiday zing. Add in a dash of artistry with pastel colors (pale pink and mint green, to match the photo) and you’ve got a festive treat that tastes and looks like Christmas.
Visual Inspiration: Creating the Candy from the Image
If you’re looking to recreate what’s in the photo (which you absolutely should), here’s what you’re aiming for:
- Soft pastel pink, mint green, and creamy white candies, shaped like blossoms or starbursts.
- Glossy, clean finishes with defined edges—no lumpy blobs here!
- Tiny red speckles on top that give each piece a handcrafted, festive vibe.
These aren’t just tasty—they’re edible ornaments. The key? Precision with the molds, the right chocolate, and just the tiniest bit of patience. Trust me, it’s worth it.
Ingredients Overview
Let’s break down what you need before you head to the kitchen:
For the Candy Coating:
- 2 cups white chocolate melting wafers (or almond bark)
- 2 cups pastel-colored candy melts (1 cup pink, 1 cup green)
- 1–2 teaspoons peppermint extract (oil-based, to taste)
For the Speckled Tops:
- Red sanding sugar or finely crushed red sprinkles
- Optional: 1 drop red oil-based food coloring mixed with a small amount of melted white chocolate for the flicked “speckles”
These ingredients are easy to find, but make sure you’re using oil-based coloring and extract—anything water-based will make the chocolate seize up faster than a snowstorm in January.
The Equipment You’ll Need
Here’s your candy-making toolbox:
- Silicone flower/starburst molds (10–12 petal varieties work best)
- Microwave-safe bowls for melting each chocolate batch
- Piping bags or a small spoon for filling the molds
- Small food-safe brush (optional, for flicking speckles)
- Toothpick or skewer to pop air bubbles
Make sure your molds match the shape shown in the image—flower/starburst design with crisp edges is the look we’re after.
Choosing the Right Chocolate and Candy Melts
Now let’s talk about your base. The smoother the chocolate, the better the end result. Go for:
- White chocolate melting wafers (Ghirardelli or Merckens work great)
- Candy melts in pastel pink and mint green (Wilton is a solid pick)
- Or color white chocolate yourself using oil-based coloring (NEVER water-based!)
Avoid using chocolate chips—they have stabilizers that make them hard to melt smoothly.
Preparing the Molds for Success
Let’s start where the magic happens—your silicone molds. These little flower-shaped cavities are what transform your simple melted chocolate into something utterly stunning.
First, make sure they’re super clean and completely dry. Any moisture, even a tiny drop, can cause your chocolate to seize or come out with weird textures.
To match the image exactly:
- Sprinkle just a pinch of red sanding sugar or crushed red sprinkles into the bottom of each mold cavity before pouring in your melted chocolate. This is what gives that speckled, snowy look you see on the candy blossoms in the photo.
If you want to go a step further, you can also:
- Mix 1 drop of red oil-based coloring into a dab of melted white chocolate and flick it with a small food-safe brush inside the molds before adding your main layers. This creates a more artistic speckled effect that’s photo-perfect.
Don’t worry—this step is optional, but if you want that Pinterest-ready finish, it’s 100% worth it.
Melting Your Chocolate Layers (Step-by-Step)
We’re working with three different color layers here, so you’ll melt them separately.
1. White Layer (Base Color)
- Add 2 cups of white melting wafers or almond bark to a microwave-safe bowl.
- Microwave in 20–30 second bursts, stirring in between, until smooth and pourable.
- Stir in ½–1 teaspoon peppermint extract (optional, but recommended).
2. Pink Layer
- Melt 1 cup pastel pink candy melts in a separate bowl the same way.
- Add a tiny drop of peppermint extract if you want consistent flavor across all colors.
3. Green Layer
- Melt 1 cup pastel green candy melts using the same method.
- Again, a small amount of peppermint extract can go in here too.
Important:
If you’re customizing colors, only use oil-based coloring. Water-based dyes will ruin your chocolate faster than holiday stress. Also, avoid overheating. Chocolate can scorch in seconds, and that’s just heartbreaking.
Flavor Boost: Adding Peppermint Extract
Here’s the thing about peppermint—it’s powerful. A little goes a long way.
- Start with ½ teaspoon, then taste-test a small dab on a spoon.
- Want more of a peppermint bark vibe? Add another ½ teaspoon.
- Don’t go overboard. Too much peppermint can overpower the sweetness and make your candies taste like toothpaste. No one wants that on Christmas.
Oil-based peppermint extract is your friend here. Alcohol or water-based versions will make your beautifully melted chocolate seize into a sad clump.
Filling the Silicone Molds Like a Pro
This is where you take your melted mixtures and turn them into showstoppers.
Here’s the technique:
- Use a spoon or a piping bag to carefully fill each mold cavity with melted chocolate.
- Tap the mold gently on your counter to pop air bubbles.
- Smooth the tops using the back of a spoon or a small spatula. This is key for that clean, flat finish once they’re unmolded.
Want to layer your colors? You can:
- Pour half white, then pink, or
- Swirl the pink and green together for a marbled effect
But for a photo match? Stick to single-color candies per mold like the image—clean, bold, pastel hues with speckled tops.
Speckle Techniques for That Holiday Pop
If you skipped speckling the inside of the molds, don’t worry—you can still do it on top:
Option 1: Sprinkles on Wet Chocolate
- While the chocolate is still wet in the molds, sprinkle a dusting of finely crushed red sprinkles.
- Tap lightly to set them in place.
Option 2: Flicking Method
- Mix 1 drop of red oil-based food coloring with a bit of melted white chocolate.
- Use a clean brush or a flicking tool to gently splatter the mix across the tops of your candies.
It’s the easiest way to make your candies look handcrafted and high-end—like you picked them up at a holiday chocolatier.
Chilling and Setting Your Candy Blossoms
Once your molds are filled and speckled to perfection:
- Place the tray in the refrigerator for 15–20 minutes.
- You’ll know they’re ready when they’re firm to the touch and pop cleanly out of the molds.
Avoid freezing—this can cause condensation when you remove them, dulling the glossy finish.
The Art of Unmolding Perfect Blossoms
Here’s the moment of truth—and if you followed everything right, it’ll be super satisfying.
- Gently press the back of each silicone mold to pop out the candies.
- If they resist, give them another 5 minutes in the fridge.
- They should be smooth, glossy, and exactly shaped like the mold—just like in the image.
No need to trim or reshape. That’s the power of using a good mold and smoothing the top.
Print
Christmas Peppermint Meltaway Candy Blossoms
- Prep Time: 10 minutes
- Cook Time: 20 minutes
- Total Time: 30 minutes
- Category: Holiday Candy / No-Bake Christmas Treats
Description
❄️✨ These little peppermint blossoms melt the moment they touch your tongue… soft, creamy, and beautifully speckled just like holiday snowflakes. Perfect for gifting, snacking, or filling those Christmas cookie trays with something extra magical. 🍬💖
Ingredients
2 cups white chocolate melting wafers or almond bark
2 cups pastel pink and pastel green candy melts
1–2 teaspoons peppermint extract (optional, to taste)
Red sanding sugar or finely crushed red sprinkles
Optional: 1 drop red oil-based coloring mixed with a bit of melted white chocolate (for splatter design)
Instructions
Prepare the molds:
Make sure silicone flower molds are clean and dry. Add a pinch of red sanding sugar to some cavities for speckled bottoms.
⏱️ Duration: 2 minutesMelt the white chocolate:
Microwave in 20–30 second intervals until smooth. Stir in ½ teaspoon peppermint extract if desired.
⏱️ Duration: 2 minutesMelt the pink and green coatings:
Melt each color in separate bowls, adding a tiny drop of extract if you want consistent flavor.
⏱️ Duration: 3 minutesFill the molds:
Spoon or pipe chocolate into each mold. Tap gently to remove air bubbles and smooth the tops.
⏱️ Duration: 3 minutesAdd speckles (optional):
Lightly dust tops with fine red sprinkles or flick colored chocolate for a splatter effect.
⏱️ Duration: 1 minuteChill:
Refrigerate 15–20 minutes until completely set.
⏱️ Duration: 20 minutesUnmold:
Gently pop each blossom out of the silicone mold — they should come out glossy and perfect.
⏱️ Duration: 1 minute
Notes
These little peppermint blossoms stay beautifully glossy if kept at cool room temperature—avoid storing them near heat sources.
For the exact speckled look, use superfine red sanding sugar rather than crushed large sprinkles.
Oil-based coloring is essential if adjusting the pink or green shades; water-based dyes will cause the chocolate to seize.
If you want an even creamier “meltaway” texture, use almond bark as your base instead of standard candy melts.
These make wonderful gift-box treats—mix the pink, green, and white pieces together for a sweet pastel Christmas theme.
Nutrition
- Serving Size: 24–30 bite-size candies
- Calories: 90 kcal per piece
Storage Tips to Keep Them Fresh and Glossy
Store your finished meltaway blossoms in:
- An airtight container
- Cool, dry place away from sunlight or heat
Do not refrigerate long-term unless your house is warm. Moisture from the fridge can dull the surface or cause white chocolate to develop streaks.
Shelf life? These babies stay perfect for 1–2 weeks at room temp—if they last that long.
You may like also :
Soft Christmas Peppermints Recipe: Sweet, Buttery, and Melt-in-Your-Mouth Magic for the Holidays!
No-Bake Peppermint Cheesecake Bites Recipe: The Ultimate Festive Treat You’ll Crave All Winter Long
Troubleshooting Common Candy Making Mistakes
Here’s how to fix the most common holiday hiccups:
- Chocolate seized up while melting? Probably water got in, or you used water-based coloring. Start fresh.
- Blossoms won’t pop out? Not fully set yet. Chill longer.
- Dull surface instead of glossy? Could be humidity or over-chilling. Keep molds clean and dry next time.
- Speckles too chunky? Use finer sprinkles or sift crushed candy through a mesh sieve.
Serving Ideas and Gift Packaging Tips
Presentation matters—especially around the holidays. Here are a few ways to show off your peppermint meltaway candy blossoms:
🎄 On a dessert tray: Arrange in a circle like a candy wreath
🎁 Packaged in treat boxes: Line with parchment and stack in rows
🧊 Frozen in hot cocoa bombs: Add one blossom inside for a surprise!
🍬 Gift jars or tins: Great for neighbors, coworkers, or teachers
Pair with a handwritten note and you’ve got the perfect edible gift.
Why You’ll Make These Every Holiday Season
You know how some recipes become traditions? This is one of them. These meltaway blossoms check every box:
- Easy to make in batches
- Customizable with colors and flavors
- Adorable enough for gifting
- Deliciously addictive
And they’re not just for Christmas. You can adapt them for Valentine’s Day, Easter, baby showers—just swap the color scheme. But something about peppermint, pastel blossoms, and red speckles makes them just feel like the holidays.
Conclusion: Festive, Fun, and Fabulous
There’s something incredibly satisfying about making a treat that not only tastes amazing but also looks like a masterpiece. These Christmas Peppermint Meltaway Candy Blossoms hit all the right notes—easy to make, beautifully festive, and deliciously addictive. Whether you’re a seasoned baker or a kitchen newbie, this recipe is foolproof. With just a few ingredients and the right technique, you’ll create peppermint candies that rival anything in a boutique holiday sweets shop.
Their creamy texture, gentle pastel coloring, and cooling peppermint finish make them a standout addition to any dessert table. But honestly? They’re just as perfect for snacking straight from the container while watching Christmas movies on the couch. And that’s what the season’s really about—joy in the little things.
So go ahead, make a batch. Share them with friends, wrap them up as gifts, or keep them all to yourself (no judgment). They’re guaranteed to bring smiles—and maybe even requests for the recipe.
Similar recipes :
Christmas Sugar Cookie Bars Recipe: The Ultimate Festive Treat You’ll Bake on Repeat
FAQs
1. Can I freeze these peppermint meltaway candy blossoms?
Yes, but it’s not ideal if you want to keep the glossy finish. Freezing can cause condensation when thawed, which may dull the chocolate. If you must freeze, wrap them tightly in plastic and store in an airtight container.
2. Can I use other flavors besides peppermint?
Absolutely! Try orange, vanilla, or even almond extract—just make sure they’re oil-based if you’re mixing them into melted chocolate. You can easily create a whole collection of flavored meltaways.
3. How do I make these candies vegan?
Use dairy-free white chocolate and vegan-friendly candy melts. Brands like Enjoy Life or Pascha offer allergen-friendly alternatives. Just double-check labels to ensure they’re truly dairy-free.
4. What if I don’t have the flower/starburst molds?
You can still make this recipe using mini muffin silicone molds or any small silicone candy mold you have on hand. The key is using silicone for easy release.
5. Can I make these ahead of time for a party or gifting?
Yes! These store beautifully for 1–2 weeks at room temperature. Make them a few days ahead, and they’ll be ready to go when you need them. Just keep them in an airtight container away from heat or sunlight.


