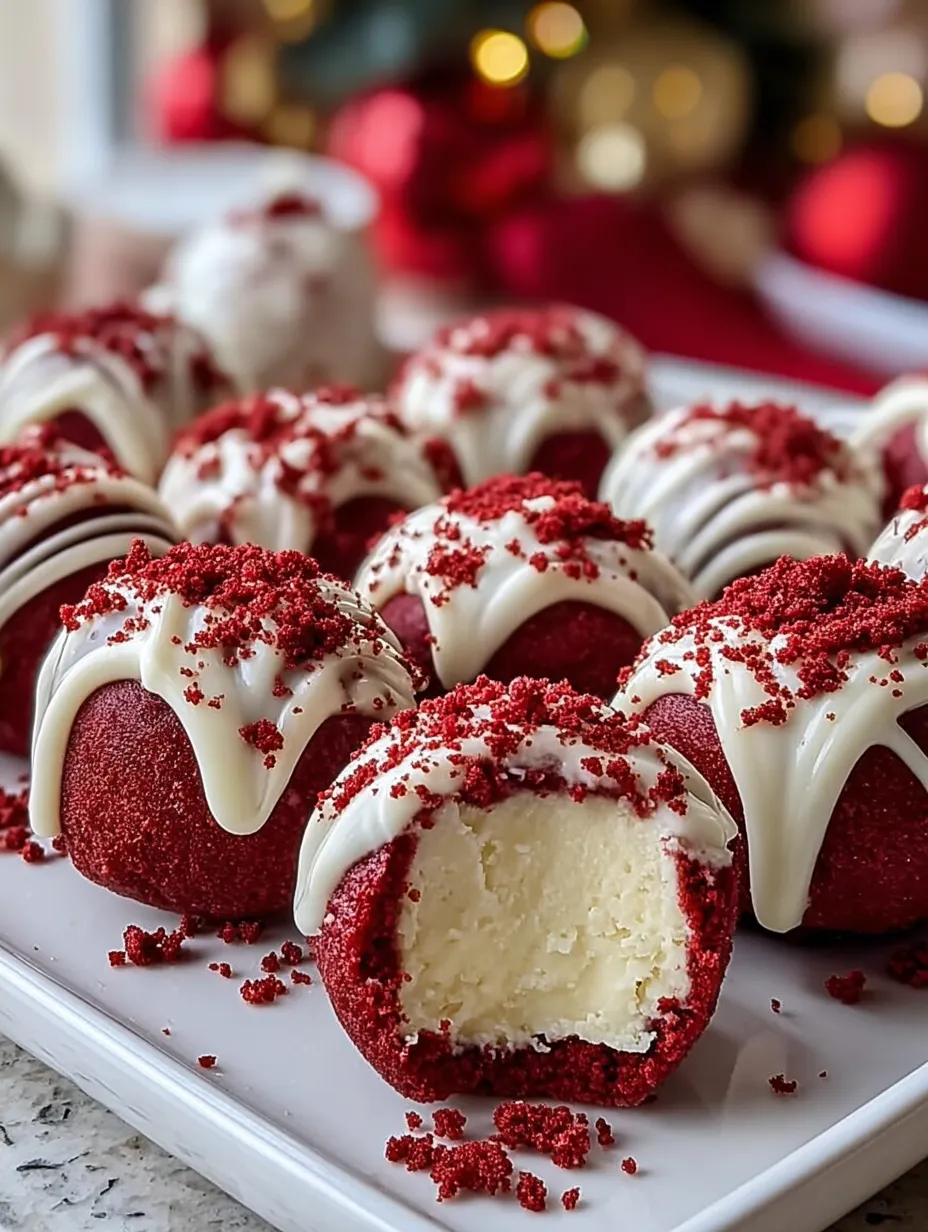
Nothing says Christmas quite like the vibrant red color of red velvet desserts. But the treats in this recipe take that festive color and flavor to a whole new level. These Christmas Red Velvet Cheesecake Bites—as shown in your image—are rich, creamy, luxurious little truffle‑style cake balls filled with a smooth cheesecake center. They’re perfectly round, beautifully coated in red velvet crumbs, and topped with a silky drizzle of white chocolate that makes them look like they came straight off a holiday dessert board on Pinterest.
But here’s the best part:
even though they look impressive and bakery‑made, they’re shockingly simple to create at home with basic tools and pantry ingredients. The combination of tender red velvet cake on the outside and cold, creamy cheesecake filling on the inside makes each bite feel like a tiny Christmas miracle. They’re soft, sweet, velvety, and rich without being overwhelming—exactly the kind of treat everyone reaches for first at a party.
Whether you’re preparing holiday dessert platters, baking gifts for neighbors, hosting a family dinner, or simply treating yourself while watching Christmas movies, these cheesecake‑filled red velvet cake bites are the perfect festive indulgence. They look stunning, taste even better, and bring effortless elegance to your holiday menu.
This article will walk you through every step—from baking the red velvet cake base to rolling the cheesecake centers to drizzling the final white chocolate accents—ensuring your results match the gorgeous final product in the image you provided.
What Makes These Cheesecake-Filled Red Velvet Bites So Special
So, what sets these little bites apart from the sea of other holiday desserts? It’s simple: texture and surprise.
Most red velvet treats—whether cupcakes, cookies, or cakes—deliver a uniform flavor and texture. But these bites offer layers of indulgence:
- A soft, moist red velvet shell made from real cake
- A cool, creamy cheesecake center that contrasts beautifully
- A slightly firm white chocolate top layer
- Finished with a dusting of crimson red velvet crumbs
Each bite is a mini dessert adventure. You bite in expecting one thing, and then boom—your teeth sink through tender cake into that creamy center, and it’s like holiday magic on your tongue.
Plus, unlike cupcakes, which can dry out or get messy in transit, these are compact, giftable, portable, and freezer-friendly. They don’t need forks, plates, or even napkins if you’re careful (although good luck eating just one). They’re perfectly sized to pop into your mouth, and festive enough to shine at any holiday table.
The addition of that cheesecake filling elevates these from your average red velvet cake pop. This isn’t a shortcut recipe—this is the real deal, made with homemade red velvet cake, hand-mixed cheesecake, and thoughtful finishing touches. And that’s exactly what makes these bites special: they feel like they were made with love.
How These Bites Differ From Cupcakes or Cake Pops
Let’s be clear: these aren’t cupcakes and they’re not cake pops either.
Cupcakes are baked in liners, and cake pops are usually made from a mix of crumbled cake and frosting, shaped onto sticks, and dipped in chocolate. These Christmas Red Velvet Cheesecake Bites are a bit more refined and balanced. There’s no stick, and no messy frosting globs—just red velvet cake formed into balls with a hidden pocket of whipped cheesecake inside.
Unlike a cupcake, where the cheesecake would sit on top or be swirled in, this version encases the filling, so when you take a bite, you get a clean edge of cake and a velvety center that holds its shape. Think of them as cake truffles with a twist: the center is lighter than frosting, and the coating is more festive thanks to the chocolate drizzle and decorative crumbs.
In other words, these are the holiday upgrade to any traditional red velvet treat. They’re neater, prettier, and somehow taste even better.
Ingredients You’ll Need
Before you get started, make sure you have everything on hand. These bites are made in three parts: the red velvet cake base, the cheesecake filling, and the decorative topping.
Red Velvet Cake Base Ingredients
- 1 ½ cups all-purpose flour – Gives the cake its structure
- 1 tsp baking powder – Helps the cake rise slightly
- ¼ tsp baking soda – Works with vinegar to make it light
- ¼ tsp salt – Enhances all the flavors
- 1 tbsp unsweetened cocoa powder – Just enough for the classic red velvet taste
- ½ cup unsalted butter, softened – Adds richness
- 1 cup granulated sugar – Sweetens the base perfectly
- 2 large eggs – Bind the batter and add moisture
- 1 tsp vanilla extract – Deepens the flavor
- 1 tbsp white vinegar – Reacts with cocoa and soda for signature texture
- 1 oz red food coloring – For that deep red color
- ½ cup buttermilk – Makes the cake tender and soft
Cheesecake Filling Ingredients
- 8 oz cream cheese, softened – The creamy center
- ¼ cup powdered sugar – Sweetens the cheesecake without grittiness
- 1 tsp vanilla extract – Adds flavor depth
- ¼ cup heavy cream – Whips up to make the filling airy
Decoration Ingredients
- ½ cup white chocolate chips or melting wafers – For the drizzle
- Reserved red velvet crumbs – For that festive topping
- Optional: powdered sugar for light dusting
Tools Needed to Make Perfect Cake Bites
These bites don’t need any fancy equipment, but the right tools can make your process smoother:
- Hand mixer or stand mixer – To cream the butter, sugar, and cheesecake filling
- Mixing bowls – At least two (one for cake, one for filling)
- 9×9 or 8×8 inch cake pan – To bake the red velvet base
- Spatula and whisk – For combining ingredients
- Spoon or small cookie scoop – To form even-sized bites
- Parchment paper or silicone mat – For chilling the bites
- Small saucepan or microwave-safe bowl – To melt the white chocolate
- Optional: piping bag for clean drizzle
That’s it—you don’t need molds, liners, or muffin pans because these are hand-formed, rustic-style cake truffles.
Step 1: Bake the Red Velvet Cake Sheet
Before we can shape anything into bites, we need the red velvet cake base.
Here’s how to do it:
- Preheat your oven to 350°F (175°C).
- Line a square 9×9 inch or 8×8 inch pan with parchment paper (or lightly grease it).
- In a medium bowl, whisk together:
- flour
- baking powder
- baking soda
- salt
- cocoa powder
- In a separate large mixing bowl, beat the softened butter and sugar until light and fluffy (about 2–3 minutes).
- Add the eggs, one at a time, mixing well after each.
- Stir in vanilla extract, vinegar, and red food coloring.
- Alternate adding the dry ingredients and buttermilk to the wet mixture.
- Start and end with dry ingredients.
- Mix just until combined.
- Pour the batter into your prepared pan and smooth the top.
- Bake for 22–25 minutes, or until a toothpick comes out clean.
- Let the cake cool completely before the next step.
You’ll be crumbling this cake later to make the outer shell of the bites, so it’s okay if it’s slightly dense—what matters most is moisture and flavor.
Once cooled, cover it and let it sit for at least 15–20 minutes. This makes it easier to crumble later without sticking to your hands too much.
Step 2: Prepare the Creamy Cheesecake Filling
This is the surprise center that sets these bites apart. It’s creamy, tangy, sweet, and slightly fluffy—like a cross between cheesecake and whipped cream.
Here’s how to make it:
- In a medium bowl, beat the softened cream cheese until totally smooth—no lumps.
- Add the powdered sugar and vanilla extract, and beat again until creamy.
- Slowly add the heavy cream while beating, and keep going until the filling is thick and fluffy.
- You want it scoopable but not runny.
- Chill the filling in the fridge or freezer for 10–15 minutes so it firms up slightly.
Chilling helps you scoop and form it into small centers without it sticking everywhere.
If you want to get ahead, you can even scoop teaspoon-sized balls of this filling onto a parchment-lined plate and freeze them for 10 minutes. This makes them easier to work with when wrapping the cake around.
Step 3: Crumble the Cake to Create the Red Velvet “Dough”
Once your cake is completely cooled, it’s time to transform it into a soft dough you can shape.
Here’s how:
- Use your hands (clean, of course) to crumble the cake into a large bowl.
- Crumble it finely—no big chunks.
- Test the texture by squeezing a small handful.
- If it sticks together like clay, you’re good to go.
- If it’s too dry and falls apart, add 1–2 tbsp of cream cheese or frosting to help bind it.
- Mix until you get a play-dough-like consistency.
You’ll know it’s right when you can scoop some, roll it into a ball, and it holds its shape without cracking.
Set this aside—you’re now ready to form the bites.
Step 4: Form the Cheesecake Centers
This part is simple but crucial for that ooey-gooey inside you see in the image.
Instructions:
- Using a teaspoon or small scoop, scoop chilled cheesecake filling.
- Roll each scoop into a small ball about ½ to ¾ inch wide.
- Place the cheesecake balls on a parchment-lined tray.
- Freeze them for 10 minutes, just enough to firm them up.
This will make the next step—wrapping the red velvet around them—so much easier.
Don’t skip the freeze step, or the filling may leak or break apart during shaping.
Step 5: Wrap the Cheesecake Center in the Red Velvet Shell
This is where the magic happens—combining that soft red velvet dough with the creamy cheesecake center to form the final bite.
Here’s how to assemble:
- Scoop a small amount of red velvet dough (about 1 tablespoon) and flatten it in your palm into a disc about 2 inches wide.
- Take one of the chilled cheesecake centers and place it in the middle of the red velvet disc.
- Gently wrap the cake around the filling and roll it into a ball with your hands.
- Seal the edges well so the filling stays hidden.
- Roll gently to make it smooth.
- Place the finished ball onto a parchment-lined tray.
- Repeat with remaining dough and filling.
You should end up with around 18–24 bites, depending on how big you make them. Try to keep them consistent in size so they look uniform when served.
These should now look exactly like the photo you shared: smooth, red, round bites with a clean outer coating.
Once all the bites are shaped, it’s time to chill them before decorating.
Step 6: Chill the Bites for the Perfect Texture
You’ve done the heavy lifting—it’s time to let the fridge (or freezer) do its part.
- Place the tray of rolled bites in the fridge for 30–45 minutes, or in the freezer for 15–20 minutes.
- This step helps the cheesecake center firm up and keeps the outer shell intact for decorating.
- Chilling also makes the bites easier to dip, drizzle, or top without falling apart.
You want them cold, but not rock-hard. When you press them gently, they should feel firm but have a little give.
If you’re short on time, the freezer works in a pinch. Just don’t freeze them too long, or they’ll sweat as they thaw—which can make the chocolate drizzle slide off.
Step 7: Decorate with White Chocolate & Red Velvet Crumbs
Now it’s time for that signature festive finish—just like in your image.
Here’s how to finish your bites:
- Melt ½ cup white chocolate chips or white melting wafers in a microwave-safe bowl.
- Heat in 20–30 second bursts, stirring between each, until smooth.
- Using a spoon or piping bag, drizzle white chocolate over the top of each chilled bite.
- Don’t worry about perfection—imperfection looks more homemade and inviting.
- While the chocolate is still wet, sprinkle each bite with reserved red velvet cake crumbs.
- You can set some aside from earlier crumbling or crumble an extra corner of cake.
- Let the chocolate set completely before serving or storing.
- This usually takes about 10–15 minutes in the fridge.
Optionally, dust lightly with powdered sugar or edible glitter for extra sparkle. But really, they’re already beautiful just as they are.
Once finished, these bites will look identical to your attached image—round, red, creamy-centered, topped with white chocolate and festive crumbs.
Flavor, Texture & Appearance – What the Perfect Bite Should Look Like
Let’s talk about what it feels like to eat one of these red velvet cheesecake bites, because that’s where the real magic lies.
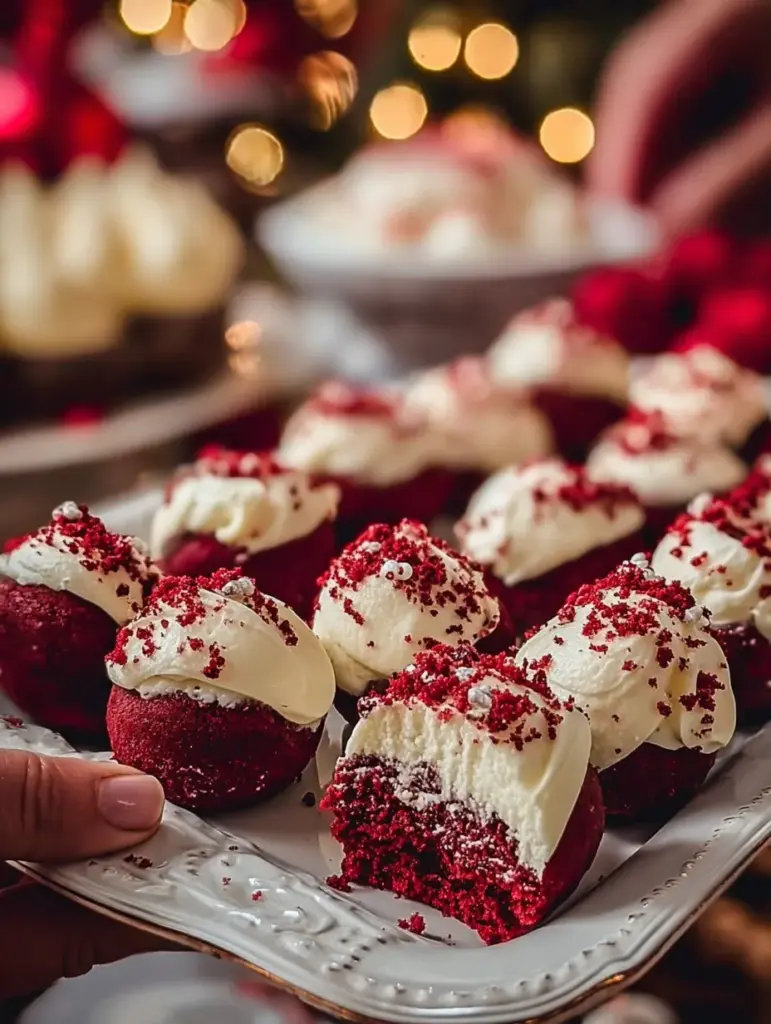
First, you pick one up—it’s slightly cool to the touch and just firm enough to hold its shape. As you bite in, your teeth sink through that soft red velvet cake layer—moist, tender, and rich with a hint of cocoa. Then you hit the center—cool, creamy, lightly sweet cheesecake that melts in your mouth. And finally, the top finishes it off with a soft white chocolate layer and a slight crunch from the red velvet crumbs.
It’s silky, soft, creamy, and a little sweet—but not overpowering. The balance between the mild cocoa notes of red velvet and the tangy cheesecake is absolutely perfect.
Each one feels like an individually wrapped gift for your tastebuds. And even better: they look stunning on any plate, tray, or dessert board.
Print
Christmas Red Velvet Cheesecake Bites (Cheesecake-Filled Cake Balls)
- Prep Time: 25 minutes
- Cook Time: 25 minutes
- Total Time: 1 hour 20 minutes
- Category: Holiday Desserts / Christmas Treats
Description
❄️ These soft, velvety bites feel like little Christmas miracles in your hands. ❤️ A tender red velvet shell wrapped around a creamy cheesecake center — every bite brings that cozy holiday warmth we all grew up loving. And goodness… the way the white chocolate drips down the sides makes them look like snowy Christmas ornaments. ✨🎄
Ingredients
Red Velvet Cake Base:
1 ½ cups all-purpose flour
1 tsp baking powder
¼ tsp baking soda
¼ tsp salt
1 tbsp cocoa powder
½ cup unsalted butter, softened
1 cup granulated sugar
2 large eggs
1 tsp vanilla extract
1 tbsp white vinegar
1 oz red food coloring
½ cup buttermilk
Cheesecake Center:
8 oz cream cheese, softened
¼ cup powdered sugar
1 tsp vanilla extract
¼ cup heavy cream
Decoration:
Melted white chocolate
Crushed red velvet crumbs
Optional: light powdered sugar dusting
Instructions
Preheat oven to 350°F (175°C). Line a 9×9 pan with parchment paper. (2 minutes)
Whisk flour, baking powder, baking soda, salt, and cocoa. (2 minutes)
Beat butter and sugar until fluffy, then add eggs, vanilla, vinegar, and red coloring. (4 minutes)
Add dry ingredients alternating with buttermilk, mixing until smooth. (3 minutes)
Spread batter into pan and bake 20–25 minutes, then cool completely. (25 minutes baking + 30 minutes cooling)
Beat cream cheese until smooth. Add powdered sugar, vanilla, and heavy cream; whip until fluffy. (4 minutes)
Freeze filling for 10–12 minutes until slightly firm. (12 minutes)
Crumble cooled red velvet cake into fine, moist crumbs. (2 minutes)
Flatten small portions of cake crumbs into discs. (5 minutes)
Scoop ½–1 tsp of cheesecake filling into each disc and shape into a smooth ball. (12 minutes)
Refrigerate formed bites for 20–30 minutes. (25 minutes)
Spoon melted white chocolate over each bite and top with red velvet crumbs. (5 minutes)
Notes
These are truffle-style cake bites, not cupcakes.
Perfect for Christmas platters and gifting.
No-bake assembly after baking the cake layer.
The cheesecake center should be firm enough to scoop.
White chocolate topping + red velvet crumbs give the festive finish.
Nutrition
- Serving Size: 20 bites
- Calories: 165 kcal
Tips for the Best Cheesecake-Filled Cake Balls
These cheesecake-stuffed red velvet bites might look bakery-level, but with a few simple tricks, anyone can master them at home. Whether it’s your first time or you’ve made cake balls before, these tips will make sure your batch turns out just like the image — rich red, creamy-centered, and perfectly shaped.
✅ Chill Everything
Chilling is your best friend. Chill the cheesecake filling before rolling it. Chill the cake balls before decorating. Cold ingredients are easier to handle and hold their shape better.
✅ Use Gloves (Optional)
Want smoother cake balls and less mess? Use food-safe gloves when rolling. The red coloring can stain your hands, and gloves make cleanup a breeze.
✅ Don’t Overdo the Cream Cheese Binder
When mixing your red velvet crumbs, go light on cream cheese or frosting. Too much and the dough will be greasy or gummy. You want it moist enough to stick together, not mushy.
✅ Use a Cookie Scoop for Even Sizes
If you want your bites to look uniform, use a small cookie scoop for both the cheesecake filling and the red velvet dough. Consistent size = prettier presentation and even chilling.
✅ Work in Batches
Only take a few cheesecake centers out of the freezer at a time when wrapping with cake. The colder they are, the easier the wrapping.
✅ Don’t Skip the Decoration
The white chocolate drizzle and red velvet crumb topping don’t just look good — they add a delicious texture contrast and holiday flair. Even a light drizzle takes these to the next level.
Serving Tips for Holiday Parties
These red velvet cheesecake bites are made for sharing. They’re easy to eat with fingers, look beautiful on platters, and can be made ahead of time — a Christmas host’s dream.
Here are a few festive ways to serve them:
🎁 On a Holiday Dessert Board
Place them next to cookies, chocolate bark, and mini brownies on a large board for a showstopping sweet spread.
🍽 On Tiered Trays
These bites are gorgeous displayed on tiered cake stands or dessert towers. Their color pops and they hold their shape well at room temp.
🎉 For Parties & Potlucks
Place each bite in a mini cupcake liner for easy grabbing and to keep fingers clean. It adds a professional touch without extra work.
❄️ Cold or Room Temperature?
They’re great both ways! Cold gives a firmer center, while room temperature gives you a creamy, melt-in-your-mouth middle.
Want to get fancy? Serve them with a glass of eggnog, hot chocolate, or mulled wine.
Similar recipes :
Christmas Red Velvet Poke Cake Recipe: A Festive Showstopper You’ll Make Every Year
Decadent Red Velvet Honeybun Cake with Cinnamon Cream Cheese Icing
How to Store & Freeze Your Bites
One of the best parts about this recipe? These bites are extremely make-ahead friendly. Here’s how to keep them fresh and festive:
🧊 Refrigerator
- Store in an airtight container in the fridge for up to 5 days.
- Let them sit out for 10–15 minutes before serving for the best texture.
❄️ Freezer
- Place finished (decorated) bites in a single layer on a tray and freeze until solid.
- Transfer to a freezer bag or container.
- Freeze for up to 1 month.
- Thaw overnight in the fridge before serving.
They hold up beautifully in the freezer and taste just as good after thawing — perfect for holiday prep.
Variations & Fun Holiday Twists
Once you’ve mastered the base recipe, feel free to experiment. These cake bites are super adaptable and easy to customize.
🍬 Peppermint Red Velvet Cheesecake Bites
- Add ½ tsp peppermint extract to the cheesecake filling.
- Sprinkle crushed candy canes on top of the white chocolate drizzle.
🍪 Cookies and Cream Version
- Mix crushed Oreos into the cheesecake filling.
- Top with crushed Oreo crumbs instead of red velvet.
🍫 Chocolate Lovers
- Use dark chocolate drizzle instead of white.
- Add mini chocolate chips to the red velvet dough before shaping.
🎅 Kid-Friendly Reindeer Bites
- Add candy eyes and mini pretzels for antlers after decorating to turn them into reindeer faces.
You can even roll them in crushed graham crackers or toasted coconut for a totally new texture.
Troubleshooting Guide
Even with a straightforward recipe like this one, things can go sideways. Here’s how to avoid or fix the most common issues when making red velvet cheesecake bites.
❌ My bites are cracking when I roll them
- Fix: Your red velvet cake might be too dry. Add 1 tablespoon of cream cheese or a touch of frosting to the mixture and mix again until it binds better.
❌ Cheesecake filling is leaking out
- Fix: The centers weren’t cold enough. Make sure you chill or freeze the cheesecake filling balls before wrapping them in cake dough.
❌ The outer layer is too sticky or greasy
- Fix: You may have added too much binding (cream cheese or frosting) to the cake crumbs. Add a few more dry crumbs to rebalance.
❌ Chocolate drizzle is sliding off
- Fix: Bites are too cold and the chocolate is hardening before sticking. Let the bites sit at room temp for 5–10 minutes before drizzling.
❌ Bites are too soft to pick up
- Fix: They need to chill longer to firm up. Pop them back in the fridge or freezer for 10–15 minutes before serving.
Conclusion – The Sweetest Christmas Treat
These Christmas Red Velvet Cheesecake Bites are everything we love about holiday desserts: rich, creamy, beautiful, and incredibly satisfying. They look like they took hours to make—but they’re surprisingly simple, totally make-ahead friendly, and guaranteed to steal the spotlight at any gathering.
From the luscious red velvet shell to the surprise cheesecake center, every bite is festive perfection. They’re the kind of treat that makes people go “wow, did you really make these?” And the best part? You did.
Whether you’re baking a batch for your family, sharing treats with your coworkers, or preparing an edible gift for someone special, these cheesecake-filled red velvet bites are the kind of recipe that becomes a holiday tradition.
So tie on your apron, crank up the Christmas music, and get ready to roll some bites of joy. 🎄❤️
FAQs
1. Can I use boxed red velvet cake mix?
Yes! If you’re in a pinch, bake a boxed red velvet cake and crumble it once cooled. Just be sure it’s moist enough to form into balls. You might need to add a little frosting or cream cheese as a binder.
2. Can I make them without the cheesecake filling?
You can, but they won’t have that creamy surprise center. If you prefer, you can roll the red velvet cake dough alone and still decorate with white chocolate.
3. Can I make these ahead of time for a party?
Absolutely! You can store them in the fridge for up to 5 days or freeze them for up to a month. Just be sure to keep them in an airtight container to avoid drying out.
4. How do I keep the red color from bleeding into the filling?
Chill the cheesecake filling before wrapping. Also, avoid over-handling the cake dough, which can cause smearing.
5. Do I need a stand mixer to make these?
Nope! A hand mixer works perfectly for both the cake batter and the cheesecake filling. You can even mix by hand if needed (just be ready for a bit of a workout!).
🎄✨ Happy Holidays, and enjoy every bite of these magical treats!