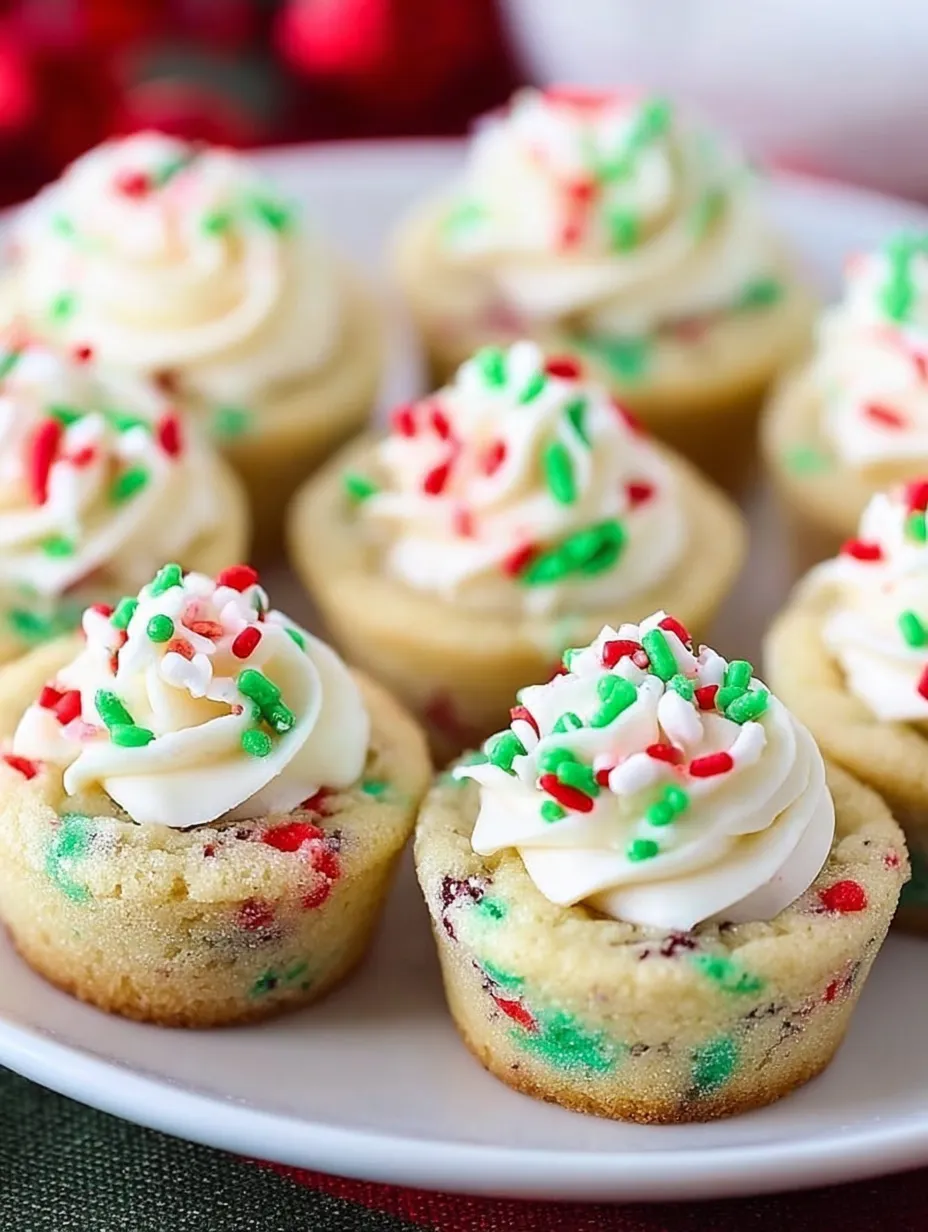
Ready to steal the show at every holiday party this year? These Christmas Sprinkle Cookie Cups are the ultimate crowd-pleasers—soft, buttery sugar cookie bases filled with fluffy vanilla frosting and topped with red and green sprinkles for that festive punch. Whether you’re baking for a cookie exchange, Santa’s cookie plate, or just a cozy December night in, these little cups of holiday cheer deliver big flavor and smiles.
What makes these extra special? They’re super easy to make (yes, even for beginners), bake up beautifully in mini muffin tins, and they look just as festive as they taste! Think: sugar cookie meets cupcake meets a snow-globe full of sprinkles. 🎉
🎁 What Are Christmas Sprinkle Cookie Cups?
These delightful treats are bite-sized sugar cookies that are baked in mini muffin tins to form cup shapes. After baking, they’re filled with rich vanilla buttercream and topped with holiday sprinkles. The soft cookie base and the creamy frosting balance each other perfectly, creating a decadent but not-too-sweet treat.
They’re like mini desserts that pack a serious Christmas punch. The best part? You don’t need any fancy equipment or complicated techniques. Just a bowl, a mixer, and a bit of holiday spirit.✨
❤️ Why You’ll Love These Festive Cookie Cups
- Festive AF – The red and green sprinkles baked right into the cookies scream Christmas!
- Soft and Buttery Texture – No dry cookie cups here. The texture is melt-in-your-mouth good.
- Perfectly Portioned – Ideal for parties, lunchboxes, or cookie platters.
- Frosting Heaven – Creamy, dreamy vanilla buttercream piped into each cup.
- Kid-Friendly – Easy to make and decorate with the kiddos.
They’re not just cookies, they’re mini moments of joy. 🎄
🛒 Ingredients Overview
Let’s take a closer look at what makes these little cookie cups magical.
Butter
You’ll need unsalted butter for both the cookie dough and the frosting. It’s what gives these cookies their rich, melt-in-your-mouth texture. Make sure it’s softened at room temperature!
Powdered Sugar
This adds that classic sugar cookie sweetness without the graininess. It also makes the frosting smooth and fluffy.
Flour
Use all-purpose flour for structure. Don’t skip the sifting—it helps keep your cookies light and soft.
Baking Powder & Salt
These balance the sweetness and give the cookie cups a bit of lift.
Egg & Vanilla
They bring moisture and flavor. Don’t underestimate the vanilla—it adds that warm holiday bakery scent we all love.
Sprinkles
Use a mix of red and green sprinkles. Nonpareils or jimmies work great—but avoid sugar crystals that may melt too much.
Frosting Ingredients
Same butter and powdered sugar combo with vanilla and a splash of milk to get that perfect pipeable consistency. Optional: add a pinch of salt to cut through the sweetness.
🍽 Tools You’ll Need
- Electric mixer or hand mixer
- Mini muffin tin (24-cup)
- Mixing bowls
- Rubber spatula
- Measuring cups and spoons
- Piping bag (with star tip for flair)
- Cooling rack
Pro tip: Mini cookie scoops make portioning dough into muffin tins super quick and even!
🌈 Let’s Talk Sprinkles: Choosing the Right Colors and Types
This isn’t just decoration—it’s personality! For the best results:
- Stick with jimmies or soft nonpareils—they hold shape during baking.
- Avoid sanding sugar (it dissolves).
- Match your frosting sprinkles with the cookie dough ones for visual harmony.
- Go for classic Christmas colors: red, green, white, and even a pinch of gold for sparkle.
🧈 The Secret to Soft, Buttery Cookie Cups
Here’s the deal: Don’t overbake! These cookies might look pale on top but will continue baking slightly in the tin after you take them out. A golden bottom is the sweet spot.
Also, softened butter (not melted!) is key for that dreamy creamed texture that makes the dough fluffier.
👩🍳 Step-by-Step Instructions (Detailed Walkthrough)
Let’s break down every step so your cookie cups come out bakery-perfect, every single time.
1. Preheat and Prep the Pan
Set your oven to 350°F (175°C) and lightly grease a mini muffin tin. You can also use a baking spray with flour or just brush a little melted butter into each cup. This ensures the cookie cups pop out easily after baking.
❄️ Tip: If you’re baking in batches, let the pan cool between rounds to keep cookie cups from spreading weirdly.
2. Cream the Butter and Sugar
In a large mixing bowl, beat 1¼ cups of softened butter with 1½ cups of powdered sugar using an electric mixer. This should take 2-3 minutes until the mix is light, fluffy, and almost mousse-like. This step is crucial—it gives your cookie base its softness.
💡 Creaming = incorporating air = fluffy cookies!
3. Add the Egg and Vanilla
Crack in 1 egg and pour in 1 teaspoon of vanilla extract. Beat the mixture until everything is smooth and creamy.
🥚 Room temperature eggs mix better—take it out about 30 minutes before baking.
4. Combine Dry Ingredients
In a separate bowl, whisk together:
- 2½ cups all-purpose flour
- 1 teaspoon baking powder
- ½ teaspoon salt
Give it a quick sift or fluff it up with a whisk to prevent lumps and make it easier to incorporate.
5. Make the Dough
Gradually add the dry mixture to the wet mixture. Stir with a spatula or your mixer on low speed until everything’s well combined. It’ll be a soft, slightly sticky dough.
Now, fold in the holiday cheer:
- ¼ cup red sprinkles
- ¼ cup green sprinkles
Fold gently so the colors don’t smear and turn your dough brown!
🎄 Try adding a drop of almond extract for an extra holiday flavor boost!
6. Shape the Cookie Cups
Scoop about 1 tablespoon of dough into each greased mini muffin cavity. Press it gently into the bottom and up the sides a little bit to start the cup shape.
Don’t worry too much about perfection—they’ll naturally puff into cup shapes while baking.
🥄 Using a cookie scoop keeps things even and pretty!
7. Bake to Golden Perfection
Pop the tray into your preheated oven and bake for 10–12 minutes. You’ll know they’re ready when:
- The tops are pale but set
- The edges look slightly golden
- They spring back gently when touched
Right after baking, press down the centers again using the back of a teaspoon or a round measuring spoon to keep that “cup” shape.
Let them sit in the tin for a couple of minutes, then transfer to a wire rack to cool completely.
🍥 Making the Dreamy Vanilla Frosting
Now comes the fun part—fluffy, creamy vanilla frosting.
1. Beat the Butter
In a clean bowl, beat ½ cup of softened butter until it’s smooth and slightly pale—about 1–2 minutes.
2. Add the Good Stuff
Gradually add:
- 2½ cups of powdered sugar
- 1 teaspoon vanilla extract
- ½ teaspoon salt
- 2–3 tablespoons of milk, as needed
Mix slowly at first to avoid a sugar cloud, then whip on high speed for 2–3 minutes until it’s light and fluffy.
🎀 If it’s too thick, add a little more milk. Too thin? Add more sugar.
🎨 Piping and Decorating Like a Pro
Once your cookie cups are completely cooled:
- Spoon the frosting into a piping bag fitted with a star tip.
- Pipe a festive swirl into each cookie cup.
- Top with extra sprinkles—red, green, maybe even a little edible glitter!
It’s like decorating a tiny Christmas tree… that you can eat.
✨ No piping bag? Use a zip-top bag and snip a corner off.
📦 How to Store Your Cookie Cups
Keep them fresh by storing in an airtight container at room temperature for up to 3 days. If you live in a warmer climate, refrigerate—but bring them to room temp before serving so the frosting softens back up.
Want to make them ahead? You can freeze the cookie cups without the frosting for up to 2 months. Just thaw, frost, and decorate when you’re ready.
Print
🎄 Christmas Sprinkle Cookie Cups Recipe
- Prep Time: 20 minutes
- Total Time: 32 minutes
- Category: Holiday Cookies / Christmas Desserts / Bite-Sized Treats
Description
🎄✨ Soft, buttery cookie cups filled with creamy frosting and showered in festive sprinkles — the kind of treat that makes the whole kitchen feel like Christmas morning. These tiny bites of joy disappear faster than snowflakes in warm hands! 🎅💚❤️🍪
Ingredients
1 1/4 cups unsalted butter, softened
1 1/2 cups powdered sugar
1 teaspoon baking powder
1/2 teaspoon salt
1 egg
1 teaspoon vanilla extract
2 1/2 cups all-purpose flour
1/4 cup red sprinkles
1/4 cup green sprinkles
Frosting:
1/2 cup unsalted butter, softened
2 1/2 cups powdered sugar
1 teaspoon vanilla extract
1/2 teaspoon salt
2–3 tablespoons milk
Extra sprinkles for topping 🎉
Instructions
Preheat the oven 🔥
Set oven to 350°F (175°C) and lightly grease a mini muffin pan.
⏱️ Duration: 2 minutesCream the butter & sugar 🧈✨
Beat softened butter and powdered sugar until fluffy and pale.
⏱️ Duration: 3 minutesAdd egg & vanilla 🥚🌿
Mix in egg and vanilla until smooth and creamy.
⏱️ Duration: 1 minuteCombine dry ingredients 🥣
In another bowl, whisk flour, baking powder, and salt together.
⏱️ Duration: 2 minutesForm the dough 🎄
Add the dry ingredients to the butter mixture, then fold in red and green sprinkles.
⏱️ Duration: 2 minutesShape the cookie cups 🍪
Scoop about 1 tablespoon of dough into each mini muffin mold and gently press the center.
⏱️ Duration: 3 minutesBake 🔔
Bake for 10–12 minutes until lightly golden. Press centers again after baking to maintain the cup shape.
⏱️ Duration: 10–12 minutesCool completely ❄️
Let cookie cups cool before filling.
⏱️ Duration: 15 minutesPrepare the frosting 🍥
Whip butter until airy, then add powdered sugar, vanilla, salt, and milk until smooth and pipeable.
⏱️ Duration: 4 minutesPipe frosting 🎀
Fill each cooled cookie cup using a piping bag.
⏱️ Duration: 3 minutesDecorate 🎉
Add festive sprinkles on top for the perfect holiday sparkle.
⏱️ Duration: 1 minute
Notes
– These cookie cups are soft, buttery, and perfect for Christmas parties or cookie boxes.
– The festive sprinkles baked right into the dough give them that joyful holiday look without extra effort.
– They hold their shape beautifully in a mini muffin pan, making them easy to fill and serve.
– The creamy frosting adds a lovely sweetness that balances the buttery cookie base.
– Kids especially adore these — they look like tiny edible presents!
Nutrition
- Serving Size: 24 cookie cups
- Calories: ~150 kcal
⏳ Can You Make These Ahead of Time?
Absolutely! Here’s how:
- Bake the cookie cups a day or two ahead and keep in a sealed container.
- Make the frosting in advance and store in the fridge—just rewhip before piping.
- Assemble right before serving to keep them fresh and picture-perfect.
Perfect for holiday prep when you’re juggling 10 other things.
You may also like :
White Chocolate Christmas Chex Mix: The Ultimate Festive Treat
Striped Christmas Ornament & Snowflake Sugar Cookies: A Holiday Classic
🎯 Tips & Tricks for Perfect Cookie Cups Every Time
- Don’t overmix the dough—once the flour’s in, just stir until combined.
- Cool completely before frosting or you’ll have a melty mess.
- Use room-temp ingredients for best texture.
- Double the batch—these go fast at parties!
- Decorate with personality! Let kids or guests add their own toppings.
🧁 Want extra flavor? Try a little almond or peppermint extract in the frosting.
🎉 Variations & Fun Holiday Twists
Switch things up to make these your own!
1. Chocolate Drizzle
Drizzle melted white or dark chocolate over the top for extra richness.
2. Peppermint Wonderland
Add crushed candy canes into the dough or on top of the frosting for minty crunch.
3. Sprinkle Themes
Try blue and white sprinkles for a Frozen theme or gold for New Year’s Eve cookie cups.
4. Flavor the Frosting
Swap vanilla for peppermint, orange zest, or maple for a fun twist.
🎄 Conclusion
These Christmas Sprinkle Cookie Cups are everything a holiday treat should be—fun, festive, flavorful, and ridiculously cute. From the soft, buttery base to the creamy vanilla frosting and crunchy sprinkles, each bite feels like unwrapping a tiny Christmas present.
Whether you’re baking with family, prepping for a cookie swap, or just indulging in a little holiday cheer for yourself, this recipe is your go-to. And hey, Santa wouldn’t mind finding a few of these on his plate either. 😉
Make them once, and they’ll become a beloved Christmas tradition year after year.
Similar recipes :
Christmas Sugar Cookie Cheesecake Bars (No-Bake)
No-Bake Christmas Oreo Lasagna
🎅 FAQs
1. Can I freeze these cookie cups?
Yes! Freeze the unfrosted cookie cups for up to 2 months. Thaw at room temp before decorating.
2. Can I use store-bought frosting?
You can, but homemade gives better flavor and texture. If using store-bought, whip it a bit to fluff it up before piping.
3. What other flavors can I try?
Almond extract, lemon zest, or peppermint are great holiday flavors you can mix into either the dough or the frosting.
4. How do I keep the cookie cups soft?
Don’t overbake! Also, store in an airtight container at room temp and avoid over-handling after baking.
5. Can I make this in regular muffin tins?
You can, but they’ll be bigger. Adjust baking time to about 14–16 minutes and press down the centers well after baking.


