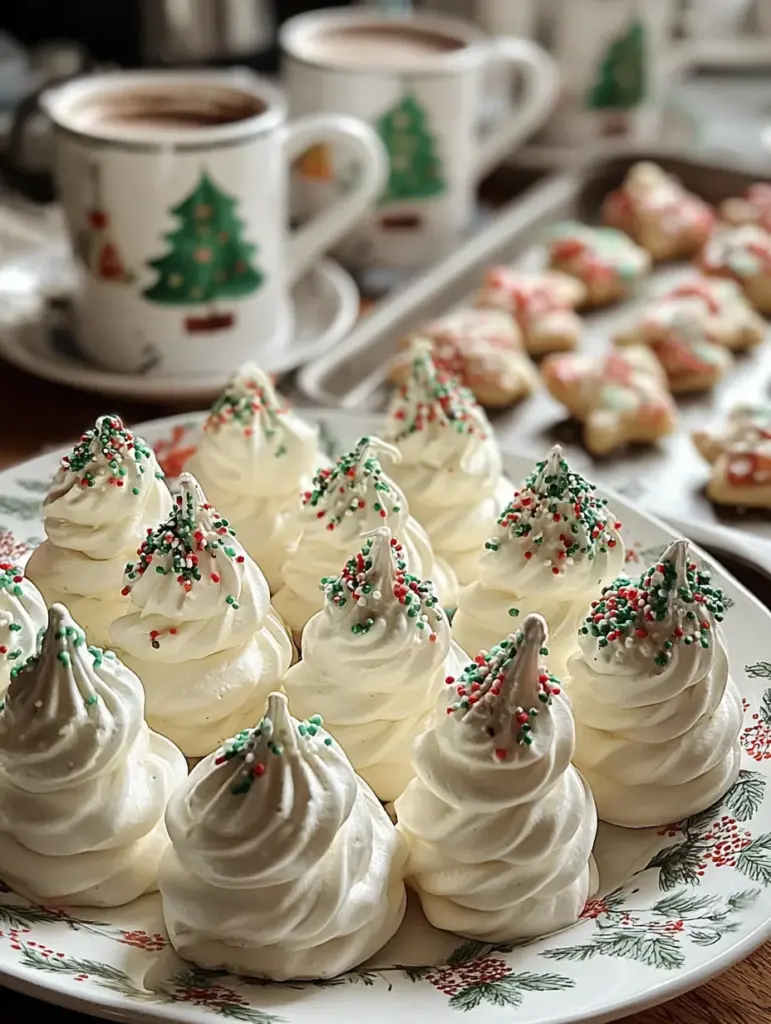
Delicately crisp on the outside, soft and airy on the inside—these Christmas Tree Meringue Cookies are as magical as freshly fallen snow. With their graceful white swirls, sparkly green tips, and festive sprinkles, they’re the perfect treat for cookie trays, holiday gifts, or just a cozy night in with hot cocoa. Even better? They’re surprisingly easy to make with just a handful of ingredients!
🎄 A Holiday Treat That’s Equal Parts Elegant and Adorable
If you’re looking for a holiday cookie that feels like it came straight out of a Christmas fairy tale, Christmas Tree Meringue Cookies are exactly what you need.
These cookies are more than just eye candy—they’re a textural masterpiece. The first bite delivers a satisfying crunch that gives way to a light, melt-in-your-mouth interior. They’re sweet without being overpowering, and the subtle vanilla flavor brings a comforting warmth that pairs perfectly with the chill of the season.
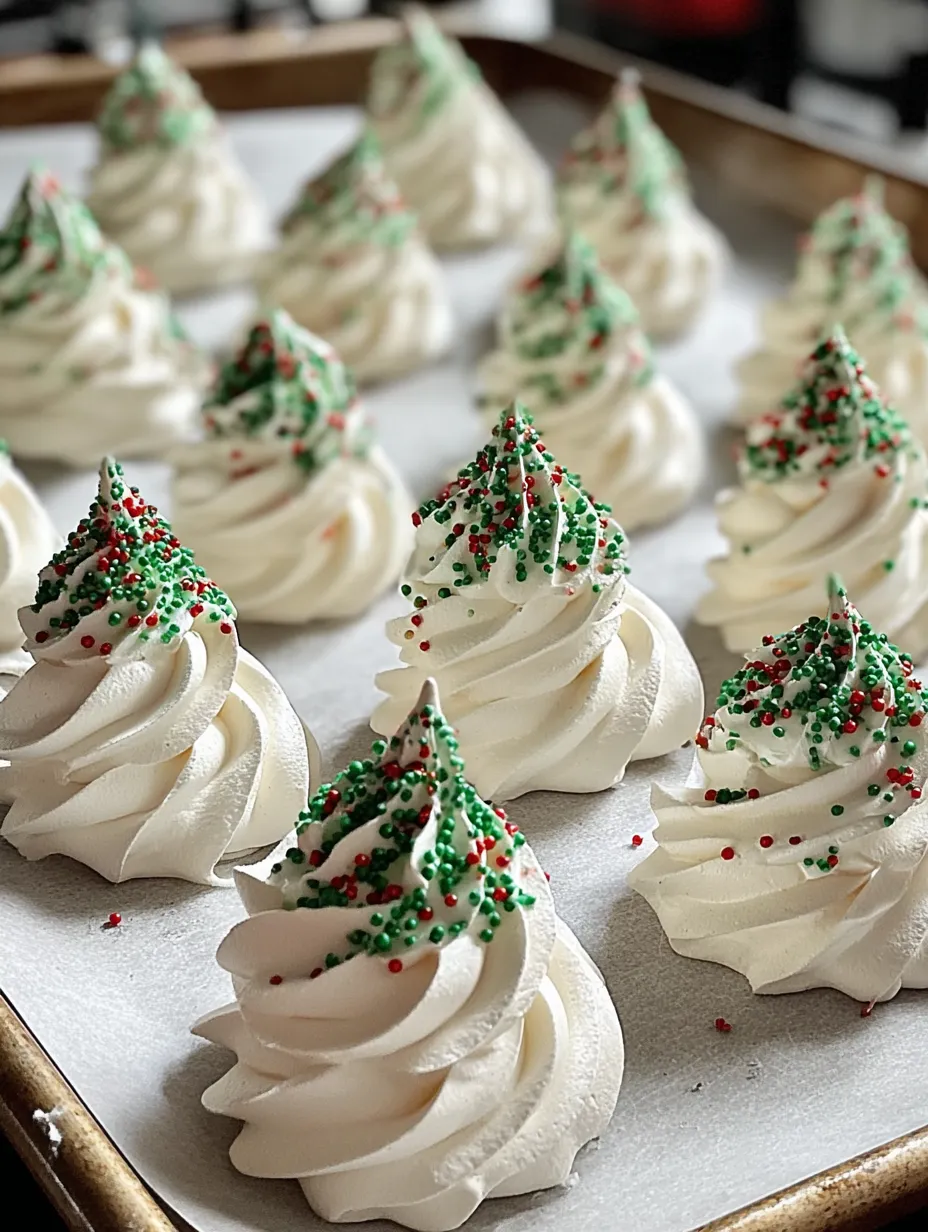
Visually, they’re little showstoppers. Picture swirling mounds of bright white meringue, piped into beautiful Christmas tree shapes, gently kissed with green sugar sprinkles at the tips, and decorated with tiny red and green nonpareils that resemble ornaments. Some even get topped with a tiny star for that classic Christmas tree finish.
And while they look like something from a professional bakery, they’re actually very beginner-friendly. With a few tips, the right tools, and a little patience, anyone can whip these up at home—even if you’ve never made meringue before.
💖 What Makes These Meringues So Magical?
The magic of these cookies is in the contrast—both visually and texturally.
- They’re festive yet minimalist: The contrast between the clean white base and the subtle sparkle of green sugar and colorful sprinkles is both elegant and whimsical.
- They’re light yet satisfying: You can enjoy a few of these without feeling stuffed or overly sugared out.
- They store well: Unlike frosted cookies, these keep beautifully when stored properly.
- They’re versatile: Change the decorations, add flavorings, or color the meringue for endless holiday variations.
- They make perfect edible gifts: Wrapped in a clear bag or nestled in a festive tin, they’re as delightful to give as they are to receive.
🥚 Ingredients – Simple, Accessible, and Magical
What’s truly wonderful about this recipe is that it doesn’t call for any exotic or expensive ingredients. You may already have most of these in your pantry!
4 Large Egg Whites (Room Temperature)
Egg whites are the heart and soul of meringue. Room temperature whites whip more easily and achieve better volume. Cold whites can be used, but they take longer to whip and might not reach the same height.
Pro tip: If you’re in a rush, place the eggs in a bowl of warm (not hot!) water for 10 minutes before separating.
1 Cup Granulated Sugar
The sugar sweetens the meringue and stabilizes the foam created by the egg whites. It must be added slowly, a tablespoon at a time, and completely dissolved before baking. If added too quickly, your meringue may turn grainy.
Optional but helpful: You can pulse the sugar in a food processor for a few seconds to make it finer—this helps it dissolve faster.
¼ Teaspoon Cream of Tartar
This acid strengthens the protein structure in the egg whites, helping them whip up into stiff peaks and hold their shape. It also improves the overall texture of the meringue.
Substitute: If you don’t have cream of tartar, use ½ teaspoon of lemon juice or white vinegar.
1 Teaspoon Pure Vanilla Extract
This adds flavor and warmth to the cookies. Always opt for pure vanilla extract over artificial—it makes a big difference in taste, especially in such a simple recipe.
Green Sanding Sugar or Green Sprinkles
To mimic the green-tipped branches of a snowy Christmas tree. Only sprinkle a small amount on the top swirls of the piped meringue to create a realistic effect (as seen in your image).
Red & Green Nonpareils
Tiny round sprinkles that resemble miniature ornaments or holiday lights. Scatter a few randomly over each tree for a festive touch.
Mini Star Sprinkles (Optional)
A small golden or yellow star placed right at the tip of each tree brings the whole look together. This part is totally optional, but it adds that final magical touch.
🛠 Essential Tools & Setup for Success
While the ingredients are simple, the technique requires the right tools to ensure success:
- Electric Mixer: A stand mixer is ideal, but a hand mixer works just fine. Whipping by hand is not recommended—it’s extremely labor-intensive.
- Large Mixing Bowl: Use stainless steel or glass, never plastic. Plastic can retain grease, which interferes with whipping.
- Piping Bag: You’ll need a large piping bag or a strong zip-top bag with the corner snipped off.
- Large Star Tip: A Wilton 1M or 2D piping tip will give you that classic tree swirl look.
- Spatula: For gently transferring the meringue into the piping bag.
- Parchment Paper: Lining your baking sheets ensures easy removal without sticking or overbaking.
👩🍳 Step-by-Step Instructions
This is where the magic really happens. Follow these steps carefully, and you’ll have a tray full of stunning, bakery-style Christmas meringues.
Step 1: Preheat and Prep
Set your oven to 200°F (95°C). Low and slow is the rule for meringues. Too hot, and they’ll crack. Too fast, and they won’t dry out properly.
Line 2–3 baking sheets with parchment paper. Do not use wax paper or foil—parchment only.
Step 2: Whip the Egg Whites
In a clean, grease-free bowl, add your 4 egg whites. Begin beating on medium speed until they become frothy—like soap bubbles. This usually takes 1–2 minutes.
Once frothy, add the ¼ teaspoon of cream of tartar.
Step 3: Add Sugar Slowly
With the mixer still on medium, begin adding 1 cup of granulated sugar, 1 tablespoon at a time. This step should take a full 7–10 minutes. Don’t rush it.
Watch as the mixture turns from frothy to glossy white.
Step 4: Beat to Glossy Stiff Peaks
Turn the mixer to high speed and continue beating until stiff peaks form. This means the meringue should hold its shape when the beaters are lifted, with the peak standing up without drooping.
Test it: Pull out the beaters and flip them over. If the peak doesn’t fall over and the meringue looks shiny, you’re ready.
Step 5: Add Vanilla Extract
Once you’ve reached stiff peaks, add 1 teaspoon of vanilla and beat just long enough to incorporate. Don’t over-beat here—you don’t want to deflate the meringue.
Step 6: Pipe the Trees
Spoon the meringue into your piping bag fitted with a star tip.
Hold the bag vertically, close to the parchment paper. Start with a wide spiral at the bottom and work your way upward, making slightly smaller swirls as you go. Finish with a pointed tip at the top.
Each tree should be about 2 inches tall and 1.5–2 inches wide.
Step 7: Decorate with Sprinkles
Now for the fun part!
- Lightly sprinkle green sanding sugar on the top third of each tree.
- Add a few red and green nonpareils scattered across the sides.
- Optionally, place a mini star sprinkle right on top.
Pro Tip: Use tweezers to place the stars if your fingers are too big—it helps with precision.
Step 8: Bake Low and Slow
Place your trays in the preheated oven and bake for 90 minutes. Resist the urge to open the oven—it lets moisture in.
After 90 minutes, turn off the oven, crack the door open with a wooden spoon, and let the cookies cool inside for 1 hour. This prevents cracking and ensures a perfectly crisp texture.
💡 Expert Tips for Success
- Humidity is the enemy: Don’t make meringue on a rainy or humid day if you can avoid it.
- Use superfine sugar: It dissolves faster and creates a smoother meringue.
- Wipe tools with vinegar: Before whipping, clean your bowl and beaters with vinegar to eliminate grease.
🎨 Decorating Variations to Try
- Peppermint Flavor: Swap vanilla for peppermint extract and sprinkle with crushed candy cane.
- Chocolate Drizzle Trees: Once baked and cooled, drizzle with melted white or dark chocolate.
- Snow-Kissed Trees: Add edible glitter or powdered sugar for a snow-dusted effect.
- Green Swirl Trees: Tint a portion of your meringue light green and swirl with white for a marbled look.
📦 Storage & Make-Ahead Tips
- Store in airtight containers at room temperature.
- Keep them away from moisture or humidity.
- Don’t refrigerate—it’ll make them sticky.
- Great for make-ahead gifting—they stay fresh for up to 7 days.
You may also like :
Chocolate Pretzel Christmas Trees – A Magical Holiday Treat
Pastel Chocolate Pretzel Christmas Trees: A Holiday Dream Come True
❄️ Can You Freeze Meringue Cookies?
Yes! Freeze fully cooled meringues in an airtight container separated by parchment paper. Freeze for up to 1 month.
To thaw: Remove the lid and thaw at room temperature to prevent moisture from ruining the texture.
Print
Christmas Tree Meringue Cookies (Bakery-Style White Trees)
- Prep Time: 25 minutes
- Cook Time: 1 hour 30 minutes
- Total Time: 2 hours 55 minutes
- Category: Holiday Cookies & Christmas Desserts
Description
🎄 Light as snowflakes and crisp with a gentle melt, these bakery-style Christmas tree meringue cookies feel like pure holiday magic. ✨ Snowy white swirls with festive green tips and tiny sprinkles make them a quiet showstopper on any cookie tray. They’re the kind of treat that disappears slowly, one delicate bite at a time. 🤍🍪
Ingredients
4 large egg whites, room temperature
1 cup granulated sugar
¼ tsp cream of tartar
1 tsp pure vanilla extract
Green sanding sugar or green sprinkles
Red & green nonpareils
Mini star sprinkles (optional)
Instructions
Preheat oven to 200°F (95°C) and line baking sheets with parchment paper. (5 minutes)
In a clean mixing bowl, beat egg whites on medium speed until foamy, then add cream of tartar. Continue beating until soft peaks form. (5 minutes)
Gradually add granulated sugar, one tablespoon at a time, beating constantly until stiff, glossy peaks form. Beat in vanilla extract. (8–10 minutes)
Transfer the meringue to a piping bag fitted with a large star tip and pipe tall, stacked swirls to form Christmas tree shapes. (10 minutes)
Lightly sprinkle green sanding sugar on the tips only, then add red and green nonpareils. Top with a mini star if desired. (5 minutes)
Bake at 200°F for 90 minutes, then turn off the oven, crack the door slightly, and let cookies cool completely inside. (1 hour 30 minutes bake + 1 hour cooling)
Notes
Nutrition
- Serving Size: 24–30 cookies
- Calories: 35 kcal
📊 Nutritional Information (Per Cookie)
| Component | Amount |
|---|---|
| Calories | ~35 |
| Total Fat | 0g |
| Carbohydrates | 8g |
| Sugars | 8g |
| Protein | 1g |
| Gluten | 0g (GF!) |
🎁 Gifting Ideas: Wrap With Love
- Cellophane bags tied with gold or red ribbon.
- Mason jars layered with parchment for a rustic look.
- Holiday tins with a custom cookie label.
- Add a handwritten note: “Wishing you a sweet, snowy season!”
🧁 Why They Belong on Your Christmas Cookie Tray
- They add height and elegance to a cookie spread.
- They’re unique and surprising—most people haven’t seen cookies like these!
- They’re light enough to eat after a heavy meal.
- They bring joy—kids love decorating them, and adults love admiring them.
🎉 Conclusion
Christmas Tree Meringue Cookies are a reminder that simple things can be truly magical. With their snowy white spirals, gentle crunch, and sparkling festive flair, they capture the essence of the holidays in one light, delightful bite.
Make them with your kids, gift them to your neighbors, or just bake a batch for yourself while holiday music plays in the background. However you enjoy them, these cookies are guaranteed to become a cherished holiday tradition.
Similar recipes :
Creamy Cranberry Pecan Christmas Tree Appetizers 🎄
Christmas Cherry Bombs – A Festive No-Bake Delight
❓FAQs
1. Can I make these ahead of time?
Yes! They keep perfectly for 5–7 days in a sealed container.
2. Why are my meringues sticky?
Most likely, the humidity is too high. Try baking a little longer or avoid making them on damp days.
3. Can I use liquid food coloring to tint the meringue?
Use gel coloring instead. Liquid can loosen the meringue and ruin the structure.
4. Can I make them without cream of tartar?
Yes, substitute with ½ tsp lemon juice or white vinegar.
5. How do I prevent cracks?
Cool the cookies in the oven with the door slightly open for at least an hour.


