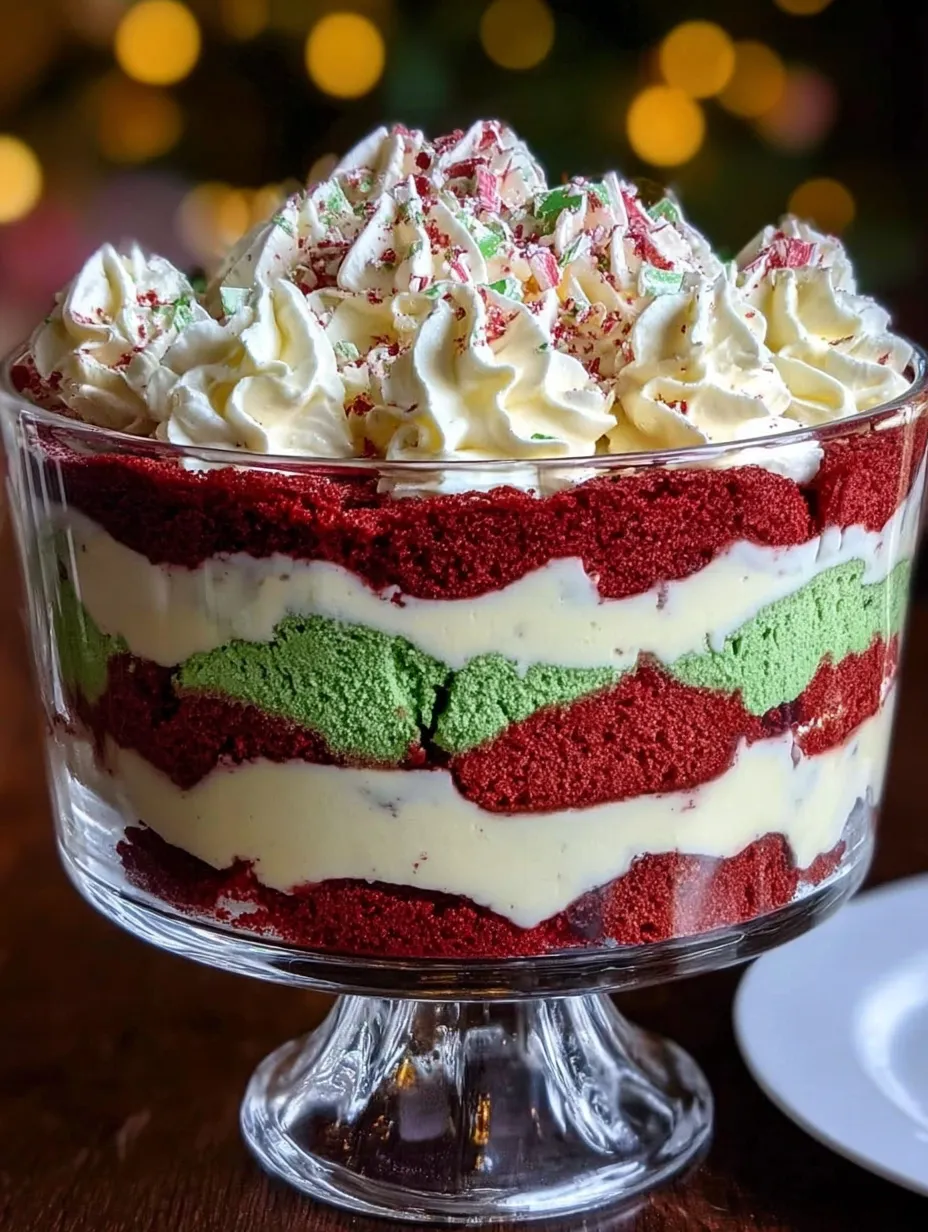
Let’s be honest — the holidays are just as much about the food as they are about the presents. And when it comes to desserts, nothing says “wow” quite like this Christmas Trifle Dessert. Imagine a stunning glass bowl layered with vibrant red velvet crumbs, bright green vanilla cake, a dreamy cheesecake-style filling, and pillowy whipped cream rosettes dusted in red and green sugar. It’s like Christmas in dessert form!
This isn’t just a treat; it’s a centerpiece. Whether you’re hosting a holiday party, bringing something to the family dinner, or just want to surprise your kids with something magical — this dessert brings joy with every spoonful.
What is a Christmas Trifle?
A trifle is traditionally a layered dessert originating from England, typically made with sponge cake, custard, and whipped cream. But we’re putting a merry twist on this classic with holiday colors, a luscious cream cheese filling, and a cake base that looks like a holiday ornament exploded in the best way possible.
Instead of ladyfingers or sponge soaked in alcohol, we’re using vibrant red velvet and a bright green vanilla cake — which not only taste fantastic but also give the dessert a striking, festive contrast.
Why You’ll Love This Dessert
Let’s count the ways this trifle will become a holiday tradition:
- It’s a showstopper. The vibrant layers look like a dessert straight out of Santa’s workshop.
- It’s ridiculously easy. Yes, it looks fancy — but we’re using boxed cake mixes and simple ingredients to get you there fast.
- It feeds a crowd. One trifle serves up to 12 people — perfect for gatherings.
- It’s make-ahead friendly. Prep it the day before, chill it overnight, and you’re ready to go.
Ingredients Overview: What You’ll Need
Here’s everything you need to create this festive masterpiece. Most are pantry-friendly, and everything else can be picked up at any grocery store.
Red Velvet Cake Layer
- 1 box red velvet cake mix
- Eggs, oil, water (per box instructions)
Green Vanilla Cake Layer
- 1 box white or vanilla cake mix
- Green gel food coloring
- Eggs, oil, water (per box instructions)
Cream Cheese Filling
- 2 cups cold heavy whipping cream
- 1 (8 oz) block cream cheese, softened
- 1 cup powdered sugar
- 1 teaspoon vanilla extract
Whipped Cream Topping
- 2 cups cold heavy whipping cream
- 4 tablespoons powdered sugar
- 1 teaspoon vanilla extract
- Red and green sanding sugar for sparkle
Tools You’ll Need
- A clear trifle bowl or large glass bowl (a must for that visual effect!)
- Electric mixer or hand mixer
- Mixing bowls
- Offset spatula or spoon for spreading layers
- Piping bag with a large star tip for those beautiful whipped cream rosettes
Red Velvet Cake Layer: The Foundation of Holiday Flavor
Start by baking your red velvet cake according to the box instructions. Use a 9×13 inch pan and let it cool completely before you even think of layering. Once cool, use clean hands to gently crumble the cake into fluffy, moist chunks — not powdery crumbs. You want texture, not dust.
Pro tip: Don’t overbake the cake! Dry crumbs won’t hold their color or texture well in the trifle.
Green Vanilla Cake Layer: A Festive Pop of Color
This is the layer that screams “Christmas!” Take a vanilla or white cake mix and prepare it as instructed. Add green gel food coloring (not liquid — it’ll dull the batter) until you get that perfect Christmas tree green.
Bake in a 9×13 pan and allow to cool fully. Once cooled, crumble gently just like you did with the red velvet.
Color tip: If your batter looks neon before baking — don’t worry. It’ll deepen beautifully in the oven.
Cream Cheese Filling: Silky, Fluffy, and Just Sweet Enough
This layer is a cross between cheesecake and whipped cream — and honestly, it’s what makes this trifle next-level.
Start by beating the softened cream cheese until totally smooth (no lumps!). Add in powdered sugar and vanilla, beating again until creamy.
Now in a separate bowl, whip your cold heavy cream to stiff peaks. Then fold the whipped cream gently into the cream cheese mixture — you’re looking for a smooth, fluffy, spreadable filling. Don’t overmix or you’ll deflate all that airy goodness.
Whipped Cream Topping: Light, Sweet, and Pipe-Worthy
No trifle is complete without a generous crown of whipped cream. For this one, we go big. Beat the heavy cream with powdered sugar and vanilla until stiff peaks form. It should be firm enough to hold its shape when piped but not overbeaten into butter.
Spoon it into a piping bag fitted with a star tip and set aside in the fridge until ready to top.
Bonus Tip: Chill your mixing bowl and beaters before whipping — it makes the process faster and fluffier.
Assembling the Christmas Trifle: Layer by Layer Perfection
Here comes the fun part — building your dessert masterpiece.
- Base Layer: Start with a thick layer of red velvet cake crumbs. Press them down gently to create an even base.
- Cream Cheese Layer: Spread a generous, fluffy layer of the cream cheese mixture over the red velvet.
- Green Cake Layer: Add a firm layer of green vanilla cake crumbs. Press lightly to form a clean, bright stripe.
- Second Red Velvet Layer: Repeat with more red velvet crumbs.
- Top It Off: Pipe tall whipped cream rosettes all across the surface. Finish with a sprinkle of red and green sanding sugar for that festive sparkle.
You’re done! Isn’t it stunning?
Decorating Like a Pro: The Finishing Touches
The final step is all about that wow factor. The whipped cream rosettes make this trifle look bakery-worthy — and they’re easier than you think. Just hold your piping bag at a 90° angle over the surface, then swirl outward in a circle to create each rosette. Do this all over the top for a full, snowy look.
Once that’s done, sprinkle generously with red and green sanding sugar. These sprinkles catch the light and give the dessert a magical sparkle, like freshly fallen snowflakes. If you’re feeling extra fancy, you could even top it with tiny edible ornaments, crushed candy canes, or white chocolate shavings.
Presentation tip: If you’re transporting this to a party, wait until you arrive before adding the whipped cream topping and sprinkles — this keeps it looking crisp and fresh.

Make-Ahead and Storage Tips
One of the best things about this trifle? You can make it ahead — which means less stress on the big day.
- Make-ahead: Assemble all the layers except the whipped cream topping up to 24 hours in advance. Cover tightly with plastic wrap and refrigerate.
- Day-of serving: Pipe the whipped cream and add sprinkles the same day you’re serving it to keep everything looking perky.
- Leftovers: Store any leftovers covered in the fridge for up to 3 days. The flavors actually meld together beautifully overnight — the cake soaks up some of the filling like a dream.
Freezer tip: While the cake and filling can technically be frozen separately, once assembled, this dessert is best enjoyed fresh or within a couple of days.
Serving Suggestions: Make It Shine
This trifle isn’t just a dessert — it’s a showpiece. Set it in the center of your holiday table and watch the compliments roll in. Serve it after a Christmas dinner with:
- Hot cocoa or spiced cider
- A festive cocktail like eggnog or mulled wine
- Coffee with a splash of peppermint mocha creamer
Scoop out generous spoonfuls, making sure to dig deep and get every beautiful layer in each serving. If you’re serving a big group, offer it buffet-style with a big serving spoon and dessert bowls.
Optional twist: Serve in mini trifle glasses or mason jars for a personalized touch at holiday parties!
Troubleshooting Common Mistakes
Let’s save your trifle from any festive fails:
- Dry cake crumbs: Avoid overbaking your cake. Slightly underbaking is better for moist, fluffy crumbles.
- Soggy layers: Don’t over-press your cake crumbs or over-whip your cream cheese filling — you want lightness, not a soggy bottom.
- Runny whipped cream: Make sure your cream is cold and whipped to stiff peaks. If it’s too soft, it won’t hold shape for piping.
- Faded green color: Always use gel food coloring for vibrant, bakery-style colors.
🎄 Christmas Trifle Dessert Recipe
- Prep Time: 20 minutes
- Total Time: 1 hour 15 minutes
- Category: Desserts • Holiday Treats • Christmas Sweets • Layered Desserts
Description
A festive, colorful, and irresistibly creamy layered treat featuring red velvet cake, green vanilla cake, silky cheesecake filling, and fluffy whipped cream. Perfect for holiday gatherings and Christmas tables! ❤️💚🍰✨
Ingredients
Red Velvet Cake Layer:
1 box red velvet cake mix
Ingredients required on the box (eggs, oil, water)
Green Vanilla Cake Layer:
1 box vanilla or white cake mix
Ingredients required on the box
Green gel food coloring
Cream Cheese Filling:
2 cups heavy whipping cream, cold
1 (8 oz) block cream cheese, softened
1 cup powdered sugar
1 teaspoon vanilla extract
Whipped Cream Topping:
2 cups heavy whipping cream
4 tablespoons powdered sugar
1 teaspoon vanilla
Red & green sanding sugar sprinkles 🎄✨
Instructions
Prepare the red velvet cake according to box instructions and bake in a 9×13 pan. Cool completely. ⏱️ 35–40 minutes
Prepare the vanilla cake according to box instructions, tinting with green gel coloring until vibrant. Bake in a 9×13 pan and cool completely. ⏱️ 35–40 minutes
Once both cakes are cooled, crumble them into fine crumbs by hand. ⏱️ 5 minutes
Make the Cream Cheese Filling:
4. Beat cream cheese until smooth. ⏱️ 1–2 minutes
5. Add powdered sugar and vanilla; beat until creamy. ⏱️ 1 minute
6. Whip 2 cups of heavy cream to stiff peaks. ⏱️ 2–3 minutes
7. Fold whipped cream into the cream cheese mixture for a thick, fluffy layer. ⏱️ 1–2 minutes
Make the Whipped Cream Topping:
8. Beat 2 cups heavy cream with powdered sugar and vanilla until stiff, pipeable peaks form. ⏱️ 2–3 minutes
Assemble the Trifle:
9. Add a thick bottom layer of red velvet crumbs, pressing lightly. ❤️ ⏱️ 2 minutes
10. Spread a generous layer of cream cheese filling over the red velvet. ⏱️ 2 minutes
11. Add a compact, smooth layer of green vanilla cake crumbs, pressing firmly. 💚 ⏱️ 2 minutes
12. Add another thick layer of red velvet crumbs. ⏱️ 2 minutes
13. Pipe tall whipped cream rosettes on top and sprinkle with red and green sanding sugar. 🎄✨ ⏱️ 5 minutes
Notes
For cleaner layers, press each cake layer firmly to create defined stripes.
Make sure the cakes are fully cooled before crumbling to avoid soggy layers.
You can prepare the cakes a day ahead for easier assembly.
Chill the trifle for at least 1 hour before serving for the best texture.
Swap the whipped cream topping for stabilized whipped cream if serving outdoors or for long events.
Nutrition
- Serving Size: 12 servings
- Calories: ~320 kcal per serving
Variations You Can Try
Want to remix this trifle into something uniquely yours? Here are some festive variations:
Chocolate Peppermint Trifle
- Use chocolate cake and add crushed peppermint candies between layers.
- Flavor whipped cream with peppermint extract.
Gluten-Free Version
- Use gluten-free cake mixes. Everything else remains the same.
Berry Trifle
- Add fresh raspberries or strawberries between layers for a fruity twist.
Tiramisu-Inspired Christmas Trifle
- Soak vanilla cake crumbs lightly in coffee or espresso.
- Dust cocoa powder between layers.
These spins let you enjoy the base recipe in different ways — ideal for multiple holiday gatherings!
You may also like :
Fluffy Christmas Whipped Cream Sprinkle Dip 🎄 A Festive Treat That Tastes Like Joy in a Bowl
Christmas Berry Cookie Crunch Trifle
Nutritional Info (Per Serving)
| Component | Approximate Value |
|---|---|
| Calories | ~320 kcal |
| Fat | 21g |
| Sugar | 22g |
| Carbohydrates | 34g |
| Protein | 4g |
| Servings | 12 |
This dessert is rich — but hey, it’s Christmas! Calories don’t count during the holidays, right? 😉
Conclusion: A New Holiday Tradition in Every Bite
This Christmas Trifle Dessert isn’t just a dessert — it’s an experience. From the first spoonful of silky cream cheese filling and moist cake crumbs to the last bite of whipped cream and sprinkles, it wraps up all the best holiday flavors in one beautiful dish.
Whether you’re baking with kids, impressing guests, or just treating yourself — this trifle delivers the perfect mix of comfort and celebration. Plus, it looks like something straight out of a Hallmark movie. So grab your ingredients, turn on some Christmas tunes, and create a new tradition your family will ask for year after year.
Similar recipes :
Christmas Cherry Fluff Recipe – A No-Bake Holiday Classic Full of Cheer
FAQs
1. Can I make this trifle with homemade cakes instead of boxed mix?
Absolutely! If you have a favorite scratch-made red velvet or vanilla cake recipe, use it. Just bake them in 9×13 pans and follow the same crumbling and layering method.
2. Can I freeze the trifle for later?
While you can freeze the cake layers separately, the assembled trifle doesn’t freeze well due to the whipped cream and cream cheese filling. It’s best enjoyed fresh or refrigerated for up to 3 days.
3. What if I don’t have a trifle bowl?
No worries! Any clear glass bowl or even a large glass measuring jug will work. The goal is to see those beautiful layers, so use whatever you have on hand.
4. Can I use store-bought whipped topping?
You can use a tub of whipped topping in place of homemade whipped cream for convenience. Just note that it may be slightly sweeter and less stable for piping.
5. Is this kid-friendly?
Totally! There’s no alcohol or intense spices. It’s colorful, creamy, and sweet — kids (and adults) will be obsessed.