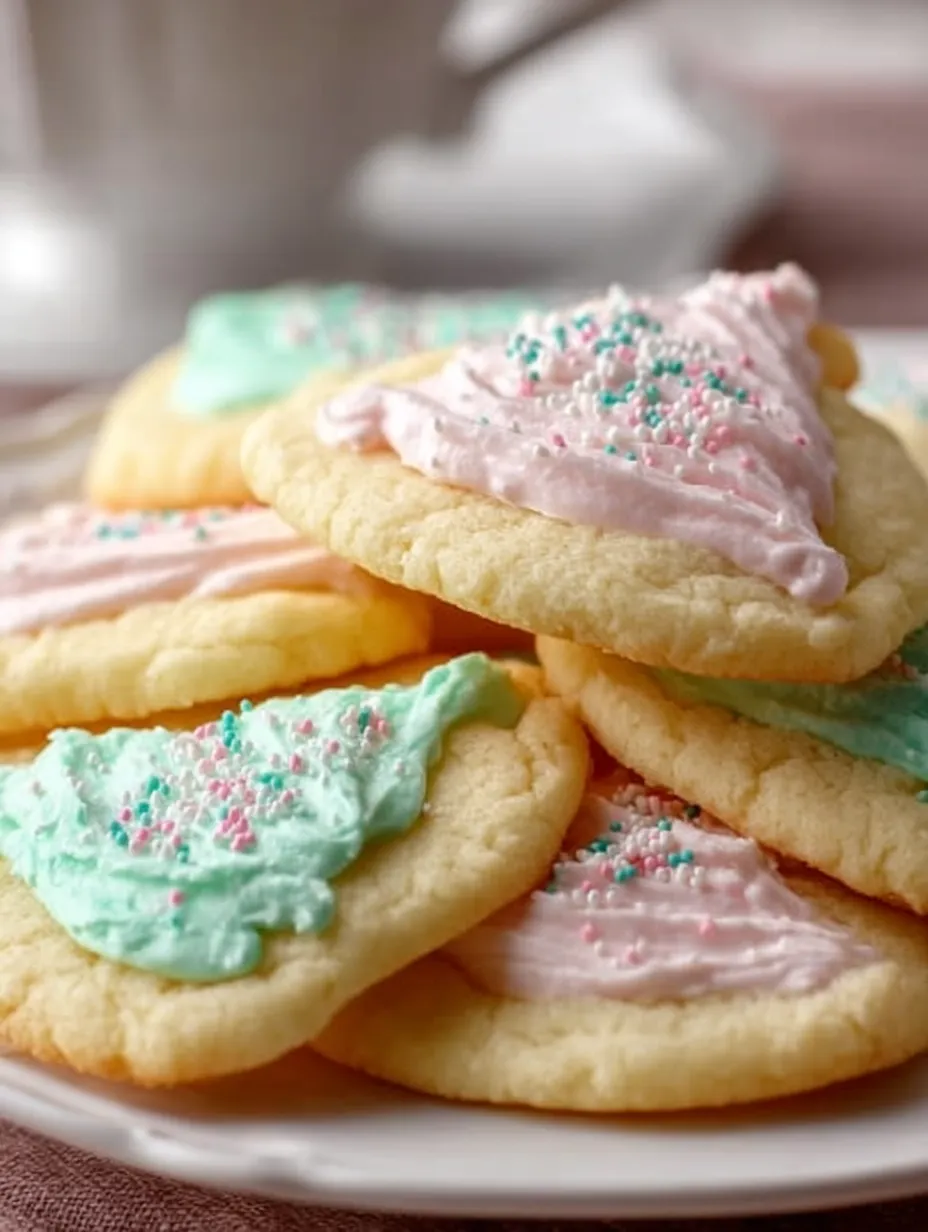
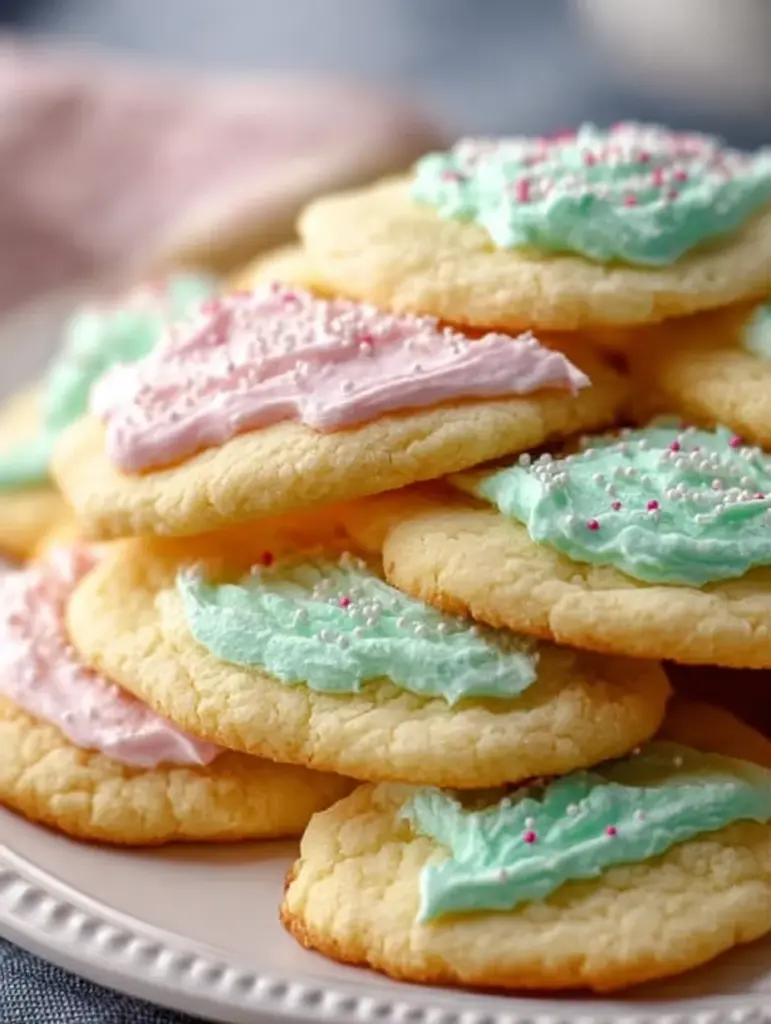
Let’s talk about a cookie so soft, so melt-in-your-mouth, it almost feels like biting into a cloud. Cream cheese cookies are that kind of magic — tender, sweet, and lightly tangy with the comforting aroma of butter baking in the oven. And when you top them with a swirl of pastel frosting and rainbow sprinkles (just like the image above)? Well, you’ve officially reached cookie perfection.
These aren’t your basic sugar cookies. They’re fluffier. Softer. More buttery. And they practically beg to be frosted, especially with light and creamy colors like pink and mint green, finished with those cheerful little nonpareil sprinkles. Whether you’re baking for a holiday, a birthday, or just a regular Tuesday, these cream cheese cookies bring joy with every bite.
So, grab your apron, preheat the oven, and let’s dive into the coziest cookie recipe you’ll ever bake. 🍪
Why Cream Cheese Cookies Deserve a Spot in Your Recipe Box
Why these cookies? Because they strike the perfect balance between simplicity and indulgence. You don’t need fancy ingredients or tricky techniques. Just a bowl, a spoon (or mixer), and a short list of pantry staples. But what you get in return is a cookie that tastes like it came from a boutique bakery.
Cream cheese isn’t just in the name — it’s the secret weapon that gives these cookies their irresistible texture. While traditional sugar cookies can sometimes feel dry or crumbly, the cream cheese ensures each bite stays moist and rich. And when you frost them with a smooth pastel topping? They transform from a simple treat into a cookie that’s ready for a party.
They’re also incredibly versatile. Want to shape them into trees for Christmas? Hearts for Valentine’s Day? Stars for a birthday bash? You can. Or just drop and bake for a more rustic, homestyle look. (Like in the photo!) Either way, they’re guaranteed to disappear fast.
The Magic of Cream Cheese in Baking
Cream cheese in cookies? Absolutely. It might seem like an odd choice at first — usually, it’s reserved for cheesecake or frosting — but when blended into cookie dough, it creates something really special.
Here’s what cream cheese brings to the table:
- Moisture: It adds softness without making the dough too wet.
- Tang: That subtle tang balances the sugar, preventing the cookies from being overly sweet.
- Structure: Cream cheese helps cookies keep their shape, especially useful if you’re decorating them.
And let’s not forget: it gives the dough that rich, luxurious texture that makes you want just one more bite.
Ingredients You’ll Need for These Cookies
This recipe keeps it simple — nothing weird, nothing hard to find. Here’s what you’ll need:
- ½ cup unsalted butter, softened
- 4 oz cream cheese, softened (use full-fat for best results)
- 1 cup granulated sugar
- 1 large egg
- 1 tsp vanilla extract
- 1¾ cups all-purpose flour
- ½ tsp baking powder
- ¼ tsp salt
- Optional: powdered sugar for dusting or frosting (as shown)
Let’s break down a few of these to understand their role in creating the perfect cookie.
Butter & Cream Cheese: The Dream Duo
This combo is what gives the cookie dough its creamy, rich base. Make sure both are at room temperature before you start mixing. If they’re too cold, the batter won’t whip up properly. If they’re melted, your cookies will spread too much. Room temp = just right.
Granulated Sugar: Just the Right Sweetness
No brown sugar here — we want a classic sugar cookie flavor. Granulated sugar creates that soft, slightly crisp edge and smooth crumb. You can reduce the sugar slightly if you prefer less sweet cookies, but we find 1 cup hits the sweet spot (pun intended).
Egg & Vanilla: The Binding Flavors
One large egg gives structure and richness. The vanilla extract, meanwhile, makes everything taste like a cozy bakery. Use pure vanilla if possible for a deeper flavor.
Flour, Baking Powder, and Salt: The Base Trio
These three provide the body and lift. All-purpose flour gives the right amount of chew, baking powder offers a gentle rise, and the salt sharpens all the flavors — don’t skip it!
Optional but Oh-So-Worth-It: Frosting and Sprinkles
This is where your cookies go from everyday to show-stopping. The cookies in the image you provided are clearly frosted with pretty pastel colors — light pink and mint green — and topped with rainbow nonpareils. If you want to match that look, don’t skip the buttercream. You can also go for a glaze if you prefer something thinner.
Kitchen Tools You’ll Need
Here’s what you should have on hand:
- Mixing bowls (one large, one medium)
- Electric mixer or stand mixer
- Spatula
- Cookie scoop or tablespoon
- Baking sheet
- Parchment paper
- Cooling rack
- Optional: piping bags or offset spatula for frosting
How to Make Cream Cheese Cookies: Step-by-Step
Ready to bake? Let’s walk through this step-by-step. It only takes about 20 minutes of actual work and a bit of baking and cooling time. You’ll have cookies ready to eat in under an hour!
Prepping Your Kitchen Space
First things first: preheat your oven to 350°F (175°C) and line your baking sheet with parchment paper. This prevents sticking and helps the cookies bake evenly.
Make sure your butter and cream cheese are softened — set them out 30 minutes before starting. Softened doesn’t mean melted. You want them pliable, not runny.
Creaming the Butter and Cream Cheese
Using your mixer, beat the softened butter and cream cheese together until the mixture is light and fluffy — about 2 minutes on medium speed. This step is key. Proper creaming incorporates air into the dough, helping the cookies bake up tender and not too dense.
Adding the Sugar, Egg, and Vanilla
Once the fats are fluffy, add the sugar and mix until fully incorporated — about 1 more minute. Then beat in the egg and vanilla extract, mixing until smooth. The mixture should look thick and glossy.
Mixing the Dry Ingredients
In your medium bowl, whisk together the flour, baking powder, and salt. Mixing the dry ingredients separately ensures everything gets evenly distributed — you don’t want a pocket of baking powder in your final dough.
Combining It All into One Perfect Dough
Gradually add the dry mix to your wet ingredients. Do this in 2–3 additions to avoid overworking the dough. Mix just until everything comes together. The dough should be soft and slightly sticky, but not wet.
If your dough feels too loose, chill it in the fridge for 15–20 minutes before baking.
Scooping and Shaping the Dough
Use a small cookie scoop or tablespoon to drop dough onto your prepared baking sheet. Space them about 2 inches apart — they’ll spread just a bit, but not much. You can flatten them slightly with the back of a spoon for more even shapes, or leave them domed for a rustic look.
Baking to Golden Perfection
Bake in the preheated oven for 10–12 minutes, until the edges are just barely golden. Don’t overbake — the centers might look a little soft, but they’ll firm up as they cool.
Remove from the oven and let the cookies sit on the tray for 2 minutes before transferring to a cooling rack.
Cooling and Frosting the Final Cookies
Once completely cool, it’s time for frosting. You can use a piping bag or just spread with a knife or spatula. Then add sprinkles for that fun, nostalgic touch!
Frosting That Makes These Cookies Pop (and Look Like the Photo!)
The frosting is the finishing touch that takes these cookies from tasty to totally irresistible. Just take a look at the cookies in the image — frosted in soft pastel shades of pink and mint green, each one dusted with cheerful rainbow nonpareil sprinkles. That kind of decoration screams “party on a plate!”
To recreate that look, you’ll want to whip up a simple pastel buttercream. Here’s how to make it:
Easy Pastel Buttercream Frosting Recipe
Ingredients:
- ½ cup unsalted butter, softened
- 2 cups powdered sugar
- 1–2 tbsp milk or heavy cream
- 1 tsp vanilla extract
- Gel food coloring (pink, green, blue – pastel tones work best)
- Rainbow nonpareils or pastel sprinkles
Instructions:
- In a bowl, beat the butter until smooth and creamy (about 1–2 minutes).
- Gradually add the powdered sugar, about ½ cup at a time, mixing slowly to avoid clouds of sugar.
- Add in the vanilla extract and 1 tablespoon of milk or cream. Beat until fluffy.
- Adjust texture with more milk (for a smoother spread) or more powdered sugar (for a thicker frosting).
- Divide into small bowls and add food coloring to each, stirring until you reach the desired pastel shades.
- Frost each cooled cookie with a generous layer of frosting using an offset spatula or butter knife.
- Immediately top with nonpareil sprinkles so they stick before the frosting sets.
The final result? Exactly like the cookies in your image — soft, buttery rounds topped with sweet pastel frosting and a joyful sprinkle crunch.
Troubleshooting: What If Your Cookies Spread Too Much?
Cookies too thin? Spreading out into each other? Here’s what could be happening — and how to fix it:
- Butter or cream cheese too soft/melted: Warm fats make dough too loose. Always start with room-temp, not melty.
- Overmixed dough: Too much mixing = more gluten, which can make cookies spread and tough.
- No chilling: If your dough feels soft or sticky, chill it for 20–30 minutes before baking.
- Hot baking sheet: Always let your baking sheet cool between batches.
If your cookies still spread more than you’d like, you can add 1–2 tbsp more flour to the dough next time for a slightly firmer result.
Texture Tips: Getting That Soft and Tender Bite
These cookies are all about texture — soft, pillowy, melt-in-your-mouth. If you want to nail it every time:
- Don’t overbake. Take them out when the edges are just golden.
- Let them rest. They firm up as they cool, so don’t rush it.
- Cream cheese + butter ratio matters. Stick to the 1:2 ratio for that perfect softness.
Also, these cookies actually taste even better the next day. The flavors settle and the texture becomes even softer. Store them in an airtight container overnight — you’ll see what we mean.
Storage Tips: Keeping Cookies Fresh for Days
To keep your cookies soft and fresh:
- Airtight container: Store cookies in a container with a tight-fitting lid.
- Room temperature: These cookies stay good for 4–5 days on the counter.
- Layering: If stacking, place parchment or wax paper between layers to prevent frosting from smudging.
Want to keep them extra fresh? Add a slice of bread to the container. The cookies absorb moisture from the bread and stay softer longer. Trust your grandma — it works.
Freezing Instructions: Dough or Baked? Both Work!
Want to prep ahead? These cookies freeze beautifully.
To freeze dough:
- Scoop and roll dough into balls.
- Flash freeze on a baking sheet, then transfer to a freezer-safe bag or container.
- Bake from frozen, adding 1–2 extra minutes to the bake time.
To freeze baked cookies:
- Let cookies cool completely.
- Skip the frosting and freeze them plain.
- When ready to serve, thaw at room temp, then frost and decorate fresh.
Perfect for holiday prep or cookie swaps!
Print
The Ultimate Guide to Cream Cheese Cookies (With Soft Frosting)
- Prep Time: 10 minutes
- Total Time: ~22 minutes
- Category: Dessert • Cookies • Easy Baking
Description
🍪 These soft, tender Cream Cheese Cookies melt in your mouth with every bite! Buttery, light, and perfectly sweet — the kind of treat that fills your kitchen with cozy aromas and warms the heart. ✨💛
Ingredients
½ cup unsalted butter, softened
4 oz cream cheese, softened
1 cup granulated sugar
1 large egg
1 tsp vanilla extract
1¾ cups all-purpose flour
½ tsp baking powder
¼ tsp salt
Powdered sugar for dusting (optional)
Instructions
Preheat the oven to 350°F (175°C) and line a baking sheet with parchment paper. (⏱️ 5 minutes)
Beat the softened butter and cream cheese until smooth and fluffy. (⏱️ 2 minutes)
Add the granulated sugar and mix until creamy. (⏱️ 1 minute)
Beat in the egg and vanilla extract until well combined. (⏱️ 1 minute)
In a separate bowl, whisk together the flour, baking powder, and salt. (⏱️ 1 minute)
Gradually mix the dry ingredients into the wet mixture until a soft dough forms. (⏱️ 2 minutes)
Scoop or roll small dough balls and arrange them on the baking sheet. (⏱️ 2 minutes)
Bake for 10–12 minutes, or until the edges are lightly golden. (⏱️ 12 minutes)
Let cookies cool, then dust with powdered sugar if desired. 😍🍪 (⏱️ 10 minutes)
Notes
For the softest texture, avoid overbaking—remove cookies when edges are just set.
Chilling the dough for 15–20 minutes can make shaping easier, especially in warm kitchens.
These cookies pair beautifully with a dusting of powdered sugar or a light drizzle of glaze.
Store in an airtight container to keep them tender for several days.
Nutrition
- Serving Size: 24 cookies
- Calories: ~95 kcal
Creative Twists You Can Try
Want to switch things up next time? Try these fun variations:
Lemon Cream Cheese Cookies
- Add 1 tbsp lemon zest to the dough
- Swap vanilla extract for lemon extract
- Frost with pale yellow icing and top with candied lemon peel
Almond Frosted Cookies
- Replace vanilla with almond extract (use just ½ tsp — it’s strong!)
- Top with sliced almonds and white frosting
Chocolate Drizzle
- Instead of frosting, drizzle melted chocolate over the cooled cookies
- Use white, milk, or dark chocolate — or all three!
Holiday Themes
- Red and green frosting + tree shapes = Christmas
- Heart cut-outs + pink frosting = Valentine’s Day
- Stars + blue and yellow = Baby shower
These cookies are like a blank canvas — and you’re the artist. 🎨
You may also like :
Heavenly Lemon Cheesecake Cake with Cream Cheese Frosting
This Banana Bread Cake is Soft, Sweet, and Topped with the Best Cream Cheese Frosting
Hawaiian Carrot Pineapple Cake With Cream Cheese Glaze
Fun Ways to Present These Cookies
Want to make these cookies gift-worthy or table-ready? Try these ideas:
- Gift boxes: Line with parchment and stack the cookies, alternating colors.
- Cookie tins: Add a bow and tag — perfect for neighbors or coworkers.
- Themed platters: Use cookie cutters to shape and match your party theme.
- Party favors: Wrap two cookies in clear treat bags and tie with a ribbon.
They also make a beautiful addition to cookie swaps or holiday dessert tables!
Final Thoughts: Why These Cream Cheese Cookies Win Every Time
So here’s the thing: cream cheese cookies are easy. They’re quick. They’re pretty. They’re delicious. They’re literally everything a homemade treat should be.
Whether you’re baking with your kids, impressing a guest, or just treating yourself after a long week — these cookies bring joy. The texture is perfectly soft and tender. The frosting adds a colorful twist. And that little bit of tang from the cream cheese? Total flavor upgrade.
They’re simple comfort wrapped in sweet pastel frosting and cheerful sprinkles. What’s not to love?
So go on. Bake a batch. Frost ‘em up. And don’t forget to sneak one while they’re still warm. You deserve it.
FAQs
1. Can I make these cookies without frosting?
Absolutely! They’re just as delicious plain — buttery, soft, and lightly sweet. A dusting of powdered sugar is a nice touch if you’re skipping frosting.
2. Can I use low-fat cream cheese?
You can, but full-fat cream cheese yields better texture and flavor. Low-fat versions may make the dough softer and less rich.
3. How long do these cookies stay soft?
Stored properly in an airtight container, they stay soft for up to 4–5 days at room temperature. They freeze well, too!
4. Can I add mix-ins like chocolate chips or nuts?
Sure! Mini chocolate chips, white chocolate, or chopped pecans are great. Just don’t overload the dough — about ½ cup of mix-ins is plenty.
5. How do I get vibrant pastel colors in the frosting?
Use gel food coloring for the best color payoff without thinning the frosting. Start with a tiny amount and build up gradually.