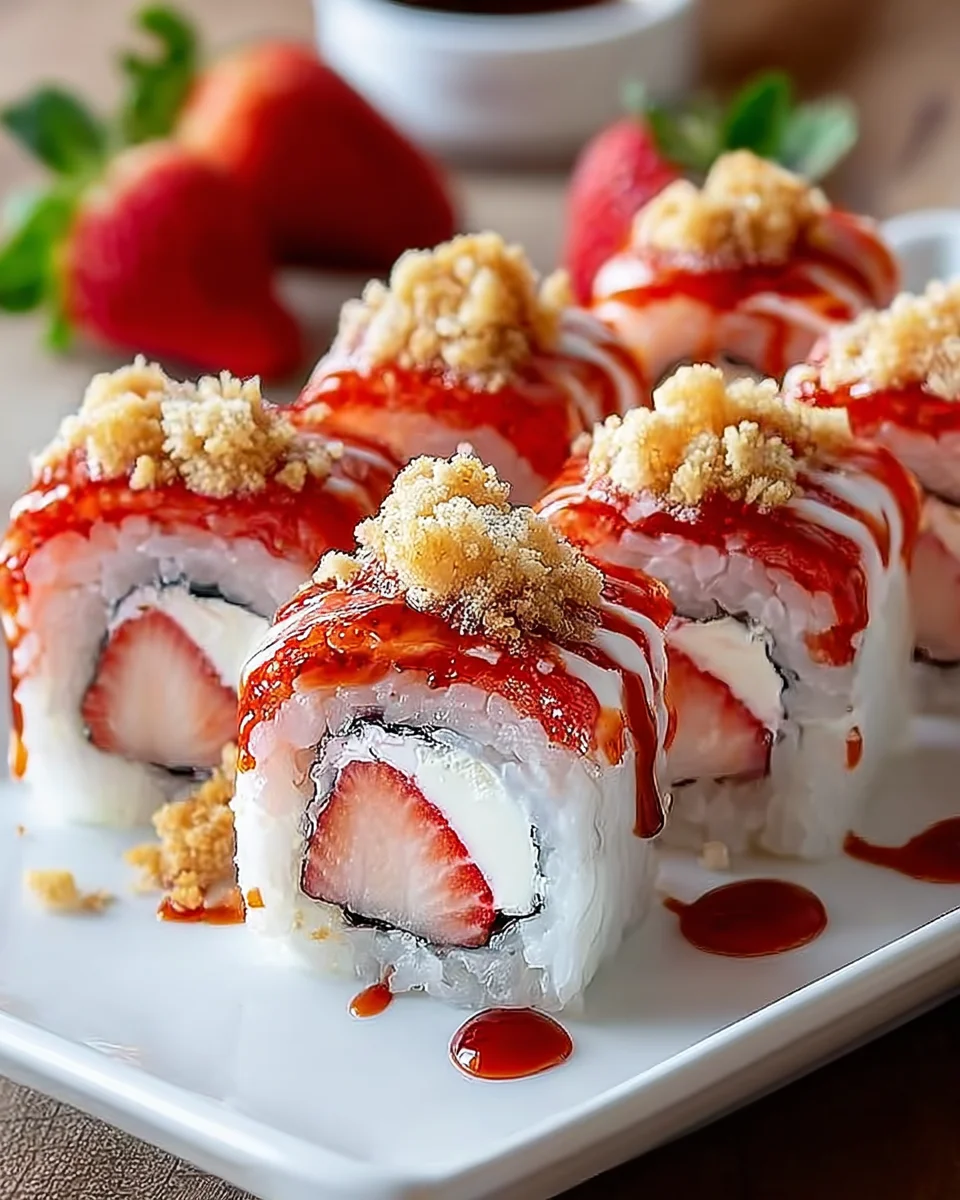
Introduction to Creative & Cute Strawberry Shortcake Sushi Roll
Welcome to the delightful world of dessert creating, where whimsy meets flavor! Today, I’m thrilled to share my recipe for the Creative & Cute Strawberry Shortcake Sushi Roll. This fun twist on a classic dessert transforms the beloved strawberry shortcake into a sushi-inspired treat. It’s perfect for busy moms like me, who desperately need quick solutions that still impress the family. Picture this: a beautiful sushi roll packed with creamy filling and fresh strawberries, ready in no time. Let’s dive in and brighten up your dessert table with this eye-catching creation!
Why You’ll Love This Creative & Cute Strawberry Shortcake Sushi Roll
This Creative & Cute Strawberry Shortcake Sushi Roll is a dessert dream come true! It’s incredibly easy to whip up, making it a go-to for busy days. The flavors, oh my goodness! Creamy, sweet, and fruity, all rolled into one delightful bite. Plus, it’s a showstopper—perfect for impressing guests or simply treating your family. Each slice brings happiness, making it an irresistible addition to any dessert spread!
Ingredients for Creative & Cute Strawberry Shortcake Sushi Roll
Now, let’s gather our ingredients for this delightful dessert that’s sure to make your taste buds dance! Here’s what you’ll need:
- Sponge Cake Sheet: This serves as the foundation. You can either make a homemade sponge cake or grab one from the store. Just make sure it’s cooled.
- Cream Cheese: The key to a luscious filling. Softened cream cheese gives that rich, velvety texture.
- Powdered Sugar: This adds sweetness and creates a smooth consistency when combined with the cream cheese.
- Vanilla Extract: A splash of this aromatic flavor elevates everything. Trust me, it’s a game-changer!
- Whipped Cream: Lightness is the name of the game! Whipped cream makes the filling fluffy and oh-so-decadent.
- Fresh Strawberries: Diced strawberries are the stars of this dish. Their juicy sweetness brings life to the sushi roll.
- Strawberry Preserves or Jam: This adds a burst of flavor and ties all the components together. Feel free to use your favorite brand!
- Optional Ingredients: If you want to take it over the top, consider adding a drizzle of white chocolate, extra whipped cream, or even mint leaves for a pop of color and freshness!
For exact quantities, you can check the bottom of the article for a handy printout of this super fun recipe!
How to Make Creative & Cute Strawberry Shortcake Sushi Roll
Now that we have our ingredients ready, it’s time to roll up our sleeves and get cooking! This Creative & Cute Strawberry Shortcake Sushi Roll is a delightful no-bake dessert that will impress everyone. Follow these simple steps to make your delicious creation.
Prepare the Cake
Lay out the Sponge Cake
Start by placing your cooled sponge cake flat on a piece of parchment paper or a clean rolling mat. The parchment acts like a friendly guide, helping you roll the cake without sticking. This will set the stage for all those filling layers!
Make the Filling
Cream Cheese Mixture
In a mixing bowl, combine the softened cream cheese, powdered sugar, and vanilla extract. Mix them until smooth and creamy—imagine a fluffy cloud of sweetness!
Next, gently fold in the whipped cream. This step is all about being gentle. You want to keep that airy texture, making the filling light and dreamy.
Assemble the Roll
Spreading and Layering
Grab your sponge cake and spread a layer of strawberry preserves evenly over the surface. Then, spoon on the cream cheese mixture. Don’t be shy—this filling is where the magic happens!
Finally, sprinkle diced fresh strawberries over the top to add bursts of sweetness. It’s like decorating a canvas with colorful berries!
Roll the Cake
Techniques for Perfect Rolling
Now comes the fun part! Starting from one short end, grab the edge of the parchment paper and begin to roll the cake tightly. Use the parchment to guide the cake and help it shape into a lovely log. Don’t rush; take your time to create that perfect sushi roll. Chilling it later will make slicing easier!
Slice & Serve
Tips for Presentation
Once your roll is chilled for about 20-30 minutes, it’s time to slice. Using a sharp knife, cut the roll into 1-inch pieces. Clean your knife with a damp cloth between cuts for pretty, clean edges.
Arrange the slices on a platter, and here’s the best part: drizzle them with white chocolate or top with extra whipped cream and mint leaves for a pop of color! Each piece looks like a precious gem on your table.
Tips for Success
- Always ensure your sponge cake is completely cool before rolling; it’ll prevent cracking.
- Use a sharp knife for slicing to get those clean, elegant edges.
- Chill your roll longer for even cleaner slices—patience pays off!
- Get creative with garnishes; a sprinkle of colorful sprinkles can brighten up your presentation.
- Don’t fuss too much; it’s about enjoying the process and delighting in your creation!
Equipment Needed
- Mixing bowls: A large bowl for mixing ingredients. Any size will do, but a medium bowl works great!
- Sharp knife: For slicing the sushi roll cleanly. A serrated knife works wonders.
- Parchment paper: Helps with rolling and prevents sticking. A silicone mat is a fantastic alternative!
- Spatula: Ideal for spreading fillings evenly. A butter knife can also do the trick.
Variations
- Gluten-Free Option: Substitute the sponge cake with a gluten-free cake mix or make a homemade gluten-free sponge cake.
- Chocolate Lovers: Add cocoa powder to the cream cheese mixture for a chocolate twist, or use chocolate cake instead of sponge cake.
- Fruit Medley: Mix in other fruits like diced peaches or blueberries for a burst of different flavors.
- Dairy-Free Delight: Use dairy-free cream cheese and non-dairy whipped topping for a creamy, vegan version!
- Nut-ty Crunch: Incorporate crushed nuts like almonds or walnuts for a delightful crunch in each bite.
Serving Suggestions
- Pair it with Tea: A warm cup of chamomile or green tea enhances the sweetness of the roll.
- Fresh Fruit Side: Serve alongside extra strawberries or a light fruit salad for contrast.
- Plating: Use colorful plates or decorative platters to showcase your sushi rolls.
- Garnish Wisely: A sprinkle of edible flowers or mint leaves elevates the presentation.
FAQs about Creative & Cute Strawberry Shortcake Sushi Roll
Got questions? You’re not alone! Here are some frequently asked questions about this Creative & Cute Strawberry Shortcake Sushi Roll to help you out. I love sharing tips that make the cooking process easier!
Can I use frozen strawberries instead of fresh ones?
Absolutely! Just thaw the frozen strawberries and pat them dry to remove excess moisture. This keeps the filling from becoming too soggy.
How long can I store the strawberry shortcake sushi roll?
Store it in an airtight container in the refrigerator for up to three days. It’s best enjoyed fresh, but it will hold its flavor for a bit longer!
Can I make this sushi roll ahead of time for a party?
Yes! You can make it the night before and let it chill overnight. Just slice and serve right before your guests arrive for the best experience.
What other fillings could I try in this dessert?
The sky’s the limit! You can incorporate Nutella, lemon curd, or even a cream-based fruit filling for a delicious twist on this classic! Experiment and find your favorite combinations!
Is this recipe suitable for a gluten-free diet?
Yes! Simply substitute the regular sponge cake with a gluten-free option. There are plenty of great mixes available nowadays that work wonderfully.
Final Thoughts
As I reflect on my journey with the Creative & Cute Strawberry Shortcake Sushi Roll, I can’t help but feel a sense of joy. This recipe is more than just a sweet treat; it’s an experience filled with laughter, creativity, and a dash of whimsy. Whether you’re surprising your family on a busy weekday or sharing it at a gathering, this dessert brings smiles to faces. It’s about creating memories in the kitchen, filled with delicious bites and shared moments. So, roll up your sleeves and dive into this delightful adventure—it’s bound to become a family favorite!
Print
Creative & Cute Strawberry Shortcake Sushi Roll Recipe
- Prep Time: 20 minutes
- Cook Time: 0 minutes
- Total Time: 50 minutes
- Yield: 8 servings 1x
- Category: Dessert
- Method: No-bake
- Cuisine: American
- Diet: Vegetarian
Description
A delightful twist on dessert, this Creative & Cute Strawberry Shortcake Sushi Roll combines the flavors of strawberry shortcake into a fun sushi roll format.
Ingredients
- 1 sponge cake sheet (approx. 10×15 inches, homemade or store-bought)
- 8 ounces (225 g) cream cheese, softened
- ½ cup (60 g) powdered sugar
- 1 teaspoon (5 ml) vanilla extract
- 1 cup (240 ml) whipped cream
- 1 ½ cups (225 g) fresh strawberries, diced
- 3 tablespoons (45 g) strawberry preserves or jam
- Optional: white chocolate drizzle, extra whipped cream, mint leaves for garnish
Instructions
- Prepare the cake: Lay cooled sponge cake flat on parchment or rolling mat.
- Make the filling: Beat cream cheese, powdered sugar, and vanilla until smooth. Fold in whipped cream.
- Assemble the roll: Spread strawberry preserves evenly over cake, then cream cheese mixture. Sprinkle with diced strawberries.
- Roll: Starting from one short end, use parchment to help roll the cake into a tight log. Chill for 20–30 minutes.
- Slice & serve: Use a sharp knife to cut into 1-inch pieces. Arrange on a platter, drizzle with white chocolate, and garnish as desired.
Notes
- Ensure the sponge cake is completely cooled before rolling.
- Using a sharp knife will help make clean cuts.
- Let the roll chill for a longer period if possible for better slicing.
Nutrition
- Serving Size: 1 piece
- Calories: 150
- Sugar: 8g
- Sodium: 90mg
- Fat: 9g
- Saturated Fat: 5g
- Unsaturated Fat: 3g
- Trans Fat: 0g
- Carbohydrates: 15g
- Fiber: 1g
- Protein: 2g
- Cholesterol: 30mg