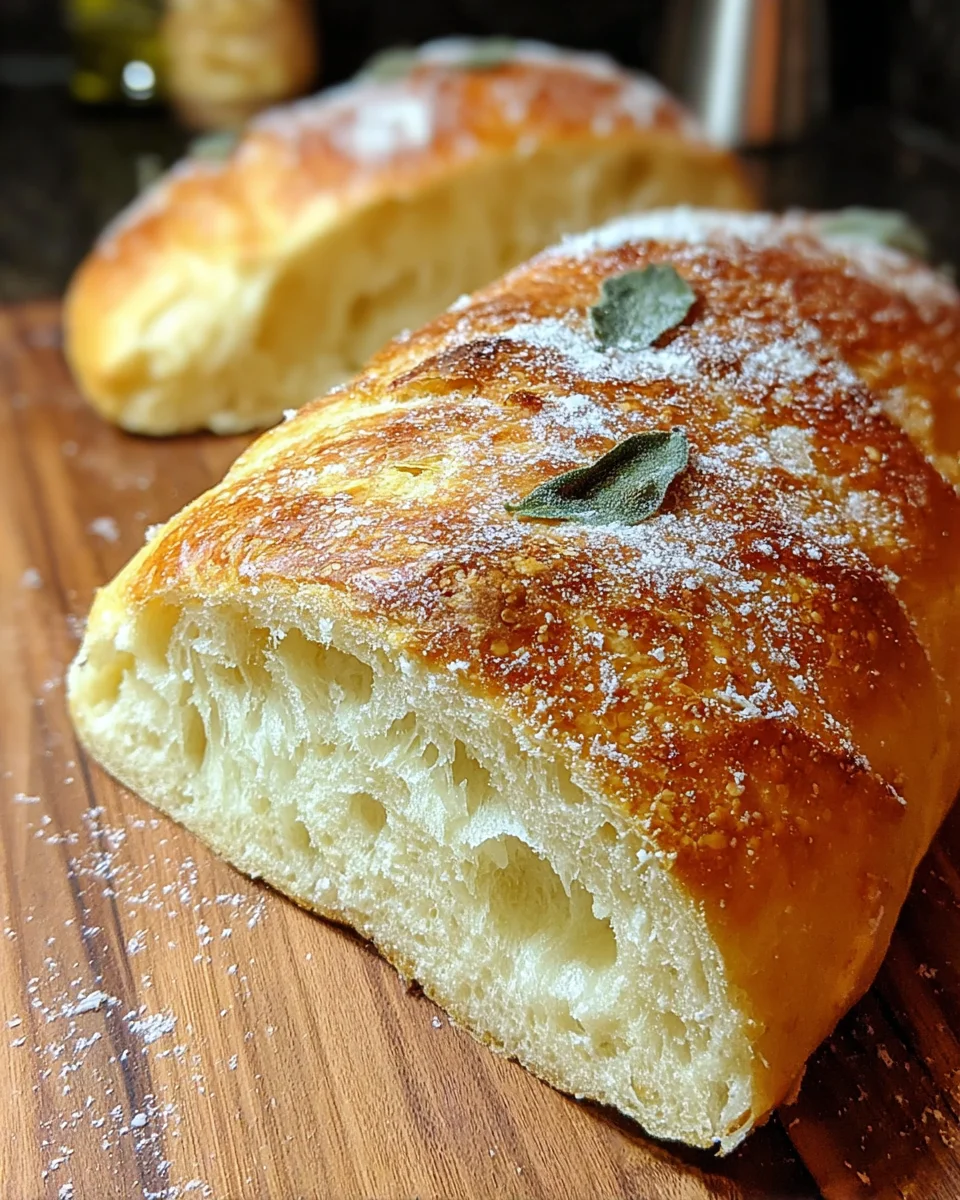
Introduction to Crusty Italian Bread
There’s something truly magical about the aroma of freshly baked crusty Italian bread wafting through the kitchen. It’s like a warm hug for your home! I know how hectic life can be, especially for busy moms and professionals trying to juggle countless responsibilities. This recipe is a beacon of hope in your culinary journey. The best part? It’s simple enough to whip up between conference calls or while the kids are finishing their homework. Imagine serving that golden loaf at dinner; it’s sure to impress your loved ones while being effortlessly delightful!
Why You’ll Love This Crusty Italian Bread
What’s not to adore about crusty Italian bread? It’s quick and easy to make, which is a lifesaver for busy schedules. The crust comes out beautifully golden, creating a satisfying crunch with every bite. Trust me, the flavor explosion is like a party in your mouth! Plus, your kitchen will smell incredible, wrapping your home in a cozy embrace that’s perfect after a long day.
Ingredients for Crusty Italian Bread
To bake the perfect loaf of crusty Italian bread, you’ll need a handful of simple ingredients that come together beautifully. Here’s what you’ll require:
- Salt: It enhances flavor and balances the dough. A must for any bread!
- All-purpose flour: The backbone of your loaf, creating structure and texture. You can also use bread flour for a chewier crust.
- Warm water: Activates the yeast! The temperature should feel warm but not too hot to your touch.
- Active dry yeast: The magic ingredient that helps the bread rise. Fresh yeast makes all the difference!
- Sugar: It feeds the yeast for a better rise and lightly sweetens the bread.
- Cornmeal: A sprinkle on your baking sheet prevents sticking and adds an extra crunch to the bottom.
Feel free to experiment with extra toppings or herbs to personalize your bread flavor. Perhaps some rosemary or a sprinkle of Parmesan? The complete measurements for each of these ingredients can be found at the bottom of the article for your convenience. Happy baking!

How to Make Crusty Italian Bread
Prepare the Oven and Tools
The first step to making heavenly crusty Italian bread is preheating your oven to 450°F. As it warms up, grab a shallow pan and fill it with water. Place it on the lowest rack. This simple trick creates steam as the bread bakes, which gives your crust that signature crackly texture! If you have a baking stone or a pizza stone, now’s the time to get that set up. It helps to create an evenly baked loaf bursting with flavor.
Mix the Ingredients
In a large mixing bowl, combine the all-purpose flour and salt. Make sure the salt is well-distributed, enhancing the bread’s flavor. In a separate bowl, mix the warm water, sugar, and active dry yeast. Allow it to sit for about 10 minutes until it bubbles and froths, indicating that your yeast is alive and ready to work its magic. Once bubbly, add this mixture to the flour and salt. Stir until a shaggy dough forms, uniting the ingredients in a lovely embrace.
Knead the Dough
It’s time to give your dough some love! Turn it out onto a floured surface and start kneading. Press your palms into the dough, fold it over, and turn it. Repeat this for about 8 to 10 minutes until it’s soft and elastic. You want a dough that’s smooth but not too sticky. If it is, sprinkle a bit of flour as you knead. This is where the magic happens—developing that gluten gives your bread chewy texture and structure!
First Rise
Once kneaded, place your dough in a lightly greased bowl and cover it with a damp cloth. Slide it into a warm spot. This could be near a sunny window or even inside a turned-off oven. Let it rise for 1 to 2 hours until it doubles in size. This step is crucial for developing the flavor and texture of your bread, so be patient—good things come to those who wait!
Shape the Dough
Now that your dough has risen, it’s time to shape it. Gently deflate the dough by pressing it down. Form it into a round or oval shape, tucking the edges underneath. This creates tension on the surface, which makes for a nice crust. Using a sharp knife, score a few shallow cuts on top—this allows the dough to expand while baking, giving you those lovely rustic characteristics that everyone adores.
Second Rise
Place your shaped loaf on a baking sheet dusted with cornmeal to prevent sticking. Cover it again with a towel and let it rise for another 30 to 45 minutes. This second rise is vital; it builds flavor and enhances the texture. You’ll notice your dough puffing up again, getting ready for that transformation in the oven!
Bake the Bread
Carefully transfer the loaf onto the middle rack of your preheated oven. Bake it for 25 to 30 minutes, or until the crust turns a beautiful golden brown. You can tell it’s done when it sounds hollow when tapped on the bottom. This is where your patience pays off! That stunning crust and heavenly aroma are what you’ve been waiting for.
Cool and Serve
Once baked, transfer your crusty Italian bread to a wire rack. Let it cool completely before slicing. I know it’s tempting to cut into it while it’s hot, but trust me—waiting ensures that the crumb sets. When you finally slice into it, you’ll be rewarded with a texture that will make you swoon! Serve it with olive oil, or load it up with your favorite toppings—you deserve every delicious bite!
Tips for Success
- Use a digital thermometer to ensure your water is at the perfect temperature for the yeast.
- Don’t rush the rising times; let the dough develop its full flavor and texture.
- Feel free to experiment with different herbs or cheese for unique variations.
- Store leftover bread in a paper bag, not plastic, to keep the crust crispy.
- Practice makes perfect! Don’t be discouraged by a less-than-perfect loaf.
Equipment Needed
- Mixing bowl: Any large bowl works, but a glass one lets you see the rising.
- Floured surface: A clean countertop or a large cutting board is perfect.
- Baking sheet: A rimmed baking sheet can be used if you don’t have a pizza stone.
- Sharp knife: A bread lame or a serrated knife is ideal for scoring.
- Wire rack: A cooling rack helps to prevent sogginess after baking.
Variations of Crusty Italian Bread
- Herbed Bread: Add dried herbs like oregano or thyme into the flour for an aromatic twist.
- Garlic Bread: Incorporate minced garlic or garlic powder into the dough for a rich flavor.
- Olive Bread: Mix in chopped olives for a Mediterranean flair and added saltiness.
- Cheese-Stuffed Loaf: Place cubes of mozzarella or feta inside the dough before shaping for a gooey surprise.
- Whole Wheat Variation: Substitute half of the all-purpose flour with whole wheat flour for a nuttier taste and added fiber.
- Seed Topping: Before baking, sprinkle sesame or poppy seeds on top for added texture and flavor.
Serving Suggestions for Crusty Italian Bread
- Pair with a hearty soup, like minestrone or tomato basil for a comforting meal.
- Serve alongside a fresh salad drizzled with balsamic vinaigrette for a light lunch.
- Enjoy with a slather of garlic herb butter for an indulgent treat.
- Accompany with bruschetta topped with fresh tomatoes and basil.
- For breakfast, toast slices and add avocado for a delicious start to your day.
FAQs about Crusty Italian Bread
Let’s tackle some common questions about making crusty Italian bread! I’ve gathered a few queries that pop up often and I’m excited to help you navigate this delicious journey.
Can I use instant yeast instead of active dry yeast?
Absolutely! You can use instant yeast without needing to dissolve it first. Just mix it directly with the flour, and watch your dough rise beautifully!
Why didn’t my bread rise?
There can be a few reasons for this. First, ensure your yeast is fresh and active. Also, double-check that your water temperature is warm enough—too hot can kill the yeast, while too cold might not activate it.
How do I store leftover bread?
To keep your crusty Italian bread fresh, store it in a paper bag at room temperature. This way, the crust stays crispy! If you need to keep it longer, slice it and freeze in a zip-top bag.
Can I make the dough ahead of time?
Yes! You can prepare the dough, let it rise, and then refrigerate it. Just remember to bring it back to room temperature before shaping and baking. This adds an even deeper flavor!
What can I serve with crusty Italian bread?
It’s fabulous alongside soups, salads, or even just with olive oil and balsamic vinegar for dipping. The options are endless!
Final Thoughts
Baking crusty Italian bread is more than just a culinary task; it’s an experience that fills your home with warmth and love. The joy of watching that dough transform into a golden loaf is a little miracle of its own! Each slice tells a story of patience and creativity, inviting everyone to gather around the table. This recipe not only elevates your meals but also creates lasting memories with your family. So, roll up your sleeves and dive in—your kitchen is about to become the heart of your home, bursting with delightful scents and endless smiles!
Print
Crusty Italian Bread
- Prep Time: 20 minutes
- Cook Time: 30 minutes
- Total Time: 2 hours 30 minutes
- Yield: 1 loaf 1x
- Category: Bread
- Method: Baking
- Cuisine: Italian
- Diet: Vegetarian
Description
A simple recipe for making crusty Italian bread that is flavorful and perfect for any meal.
Ingredients
- 1 1/2 teaspoons salt
- 3 1/2 cups all-purpose flour
- 1 1/2 cups warm water (about 110°F)
- 2 1/4 teaspoons active dry yeast
- 1 teaspoon sugar
- Cornmeal, as needed to sprinkle
Instructions
- Turn on the oven to 450°F (232°C). Put a shallow pan filled with water on the lowest rack to create steam during baking.
- In a bowl, stir together the flour and salt. Add in the warm water, sugar, and yeast mixture. Keep mixing until a rough dough takes shape and everything’s blended well.
- Cover the shaped loaf with a cloth. Let it sit for 30 to 45 minutes until it looks puffy.
- Grab a sharp knife. Make a few shallow cuts on top of the loaf. This helps it to expand while baking.
- In a big bowl, mix the warm water, sugar, and yeast. Let it sit for 5 to 10 minutes until the top appears bubbly.
- Take the bread out of the oven and set it on a wire rack. Let it cool down completely before slicing it up.
- Put the dough on a floured surface. Knead it with your hands for 8 to 10 minutes until it’s soft and stretchy.
- Put the dough in a lightly greased bowl. Cover it with a damp towel and put it in a warm spot for 1 to 2 hours, or until it’s about double the size.
- Place the loaf in the oven on the middle rack. Bake for 25 to 30 minutes until the crust turns golden brown and sounds hollow when you tap the bottom.
- Deflate the risen dough. Form it into a round or oval shape and set it on a baking sheet that’s dusted with cornmeal.
Notes
- Make sure the water is warm, not hot, to activate the yeast properly.
- Do not rush the rising time for best flavor and texture.
- Experiment with additional toppings or herbs for different flavors.
Nutrition
- Serving Size: 1 slice
- Calories: 150
- Sugar: 0.5g
- Sodium: 150mg
- Fat: 0.5g
- Saturated Fat: 0g
- Unsaturated Fat: 0g
- Trans Fat: 0g
- Carbohydrates: 30g
- Fiber: 1g
- Protein: 5g
- Cholesterol: 0mg