Introduction to Deviled Egg Christmas Trees
Welcome to the holiday kitchen! If you’re anything like me, juggling family, work, and the excitement of the season can feel a bit overwhelming. That’s where these delightful Deviled Egg Christmas Trees come into play. Not only are they a quick solution for a busy day, but they also add a splash of festive cheer to any table. Imagine the joy on your family’s faces when they see edible Christmas trees that are both tasty and fun! So grab your apron, and let’s create something memorable together!
Why You’ll Love This Deviled Egg Christmas Trees
You’ll adore these Deviled Egg Christmas Trees for so many reasons! They’re incredibly easy to whip up, making them perfect for busy days filled with holiday hustle. A quick prep time of just 20 minutes means you won’t be stuck in the kitchen for hours. Plus, they’re a delightful blend of creamy, savory flavor and vibrant color, sure to delight both kids and adults alike. Festive fun doesn’t get any better!

Ingredients for Deviled Egg Christmas Trees
Gathering the right ingredients is half the joy! Here’s what you’ll need to create your festive Deviled Egg Christmas Trees:
- 6 large boiled eggs: These are the foundation of your Christmas trees. For easier peeling, use eggs that are a bit older, about a week since boiling.
- 1/4 cup mayonnaise: This adds creaminess to your filling. You can also consider using Greek yogurt for a healthier twist.
- 1 teaspoon Dijon mustard: A little zing enhances flavor. If you’re not a mustard fan, feel free to leave it out!
- Salt and pepper to taste: Essential spices to bring out the best flavors. A pinch goes a long way.
- Green food coloring: Add a few drops to give the filling a vibrant, festive look. You can skip it for a more traditional appeal.
- Red bell pepper, diced: These serve as adorable ornaments on your trees. You could also use pimentos or cherry tomatoes as alternatives.
- Chives or parsley: Perfect for garlands and to add a touch of freshness. If you’re feeling creative, you can use shredded carrots for a different texture.
Exact quantities for these ingredients can be found at the bottom of the article, along with a handy printable version!
How to Make Deviled Egg Christmas Trees
Now, let’s dive into the fun part! Making these adorable Deviled Egg Christmas Trees is a delightful process full of creative possibilities. Follow these simple steps, and you’ll have a festive treat everyone will love.
Step 1: Prepare the Eggs
Begin by peeling your boiled eggs. A quick tip here: gently tap the egg on the counter to crack the shell, then roll it between your hands to loosen it. This method makes peeling much easier. Once peeled, cut each egg in half lengthwise. This way, you’ll have a perfect canvas for your tree-shaped treats. Set the egg whites aside on a platter—smooth side up for the best presentation.
Step 2: Make the Filling
Next, it’s time to create that creamy filling! In a bowl, combine the yolks from the eggs with mayonnaise, Dijon mustard, salt, pepper, and a few drops of green food coloring. Mix everything until the mixture is smooth and vibrant—a lovely green that mimics the holiday spirit. Don’t hesitate to taste it! Adjust seasoning as needed. If you like a little kick, sprinkle in some hot sauce.
Step 3: Shape the Christmas Trees
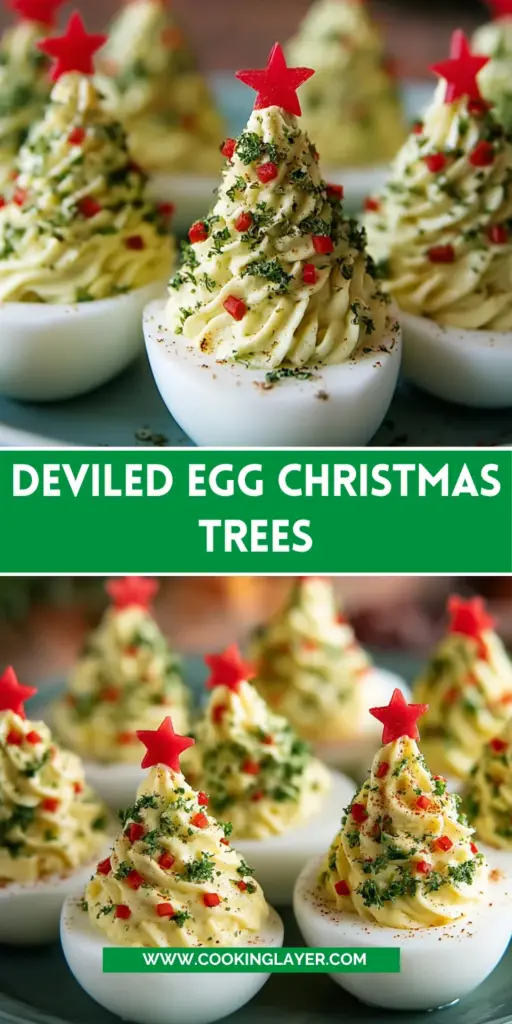
Now comes the creative part! Take the egg whites and begin filling them with your yolk mixture. To achieve the tree shape, use a spoon to pile the mixture high in the center, resembling the crown of a Christmas tree. Don’t worry about being too precise; a little mess adds to the charm. If you’re feeling adventurous, you can even use a piping bag for a neater, fancier look!
Step 4: Decorate Your Trees
Time to add some festive flair! Dice your red bell pepper into tiny pieces, using them as ornaments on your edible trees. Scatter these bits on the top and sides of the egg filling for a pop of color. Next, chop some chives or parsley to create a garland on your trees. Feel free to get creative! Using different herbs or veggies makes each tree unique and adds texture.
Step 5: Serve the Treats
Finally, it’s time to present your beautiful Deviled Egg Christmas Trees! Arrange them carefully on a festive platter. You could even place them on a bed of greens for extra pizzazz. Consider adding some cheerful holiday décor nearby; it gives a warm feel to your gathering. Enjoy watching your family and friends marvel at these creative appetizers!
Tips for Success
- Use older eggs for easy peeling—this will save you time!
- Keep your filling smooth by mixing thoroughly. Nobody likes chunky deviled eggs!
- To make the filling more colorful, adjust food coloring slowly for desired shade.
- For a cleaner presentation, consider using a piping bag to fill the whites.
- Fresh herbs make a big difference in flavor and presentation—don’t skip them!
Equipment Needed
- Medium saucepan: Perfect for boiling eggs; a large pot works too.
- Mixing bowl: For combining your yolk filling; any bowl will do.
- Fork or whisk: To blend the filling into a smooth consistency.
- Knife: Essential for cutting the eggs in half lengthwise.
- Platter: To beautifully display your finished Deviled Egg Christmas Trees.
Variations
- Spicy Version: Add chopped jalapeños or a splash of sriracha to the yolk mixture for a delightful kick.
- Herbed Delight: Mix in fresh herbs like dill or basil for added flavor and freshness; it’s a twist you won’t forget!
- Avocado Swap: Replace mayonnaise with ripe avocado for a creamy and nutritious option. This adds a unique twist!
- Make it Vegan: Use tofu or chickpeas blended with vegan mayo for a plant-based alternative that still tastes fabulous.
- Cheesy Goodness: Mix some shredded cheese into the yolk filling for a rich, cheesy flavor that both kids and adults will love.
Serving Suggestions for Deviled Egg Christmas Trees
- Pair with a light, crisp salad to balance the richness of the eggs.
- Serve alongside a festive punch or sparkling water with fresh fruit slices.
- Present on a decorative holiday platter with twinkling lights or green garlands.
- Include a selection of crackers for added crunch and variety.
- Offer dipping sauces like ranch or spicy mayo for an extra layer of flavor.
FAQs about Deviled Egg Christmas Trees
Let’s address some common questions about these delightful Deviled Egg Christmas Trees. I know you might be wondering a thing or two before getting started!
Can I make Deviled Egg Christmas Trees a day ahead?
Absolutely! You can prepare your Deviled Egg Christmas Trees in advance. Just keep them covered in the refrigerator. They’ll stay fresh and tasty, making your holiday prep even easier!
How do I store leftover Deviled Eggs?
Store any leftover eggs in an airtight container in the fridge. They’re best enjoyed within three days for optimal taste and freshness. But honestly, they’re so tasty, they probably won’t last that long!
Can I use different colors for the filling?
Of course! While the green food coloring gives that festive touch, feel free to experiment with natural color sources like spinach or beet juice for an exciting twist!
Are there any dietary restrictions to consider?
These Deviled Egg Christmas Trees are vegetarian-friendly, but for vegan or gluten-free options, check out the variations section earlier. Your friends with dietary needs will still be able to enjoy the festivities!
What if my eggs don’t peel easily?
If you struggle with peeling, try soaking the boiled eggs in cold water for a few minutes. This often helps loosen the shells, making the process much smoother!
Final Thoughts
Creating Deviled Egg Christmas Trees is more than just a recipe; it’s a delightful way to spread holiday joy. As I stood in my kitchen, surrounded by the colorful decorations and the warm aroma of the season, I realized how these simple ingredients can turn into a heartwarming dish that brings everyone together. Whether it’s a family gathering or a festive party, these charming treats are sure to spark smiles and create lasting memories. So, grab your loved ones, whip up these delightful trees, and let the festive spirit unfold—because nothing says holiday cheer quite like delicious homemade creations!
Print
Deviled Egg Christmas Trees
- Prep Time: 20 minutes
- Cook Time: 10 minutes
- Total Time: 30 minutes
- Yield: 12 deviled eggs 1x
- Category: Appetizer
- Method: Boiling and Mixing
- Cuisine: American
- Diet: Vegetarian
Description
Delicious and fun Deviled Egg Christmas Trees, perfect for holiday gatherings.
Ingredients
- 6 large boiled eggs
- 1/4 cup mayonnaise
- 1 teaspoon Dijon mustard
- Salt and pepper to taste
- Green food coloring
- Red bell pepper, diced (for decoration)
- Chives or parsley (for decoration)
Instructions
- Peel the boiled eggs and cut them in half lengthwise.
- Remove the yolks and place them in a bowl.
- Add mayonnaise, Dijon mustard, salt, pepper, and a few drops of green food coloring to the yolks. Mix until smooth.
- Fill the egg whites with the yolk mixture, creating a tree shape.
- Decorate with diced red bell pepper for ornaments and chives or parsley for garland.
- Arrange the deviled eggs on a festive platter and serve.
Notes
- For a spicier kick, add a dash of hot sauce to the yolk mixture.
- Make sure to use fresh eggs for easier peeling.
Nutrition
- Serving Size: 2 halves
- Calories: 120
- Sugar: 1g
- Sodium: 150mg
- Fat: 9g
- Saturated Fat: 2g
- Unsaturated Fat: 0g
- Trans Fat: 0g
- Carbohydrates: 1g
- Fiber: 0g
- Protein: 6g
- Cholesterol: 186mg

