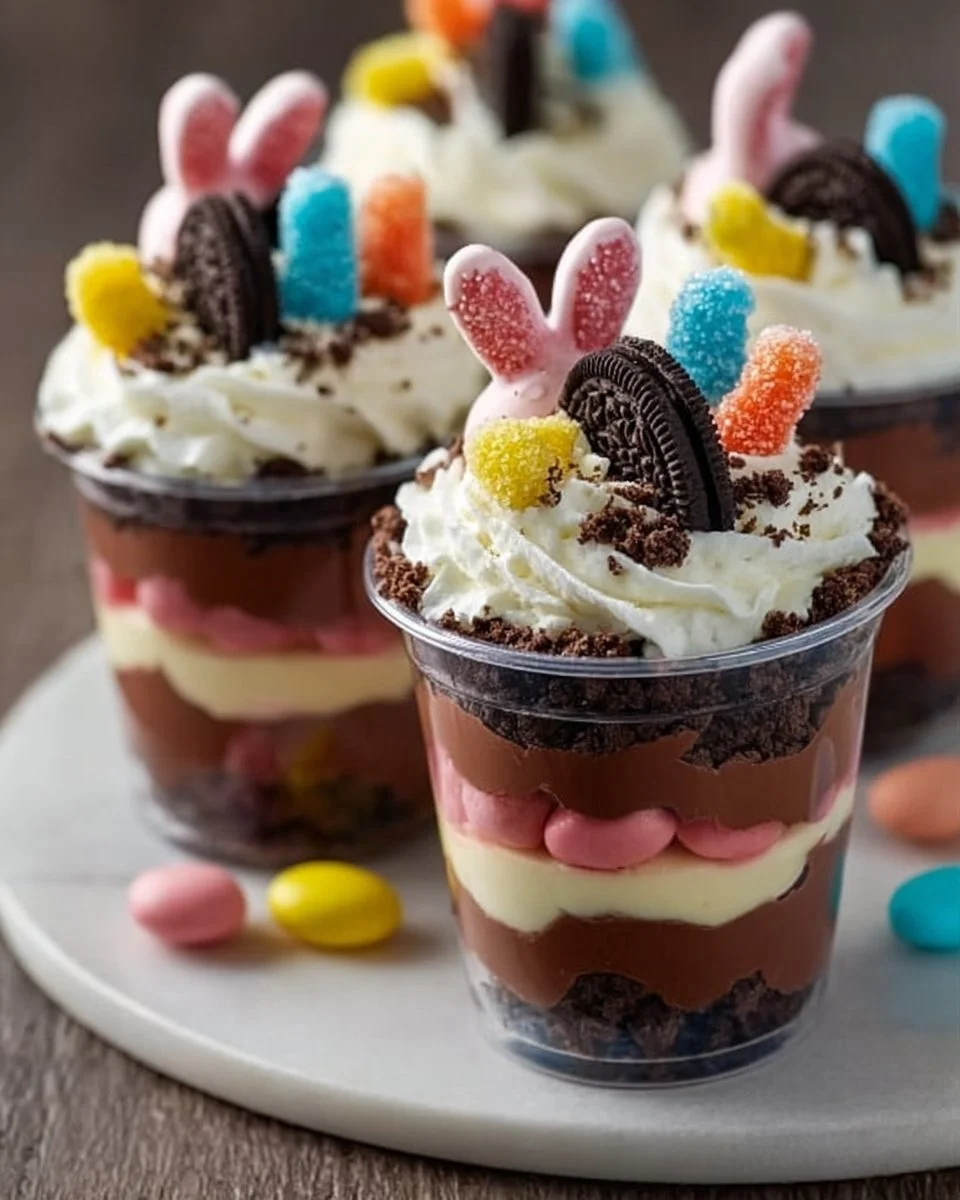
Easter Dirt Cups are a delightful dessert that can bring a joyful twist to any gathering—especially Easter! I remember the first time I made these; it was a sunny afternoon, and my niece was visiting. After seeing her favorite cartoon featuring worms, I thought, “Why not bring some of that fun into our kitchen?” Trust me, these cups are both silly and delicious!
Why You’ll Love This Easter Dirt Cups
Honestly, these Easter Dirt Cups are not just adorable; they’re also super easy to whip up. The combination of creamy chocolate pudding, crunchy Oreo cookies, and gummy worms creates a fun texture that everyone loves. You just can’t go wrong decorating these for Easter—kids and adults alike can’t resist them!
Plus, they look impressive without requiring mastery in the kitchen. With just a few simple ingredients, you’ll have a dessert that not only pleases the palate but also captures everyone’s imagination. This Easter Dirt Cups recipe is perfect for quick meals, easy snacks, or special occasions.
Preparation Phase & Tools to Use
You don’t need fancy gadgets for this recipe—just a few basic kitchen tools and some plastic cups for serving will do. Grab yourself a mixing bowl for the pudding, a sturdy zipper bag or a rolling pin for crushing those Oreos, and you’ll be set.
You’ll need:
- A mixing bowl
- A spoon or spatula
- A rolling pin or heavy object for smashing Oreos (don’t use your fist though!)
- Plastic cups for serving
Ingredients for Easter Dirt Cups
Gather these ingredients, and you’ll be ready for a fun cooking session:
- 1 package of chocolate pudding mix
- 2 cups milk
- 1 package of Oreo cookies
- 1 cup of gummy worms
- Whipped cream or Cool Whip
- Plastic cups for serving
How to Make Easter Dirt Cups at Home
Ready? Let’s dive in! Here’s how you can make these fun Easter Dirt Cups.
Prepare the pudding: In a mixing bowl, combine the chocolate pudding mix with 2 cups of milk. Whisk it together until it’s smooth and thickens to a luscious texture. Honestly, if you let it thicken a bit more than the package says, it makes layering easier.
Crush the Oreos: Place your Oreo cookies in a zipper bag and crush them. You want them to resemble dirt, so don’t be afraid to go a little rough—just remember to not turn them into dust.
Layer in the cups: Grab your plastic cups and start layering! Spoon in some chocolate pudding, followed by a layer of crushed Oreos. Repeat this until you fill the cups, topping off the final layer with the Oreo crumbs.
Add the whipped cream: Now, it’s time to add a generous dollop of whipped cream or Cool Whip on top. This adds a delightful creaminess and resembles the “dirt” just a little more.
Decorate with gummy worms: Place your gummy worms on top. They look like they’re crawling out of the dirt, and I promise this will make everyone giggle!
Chill: Pop them into the fridge for about 30 minutes. The chilling helps everything set and makes the flavors come together nicely.
And that’s it! Super simple, right?
Pro Tips for Best Results
- Chill Time Matters: Give your cups enough time in the fridge to set.
- Don’t Rush Your Layers: If you’re layering too quickly, the pudding can mix with the Oreos. Let them sit a bit to create those beautiful layers.
- Quick tip: If you want a smoother pudding, try using cold milk instead of room temperature.
Variations & Customization Ideas
You can switch things up if you want! Here are some ideas:
- Switch Flavors: Use vanilla pudding instead for a different taste.
- Mix It Up: Add crushed candy bars or chocolate chips between the layers for an extra treat.
- Theme it Out: For Halloween, swap the worms for creepy candy spider rings!
Common Mistakes to Avoid
There’s one mistake that can ruin this—overmixing the pudding. Seriously, whisk just until it’s combined. Also, don’t skip chilling the cups; you’ll thank me later for that little tip.
What to Serve With Easter Dirt Cups
These adorable cups are a fun addition to any Easter brunch or party table. Pair them with:
- Fresh fruit salad
- Mini sandwiches or sliders
- Other fun desserts like spring-themed cupcakes
Storage & Reheating Instructions
These cups are best enjoyed fresh, but you can store them in the fridge for up to 2 days. Just cover them loosely with plastic wrap. I wouldn’t recommend freezing, though—the texture of the whipped cream can get a little wonky when thawed.
Estimated Nutrition Information
Each cup of Easter Dirt Cups (without extra toppings) has approximately:
- Calories: 250
- Protein: 3g
- Carbohydrates: 36g
- Fat: 10g
Please note that these values can vary based on specific brands and quantities used.
FAQs
1. Can I use fat-free pudding?
Absolutely! Fat-free pudding will work just fine if you prefer a lighter dessert.
2. How do I make gluten-free dirt cups?
Simply use gluten-free Oreo cookies. They’re delicious, too!
3. Can I make this the day before?
Yes, these can be made a day in advance. Just store them in the fridge!
4. What if I can’t find gummy worms?
Any candy works! Try gummy bunnies or other fun candies for Easter.
5. Is there a way to reduce sugar?
You can use sugar-free pudding mix and a lighter whipped topping if you want to cut back on sugar.
Expert Tips for the Best Easter Dirt Cups
- Layering Tip: Use a clear cup so everyone can see those cute layers!
- Presentation Matters: Sprinkle some crushed Oreos on top for added visual appeal.
- Make it Interactive: Let kids customize their cups by adding their favorite candies.
Conclusion
Making Easter Dirt Cups is a joyful experience that brings out the kid in all of us. From the easy-to-follow instructions to the smile on everyone’s face, this dessert is a winner. This Easter Dirt Cups recipe is perfect for quick meals, easy snacks, or special occasions. So, go ahead—try it and see how it turns out! Save this recipe for later and share it with someone who needs a little more fun in their dessert life. Enjoy your cooking!
Print
Easter Dirt Cups
- Prep Time: 10 minutes
- Cook Time: 30 minutes
- Total Time: 40 minutes
- Yield: 4 servings 1x
- Category: Dessert
- Method: Chilling
- Cuisine: American
- Diet: Vegetarian
Description
Easter Dirt Cups are a delightful and easy dessert made with chocolate pudding, Oreo cookies, and gummy worms, perfect for any gathering.
Ingredients
- 1 package of chocolate pudding mix
- 2 cups milk
- 1 package of Oreo cookies
- 1 cup of gummy worms
- Whipped cream or Cool Whip
- Plastic cups for serving
Instructions
- Prepare the pudding: In a mixing bowl, combine the chocolate pudding mix with 2 cups of milk. Whisk until smooth and thickens.
- Crush the Oreos: Place Oreo cookies in a zipper bag and crush them until they resemble dirt.
- Layer in the cups: Spoon in chocolate pudding, then crushed Oreos. Repeat until cups are filled, topping with Oreo crumbs.
- Add the whipped cream: Top with a generous dollop of whipped cream or Cool Whip.
- Decorate with gummy worms: Place gummy worms on top to resemble them crawling out of the dirt.
- Chill: Refrigerate for about 30 minutes to set.
Notes
Allow enough chilling time for the cups to set and avoid overmixing the pudding to keep textures distinct.
Nutrition
- Serving Size: 1 cup
- Calories: 250
- Sugar: 18g
- Sodium: 200mg
- Fat: 10g
- Saturated Fat: 3g
- Unsaturated Fat: 7g
- Trans Fat: 0g
- Carbohydrates: 36g
- Fiber: 2g
- Protein: 3g
- Cholesterol: 15mg