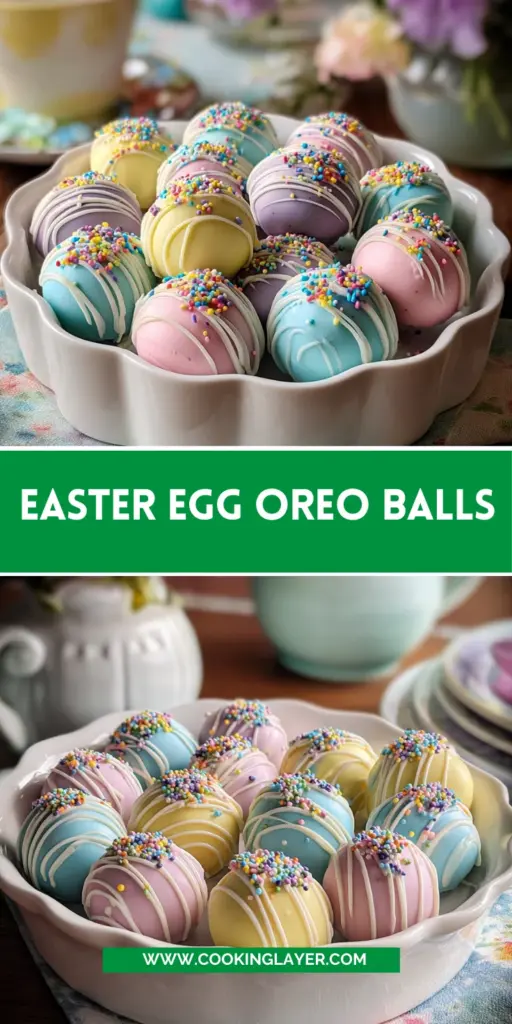
Introduction to Easter Egg Oreo Balls
As spring approaches, I find myself yearning for those delightful flavors that signal Easter is just around the corner. One of my favorite treats to whip up are these Easter Egg Oreo Balls. They’re not only festive and fun but also a quick solution for those busy days. With just a handful of ingredients and minimal effort, you can impress family and friends with a dessert that looks stunning and tastes heavenly. Plus, who can resist the classic combination of Oreos and cream cheese? Let’s dive into the delicious world of Easter Egg Oreo Balls!
Why You’ll Love This Easter Egg Oreo Balls
These Easter Egg Oreo Balls are truly a lifesaver for busy moms and professionals. They come together in just an hour, making them perfect for last-minute celebrations. Plus, the rich taste of Oreos combined with creamy filling is sure to please even the pickiest eaters. With their vibrant colors, they’re not just tasty; they’re a feast for the eyes too! You’ll find them a delightful addition to your holiday festivities.
Ingredients for Easter Egg Oreo Balls
Creating these delightful Easter Egg Oreo Balls is a breeze with just a few simple ingredients. Here’s what you’ll need:
- Oreo cookies: The backbone of this recipe! Their crunchy texture combined with the creamy filling creates a delightful base.
- Cream cheese: This adds richness and creaminess, binding the Oreo crumbs into a dough-like consistency.
- Vanilla extract: While optional, this little touch can elevate the flavors, making the balls extra delicious.
- White candy melts or white chocolate chips: These are the coatings that give our balls that charming, glossy finish. Chocolate chips can work too, just add a bit of coconut oil for smoothness.
- Pastel food coloring: Bring on the fun! These colors help to create that festive Easter vibe. Use any combination of pink, blue, yellow, or green to make them pop.
- Sprinkles or sanding sugar: These are optional, but who doesn’t love a little extra sparkle? They add a playful touch to the finished product.
For exact measurements, be sure to check the bottom of the article where everything is available for printing. Now, let’s gather these fun ingredients and jump into the magical world of baking!
How to Make Easter Egg Oreo Balls
Now that we have everything prepped, let’s get hands-on and create these delightful Easter Egg Oreo Balls. This part is where the fun truly begins! Follow these simple steps, and you’ll be on your way to a festive treat that’s bound to impress everyone.
Step 1: Crush the Oreos
The first step is to crush the Oreos. Place the entire package into a food processor, cream filling included. Pulse until the cookies turn into fine crumbs. If you don’t have a food processor, don’t fret! You can put the Oreos in a zip-top bag and crush them with a rolling pin. Just think of it as a mini workout—one that ends with a tasty reward!
Step 2: Mix with Cream Cheese
In a mixing bowl, combine the crushed Oreos with softened cream cheese. Use a spoon or a hand mixer to blend them together until you achieve a thick, dough-like consistency. This is where the magic happens, as the creaminess of the cheese binds all that deliciousness together.
Step 3: Shape the Eggs
Time to get creative! Scoop out about one tablespoon of the Oreo mixture and roll it into an egg shape using your hands. Think of creating little treasures! Place each shaped egg on a parchment-lined baking sheet. Repeat this process until you’ve used up all the mixture. Is it just me, or do they start looking like little Easter eggs?
Step 4: Chill the Oreo Balls
Once shaped, place the baking sheet with the Oreo eggs in the refrigerator. Chill for at least 30 minutes. If you’re in a hurry, the freezer works, too—just 15 minutes will do the trick. This step ensures that they hold their shape when we coat them.
Step 5: Melt the Candy Coating
Next up, melt the white candy melts! Use a microwave-safe bowl for this. Heat them in short intervals, stirring in between until smooth. If you’re opting for white chocolate chips, remember to add a teaspoon of coconut oil. This helps to achieve that silky smooth texture that will coat our Oreo delights perfectly.
Step 6: Color the Candy Coating
Here comes the fun part—coloring the candy coating! Divide the melted candy into different bowls. Add pastel food coloring to each one. Give them a good stir until the hues are vibrant and even. No need to be an artist; even a little splash of color makes these treats festive!
Step 7: Dip the Oreo Eggs
Now it’s time to dip! Using a fork or dipping tool, carefully dip each chilled Oreo egg into the melted candy coating. Make sure to let the excess drip off before placing them back onto the parchment-lined sheet. Your patience will pay off as the eggs get that glossy finish!
Step 8: Decorate the Oreo Balls
Before the coating sets, let your creativity shine! Add sprinkles, sanding sugar, or drizzle another color of melted chocolate on top. This is where you can unleash your inner artist. Just imagine all the beautiful designs you can create for your Easter gathering!
Step 9: Let Them Set
Once decorated, allow your Easter Egg Oreo Balls to set. You can let them harden at room temperature for about 15 minutes or pop them back in the fridge for an additional 10. Either way, you’ll soon have a delicious treat ready to devour!
Step 10: Serve and Enjoy!
Finally, it’s time to celebrate your hard work! Once the balls are fully set, serve them up on a pretty platter. Watch as your family and friends dig in. With every bite of these festive Easter Egg Oreo Balls, you’ll surely receive smiles and “oohs” and “aahs.” Enjoy your wonderful creation; you’ve earned it!
Tips for Success
- Use room temperature cream cheese for easier mixing.
- Chill the mixture well before shaping for a neater finish.
- Add a touch of coconut oil to melted chocolate for a smoother coating.
- Be playful with colors—mix and match for unique designs!
- Store any leftovers in an airtight container in the fridge.
Equipment Needed
- Food Processor: For crushing Oreos quickly. A rolling pin and zip-top bag can be a good alternative.
- Mixing Bowl: Essential for combining your ingredients. Any large bowl will do!
- Microwave-Safe Bowl: For melting candy. Regular bowls can be used, but ensure they’re heat-resistant.
- Parchment Paper: To line your baking sheet. Wax paper works in a pinch!
Variations of Easter Egg Oreo Balls
- Peanut Butter Delight: Mix in some creamy peanut butter with the cream cheese for a nutty twist. Trust me; it’s a game-changer!
- Minty Fresh: Add a few drops of peppermint extract to give a refreshing taste. Perfect for those who adore minty treats.
- Dark Chocolate Coating: Swap the white candy melts for dark chocolate. It adds a richer flavor that’s simply divine!
- Vegan Version: Use Oreo or another vegan cookie, dairy-free cream cheese, and plant-based chocolate. Enjoy the taste without the dairy!
- Fruit and Nut Mix: Add some finely chopped dried fruits or nuts to the Oreo mixture. It adds texture and an extra burst of flavor!
Serving Suggestions
- Festive Platter: Arrange the Easter Egg Oreo Balls on a colorful platter for an eye-catching display at your gathering.
- Drink Pairing: Serve alongside refreshing lemonade or iced tea for a delightful spring treat.
- Spring Touch: Garnish with edible flowers or fresh mint leaves for an elegant presentation.
FAQs about Easter Egg Oreo Balls
As with any beloved recipe, you might have a few questions. Here are some common queries about these delightful Easter Egg Oreo Balls!
Can I make Easter Egg Oreo Balls ahead of time?
Absolutely! These festive treats can be made a day or even two in advance. Just store them in an airtight container in the refrigerator. They’ll stay fresh and delicious, ready for your holiday celebration!
How can I store leftover Oreo balls?
Leftovers should be stored in an airtight container in the fridge. They’ll keep well for up to a week, but trust me—these treats usually disappear much faster!
Can I use regular chocolate instead of candy melts?
You can! If you prefer chocolate, feel free to use melting chocolate or chips. Just don’t forget to add a little coconut oil for a smooth finish when melting. The taste will be just as fabulous!
How do I get the pastel colors to show up on the coating?
Using good quality candy melts or chocolate will help achieve vibrant colors. Make sure to mix the food coloring well until fully incorporated for those happy Easter vibes!
Can I use gluten-free Oreos?
Of course! Gluten-free Oreos work perfectly for this recipe. Just check for any dietary needs, and you can enjoy these delectable treats without worry!
Final Thoughts
As you prepare these delightful Easter Egg Oreo Balls, I hope you feel the joy and warmth of the season. There’s something magical about crafting a sweet treat that brings family and friends together. The smiles they’ll bring, combined with the fun of creating vibrant, tasty eggs, is a recipe for happiness. So gather your loved ones, roll up your sleeves, and indulge in this sweet adventure. With flavors and colors that scream celebration, these Oreo balls are sure to be a highlight of your Easter festivities. Enjoy every bite, and happy baking!
Print
Easter Egg Oreo Balls
- Prep Time: 20 minutes
- Cook Time: 10 minutes
- Total Time: 1 hour
- Yield: 36 Oreo balls 1x
- Category: Dessert
- Method: No-bake
- Cuisine: American
- Diet: Vegetarian
Description
Delicious and festive Easter-themed Oreo balls shaped like eggs, perfect for celebrating the holiday.
Ingredients
- 1 package (14.3 oz) Oreo cookies (about 36 cookies)
- 8 oz cream cheese, softened
- 1 teaspoon vanilla extract (optional, for extra flavor)
- 12 oz white candy melts (or white chocolate chips)
- Assorted pastel food coloring (pink, blue, yellow, green, etc.)
- Sprinkles, sanding sugar, or drizzle for decoration (optional)
Instructions
- Crush the Oreos: Place the Oreo cookies (cream filling included) into a food processor. Pulse until they become fine crumbs. If you don’t have a food processor, place the Oreos in a zip-top bag and crush them with a rolling pin until finely ground.
- Mix with Cream Cheese: In a large mixing bowl, combine the crushed Oreos with softened cream cheese. Stir (or use a hand mixer) until the mixture is fully combined and resembles a thick dough.
- Shape the Eggs: Scoop out about 1 tablespoon of the Oreo mixture, roll it into an egg shape, and place it on a parchment-lined baking sheet. Repeat with the remaining mixture.
- Chill the Oreo Balls: Place the baking sheet in the refrigerator for at least 30 minutes (or the freezer for 15 minutes) until the Oreo eggs are firm.
- Melt the Candy Coating: In a microwave-safe bowl, melt the white candy melts according to the package instructions. If using white chocolate chips, add 1 teaspoon of coconut oil to help create a smooth consistency.
- Color the Candy Coating: Divide the melted candy coating into separate bowls and add pastel food coloring to each one. Stir until the colors are evenly mixed.
- Dip the Oreo Eggs: Using a fork or dipping tool, carefully dip each chilled Oreo egg into the melted candy coating. Let the excess coating drip off, then place the coated egg back onto the parchment-lined baking sheet.
- Decorate the Oreo Balls: Before the coating sets, add sprinkles, sanding sugar, or drizzle with another color of melted chocolate to create fun Easter egg designs.
- Let Them Set: Allow the Easter egg Oreo balls to set at room temperature for 15 minutes or place them in the refrigerator for 10 minutes until fully hardened.
- Serve and Enjoy!: Once set, your festive Easter Egg Oreo Balls are ready to enjoy!
Notes
- Use different colors of food dye for a variety of designs.
- Store them in an airtight container in the refrigerator for up to a week.
- Perfect for Easter parties or gatherings!
Nutrition
- Serving Size: 1 ball
- Calories: 130
- Sugar: 10g
- Sodium: 85mg
- Fat: 8g
- Saturated Fat: 4g
- Unsaturated Fat: 3g
- Trans Fat: 0g
- Carbohydrates: 15g
- Fiber: 1g
- Protein: 1g
- Cholesterol: 15mg