What Is Easter Swirl Cake?
Easter Swirl Cake is one of those desserts that instantly captures the feeling of spring the moment you see it. With its soft pastel colors, creamy texture, and buttery graham cracker crust, it’s not just a dessert—it’s a centerpiece. And the best part? You don’t even need to turn on your oven.
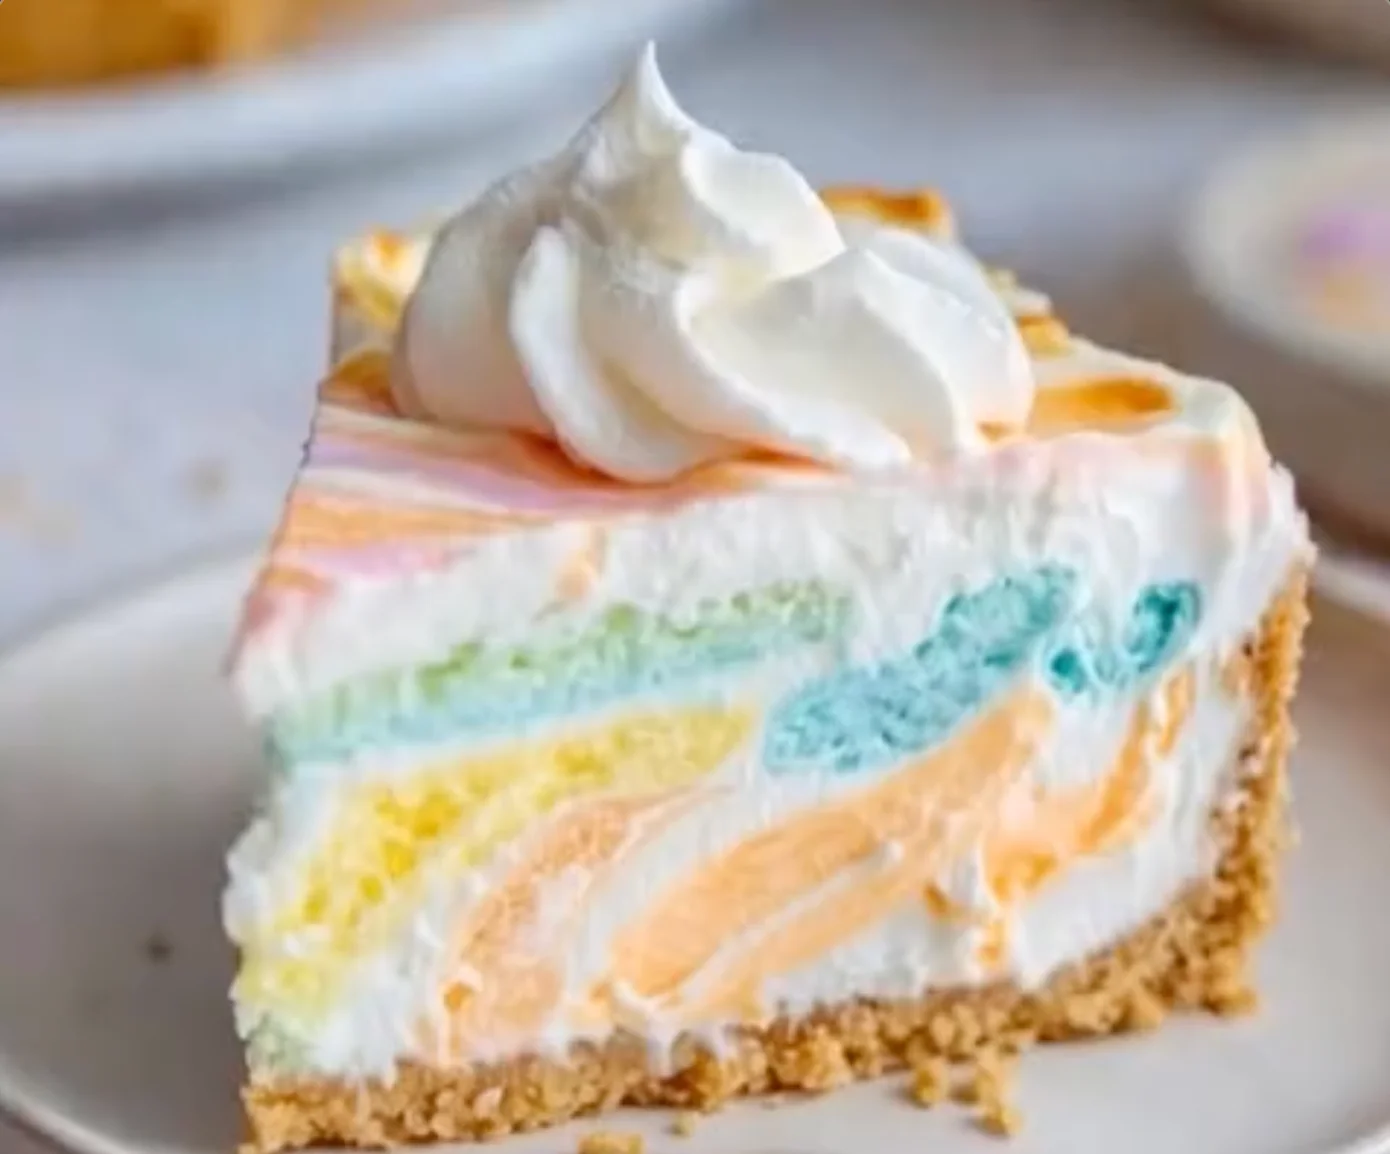
At its core, this is a no-bake cheesecake-style dessert made with a light cream cheese filling that’s been divided and colored into beautiful pastel shades. These colors are then gently swirled together, creating a marbled effect that looks almost like edible art. Once chilled, the filling firms up just enough to slice cleanly while still staying soft and creamy.
What makes this cake especially appealing is how approachable it is. You don’t need advanced baking skills or special tools. It’s more about assembling than baking, which makes it perfect for beginners or anyone who just wants something quick and fun.
The texture is another highlight. It’s smooth, fluffy, and slightly airy thanks to the whipped topping folded into the mixture. Paired with the crunchy graham crust, every bite feels balanced—not too heavy, not too light.
And let’s be honest—this is the kind of dessert that gets people talking before they even taste it. It’s colorful, cheerful, and perfectly on-theme for Easter.
The Concept of No-Bake Desserts
No-bake desserts have become incredibly popular, and it’s easy to understand why. They remove one of the biggest barriers in baking: the oven. Without worrying about temperature, timing, or overbaking, the process becomes much more relaxed.
Instead of relying on heat to set the dessert, no-bake recipes use chilling time. Ingredients like cream cheese, whipped topping, and butter firm up in the refrigerator, creating structure without baking.
This makes recipes like Easter Swirl Cake ideal for busy holidays. You can prepare it ahead of time, let it chill, and focus on everything else.
Why Swirl Cakes Are So Popular
Swirl cakes are all about visual impact. The marbled effect created by blending different colors or flavors gives each slice a unique look. No two pieces are exactly the same, which adds a fun, artistic element.
There’s also something satisfying about the process itself. Swirling feels less like baking and more like painting—you’re creating patterns, experimenting with movement, and letting the design come together naturally.
Ingredients Breakdown
Understanding the ingredients helps you get the best results, especially when texture and appearance are key.
Building the Perfect Graham Crust
The crust is simple but essential. Crushed graham crackers provide a slightly sweet, crumbly base that contrasts beautifully with the creamy filling.
Melted butter binds everything together, while a bit of sugar enhances the flavor. When pressed into the pan and chilled, it forms a firm layer that holds the dessert together.
The key here is consistency. The mixture should feel like damp sand—easy to press but not overly greasy.
Creamy Filling Components
The filling is where the magic happens. Cream cheese gives structure and a slight tang, balancing the sweetness. Powdered sugar blends smoothly, ensuring a silky texture without graininess.
Whipped topping adds airiness, making the filling light and fluffy rather than dense. Vanilla extract rounds out the flavor, adding warmth and depth.
When combined, these ingredients create a mixture that’s smooth, spreadable, and perfect for swirling.
Food Coloring and Visual Appeal
Food coloring is what transforms this dessert into a showstopper. Pastel shades like pink, blue, yellow, and purple give it that classic Easter look.
Gel food coloring works best because it provides vibrant color without thinning the mixture. The goal is soft, gentle tones—not overly bold or artificial-looking shades.
Step-by-Step Instructions
Preparing the Crust Base
Start by mixing crushed graham crackers, melted butter, and sugar until well combined. Press the mixture firmly into the bottom of an 8×8 pan, creating an even layer.
Chill the crust for 20–30 minutes. This step helps it firm up, making it easier to add the filling later without disturbing the base.
Making the Creamy Filling
Beat the softened cream cheese until completely smooth. This step is crucial—any lumps here will affect the final texture.
Add powdered sugar and vanilla extract, mixing until fully combined. Then gently fold in the whipped topping. Folding instead of mixing keeps the texture light and airy.
Creating the Signature Swirl Effect
Divide the filling into separate bowls and add different pastel colors to each. Stir gently until the colors are evenly distributed.
Drop spoonfuls of each color randomly over the crust. Once all the filling is added, use a knife or toothpick to swirl the colors together.
Here’s the trick: don’t over-swirl. A few gentle movements are enough to create that marbled effect. Too much mixing will blend the colors into one.
Chilling and Setting the Cake
Refrigerate the cake for at least 4 hours, or overnight if possible. This allows the filling to set and makes slicing easier.
Tips for the Perfect No-Bake Cake
Getting the Right Texture
The key to a great texture is balance. You want the filling to be firm enough to hold its shape but still soft and creamy when eaten.
Make sure your cream cheese is fully softened before mixing. This prevents lumps and ensures a smooth consistency.
Also, avoid overmixing once you add the whipped topping. Keeping that air in the mixture is what gives the dessert its light feel.
Mastering the Swirl Technique
Swirling is all about restraint. It’s tempting to keep mixing until the colors look perfectly blended, but that’s not the goal.
Instead, think of it like drawing gentle lines through the batter. Let the colors flow naturally rather than forcing them together.
Decorating and Presentation Ideas
Once your Easter Swirl Cake has fully set, this is where you can really bring it to life. The beauty of this dessert is that it already looks stunning with its pastel swirls—but a few thoughtful touches can elevate it from “pretty” to absolutely unforgettable.
Toppings and Garnishes
Start simple. A light layer of whipped cream piped or spread across the top adds a soft, cloud-like finish that complements the airy filling. You don’t need to cover the entire surface—sometimes a few swirls or dollops around the edges are enough to frame the cake beautifully.
Next, bring in color. Sprinkle pastel sprinkles, mini candy eggs, or even crushed candy-coated chocolates over the top. These not only add visual interest but also introduce a slight crunch that contrasts nicely with the creamy texture.
Fresh fruit can also work surprisingly well here. A few strawberries, raspberries, or blueberries placed strategically on top can add a fresh, slightly tangy element that balances the sweetness. It also gives the dessert a more natural, spring-inspired look.
If you want to keep things minimal, even a light dusting of powdered sugar can add a subtle elegance without overpowering the design.
Easter-Themed Styling Tips
Presentation goes beyond just the cake—it’s about how you serve it. Placing your Easter Swirl Cake on a pastel-colored plate or cake stand instantly enhances its visual appeal.
You can also decorate around it. Think small Easter props like decorative eggs, flowers, or even a few themed napkins. These little details create a cohesive look that makes the dessert feel like part of the celebration, not just an afterthought.
For individual servings, consider cutting clean squares and placing them on plates with a small garnish—like a mint leaf or a drizzle of syrup. It’s a simple way to make each serving feel special.
Variations and Creative Twists
One of the best things about Easter Swirl Cake is how flexible it is. Once you’ve mastered the base recipe, you can easily customize it to suit different flavors or occasions.
Fruity Swirl Cake Version
If you want to add a fresh twist, incorporate fruit flavors into the filling. You can mix a bit of strawberry, blueberry, or mango puree into each colored portion before swirling.
This not only enhances the flavor but also gives each color a slightly different taste. Imagine one bite with a hint of strawberry and another with a touch of mango—it keeps things interesting and adds depth.
You can even layer thin slices of fruit between the crust and filling for an extra surprise.
Chocolate Swirl Variation
For a richer version, add melted chocolate or cocoa powder to one portion of the filling. Swirl it together with the pastel colors for a contrast that’s both visual and flavorful.
Chocolate pairs beautifully with the creamy base, creating a dessert that feels a bit more indulgent while still keeping that light texture.
If you really want to go all out, drizzle chocolate over the top before serving. It adds a glossy finish that looks straight out of a bakery.
Storage and Serving Tips
Easter Swirl Cake is a great make-ahead dessert, which makes it perfect for busy holidays.
Store it covered in the refrigerator for up to 3–4 days. The texture holds up well, and the flavors often become even better after a day as everything settles together.
When serving, use a sharp knife and wipe it clean between cuts to keep the slices looking neat. Because of the soft texture, clean cuts make a big difference in presentation.
Serve the cake chilled for the best consistency. If it sits out too long, it may soften too much, especially in warmer environments.
Conclusion
Easter Swirl Cake is the perfect combination of simplicity and creativity. It’s easy to make, doesn’t require baking, and delivers a dessert that looks as good as it tastes. With its creamy texture, buttery crust, and vibrant pastel swirls, it captures everything we love about spring in one dish.
What makes it truly special is how adaptable it is. You can keep it classic, experiment with flavors, or decorate it to match your theme. No matter how you make it, it always feels festive and fun.
Whether you’re preparing for a big Easter gathering or just want something cheerful and sweet, this cake is one of those recipes that never disappoints.
FAQs
1. Can I make Easter Swirl Cake ahead of time?
Yes, it’s actually best when made a day in advance so it has enough time to fully set.
2. Can I use homemade whipped cream instead of whipped topping?
Absolutely. Just make sure it’s whipped to stiff peaks so the filling holds its shape.
3. Why did my colors blend too much?
You likely over-swirled the mixture. Use gentle movements and stop early for distinct patterns.
4. Can I freeze this cake?
Yes, but the texture may change slightly. It’s best enjoyed fresh from the refrigerator.
5. What size pan works best?
An 8×8-inch pan is ideal for thickness and structure, but you can adjust based on preference.
Print
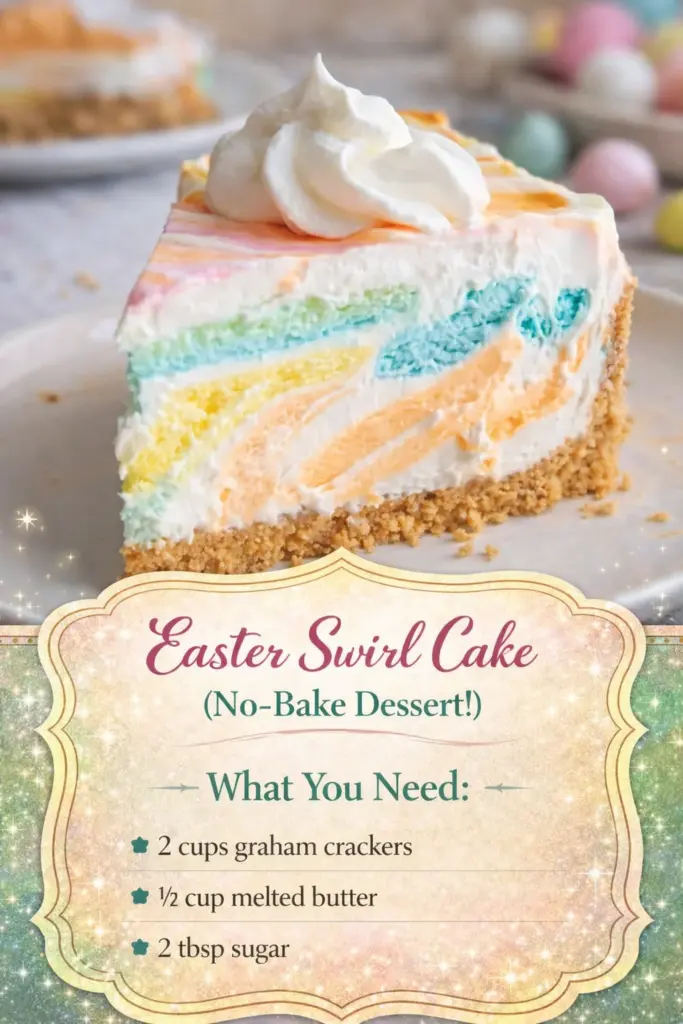
Easter Swirl Cake – The Ultimate No-Bake Spring Dessert
Description
Looking for an easy, colorful dessert? This Easter Swirl Cake is creamy, light, and full of spring vibes! With a buttery graham crust and soft pastel swirls, it’s the perfect no-bake treat for your holiday table. 🤩✨
Ingredients
For the Crust:
- 2 cups graham crackers (crushed)
- ½ cup melted butter
- 2 tbsp sugar
For the Filling:
- 8 oz cream cheese, softened
- 1 cup powdered sugar
- 1 cup whipped topping
- 1 tsp vanilla extract
- Food coloring (pastel colors)
Instructions
1. Make the Crust
- Mix crushed graham crackers, melted butter, and sugar.
- Press into the bottom of a pan (8×8).
- Chill in the fridge for 20–30 minutes.
2. Prepare the Filling
- Beat cream cheese until smooth.
- Add powdered sugar and vanilla, mix well.
- Fold in whipped topping until fluffy.
3. Create the Swirl 🎨
- Divide filling into 3–4 bowls.
- Add different food coloring to each.
- Drop spoonfuls randomly over the crust.
- Use a knife or toothpick to swirl gently.
4. Chill
- Refrigerate for at least 4 hours (or overnight).
5. Serve
- Slice and enjoy chilled!