Introduction to Fruity Pebbles Cheesecake Tacos
Yo, peeps and sweet tooth fans alike! In case you’ve been looking for something sweet and colorful to cheer up your day, look no further. These aren’t just any dessert, they are a wonderful combination of two sweets: Fruity Pebbles Cheesecake Tacos.
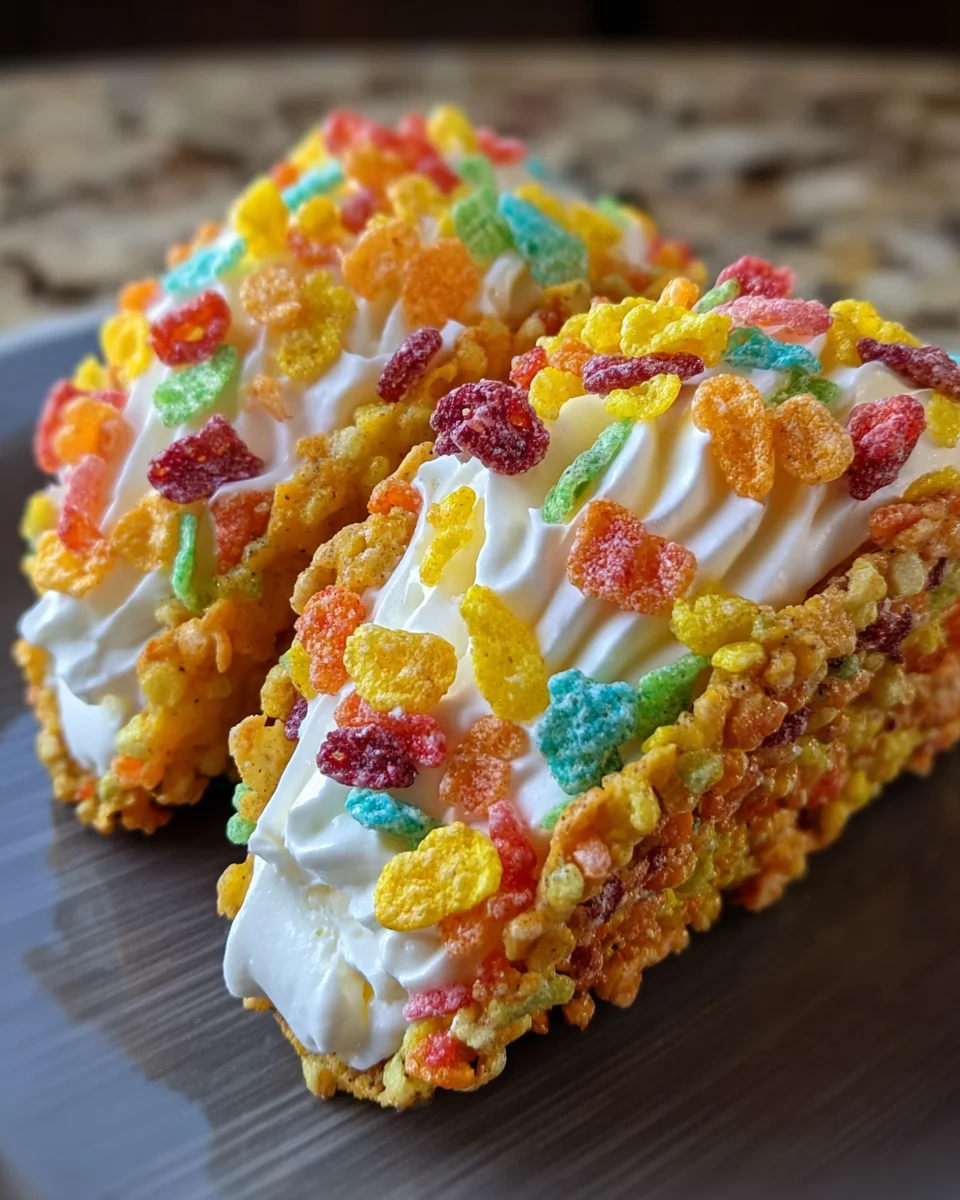
Imagine crispy cereal taco shells with delicious cheesecake custard inside. Ideal for the busy moms we are, trying to delight our families without spending all day in the kitchen. Whether it’s for an occasion or just a Tuesday, that little treat will make everybody smile!
Why You’ll Love This Fruity Pebbles Cheesecake Tacos
Let’s be real life is busy and we all need a recipe that checks all the boxes!
Fruity Pebbles Cheesecake Tacos are so easy to throw together taking 50 minutes from start to that bright colors and playful crunch will have both kids and adults giddily chowing down. Really, who can’t get down with a dessert that’s double duty as fun and great conversation starter? All the savoring without any of the hassle!
Ingredients for Fruity Pebbles Cheesecake Tacos
Gathering your ingredients for these Fruity Pebbles Cheesecake Tacos is just the beginning of the fun! This recipe calls for vibrant, playful flavors that’ll make your kitchen feel like a party. Here’s what you’ll need:
- Fruity Pebbles cereal: These colorful little gems give the tacos their signature crunch and vibrant look.
- Unsalted butter: It acts as the glue that binds the cereal together, creating a sturdy shell.
- Cream cheese: Softened to perfection, it provides that rich, creamy texture we love in cheesecake.
- Powdered sugar: A sweet touch to balance out the tanginess of the cream cheese.
- Pure vanilla extract: It amplifies the flavor and adds warmth to the cheesecake filling.
- Whipped cream: Light and airy, it makes this filling delightfully fluffy and indulgent.
- Additional Fruity Pebbles: Use as a garnish for a pop of color and extra crunch on top!
Don’t forget, you can always play around with the recipe! Swap in gluten-free cereal for a gluten-free version, or use flavored whipped cream for a twist. If you’re feeling adventurous, try to mix in some fun sprinkles!
The ingredient measurements are listed at the bottom of the article for your convenience, so feel free to print them out for your next baking adventure!
How to Make Fruity Pebbles Cheesecake Tacos
Now comes the best part—bringing these Fruity Pebbles Cheesecake Tacos to life! Follow these easy steps to create a real crowd-pleaser that’s perfect for any occasion. Let’s get started on this delicious adventure in the kitchen!
Step 1: Prepare the Cereal Shells
First off, gather your Fruity Pebbles and melted butter in a large mixing bowl.
Stir them together until every colorful piece is coated. This step is crucial! Without proper coating, your taco shells won’t hold their shape. Think of the cereal as a canvas, and the butter as paint, making it a masterpiece!
Step 2: Form Taco Shells
Next, it’s time to shape those cereal shells!
Using taco-shaped molds or muffin tins, press the coated cereal mixture tightly into the molds. Compact it well, as this creates a sturdy shell. Once you’ve formed all your taco shapes, pop those molds into the refrigerator for at least 30 minutes. This chill time will ensure the shells set properly and hold their form.
Step 3: Make the Cheesecake Filling
While your taco shells are firming up, let’s bring the filling together!
In a mixing bowl, beat the softened cream cheese until it’s light and fluffy. Then, gradually sift in the powdered sugar, along with that warm kiss of vanilla extract. This is where the magic begins!
Blend everything until it’s smooth and creamy. Just imagine how delicious it’ll taste! For that heavenly lightness, gently fold in the whipped cream, making sure not to lose that airy texture. You want to maintain a cloud-like feel for each indulgent bite!
Step 4: Combine and Fill
Once your shells have set and your cheesecake filling is ready, it’s time to assemble!
With a generous scoop, fill each taco shell with that dreamy cheesecake mixture. Be generous—after all, there’s no such thing as too much cheesecake, right?
And don’t forget to top each filled taco with a sprinkle of additional Fruity Pebbles for that extra flair and crunch!
Step 5: Serve and Enjoy!
Finally, the moment you’ve been waiting for!
You can serve your Fruity Pebbles Cheesecake Tacos right away for that soft, gooey texture. Or, if you prefer a firmer bite, let them chill in the refrigerator for another hour.
Get ready for the chorus of “Wow!” from everyone at the table as they dive into this sweet treat. Enjoy every single moment of this culinary masterpiece!
Tips for Success
- Make sure to coat your Fruity Pebbles thoroughly with butter; it’s essential for crispy shells.
- Don’t rush the cooling process; chill time is key to achieving sturdy taco shells.
- For extra flair, consider adding a drizzle of chocolate or caramel sauce on top!
- Keep the whipped cream cold to maintain that fluffy texture during mixing.
- Experiment with different flavors of whipped cream for unique taste variations!
Equipment Needed
- Taco molds or muffin tins: These are essential for shaping your shells. If you don’t have them, use small bowls to create the taco shape.
- Mixing bowls: For combining ingredients. Any medium-sized bowl will work.
- Hand mixer or whisk: To beat the cream cheese smoothly. A whisk will do in a pinch!
- Spatula: Perfect for folding whipped cream into your cheesecake mixture.
Variations for Fruity Pebbles Cheesecake Tacos
- Gluten-Free Option: Swap out the Fruity Pebbles for a gluten-free cereal to make this dessert accessible for everyone!
- Chocolate Lovers: Mix in some cocoa powder to the cheesecake filling for a rich chocolate twist that complements the fruity flavor.
- Fruit Infusion: Add some pureed strawberries or raspberries into the cheesecake mixture for added freshness and a fruity burst!
- Different Cereal Choices: Experiment with other fun cereals like Corn Pops or Cap’n Crunch for a new texture and taste.
- DIY Toppings: Get creative with toppings! Consider using crushed nuts, mini marshmallows, or sprinkles for an added crunch and visual appeal.
Serving Suggestions
- Pair with Fresh Fruit: Serve alongside fresh berries or sliced bananas for a refreshing contrast.
- Ice Cream Delight: A scoop of vanilla or strawberry ice cream can make this dessert even more indulgent!
- Creative Plating: Arrange tacos on a colorful platter and garnish with whipped cream and extra Fruity Pebbles for a stunning presentation.
- Coffee or Milk: A cup of coffee or a glass of cold milk makes the perfect complement to these sweet tacos.
FAQs about Fruity Pebbles Cheesecake Tacos
As you embark on your Fruity Pebbles Cheesecake Tacos adventure, you might have a few questions swirling around in your mind. I’ve got you covered with some quick answers to help you navigate the process smoothly!
Can I make these Fruity Pebbles Cheesecake Tacos ahead of time?
Absolutely! You can prepare the cereal shells in advance and fill them just before serving. This way, they’ll stay crisp and fresh!
How should I store leftover tacos?
If you happen to have any leftovers (which is rare!), store them in an airtight container in the refrigerator. They’re best enjoyed within a couple of days.
Can I use a different type of cereal?
Yes! While Fruity Pebbles are the star of this show, don’t hesitate to experiment with your favorite cereals. Cocoa Pebbles or even Rice Krispies can make for fun variations!
Is there a way to make this dessert lower in sugar?
For those looking to cut back on sugar, consider using sugar-free whipped cream or a sugar substitute in place of powdered sugar in the filling.
What toppings can I add to my Fruity Pebbles Cheesecake Tacos?
Get creative! Some delicious options include fresh berries, chocolate drizzle, or even a sprinkling of crushed nuts for added texture and flavor!
Final Thoughts
Making Fruity Pebbles Cheesecake Tacos truly is a delightful experience! There’s something incredibly rewarding about combining crunchy shells with creamy cheesecake, especially when shared with family.
These colorful treats add a splash of joy, transforming any ordinary day into a celebration. Whether you’re whipping them up for a birthday party or a cozy family night, they’re sure to leave smiles all around.
The best part? They’re so easy and quick to make! I can’t wait for you to experience the magic of these playful desserts. Get ready to create sweet memories over every delicious taco!
Print
Fruity Pebbles Cheesecake Tacos
- Prep Time: 20 minutes
- Cook Time: 0 minutes
- Total Time: 50 minutes
- Yield: 10 tacos 1x
- Category: Dessert
- Method: No-Bake
- Cuisine: American
- Diet: Vegetarian
Description
Fruity Pebbles Cheesecake Tacos are a delightful dessert that combines the fun flavors of fruity cereal with creamy cheesecake in a taco-shaped shell.
Ingredients
- 3 cups Fruity Pebbles cereal
- 1/2 cup unsalted butter, melted
- 8 ounces cream cheese, softened
- 1/2 cup powdered sugar, sifted
- 1 teaspoon pure vanilla extract
- 1 cup whipped cream
- Additional Fruity Pebbles cereal for garnish
Instructions
- Combine Fruity Pebbles cereal and melted butter in a large mixing bowl. Stir thoroughly to evenly coat all cereal pieces.
- Press the coated cereal mixture firmly into small taco-shaped molds or muffin tins, compacting tightly. Refrigerate molds for at least 30 minutes to set.
- Using a hand mixer, beat cream cheese until light and fluffy. Gradually incorporate powdered sugar and vanilla extract, blending until smooth and homogenous.
- Gently fold whipped cream into the cream cheese mixture with a spatula, maintaining a light and airy texture.
- Once cereal shells are firm, generously spoon cheesecake filling into each shell. Top with additional Fruity Pebbles cereal as garnish.
- Serve immediately for a soft texture, or refrigerate filled tacos for an additional hour for a firmer bite.
Notes
- Ensure the cereal shells are tightly packed to maintain their shape.
- For added flavor, consider using flavored whipped cream.
- This recipe can be made gluten-free by using gluten-free cereal.
Nutrition
- Serving Size: 1 taco
- Calories: 210
- Sugar: 10g
- Sodium: 150mg
- Fat: 10g
- Saturated Fat: 5g
- Unsaturated Fat: 3g
- Trans Fat: 0g
- Carbohydrates: 28g
- Fiber: 1g
- Protein: 2g
- Cholesterol: 30mg


