Introduction to Grandma’s Chocolate Pie – Rich, Creamy & Old-Fashioned Classic!
There’s something magical about sharing a slice of Grandma’s Chocolate Pie with family and friends. This recipe is like a warm hug on a plate—rich, creamy, and full of nostalgia. As a busy mom, I know how precious time can be, and this pie is perfect for those hectic days when you want to impress your loved ones without spending hours in the kitchen.
Easily prepared with simple ingredients, Grandma’s Chocolate Pie brings comfort and smiles. So, let’s dive into this timeless classic and create memories that will linger long after the last crumb is gone!
Why You’ll Love This Grandma’s Chocolate Pie
Grandma’s Chocolate Pie is not just a dessert; it’s a celebration of flavors and memories. It comes together quickly, making it perfect for those busy evenings. The rich, silky filling is a chocolate lover’s dream, while the nostalgia of homemade pie will bring a smile to your face. Plus, it’s an easy recipe that even kids can help with—creating a family activity that’s both fun and delicious!
Ingredients for Grandma’s Chocolate Pie
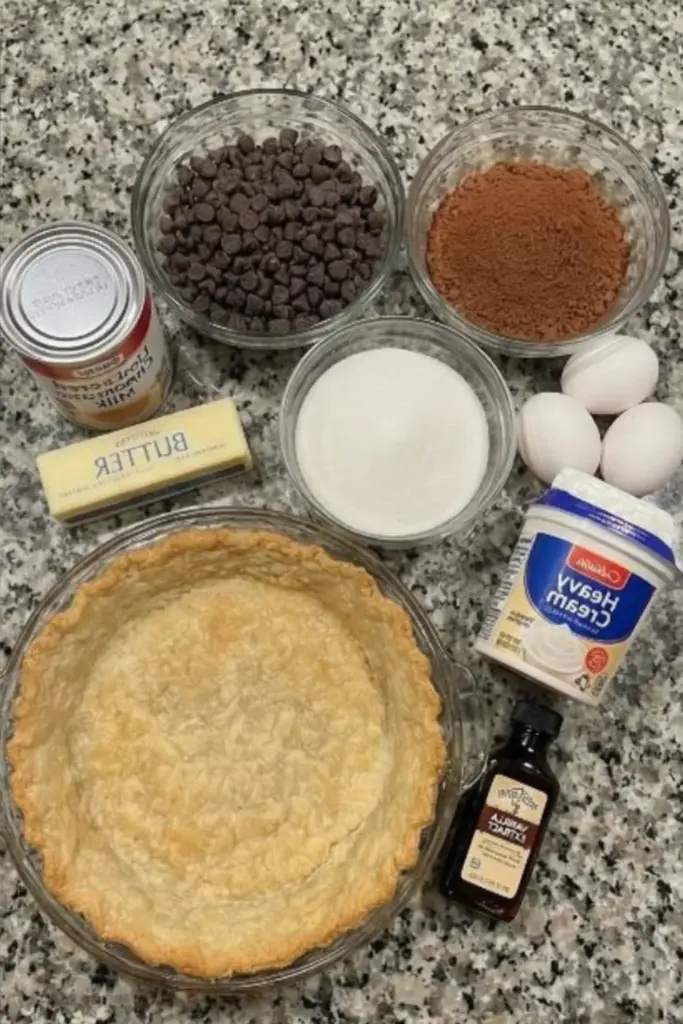
Now, let’s gather the ingredients for Grandma’s Chocolate Pie. Each component plays a vital role in creating that rich, silky filling we all love. Here’s what you’ll need:
- Granulated Sugar: The key to sweetness that balances the cocoa’s rich flavor.
- Cocoa Powder: The heart of this pie, giving it that luxurious chocolatey taste.
- All-Purpose Flour: This adds body and helps thicken the filling, ensuring it sets perfectly.
- Salt: A pinch enhances the sweetness and rounds out the flavors beautifully.
- Whole Milk: Rich milk gives the filling its creamy texture, making every bite heavenly.
- Egg Yolks: The secret to an extra velvety filling while adding a touch of richness.
- Butter: Adds a luscious finish to the filling, making it even more indulgent.
- Vanilla Extract: A dash of vanilla elevates the overall flavor, creating warm, inviting notes.
- Pre-baked Pie Crust: The crispy shell holds all that delicious filling. You can use store-bought or homemade!
- Whipped Cream (optional): A fluffy topping that adds sweetness and a pretty finish to your pie.
For ingredient quantities, see the detailed recipe at the bottom of this article, where you can also find a handy print version. Enjoy gathering these simple yet essential ingredients for a comforting dessert that’s deeply rooted in tradition!
How to Make Grandma’s Chocolate Pie
Ready to create a slice of happiness? Let’s take this journey together—step by step. Grandma’s Chocolate Pie isn’t just a recipe; it’s an experience filled with warmth and laughter. Here’s how to make it:
Step 1: Whisk the Dry Ingredients
Start by grabbing a medium saucepan. In it, whisk together the granulated sugar, cocoa powder, all-purpose flour, and salt. Just like a gentle breeze mixing through trees, ensure they blend well. This is the foundation of your filling.
Step 2: Add the Milk
Gradually pour in the whole milk while continuously whisking. This is where the magic begins! The creamy liquid will wrap around your dry ingredients like a cozy blanket. Keep whisking until it’s perfectly smooth—no lumps allowed!
Step 3: Cook the Mixture
Now, place the saucepan over medium heat. Keep stirring constantly. The mixture will begin to bubble and thicken like a comforting soup. This should take about 5–7 minutes. Be patient; you want it to transform into a luscious, velvety consistency.
Step 4: Prepare the Egg Yolks
While waiting, grab a small bowl and whisk three large egg yolks until fluffy. Here’s a pro tip: gradually add a little hot mixture into the yolks, whisking continuously. This prevents scrambling—nobody wants that in their pie! It also warms the yolks and helps combine everything smoothly.
Step 5: Combine and Heat Again
Now, pour that egg mixture back into the saucepan with the thickened chocolate goodness. Stir and cook for 2–3 more minutes. This is where Grandma’s Chocolate Pie gets its dreamy, rich texture. If it isn’t thickening enough, don’t fret! Just keep stirring a little longer.
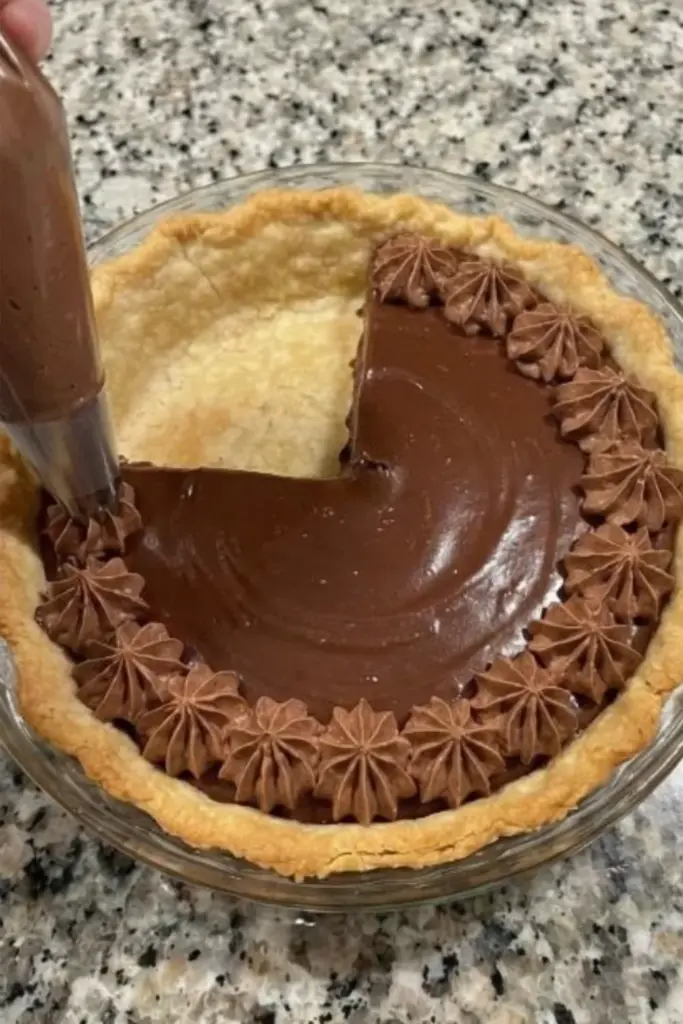
Step 6: Add Flavor and Pour into Crust
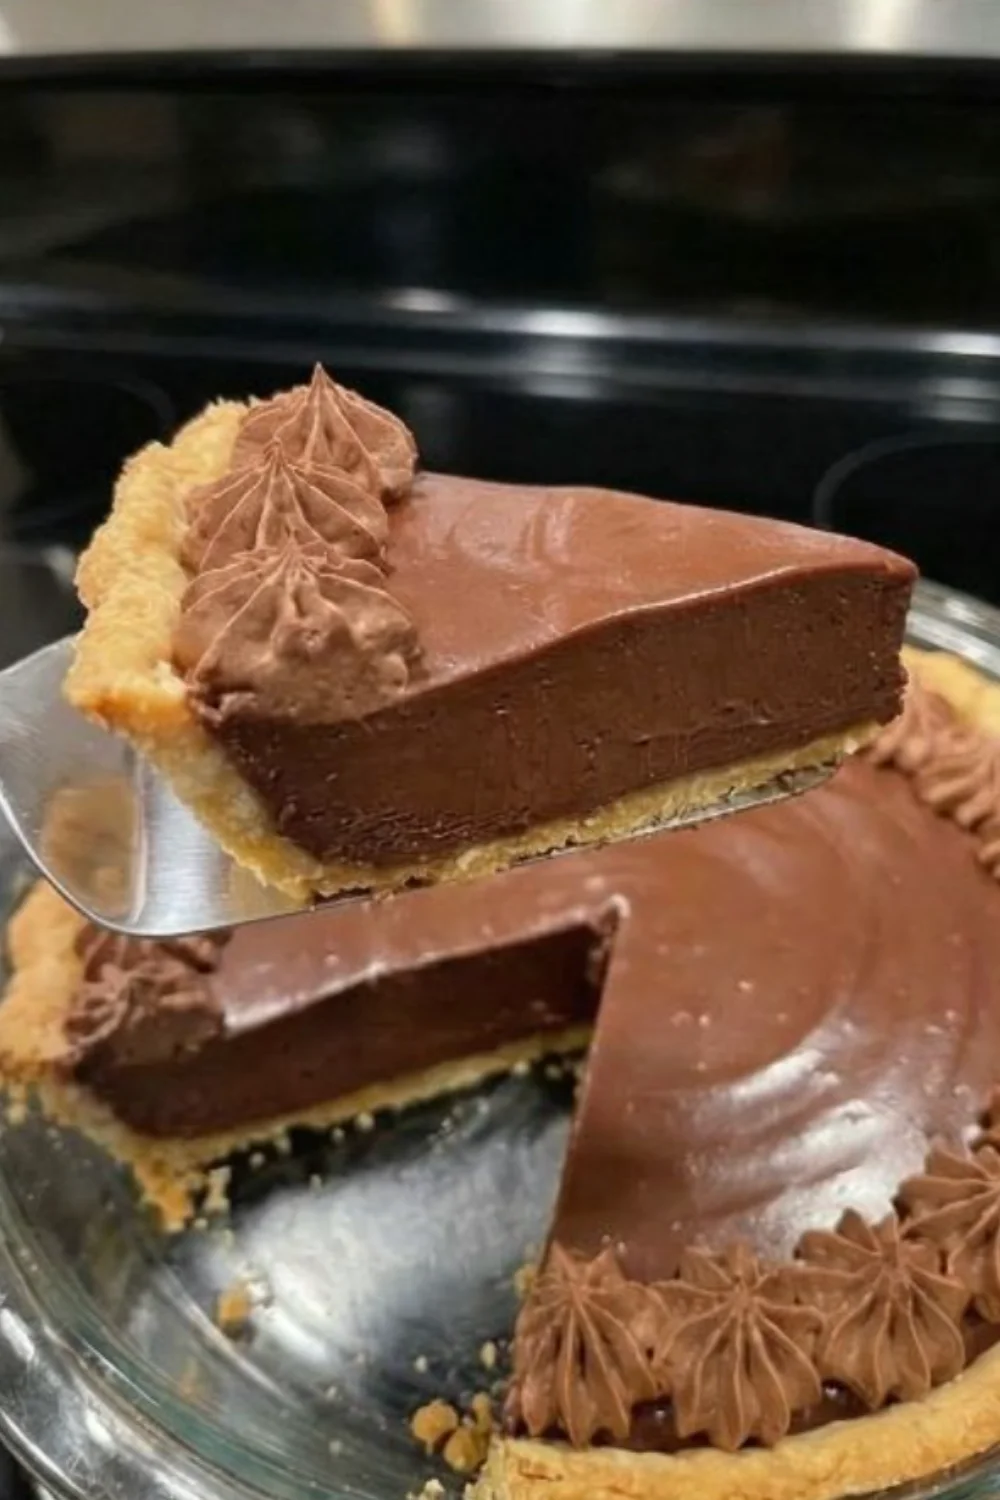
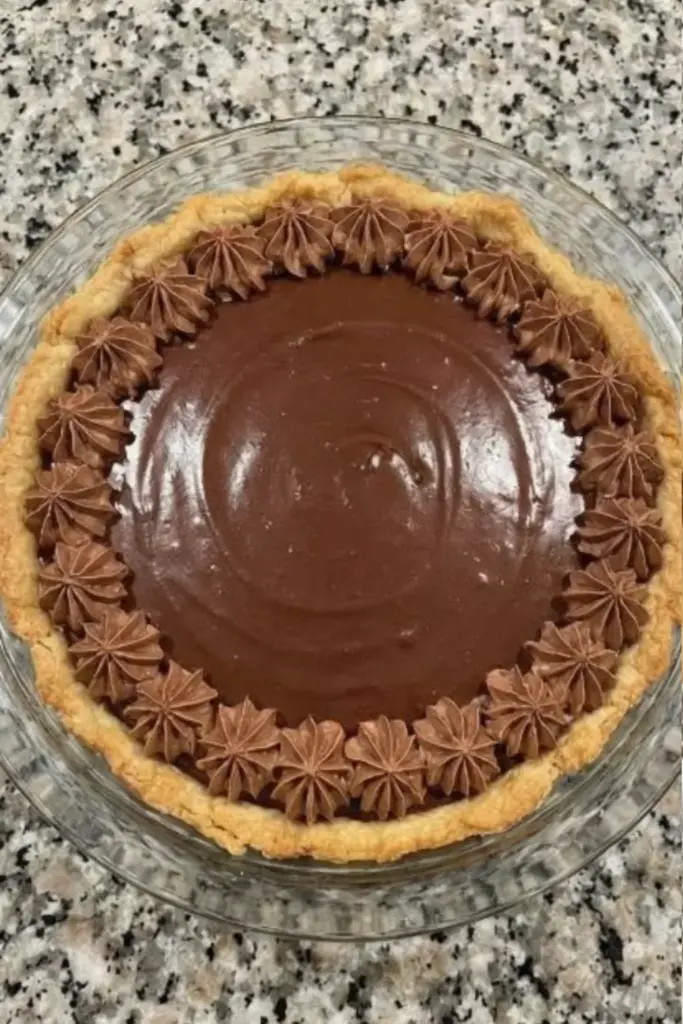
Once the filling reaches its creamy peak, remove it from the heat. Stir in the butter and vanilla extract. The aromas will swirl around your kitchen, creating magical memories. Pour this delightful mixture into your pre-baked pie crust. Trust me; it looks as good as it tastes!
Step 7: Chill and Serve
Finally, it’s time to refrigerate the pie. Let it chill for at least 4 hours until completely set. This waiting time is tough, but the end result is worth every minute. When you serve it, consider topping with whipped cream for a picture-perfect finish. Slice, serve, and watch everyone’s faces light up!
Tips for Success
- Use room temperature ingredients for a smoother filling that blends effortlessly.
- Whisk constantly while cooking to avoid lumps and ensure a creamy texture.
- Give it time to chill; a well-set pie makes for easier slicing.
- Experiment with a graham cracker crust for a fun twist!
- Keep an eye on the thickness—thicker is better for a slice that holds together!
Equipment Needed
- Medium Saucepan: Essential for cooking the filling. A deep skillet can work too.
- Whisk: For blending and stirring. A fork can do in a pinch!
- Small Bowl: Ideal for whisking the egg yolks—any mixing bowl will suffice.
- Measuring Cups and Spoons: Accurate measurements ensure the best results.
- Pie Plate: A must for your pre-baked crust. Use any sturdy dish as an alternative!
Variations
- Nutty Delight: Add chopped walnuts or pecans to the chocolate filling for an added crunch.
- Chocolate Mint: Mix in a few drops of peppermint extract for a refreshing twist that’s perfect for the holidays.
- Vegan Option: Substitute dairy milk with almond or coconut milk and use vegan butter to create a dairy-free version.
- Peanut Butter Swirl: Marble in some peanut butter to the filling just before pouring it into the crust for a deliciously decadent treat.
- Fruit Fusion: Top with sliced strawberries or raspberries for a burst of fruity flavor that pairs beautifully with chocolate.
Serving Suggestions for Grandma’s Chocolate Pie
- Accompaniment: Serve with fresh berries for a pop of color and flavor.
- Beverage Pairing: A glass of cold milk or coffee enhances the chocolate experience.
- Presentation: Dust with cocoa powder or chocolate shavings for a beautiful finish.
- Whipped Cream: Add a dollop of whipped cream on top for an elegant touch.
- Serve Chilled: Ensure it’s nicely chilled for the best texture and taste.
FAQs about Grandma’s Chocolate Pie
Can I use a store-bought pie crust for Grandma’s Chocolate Pie?
Absolutely! A store-bought pie crust saves time and still lets you enjoy the rich chocolate filling. Just make sure it’s pre-baked correctly before pouring in your delicious mixture.
How can I store leftovers of Grandma’s Chocolate Pie?
Keep any leftovers in the refrigerator. Cover it with plastic wrap or place it in an airtight container. It should stay fresh and tasty for up to 3 days, but I doubt it’ll last that long!
What can I substitute for cocoa powder in this recipe?
If you’re in a pinch, you can use Dutch-processed cocoa powder. Just remember, it may change the flavor slightly, but it will still create a delicious pie.
Can I make Grandma’s Chocolate Pie ahead of time?
Yes! This pie is perfect for making ahead. It tastes even better the next day after chilling, as the flavors have time to meld together beautifully.
Is Grandma’s Chocolate Pie suitable for special diets?
This recipe can be tweaked to fit various diets. Consider using almond or soy milk for a dairy-free version, and a gluten-free crust for those avoiding gluten. Enjoy adapting this old-fashioned classic!

Final Thoughts on Grandma’s Chocolate Pie
Making Grandma’s Chocolate Pie is more than just following a recipe; it’s about creating cherished memories with family. Each slice is a piece of joy, connecting us to the comforting traditions of the past. As you watch your loved ones eagerly devour this rich, creamy dessert, you’ll feel the warmth of home echo around the table.
The beauty of this classic lies in its simplicity and the happiness it brings. So, gather your loved ones, share a piece, and create stories that will be recounted for years to come. Trust me, nothing compares to the smiles that follow each slice!
Print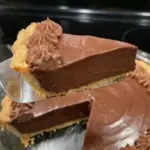
Grandma’s Chocolate Pie
- Prep Time: 15 minutes
- Cook Time: 10 minutes
- Total Time: 4 hours 25 minutes
- Yield: 1 pie 1x
- Category: Dessert
- Method: Stovetop
- Cuisine: American
- Diet: Vegetarian
Description
Grandma’s Chocolate Pie is pure comfort in every bite—rich, silky chocolate filling with a nostalgic homemade taste that is perfect for holidays and family dinners.
Ingredients
- 1 cup granulated sugar
- 1/4 cup cocoa powder
- 1/4 cup all-purpose flour
- 1/4 teaspoon salt
- 3 cups whole milk
- 3 large egg yolks
- 2 tablespoons butter
- 1 teaspoon vanilla extract
- 1 pre-baked pie crust
- Whipped cream (for topping, optional)
Instructions
- In a saucepan, whisk together sugar, cocoa powder, flour, and salt.
- Gradually pour in the milk while whisking until smooth.
- Place over medium heat and cook, stirring constantly, until the mixture thickens.
- In a separate bowl, whisk egg yolks. Slowly add a little of the hot mixture into the yolks while whisking.
- Pour the egg mixture back into the saucepan. Cook for 2–3 more minutes until thick and creamy.
- Remove from heat and stir in butter and vanilla extract.
- Pour the chocolate filling into the pre-baked crust.
- Refrigerate for at least 4 hours until fully set.
- Top with whipped cream if desired and slice!
Notes
- This pie is best served chilled for optimal texture.
- Perfect for family gatherings and special occasions.
- You can add a sprinkle of chocolate shavings on top for an extra touch.
Nutrition
- Serving Size: 1 slice
- Calories: 250
- Sugar: 20g
- Sodium: 150mg
- Fat: 10g
- Saturated Fat: 5g
- Unsaturated Fat: 5g
- Trans Fat: 0g
- Carbohydrates: 35g
- Fiber: 2g
- Protein: 4g
- Cholesterol: 50mg