Introduction to Halloween Rice Krispie Treats
With the turning leaves and Halloween accoutrements decking every ’hood, it’s time to magic things up in the kitchen. Hence these Halloween Rice Krispie Treats, not just a seasonal indulgence but a sweet mode of infusing joy into your home that doesn’t take hours to create. I mean, life gets pretty crazy sometimes – I’ve got work to do, kids’ calendars to juggle and, of all things, plan a holiday celebration. So here’s your ace-in-the-hole recipe that makes it as simple to quickly create something fun and spooky that will please all the players. Trust me, it’ll even impress your little ghosts and goblins!
Why You’ll Love This Halloween Rice Krispie Treats
Rice Krispie Treats on Halloween provide busy moms with the best kind of time-saving solution. They take no time and are very easy to prepare but are full of taste and festive cheer – just the kind your children’s faces would make upon seeing these colorful, spooky things. Plus, they are great to share at school or at parties hosted at home, making you the supermom minus the sweat!
Ingredients for Halloween Rice Krispie Treats
Gathering the right ingredients will set you off on the right foot for making these Halloween Rice Krispie Treats. Here’s what you’ll need:
- Rice Krispies cereal: This is the base of your treats. Its signature crunch adds the perfect texture.
- Mini marshmallows: These are essential for that gooey, sticky goodness that holds everything together.
- Butter: Melting this down creates a rich, delicious flavor that balances out the sweetness.
- Orange food coloring: Bright orange not only celebrates the Halloween spirit but also makes these treats visually stunning. It’s all about those festive vibes!
- Black decorating icing: Perfect for creating spooky faces or fun designs—your imagination is the limit!
- Candy eyes: These make your treats come alive with a fun personality! Kids adore them, and they add a cute touch.
- Halloween-themed sprinkles: Use these for a sprinkle of extra fun—think of them as the confetti of the Halloween treats world.
If you want to get creative, consider some optional ingredients such as vanilla extract for a flavor boost. The exact measurements for each ingredient are available at the bottom of this article if you want to print this out and keep it handy for your next spooky gathering!
How to Make Halloween Rice Krispie Treats
Now that you have your ingredients ready, let’s dive into the fun part: making these delightful Halloween Rice Krispie Treats! This process is quick, straightforward, and oh-so-rewarding. Grab a large saucepan and get ready to create magic!
Step 1: Melt the Butter
Start by melting the butter in a large saucepan over low heat. This step is crucial as it creates a rich base for your marshmallows. If you overheat it, the butter may burn, which isn’t tasty. Stir it gently until it’s completely melted and glossy—like a beautiful sunset in a pan!
Step 2: Add the Mini Marshmallows
Once the butter is melted, add in those mini marshmallows. Stir continuously until they’re completely melted and smooth, which can take about 2 to 3 minutes. This creates that delicious, gooey mixture we love. Trust me; your kitchen will smell heavenly!
Step 3: Add Food Coloring
Next, it’s time for some Halloween flair! Add a few drops of orange food coloring into the melted marshmallow mixture. Stir it well to achieve that vibrant hue. This not only makes your treats look festive but also amps up the fun factor—perfect for those spooky celebrations!
Step 4: Mix in Rice Krispies
Now, carefully mix in the Rice Krispies cereal. I find it helpful to add it gradually, stirring gently as you go. This ensures every morsel gets a delightful coating without making a sticky mess. And let’s face it, no one enjoys cleaning up rice cereal explosions!
Step 5: Press into a Baking Pan
With the mixture ready, it’s time to transfer it to a greased 9×13-inch baking pan. Using a buttered spatula or even your hands (covered with wax paper for an easy release), press the mixture firmly and evenly into the pan. Aim for a smooth surface—this makes cutting the treats easier later on!
Step 6: Cool and Set
Allow your pressed treats to cool for about 30 minutes. This setting time is crucial for achieving the perfect chewy texture. If you don’t let them set, they might crumble or fall apart. Patience is key here; good things come to those who wait!
Step 7: Cut and Decorate
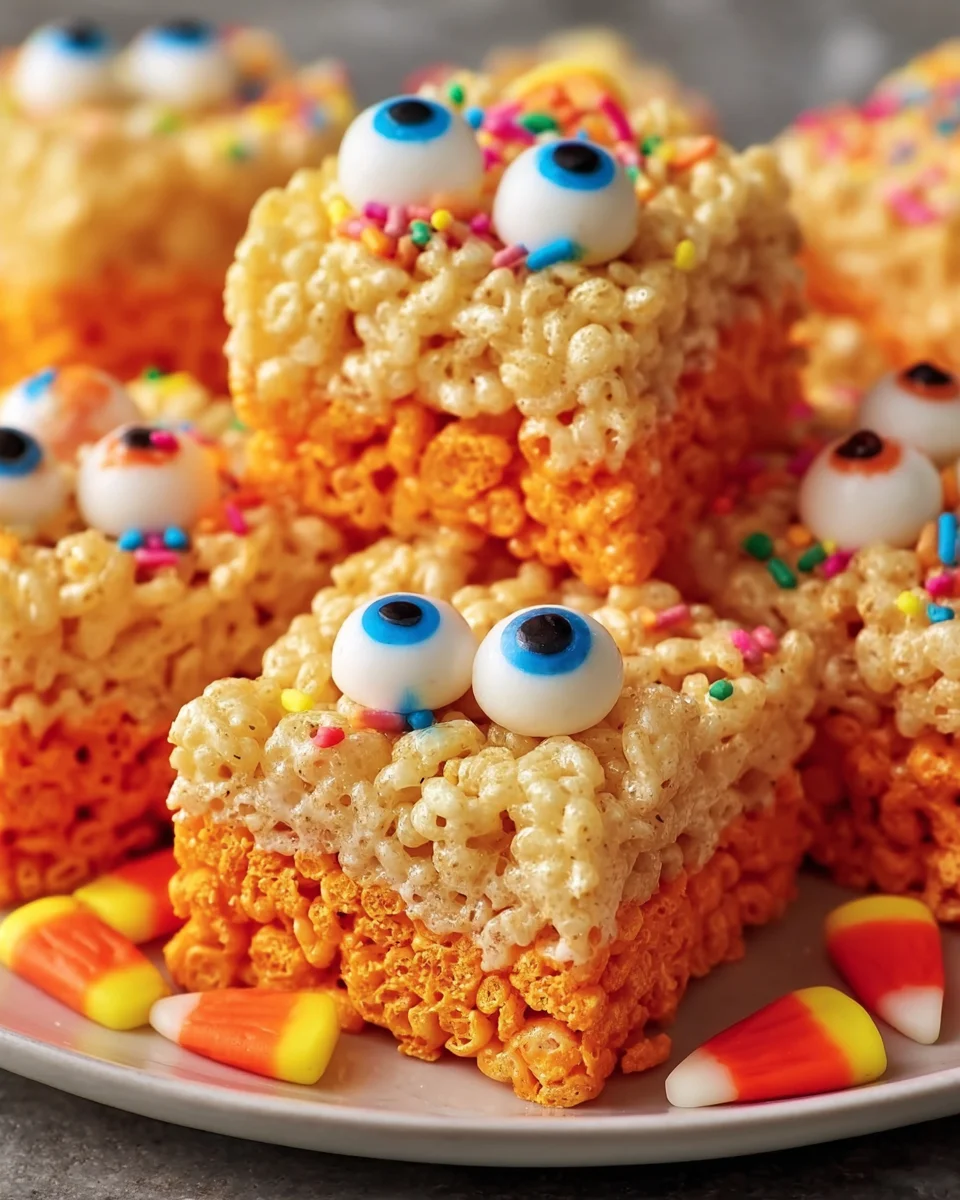
Once your treats are firm, cut them into squares. Here comes the best part! Get creative with your decorations. Use candy eyes to give your treats personality and black icing to draw spooky faces. Top with Halloween-themed sprinkles for an extra festive touch. Your kids will absolutely adore the colorful presentation!
Tips for Success
- Make sure your butter is melted slowly over low heat to avoid burning.
- Use a buttered spatula or wax paper to prevent sticking when pressing the mixture into the pan.
- Allow the treats to cool fully for the best texture; don’t rush this step!
- Get creative with decorations—each treat can be unique!
- Utilize any leftovers by making fun shapes or topping with different sprinkles.
Equipment Needed
- Large saucepan: A heavy-bottom one works best for even heating.
- Butter spatula: A regular spatula will do, but a silicone one makes for easy cleaning.
- 9×13-inch baking pan: Any size similar will work if you don’t have this specific size.
- Wax paper: This helps prevent sticking when pressing the mixture.
Variations for Halloween Rice Krispie Treats
- For a chocolate twist, substitute half of the Rice Krispies with chocolate cereal for a delicious flavor combination.
- Add in some mini chocolate chips or M&M’s for a sweet surprise in each bite.
- Try using colored or themed sprinkles that match your Halloween party colors for a custom look!
- For a gourmet touch, drizzle melted chocolate over the cooled treats before adding decorations.
- Need a gluten-free option? Use gluten-free Rice Krispies for a similar texture without the gluten!
- Switch things up by using flavored marshmallows like pumpkin spice or caramel for extra seasonal flair.
Serving Suggestions
- Pair these treats with a warm cup of apple cider for a cozy autumn feel.
- Serve alongside spooky-themed cupcakes or cookies for a festive dessert table.
- Present the Rice Krispie Treats on a Halloween-themed platter for extra flair.
- Consider adding some fun Halloween napkins for a whimsical touch.
FAQs about Halloween Rice Krispie Treats
Can I make Halloween Rice Krispie Treats ahead of time?
Absolutely! These treats can be made a day or two in advance. Just store them in an airtight container to keep them fresh and chewy. This means less stress on the big day!
How do I store leftover Halloween Rice Krispie Treats?
To keep them at their best, place them in a sealed container at room temperature. Avoid the fridge as it can make them harden.
Can I customize the colors for different holidays?
Yes, you can! Simply swap out the food coloring—think green for spooky monsters or red for Valentine’s Day treats. The possibilities are endless!
What if I don’t have black icing?
No worries! You can use melted chocolate or dark chocolate chips to create spooky designs instead. It’s equally delicious and adds that Halloween touch!
Are these treats suitable for vegans?
These Halloween Rice Krispie Treats are not vegan due to butter and marshmallows. However, you can use vegan alternatives for both to create a delightful vegan version!
Final Thoughts
Making these Halloween Rice Krispie Treats isn’t just about the delicious flavors; it’s about creating cherished memories with your loved ones. I can already picture the laughter and joy on my kids’ faces as they help decorate their spooky snacks. This simple yet fun recipe brings everyone together, allowing us to unwind and share a bit of creativity during the busy Halloween season. Plus, the combination of crunchy, gooey, and sweet will definitely keep everyone coming back for more. So gather your ingredients and let’s create some delightful treats that celebrate the spirit of Halloween!
Print
Halloween Rice Krispie Treats
- Prep Time: 10 minutes
- Cook Time: 10 minutes
- Total Time: 20 minutes
- Yield: 12 servings 1x
- Category: Dessert
- Method: Stovetop
- Cuisine: American
- Diet: Vegetarian
Description
Delightful Halloween Rice Krispie Treats that are perfect for kids and festive celebrations.
Ingredients
- 6 cups Rice Krispies cereal
- 4 cups mini marshmallows
- 3 tablespoons butter
- Orange food coloring
- Black decorating icing
- Candy eyes
- Halloween-themed sprinkles
Instructions
- In a large saucepan, melt the butter over low heat.
- Add the mini marshmallows and stir continuously until completely melted and smooth.
- Remove from heat and add a few drops of orange food coloring to achieve a bright orange color. Stir well.
- Gradually add the Rice Krispies cereal, stirring until well coated with the marshmallow mixture.
- Using a buttered spatula or hands, press the mixture evenly into a greased 9×13-inch baking pan.
- Allow the treats to cool and set for about 30 minutes.
- Once set, cut into squares. Decorate each square with candy eyes, black icing to create spooky faces, and sprinkle with Halloween-themed sprinkles.
Notes
- Use wax paper on your hands to prevent sticking while shaping the treats.
- For extra flavor, add a teaspoon of vanilla extract to the melted marshmallow mixture before combining with cereal.
Nutrition
- Serving Size: 1 square
- Calories: 150
- Sugar: 10g
- Sodium: 60mg
- Fat: 5g
- Saturated Fat: 3g
- Unsaturated Fat: 2g
- Trans Fat: 0g
- Carbohydrates: 24g
- Fiber: 0g
- Protein: 1g
- Cholesterol: 15mg