Introduction to Halloween Rice Krispie Treats
As the leaves turn and the air gets crisp, I can’t help but get excited about Halloween. There’s magic in the air, and it’s the perfect time to whip up some delightful Halloween Rice Krispie Treats! If you’re a busy mom juggling work and family, these treats are a quick solution that will impress your loved ones. They’re fun to make, can be whipped up in no time, and who doesn’t love a sweet, gooey bite of nostalgia? Let’s dive into this spooky adventure and create some memories together!
Why You’ll Love This Halloween Rice Krispie Treats
These Halloween Rice Krispie Treats are the epitome of quick and easy snacks! In just 35 minutes, you can transform simple ingredients into cute, spooky delights. The best part? They’re incredibly delicious and bring a sense of whimsical joy that both kids and adults adore. Plus, the creative decorations make it fun for the whole family. You’ll find yourself coming back to this recipe year after year, creating sweet traditions!

Ingredients for Halloween Rice Krispie Treats
Gathering your ingredients is the first step to creating these magical Halloween Rice Krispie Treats. Let’s break down what you’ll need:
- Rice Krispies cereal: The classic crunch provides the base for our treats. A familiar favorite!
- Butter: This adds richness and helps everything stick together, giving that melt-in-your-mouth texture.
- Mini marshmallows: These are the star ingredient! They melt beautifully and contribute a delightful sweetness.
- White candy melts: Perfect for creating adorable mummies and ghosts. Use your creativity here!
- Semi-sweet chocolate chips: Ideal for those spooky spider webs or a ghostly face. A touch of chocolate never hurts!
- Halloween sprinkles: These colorful little additions enhance the festive flair. They’re like confetti for your treats!
- Candy eyes: The finishing touch for mummies! These make your creations come to life.
- Liquid food coloring: Use purple, orange, or black to give your treats a spooky look. A splash of color can really pop!
Feel free to mix things up with options like using different types of cereal or chocolate! You can find exact measurements at the bottom of this article, which are available for printing. Let’s get ready for some kitchen fun!

How to Make Halloween Rice Krispie Treats
Making Halloween Rice Krispie Treats is a delightfully easy process that’s perfect for the whole family. Gather your ingredients and let’s get started!
Step 1: Prepare Your Ingredients
First, gather all your ingredients and equipment. Having everything at your fingertips makes cooking smoother.
Lightly grease an 8×8-inch pan with nonstick spray or butter. This ensures easy removal later. Once this is done, you’re ready to dive in!
Step 2: Melt the Butter and Marshmallows
In a medium saucepan, melt 1/4 cup of butter over low heat.
Once melted, add 4 cups of mini marshmallows. Stir these gently.
It’ll take about 3–5 minutes for them to become completely smooth.
If you want to add color, this is the perfect time! A few drops of food coloring can jazz up your treats and create festive vibes.
Step 3: Combine with Rice Krispies
Next, pour those perfectly melted marshmallows over 5 cups of Rice Krispies cereal.
Using a rubber spatula, mix everything gently.
Make sure every piece of cereal gets a gooey coating. If you have sprinkles, fold them in at this stage.
This adds a fun texture and some extra magic!
Step 4: Press the Mixture
Now, let’s transfer that delightful mixture into your prepared pan.
Use a piece of wax or parchment paper to press it down gently.
Be careful not to compact it too hard; you want to keep your treats light and chewy!
Step 5: Cool the Treats
Allow your creation to cool at room temperature for about 20–30 minutes.
If you’re in a hurry (and who isn’t?), pop it in the fridge for around 5 minutes.
This helps the treats firm up nicely and makes cutting them easier.
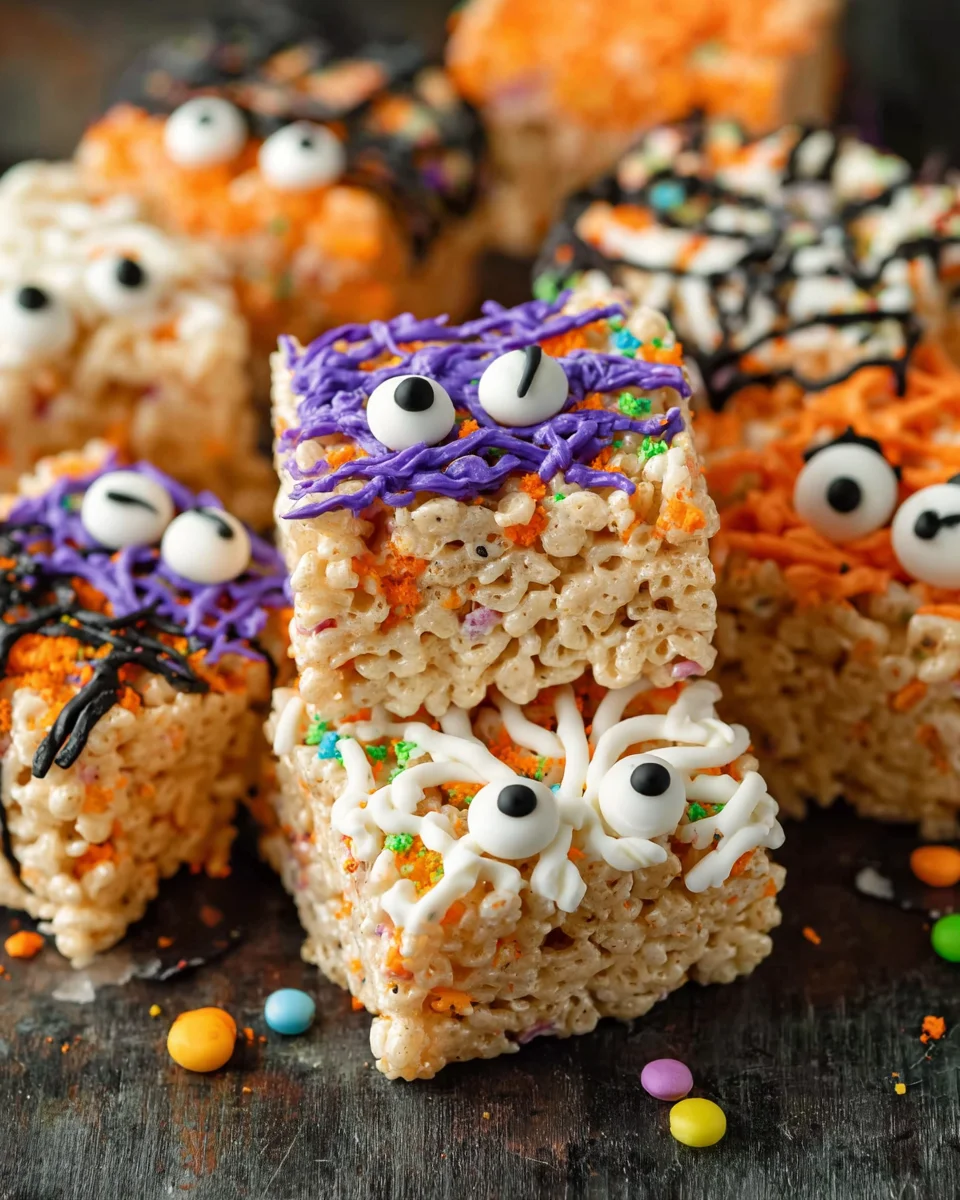
Step 6: Decorate for Halloween Fun
Once cooled, it’s time for the fun part—decorating!
For mummies, drizzle white candy melts in a crisscross pattern.
Stick two candy eyes on top while the melts are still wet for that spooky face.
For ghost treats, spread melted candy melts for a ghostly look and add chocolate chips for eyes and a mouth.
Feeling creative? Use melted chocolate to create spiderwebs—drizzle it in a spiral and drag the lines outward with a toothpick to complete the design.
Tips for Success
- Keep your butter and marshmallows on low heat for even melting.
- Use a rubber spatula for easy mixing and scraping down the sides.
- Don’t press the mixture too tightly; this keeps your treats soft and chewy.
- Experiment with colors and decorations to make each batch unique!
- Store treats in an airtight container to maintain freshness for longer.
Equipment Needed
- Medium saucepan: Essential for melting butter and marshmallows. A large pot works too if that’s all you have.
- Rubber spatula: Perfect for mixing. A wooden spoon can serve as a substitute in a pinch.
- 8×8-inch pan: For shaping your treats. Use any similar-sized dish if needed.
- Parchment or wax paper: Great for pressing the mixture down. Clean hands work too!
- Refrigerator: Not mandatory but helpful for cooling your treats faster.
Variations on Halloween Rice Krispie Treats
- Chocolate Bliss: Swap some of the Rice Krispies for Cocoa Krispies for a chocolaty version that delights with every bite!
- Nutty Power: Add chopped nuts like almonds or walnuts for a crunchy twist. Just be sure to check for allergies first!
- Rice Crispy Pumpkins: Shape your treats into pumpkin forms, using orange food coloring and adding green sprinkles for stems.
- Gluten-Free Option: Use gluten-free Rice Krispies. They taste just as good and are perfect for those avoiding gluten!
- Vegan Treats: Substitute the butter with coconut oil and use vegan marshmallows to create dairy-free delights!
Serving Suggestions for Halloween Rice Krispie Treats
- Pair with a glass of cool apple cider for a festive fall treat!
- Serve on a colorful Halloween-themed platter to impress your guests.
- Include a side of fresh fruit, like sliced apples or grapes, to balance the sweetness.
- Garnish with additional sprinkles or edible glitter for added flair.
- Wrap individual treats in cellophane bags for a cute party favor!
FAQs about Halloween Rice Krispie Treats
Can I make these Halloween Rice Krispie Treats ahead of time?
Absolutely! These treats can be made a day in advance. Just store them in an airtight container to keep them fresh when you’re ready to enjoy!
What if I don’t have candy melts?
No worries! You can use white chocolate chips as a substitute. Just melt them down and drizzle away for those fun decorations!
How do I store my Halloween Rice Krispie Treats?
Keep them in an airtight container at room temperature. They’ll stay fresh and chewy for up to a week, perfect for those Halloween festivities.
Can I adjust the sweetness?
If you want to tone down the sweetness, try using less marshmallows or incorporating other treats like nuts or dried fruit. It’s all about balance!
What’s the best way to cut these treats?
For clean cuts, use a buttered or oiled knife. This helps in slicing through without sticking, keeping those shapes pretty and Halloween-ready!
Final Thoughts
Creating Halloween Rice Krispie Treats is more than just a recipe; it’s a delightful adventure in your kitchen! These treats are a wonderful way to share laughter and creativity with your family, sparking memories that will last long after the Halloween decorations are tucked away. Whether you’re hosting a spooky gathering or just want to treat the kids, the joy these simple, sweet snacks bring is unmatched. I cherish moments spent decorating with sprinkles and candy eyes, as we all get lost in the spirit of the season. Happy Halloween baking to you all!
Print
Halloween Rice Krispie Treats
- Prep Time: 15 minutes
- Cook Time: 5 minutes
- Total Time: 35 minutes
- Yield: 16 treats 1x
- Category: Snacks/Desserts
- Method: Stovetop and Cooling
- Cuisine: American
- Diet: Vegetarian
Description
Delightful, spooky snacks perfect for Halloween.
Ingredients
- 5 cups Rice Krispies cereal
- 1/4 cup butter
- 4 cups mini marshmallows
- 1 cup white candy melts (for mummies and ghosts)
- 1/2 cup semi-sweet chocolate chips (for spider webs or ghosts)
- 1/4 cup Halloween sprinkles
- 2 tablespoons candy eyes (for mummies)
- 5 drops liquid food coloring (purple, orange, or black)
Instructions
- Pour 5 cups Rice Krispies cereal into a large mixing bowl. Set aside. Lightly grease an 8×8-inch pan with nonstick spray or butter.
- In a medium saucepan over low heat, melt 1/4 cup butter. Once melted, add 4 cups mini marshmallows. Stir constantly until the marshmallows are fully melted and the mixture is smooth, about 3–5 minutes. Optional: Add purple, orange, or black food coloring at this stage to achieve a spooky hue.
- Immediately pour the melted marshmallow mixture over the cereal. Stir with a rubber spatula until the cereal is evenly coated. If adding in sprinkles, fold them in at this stage.
- Transfer the mixture to the prepared 8×8-inch pan. Using a piece of wax or parchment paper, press the mixture evenly into the pan. Be careful not to press too hard to keep the treats light and chewy.
- Allow the treats to cool completely at room temperature, about 20–30 minutes. For faster cooling, place the pan in the refrigerator for about 5 minutes. Decorate with additional sprinkles or other decorations as desired.
- To Decorate: For Mummy Treats, drizzle white candy melts in a crisscross pattern over the Rice Krispie squares. While the candy melt is still wet, place two candy eyes on each square for the mummy face. For Ghost Faces, spread melted white candy melts over the top of each square to create a ghostly base, and add two chocolate chips for eyes and one for the mouth. For Spiderwebs, melt dark or milk chocolate and drizzle it in a spiral pattern on top of the squares. Use a toothpick to drag lines outward from the center to create a spiderweb design.
Notes
- Ensure to not press too hard when shaping the treats to maintain a chewy texture.
- Add custom decorations as desired for variety.
- Store in an airtight container to keep them fresh.
Nutrition
- Serving Size: 1 treat
- Calories: 120
- Sugar: 10g
- Sodium: 60mg
- Fat: 4g
- Saturated Fat: 2g
- Unsaturated Fat: 1g
- Trans Fat: 0g
- Carbohydrates: 20g
- Fiber: 0g
- Protein: 1g
- Cholesterol: 5mg


