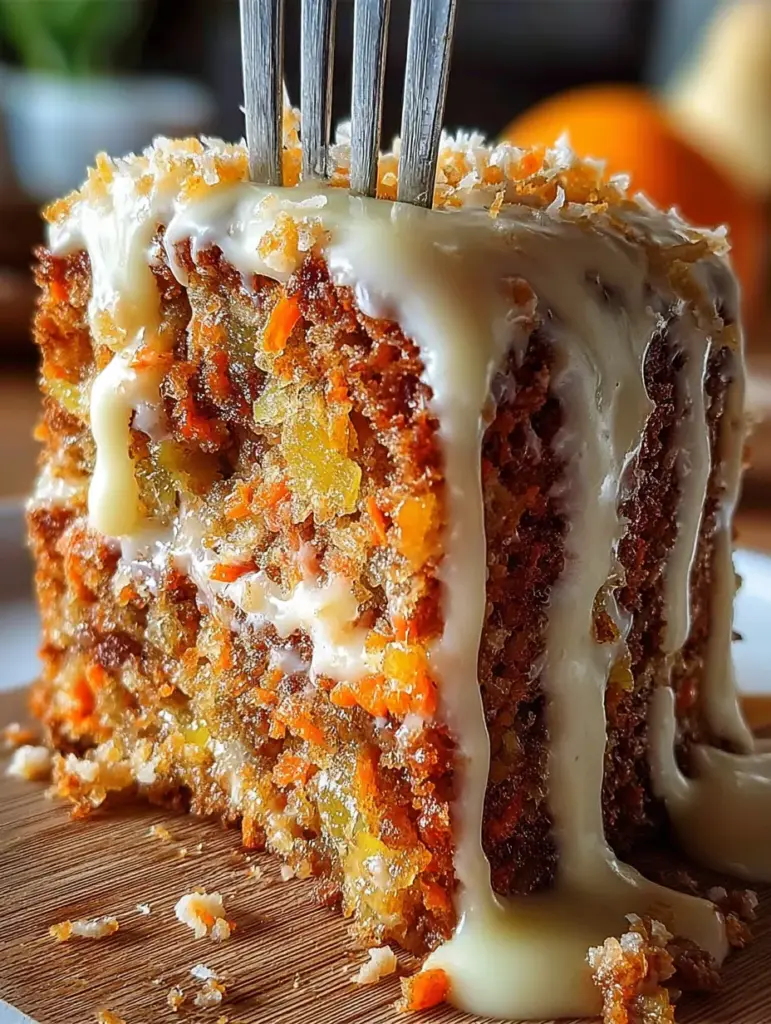
A tall, moist, tropical carrot cake dripping with glossy cream cheese glaze — perfectly matching the image you provided.
A Cake That Looks as Good as It Tastes
If you’re craving a dessert that feels like a warm tropical breeze blowing straight into your kitchen, this Hawaiian Carrot Pineapple Cake is exactly what you need. Not only does it burst with sunshiney flavors like pineapple, coconut, and fresh carrots — but visually, it delivers that thick, moist, texture-packed slice dripping with creamy glaze, just like the photo you shared.
Most carrot cakes sit on the flatter side. But this version? Oh no — this one bakes tall, dense, rich, and full of gorgeous texture. Every slice stands proudly, showing off chunks of pineapple, orange flecks of carrot, and speckles of coconut in every bite. And then that thick cream cheese glaze comes pouring over the top, slow and heavy, creating glossy, milky rivers that run down the sides. It pools around the base, clings to the crumb, and makes the whole thing look like a slice taken straight out of a dreamy tropical bakery.
This upgraded recipe ensures your cake will look exactly like the image, with the same height, texture, and dripping glaze effect. Whether you’re baking for a party, family gathering, or just satisfying a craving, this is the dessert that gets people talking — and reaching for another slice.
The Secret to That Chunky, Textured Interior
Your provided image shows something very specific:
✅ Visible pineapple pieces
✅ Large carrot shreds
✅ Dense, moist crumb
✅ Specks of coconut throughout
To achieve that:
✅ Use lightly drained pineapple
Don’t squeeze it dry — leave a bit of juice. This keeps the cake moist, but also allows the pineapple chunks to stay plump and visible.
✅ Use a box grater for carrots
Not the tiny holes — the medium shred creates the exact carrot texture shown in your image.
✅ Add real shredded coconut
Sweetened or unsweetened — either works. Coconut adds chew and structure that contributes to that thick interior.
✅ Bake in a smaller pan
This is key.
Instead of a thin 9×13 cake, bake in:
✅ One 8×8-inch square pan
OR
✅ Two 6-inch round pans (for tall stacked slices)
This gives you the height shown in the photo.
Every forkful becomes a tropical texture explosion.
Ingredients Breakdown (Adjusted to Match Image)
✅ For the Cake
- 2 cups all-purpose flour
- 2 cups grated carrots (medium shred for texture)
- 1 cup crushed pineapple, lightly drained
- Leave some juice so you get visible chunks like the image
- 1 cup shredded coconut
- 1 cup granulated sugar
- ½ cup vegetable oil
- 4 large eggs
- 1 tsp baking soda
- ½ tsp baking powder
- 1 tsp vanilla extract
- ½ tsp salt
Optional (matches the “speckled” look in images):
- ½ cup chopped macadamia nuts
- ½ tsp cinnamon
✅ For the Thick Cream Cheese Glaze (Double for Drip Effect)
The image shows lots of glaze, so we’ll double the batch.
- 8 oz cream cheese, softened
- 2 cups powdered sugar
- 3–4 tbsp pineapple juice
This gives you that melting, glossy dripping glaze seen in your photo.
Tools You Need (Home Baker Style)
- Mixing bowls
- Whisk
- Rubber spatula
- Grater
- Measuring cups
- 8×8 baking pan
- Cooling rack
- Spoon (for controlled drips)
- iPhone 16 Pro Max… optional 😉
Step 1 – Prepping the Kitchen & Oven
Preheat your oven to 350°F (175°C).
Line your 8×8 pan with parchment paper and spray lightly. This helps maintain clean edges and allows the tall cake to lift easily — another reason the slice looks so perfect in the picture.
Step 2 – Mixing Dry Ingredients
In a medium bowl, whisk:
- Flour
- Baking soda
- Baking powder
- Salt
Mixing dry ingredients well ensures your cake rises evenly and gives you that soft yet dense crumb seen in the slice.
Step 3 – Crafting the Wet Base
Use a large bowl for this step — everything will end up in here.
Add:
- Sugar
- Oil
- Eggs
Whisk until smooth and pale.
Now fold in:
- Carrots
- Pineapple (chunky!)
- Vanilla
You’ll immediately begin to see the beautiful tropical texture forming — long carrot shreds, juicy pineapple glints, and a sunny aroma that fills the room.
Step 4 – Combining Wet + Dry Without Overmixing
Gently fold the dry mixture into the wet mixture.
Do not overmix.
Overmixing = dense, rubbery cake.
Proper mixing = tall, moist, soft cake (like your image).
Step 5 – Folding in Coconut + Optional Nuts
Add the shredded coconut now.
It makes the batter thick — almost spoonable — which is exactly what we want for a tall, dense cake.
If adding macadamia nuts or spices, fold them in now too.
Step 6 – Baking for Height & Moisture
Pour the thick batter into your 8×8 pan.
Spread evenly.
Bake 32–40 minutes, depending on oven.
You want:
✅ Golden top
✅ Slightly caramelized edges
✅ Toothpick that comes out clean
Let the cake cool in the pan for 10 minutes, then move it to a cooling rack.
Let it cool completely — VERY important for the glaze drip.
Step 7 – Cooling for the Perfect Texture
Now, here’s a step that might seem skippable, but don’t do it — cooling the cake completely is essential if you want your glaze to look like the one in your image.
Why?
Because warm cake = melting glaze mess.
Cool cake = beautiful, slow-drip, glossy finish.
Give your cake at least 45–60 minutes to fully cool. You can even pop it in the fridge for 20 minutes if you’re in a rush. Once it’s completely cooled, the surface firms up enough to hold the glaze, letting it slowly cascade and cling — creating that picturesque “drip effect” we’re going for.
Step 8 – Making the Thick, Glossy Cream Cheese Glaze
Alright, glaze time.
In a medium bowl:
- Beat the softened cream cheese until smooth — no lumps!
- Add the powdered sugar a bit at a time, mixing slowly.
- Stir in pineapple juice, 1 tablespoon at a time, until your glaze is pourable but thick — like warm frosting or a thick smoothie.
📝 Glaze Pro Tip: For that dramatic drip like in your image, double this glaze recipe and pour while it’s still slightly warm. The cream cheese holds its shape but flows beautifully when not cold.
This glaze brings a tangy-sweet pop that cuts through the richness of the cake and plays up the tropical pineapple tones beautifully.
Step 9 – The Drip Technique (To Match Image)
Now, here’s the fun part — glazing that glorious cake.
Set your cake on a cooling rack over parchment (to catch extra drips).
Scoop the glaze with a spoon and begin pouring in circles from the center outward. Let the glaze fall over the edges naturally — and if some parts aren’t dripping, guide it with your spoon.
You want it to:
- Slide slowly down the sides
- Form thick glossy ridges
- Pool slightly at the base (just like the photo)
Once glazed, let it sit 5–10 minutes to firm slightly.
Take your picture now — this is the money shot.
What the Finished Cake Should Look Like
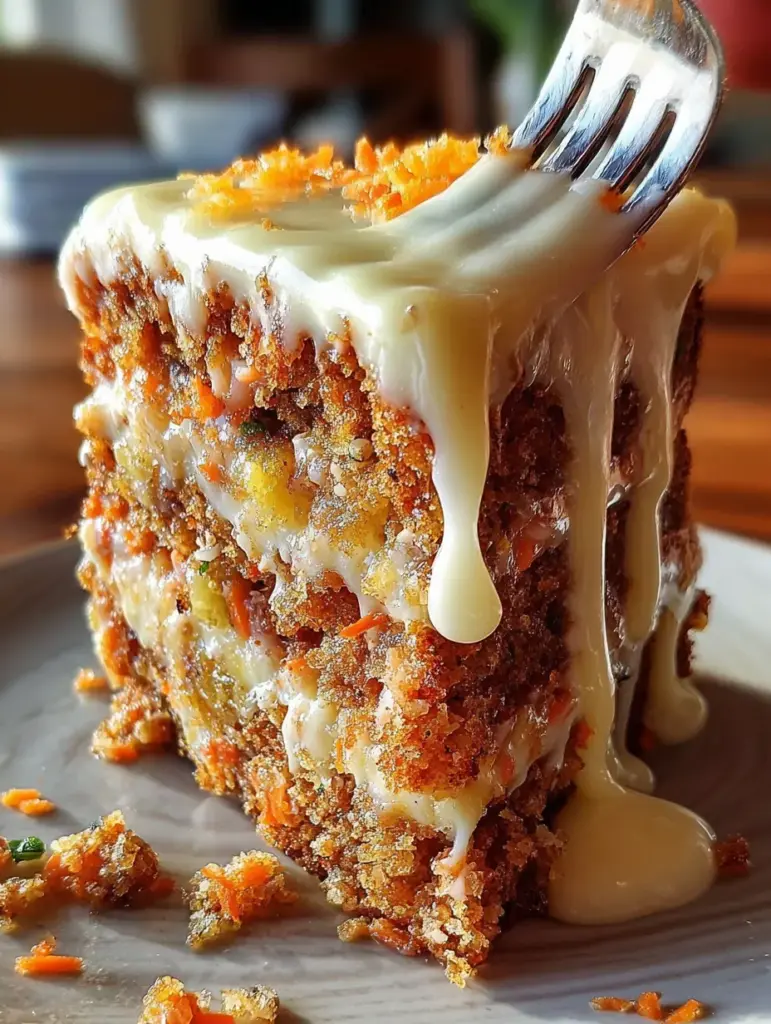
Let’s visualize the final result:
- A thick, tall slice — not a flat square
- Moist, tender crumb with visible flecks of carrot and pineapple
- Slight golden edges from caramelization
- Cream cheese glaze dripping thickly, not running thin
- Interior showing textural contrast: chewy coconut, juicy pineapple, soft cake
- Rustic but intentionally beautiful — just like a perfect amateur homemade Facebook photo
If you followed the steps and used the 8×8 pan, you’ll get that stacked slice effect that looks just like your image.
Serving Suggestions for Maximum Tropical Vibes
This cake is a slice of paradise on its own — but if you want to elevate the experience:
🍽 Pair With:
- Iced coffee with coconut milk
- Fresh pineapple juice
- Chilled mango tea
🍧 Serve:
- Slightly chilled for firmness + refreshing flavor
- Or gently warmed for a melty glaze bite
🌴 Garnish (Optional):
- A sprinkle of toasted coconut
- Fresh pineapple wedges on the side
- A small scoop of vanilla or coconut ice cream
It’s a treat that fits any occasion: birthdays, potlucks, beach parties, or even just a sunny afternoon at home.
Print
Hawaiian Carrot Pineapple Cake With Cream Cheese Glaze 🍍🥕
- Prep Time: 20 minutes
- Total Time: ~1 hour 30 minutes
- Category: Dessert
Description
A tall, super‑moist, tropical carrot cake loaded with chunky pineapple, shredded coconut, and covered in a thick, glossy cream cheese glaze that drips just like the image you shared. This recipe guarantees a dense, tender crumb and a heavy glaze flow that gives the cake its irresistible homemade beauty.
Ingredients
For the Cake
2 cups all-purpose flour
2 cups grated carrots (medium shred = better texture)
1 cup crushed pineapple, lightly drained
Leave a little juice for moisture + visible pineapple pieces
1 cup shredded coconut (sweetened or unsweetened)
1 cup sugar
½ cup vegetable oil
4 large eggs
1 tsp baking soda
½ tsp baking powder
½ tsp salt
1 tsp vanilla extract
Optional (highly recommended for texture):
½ cup chopped macadamia nuts
½ tsp cinnamon
For the Thick Cream Cheese Glaze
(Double batch for heavy drips like the image)
8 oz cream cheese, softened
2 cups powdered sugar
3–4 tbsp pineapple juice (reserved from the can)
The glaze should be thick, glossy, and pourable.
Instructions
1. Prepare Your Pan & Preheat Oven
Preheat oven to 350°F (175°C).
Line an 8×8-inch square baking pan with parchment paper and lightly grease the sides.
✅ This pan size is essential for the tall, chunky slice shown in your image.
2. Mix the Dry Ingredients
In a medium bowl, whisk together:
Flour
Baking soda
Baking powder
Salt
Set aside.
3. Make the Wet Base
In a large mixing bowl:
Whisk sugar + oil + eggs until smooth.
Stir in shredded carrots, lightly drained pineapple, and vanilla.
You should see visible shreds of carrot and pineapple pieces—this is what creates the beautiful texture in the final slice.
4. Combine Wet and Dry
Add the dry ingredients to the wet mixture.
Gently fold with a spatula until just combined.
Do not overmix.
✅ Proper mixing ensures the cake stays moist, tender, and tall.
5. Add Coconut + Optional Nuts
Fold in the shredded coconut and macadamia nuts (if using).
The batter will be thick—this is exactly what you want.
6. Bake
Pour batter into your prepared 8×8 pan.
Bake for 32–40 minutes, or until a toothpick inserted into the center comes out clean.
Edges should be lightly caramelized and golden, like your photo.
Let the cake cool in the pan for 10 minutes, then transfer to a wire rack to cool fully.
7. Make the Cream Cheese Glaze
In a medium bowl:
Beat cream cheese until smooth.
Add powdered sugar gradually.
Add pineapple juice slowly until you reach a thick, pourable consistency.
✅ For glaze that drips dramatically, keep it thick—not runny.
8. Glaze the Cake
Place cooled cake on a rack with parchment below.
Pour the glaze slowly over the top, allowing natural drips to form down the sides.
Use a spoon to encourage heavier drips if you want the exact look from your image.
Let sit for 5–10 minutes before slicing.
Notes
✅ Use an 8×8 Pan for Height
This is what gives you the thick, bakery-style slice seen in your picture.
✅ Don’t Over-Drain the Pineapple
A little juice = moist crumb + visible pineapple pieces.
✅ Medium-Shred Carrots Only
Fine shreds disappear.
Large shreds create perfect texture and color contrast.
✅ Double the Glaze for a Beautiful Drip
Your image shows a generous amount of glaze.
Double the glaze recipe for that effect.
✅ Cool Completely Before Glazing
Even slightly warm cake will melt the glaze.
✅ Texture Enhancers
Macadamia nuts and coconut create layers of texture that match the “speckled” look in your slice.
Nutrition
- Serving Size: 10–12
- Calories: 410–430 kcal
Storing the Cake Without Losing Moisture
This cake keeps incredibly well, and often tastes even better the next day once the flavors marry.
🧊 Refrigerate:
- Store in an airtight container for up to 4 days.
- Bring to room temp before serving for best texture.
❄️ Freeze:
- Freeze without the glaze.
- Wrap slices individually in plastic + foil.
- Thaw overnight in the fridge, glaze before serving.
Pro tip: You can even freeze the glaze separately in a small container and let it come to room temp before drizzling.
Variations You Can Try
Want to put your own spin on it? Here are a few delicious detours:
🥥 Coconut Cream Glaze
Swap cream cheese for full-fat coconut cream + powdered sugar + pineapple juice for a dairy-free drizzle.
🥜 Macadamia Crunch
Add ½ cup chopped macadamia nuts to the batter for rich, buttery bites.
🍌 Tropical Twist
Replace ½ cup of the pineapple with mashed ripe banana for extra sweetness.
🌰 No Coconut Version
Not a fan of coconut? Leave it out. Add an extra ¼ cup of grated carrots or ½ tsp cinnamon for warmth.
This recipe is super flexible, as long as you maintain the base structure.
You may like as well :
No-Bake Pumpkin Cheesecake Balls: A Fall Dream Come True
Apple Cheesecake Tacos Recipe
Pumpkin Bars with Pumpkin Spice Cream Cheese Drizzle – The Cozy Fall Dessert You’ll Crave All Season
Common Mistakes to Avoid
Let’s avoid any cake fails:
❌ Overmixing the batter – Leads to dense, chewy cake
❌ Overbaking – Dries out the crumb
❌ Using too much pineapple juice – Makes the batter soggy
❌ Glazing too early – Causes glaze to melt into the cake
❌ Under-glazing – That photo-worthy drip needs enough volume
Stick to the guide, and you’ll get that tall slice, rich texture, and show-stopping glaze every single time.

Final Thoughts – A Slice of Hawaii at Home
This cake is more than just dessert — it’s a little tropical escape on a plate. Each bite gives you sunshine, sweetness, warmth, and that perfect balance of texture and flavor that keeps people coming back for seconds (or thirds).
Whether you’re an amateur home baker or a seasoned dessert pro, this Hawaiian Carrot Pineapple Cake with cream cheese glaze is one of those “print-and-keep” recipes. It’s nostalgic yet fresh, rustic yet visually stunning — and every time you make it, it’ll remind you why baking can feel like a vacation.
So grab your carrots, open a can of pineapple, turn up some island tunes — and bake your way into tropical bliss.
Similar recipes : Pineapple Coconut Dream Cake
FAQs
1. Can I make this without coconut?
Yes! Just leave it out and add extra carrot or a few chopped walnuts for texture.
2. What kind of pineapple should I use?
Use crushed pineapple, lightly drained — or chop pineapple rings for chunkier texture like the image.
3. Can I use a different pan size?
Yes — but to get the tall slice look, use an 8×8-inch square pan or two 6-inch round pans. Avoid 9×13 for this version.
4. Can I make the glaze ahead of time?
Absolutely. Store in the fridge and let it come to room temperature before using. Whisk to revive the smooth texture.
5. Can I freeze this cake?
Yes — freeze unglazed slices, then glaze before serving. Wrap tightly in plastic and foil to prevent freezer burn.


