Introduction to Hot Cocoa Peppermint Cheesecake Bites
As the weather cools and the holiday season approaches, there’s nothing quite like indulging in a warm and comforting treat. That’s where my Hot Cocoa Peppermint Cheesecake Bites come in. These delightful mini cheesecakes capture the essence of cozy winter nights, combining rich chocolate flavors with a refreshing hint of peppermint. They’re not just easy to make; they also bring smiles to faces young and old. With each bite, you’ll feel the warmth and joy that this recipe brings, perfect for festive gatherings or cozy nights in with your loved ones.
Why You’ll Love This Hot Cocoa Peppermint Cheesecake Bites
There’s so much to adore about these Hot Cocoa Peppermint Cheesecake Bites. First, they’re incredibly easy to whip up, making them a perfect choice for busy schedules. The rich, luscious taste of hot cocoa combined with the festive burst of peppermint will tantalize your taste buds. Plus, they look stunning on any dessert table. You’ll find they’re a crowd-pleaser, perfect for gatherings with family and friends!
Ingredients for Hot Cocoa Peppermint Cheesecake Bites
Creating your Hot Cocoa Peppermint Cheesecake Bites requires a delightful combination of ingredients. Here’s what you’ll need to gather:
- Chocolate graham cracker crumbs: These provide a sweet, chocolatey base for your cheesecakes. You can substitute with regular graham cracker crumbs for a milder flavor.
- Melted butter: This binds the crust together, adding richness. I’ve used unsalted butter, but you could use coconut oil for a unique twist!
- Sugar: Just a touch, to sweeten the crust and filling. Feel free to swap in coconut sugar or a sugar substitute if you’re watching your intake.
- Cream cheese: The star of your cheesecake! Ensure it’s softened for smooth mixing. Low-fat cream cheese works fine if you’re looking to lighten the dish.
- More sugar: A little extra in the filling for that creamy sweetness. Adjust based on your preference.
- Peppermint extract: This gives a festive kick to your bites, simulating the flavors of hot cocoa. Mint flavoring can also be used as an alternative.
- Vanilla extract: A classic flavor enhancer in dessert that balances the sweetness and adds depth.
- Eggs: They help to set the cheesecake beautifully. For a vegan option, silken tofu can be used as an egg substitute.
- Sour cream: This contributes to a creamy texture and slight tang. Greek yogurt can be a healthier alternative.
- Heavy cream: Used for the ganache, it makes it luxuriously smooth. You could replace it with coconut cream for a non-dairy version.
- Semi-sweet chocolate chips: These create the ganache topping, delivering a rich chocolate flavor. Dark chocolate or even white chocolate can be delightful substitutions.
- Whipped cream: For that luscious topping, feel free to use store-bought or homemade.
- Crushed candy canes: These add a festive crunch and a pop of color on top. You could also use chocolate shavings or nuts if you prefer.
- Mini peppermint sticks: These are an adorable finishing touch and make the bites even more festive!
Each ingredient adds a layer of flavor to your cheesecake bites, making them irresistible! For exact quantities, check the bottom of this article where you can print the full recipe.
How to Make Hot Cocoa Peppermint Cheesecake Bites
Now, let’s dive into the magic of creating your Hot Cocoa Peppermint Cheesecake Bites. Just follow these simple steps, and you’ll have a scrumptious festive treat that will impress everyone!
Step 1: Prepare the Crust
Start by preheating your oven to 325°F (163°C).
In a medium bowl, mix the chocolate graham cracker crumbs, melted butter, and sugar until evenly combined.
Next, press this mixture into the bottom of mini cheesecake molds or lined muffin tins.
I like to use the bottom of a measuring cup to pack it down firmly.
Pop them in the oven and bake for about 5 to 7 minutes.
Remove and let them cool while you prepare the filling.
Step 2: Make the Cheesecake Filling
In a mixing bowl, beat the softened cream cheese until it’s silky smooth.
Add sugar, peppermint extract, and vanilla extract, mixing until everything is well combined.
Now, add the eggs one at a time, mixing well after each addition.
Fold in the sour cream gently—this gives your filling that creamy texture.
Once everything is incorporated, spoon that delightful cheesecake mixture over the cooled crusts—you want a nice thick layer!
Step 3: Bake the Cheesecakes
Time to bake! Place the filled molds back in the oven and bake for 18 to 22 minutes.
You’re looking for the centers to be set yet slightly jiggly—this ensures they’ll be perfect once cooled.
After baking, take them out and let them cool completely before transferring to the fridge.
Trust me, chilling them for at least 2 hours is crucial. It enhances the flavors and gives the texture a dreamy finish!
Step 4: Create the Ganache
While the cheesecakes cool, let’s whip up the ganache.
Heat the heavy cream in a small saucepan until it’s just about to simmer, but don’t let it boil!
Pour the warm cream over the semi-sweet chocolate chips and let it sit for about 2 minutes.
Then, stir the mixture until it’s beautifully smooth and glossy.
This ganache will add a rich, chocolatey layer on top of those cheesecake bites!
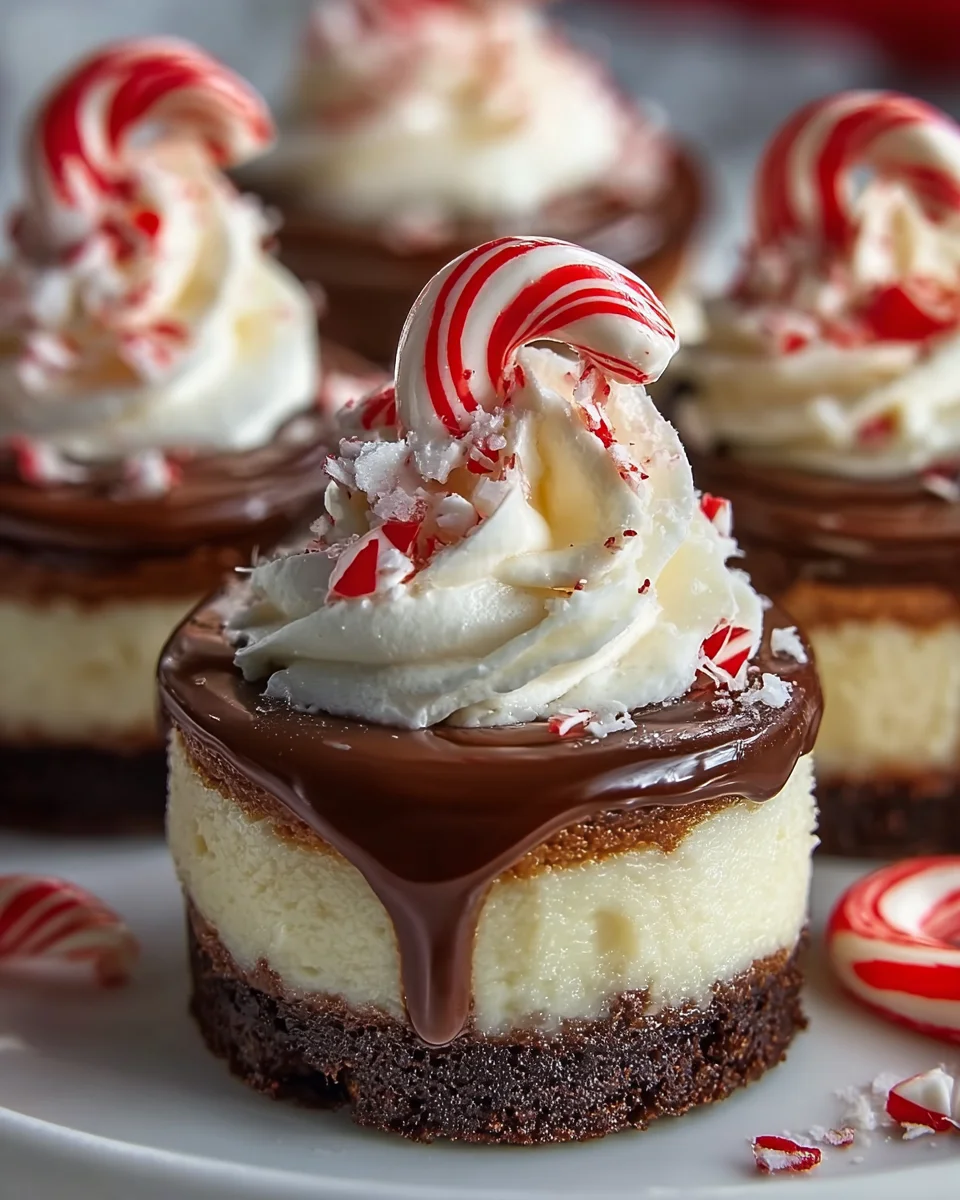
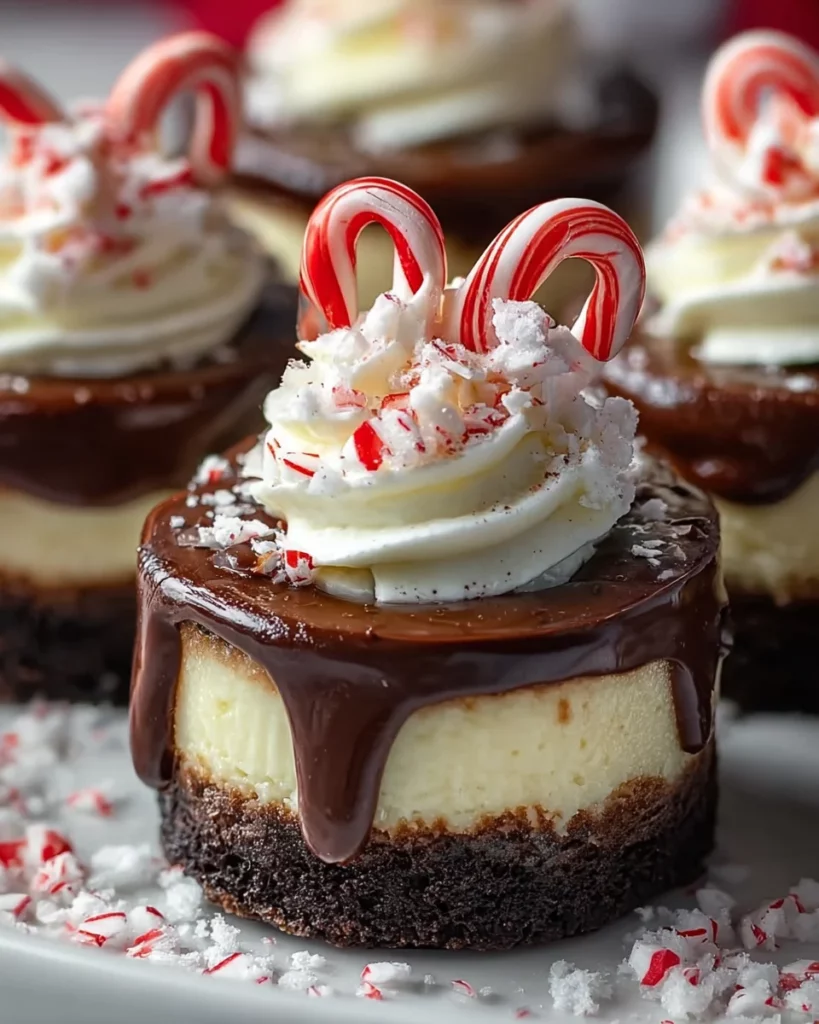
Step 5: Decorate and Serve
Once your cheesecake bites are chilled and the ganache is ready, it’s time to decorate!
Spoon or drizzle the ganache over each mini cheesecake, letting it flow down the sides for that gorgeous look.
Then, pipe a little whipped cream on top and sprinkle with crushed candy canes.
For an extra festive touch, add a mini peppermint stick or two.
Serve these delightful bites chilled, and watch as everyone savors the flavor of this holiday classic!
Tips for Success
- Ensure your cream cheese is at room temperature for easy mixing and a smooth filling.
- Don’t overbake the cheesecakes; they should be slightly jiggly in the center for the best texture.
- Chill well before serving; this allows all those flavors to meld perfectly.
- Use quality chocolate for the ganache for a truly decadent experience.
- Get creative with toppings—there’s no limit to how festive you can make these bites!
Equipment Needed
- Mini cheesecake molds: These are perfect for portioning. Use lined muffin tins if you don’t have them.
- Mixing bowls: A couple of different sizes will help with preparation.
- Electric mixer: This provides the creamy texture, but a whisk will work in a pinch.
- Spatula: Useful for folding and smoothing. A spoon also does the trick!
- Double boiler or microwave-safe bowl: Great for melting chocolate or making ganache.
Variations on Hot Cocoa Peppermint Cheesecake Bites
- Chocolate Hazelnut: Swap out the peppermint extract for hazelnut extract for a nutty twist.
- Nut-Free Option: Eliminate the candy canes and mini peppermint sticks if allergies are a concern. Use crushed chocolate cookies for a sprinkle instead.
- Gluten-Free: Use gluten-free chocolate graham cracker crumbs to make these bites suitable for gluten-sensitive diners.
- Vegan Adaptation: Replace cream cheese with a vegan cream cheese and swap eggs with flaxseed meal or chia seeds mixed with water.
- Spicy Peppermint: Add a pinch of cayenne pepper to the filling for a surprising spicy kick that complements the sweetness!
Serving Suggestions for Hot Cocoa Peppermint Cheesecake Bites
- Hot cocoa: Pair your bites with a warm cup of hot cocoa for the ultimate comfort treat.
- Festive platter: Arrange on a platter with colorful holiday sprinkles or edible glitter for a magical presentation.
- Minty garnish: Add fresh mint leaves for a fresh look and herbal aroma.
- Chocolate drizzle: Drizzle extra chocolate ganache over the bites for an extra touch of indulgence.
- Cozy ambiance: Serve them by a crackling fire or at a holiday gathering for a perfect festive vibe!
FAQs about Hot Cocoa Peppermint Cheesecake Bites
As you venture into making these delightful Hot Cocoa Peppermint Cheesecake Bites, you might have a few questions. Here are some common ones I’ve come across, along with answers to make your baking experience seamless!
Can I make these cheesecake bites ahead of time?
Absolutely! You can prepare and bake the cheesecakes a day in advance. Just keep them stored in the refrigerator once they’re cool. When you’re ready to serve, add the ganache and toppings for that fresh touch!
How do I store leftovers?
Any leftovers should be stored in an airtight container in the refrigerator. They’ll last for about 3 to 5 days, though I doubt there will be any left after serving!
Can I freeze Hot Cocoa Peppermint Cheesecake Bites?
Yes, you can freeze them! Just make sure they are well-wrapped or placed in an airtight container. They can be frozen for up to a month. Thaw them in the fridge overnight before serving.
Is it possible to substitute ingredients?
Definitely! There are plenty of swaps you can make. You can use Greek yogurt in place of sour cream or opt for dairy-free options to suit your dietary needs. Check the ingredient list for possible modifications!
What can I use if I don’t have mini cheesecake molds?
No worries! You can use lined muffin tins instead. Just make sure to keep an eye on cooking times, as they might vary a little compared to the molds.
Final Thoughts on Hot Cocoa Peppermint Cheesecake Bites
There’s something truly magical about sharing homemade treats, especially during the holidays. My Hot Cocoa Peppermint Cheesecake Bites are more than just a dessert; they’re a celebration of cozy moments with loved ones. Each bite is a delightful dance of flavors that warms your heart. Whether it’s a festive gathering or a quiet night at home, these bites will surely bring smiles and comfort. I hope this recipe inspires you to create cherished memories in the kitchen and fill your home with sweetness this season. Happy baking, and enjoy every delicious moment!
Print
Hot Cocoa Peppermint Cheesecake Bites Delight Your Taste Buds!
- Prep Time: 30 minutes
- Cook Time: 30 minutes
- Total Time: 2 hours 30 minutes
- Yield: 12 mini cheesecakes 1x
- Category: Dessert
- Method: Baking
- Cuisine: American
- Diet: Vegetarian
Description
Decadent mini cheesecakes with a rich hot cocoa flavor, infused with peppermint and topped with whipped cream and crushed candy canes.
Ingredients
- 1 cup chocolate graham cracker crumbs
- 3 tbsp melted butter
- 1 tbsp sugar
- 16 oz cream cheese, softened
- 1/2 cup sugar
- 1/2 tsp peppermint extract
- 1 tsp vanilla extract
- 2 eggs
- 1/4 cup sour cream
- 1/2 cup heavy cream
- 4 oz semi-sweet chocolate chips
- Whipped cream (for topping)
- Crushed candy canes (for topping)
- Mini peppermint sticks (for topping)
Instructions
- Preheat oven to 325°F (163°C). Mix chocolate graham cracker crumbs, sugar, and melted butter. Press mixture into mini cheesecake molds or lined muffin tins. Bake for 5–7 minutes and let cool.
- In a bowl, beat cream cheese until smooth. Add sugar, peppermint extract, and vanilla extract. Mix in eggs one at a time, then fold in sour cream. Spoon filling over cooled crusts.
- Bake for 18–22 minutes or until centers are set. Remove from oven, cool completely, then chill in the refrigerator for at least 2 hours.
- To make ganache, heat heavy cream until just simmering. Pour over chocolate chips and let sit for 2 minutes. Stir until smooth. Spoon ganache over chilled cheesecakes.
- Decorate by piping whipped cream on top, sprinkling with crushed candy canes, and topping with mini peppermint sticks. Serve chilled.
Notes
- Ensure cream cheese is softened for easy mixing.
- Chilling the cheesecakes is essential for the best texture.
- Using high-quality chocolate will enhance the flavor of the ganache.
Nutrition
- Serving Size: 1 mini cheesecake
- Calories: 250
- Sugar: 18g
- Sodium: 150mg
- Fat: 16g
- Saturated Fat: 9g
- Unsaturated Fat: 6g
- Trans Fat: 0g
- Carbohydrates: 22g
- Fiber: 1g
- Protein: 4g
- Cholesterol: 60mg


