When the holidays roll around, there’s one treat that never fails to bring a smile to everyone’s face: Melted Snowman Sugar Cookies. These adorable cookies look like tiny snowmen who had a little too much fun in the sun, complete with melting “bodies,” marshmallow heads, M&M buttons, and cute hand-drawn faces. Whether you’re hosting a holiday party, baking with the kids, or looking to impress your friends with a festive edible gift, these cookies are the perfect combination of fun, festive, and delicious.
They’re soft and buttery on the bottom, topped with a glossy white icing that mimics melting snow. And the real stars? The marshmallow snowman heads tilted playfully as if mid-melt. These cookies aren’t just cute—they’re also super easy to make, and I promise, once you try them, they’ll become a new holiday tradition in your kitchen.
Why Everyone Loves Melted Snowman Cookies
Let’s be honest—holiday treats are everywhere in December, but these little guys always steal the show. Why? Because they bring personality to your cookie platter! They’re like little edible cartoons. Everyone, from toddlers to grandparents, will “aww” over their expressions and playful poses.
But it’s not just about looks. These cookies taste amazing. The sugar cookie base is buttery and soft with the perfect hint of vanilla, and the icing is sweet but not overwhelming—just the right balance. Add a little crunch from the candy buttons and the softness of the marshmallow, and you’ve got a delightful mix of textures and flavors in each bite.
And let’s not forget: they’re totally Instagram-worthy. Whether you’re showing them off at a cookie exchange or posting your creation online, these treats are always a crowd-pleaser.
Perfect for Parties, Gifts, and Family Fun
Planning a classroom party or looking for something festive for a holiday potluck? Melted Snowman Sugar Cookies are a total win. They’re easy to package in cellophane bags or cookie tins, and they make thoughtful (and adorable) homemade gifts.
Got kids at home? Let them help! These cookies are perfect for a fun family baking session. Little hands love placing the marshmallows, adding M&M buttons, and drawing silly snowman faces. Honestly, it’s like edible arts and crafts—and the best part is, you get to eat your artwork afterward.
Whether you’re looking for a weekend activity or a festive project during the winter break, this is one recipe that delivers on both fun and flavor.
Let’s Talk Ingredients
Alright, now let’s break down what you’ll need to make these cookies. Good news: no fancy ingredients required!
Basic Sugar Cookie Ingredients
These form the soft, buttery base that holds your snowman scene.
- 2 ½ cups all-purpose flour
- 1 cup granulated sugar
- 1 cup unsalted butter (softened)
- 1 large egg
- 1 ½ tsp baking powder
- 1 ½ tsp vanilla extract
- ¼ tsp salt
Melted “Snow” Icing Ingredients
This is the shiny white “snow” puddle on top of each cookie.
- 2 cups powdered sugar
- 2–3 tbsp milk
- ½ tsp vanilla extract
- 1–2 tsp light corn syrup (adds shine)
Fun Decorations That Bring the Snowmen to Life
Now for the fun part—making your snowmen “melt.”
- Large square marshmallows (the cube shape gives that perfect snowman head look)
- Black decorating gel or melted dark chocolate (for eyes, mouth, and arms)
- Orange decorating gel (for carrot noses)
- Mini M&M’s (use various colors for the buttons)
Baking Equipment You’ll Need
Here’s a quick list of tools that will make your snowman cookie journey smoother:
- Electric mixer or hand mixer
- Mixing bowls
- Measuring cups and spoons
- Baking sheets
- Parchment paper
- Cooling rack
- Icing spatula or spoon
- Toothpicks or piping bags (for detailed decorating)
Step-by-Step Instructions for Melted Snowman Cookies
This recipe is broken down into super simple steps so you can follow along easily. Let’s dive in.
Step 1: Make the Sugar Cookie Dough
Start by creaming together the softened butter and granulated sugar. Mix until the texture is light and fluffy—this helps the cookies bake up soft and thick. Then, add your egg and vanilla extract, mixing until smooth.
In a separate bowl, combine the flour, baking powder, and salt. Slowly add the dry ingredients into the wet mixture. Don’t overmix—just stir until a soft dough forms. If the dough is too sticky, you can chill it for 15 minutes to make it easier to handle.
Step 2: Shape and Bake the Cookies
Scoop or roll the dough into 1½-inch balls, then gently flatten them with your palm or the bottom of a glass. Place them on a parchment-lined baking sheet about 2 inches apart.
Bake at 350°F (175°C) for 9–11 minutes. You want the edges set but still pale—don’t overbake! We’re aiming for soft, tender cookies, not crunchy ones.
Let the cookies cool on the tray for a couple of minutes before transferring them to a wire rack to cool completely. This step is important because warm cookies will cause the icing to melt too fast.
Step 3: Cool Completely Before Decorating
Patience is key here. If you try to ice the cookies while they’re warm, everything will slide right off. Wait until they’re totally cool to the touch before moving on to the fun decorating stage.
How to Make the Glossy Melted Icing
In a bowl, whisk together 2 cups powdered sugar, 2 tablespoons of milk, and ½ teaspoon vanilla extract. Add corn syrup for a shiny finish. Adjust with more milk if needed—the consistency should be thick but pourable.
Spoon the icing onto each cooled cookie and let it naturally spread out into “melting” shapes. No need to be precise—the messier, the better for that authentic melted snow look!
Creating the Melting Snowman Look
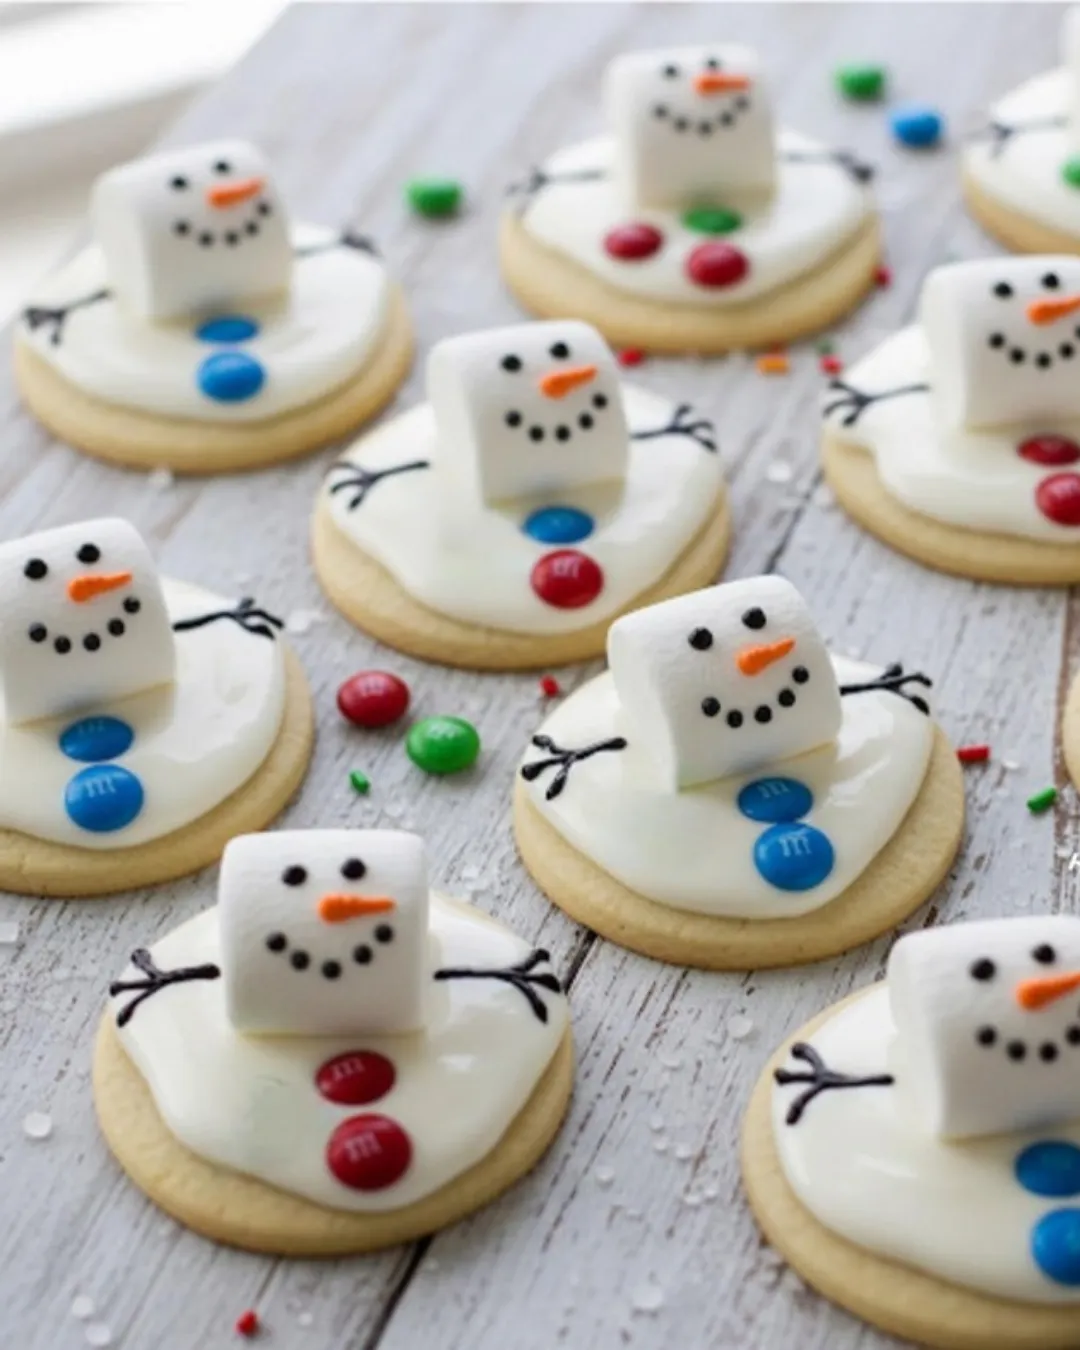
This is the step where the magic happens—transforming simple iced cookies into adorable little snowmen mid-melt! If you look closely at the image, you’ll see each cookie has a white puddle of icing, a marshmallow head tilted just slightly, colorful M&M buttons, and sweet little hand-drawn features. Let’s recreate that cuteness step by step.
Attaching the Marshmallow Heads
While your icing is still wet (super important!), gently press a large square marshmallow onto each cookie, slightly off-center and tilted a bit. That tilt gives them their playful, “oops I’m melting” vibe—like they just slipped off a snow-covered roof!
Pro Tip: Use square marshmallows for that cubey snowman head look. If you can’t find square ones, regular large marshmallows work too—just snip off one end to create a flat base so they stick better.
Adding the Mini M&M Buttons
Now grab your mini M&Ms and gently press two onto the icing below the marshmallow head. Try to match what you see in the image: some have two blue buttons, others have red, green, or a fun mix. You can go wild with the colors or try to keep them consistent for a polished batch.
Don’t push too hard—just enough so the candy sticks to the icing without sliding off. Once the icing dries, they’ll be firmly in place.
Drawing Faces and Arms
Time to give these snowmen some personality!
Using black decorating gel (or melted dark chocolate in a piping bag or even a toothpick), draw two little eyes and a dotted smile on the marshmallow. Go for the classic coal-face look, or switch it up with a smirk or a surprised expression. A little variety adds charm.
Next, give your snowmen stick arms by drawing two short lines sticking out from the icing puddle. Add little branches at the end for fingers. These look so cute and help create that “melting snowman with flailing arms” vibe.
For the carrot nose, use orange gel to add a small sideways triangle or dot between the eyes. Boom—snowman complete!
Tips for Decorating Like a Pro
Want your snowmen to look just like the ones in the picture? Here are a few extra decorating secrets:
- Use a toothpick for the fine details like eyes, smile, and arms if you don’t have decorating gel.
- Let icing set slightly before adding the face—too runny and it’ll all slide off.
- Tilt each marshmallow differently to give your snowmen unique “poses.”
- Use a clean, small spoon to add icing for more control over your “melt” shape.
- Let everything dry for 30–40 minutes before moving the cookies. This helps all the features set in place and keeps the icing shiny and firm.
How to Make Your Snowmen Look Like the Picture
Take another look at the image: there’s a beautiful consistency in design, yet each snowman has a whimsical little variation—some with double blue buttons, some red and green, all with slightly different faces. Here’s how you can match that polished look:
- Marshmallows are centered but tilted to one side, giving that playful, melting expression.
- M&M colors are thoughtfully placed. Try placing them vertically and matching similar colors for a clean finish.
- Stick arms are drawn in the same direction across cookies, keeping the theme cohesive.
- Snow “puddles” are round but organically shaped, not perfect circles.
This cookie style strikes the perfect balance between neat and homemade—just like what you see in holiday magazines!
Print
Melted Snowman Sugar Cookies
- Prep Time: 20 minutes
- Cook Time: 10 minutes
- Total Time: 1 hour 5 minutes
- Category: Holiday Desserts / No-Bake Treats
Description
⛄❄️ These sweet little snowmen look as if they wandered too close to the fireplace. Their marshmallow heads, glossy melted icing, and colorful candy buttons always make the kids giggle — and honestly, they melt my heart just as quickly as they melt on the tray. Isn’t it funny how a simple cookie can bring back the magic of childhood winters? ☃️💖
Ingredients
2 ½ cups all-purpose flour
1 cup granulated sugar
1 cup unsalted butter, softened
1 large egg
1 ½ tsp baking powder
1 ½ tsp vanilla extract
¼ tsp salt
For the Melted Snow Icing:
2 cups powdered sugar
2–3 tbsp milk
½ tsp vanilla extract
1–2 tsp light corn syrup
For Decorations:
Large square or jumbo marshmallows
Black decorating gel or melted dark chocolate
Orange decorating gel
Mini M&M’s (mixed colors)
Instructions
Preheat oven to 350°F (175°C) and line a baking sheet with parchment paper. (⏱️ 2 minutes)
Cream softened butter and sugar together until light and fluffy. (⏱️ 2 minutes)
Add egg and vanilla, mixing until smooth. (⏱️ 1 minute)
Mix in flour, baking powder, and salt until a soft dough forms. (⏱️ 2 minutes)
Roll dough into 1½-inch balls and gently flatten them. (⏱️ 4 minutes)
Bake for 9–11 minutes or until edges are set but still pale. (⏱️ 10 minutes)
Cool cookies completely on a wire rack. (⏱️ 15 minutes)
Prepare icing by whisking powdered sugar, vanilla, and 2 tbsp milk; add more milk if needed for a thick, pourable consistency. Stir in corn syrup for shine. (⏱️ 3 minutes)
Spoon icing onto cookies, allowing it to drip naturally to mimic melted snow. (⏱️ 5 minutes)
Place a tilted marshmallow on each cookie while icing is still wet. (⏱️ 3 minutes)
Add two mini M&M buttons to the front of each snowman. (⏱️ 2 minutes)
Draw eyes, smile, arms, and a carrot nose on each snowman. (⏱️ 5 minutes)
Let cookies dry 30–40 minutes before serving. (⏱️ 35 minutes)
Notes
Nutrition
- Serving Size: 16–20 cookies
- Calories: 188 kcal
Make Ahead and Storage Tips
Want to prep these ahead of time? You totally can!
- Sugar cookies can be baked 2–3 days in advance. Store in an airtight container at room temp.
- Icing can be made a day before—just keep it in a covered bowl and stir before using.
- Fully decorated cookies should be stored in a single layer (or between parchment paper if stacking) to protect the decorations.
Avoid refrigerating decorated cookies—the moisture can make the icing sticky or smear the details. Store at room temperature for up to 5 days, though they’re best within 3 days for ultimate freshness.
You may also like to read :
Holiday Spritz Cookies – A Buttery Bite of Christmas Magic
Rosemary Shortbread Christmas Tree Cookies Recipe – A Buttery, Festive Treat for the Holidays
How to Involve Kids in the Process
This recipe is perfect for kids—and a fantastic way to keep them busy on a snowy afternoon.
Here’s how to divide tasks by age:
- Little kids (3–6 years old): Let them place marshmallow heads and M&M buttons.
- Elementary age (7–10 years old): They can spoon icing and even try drawing faces.
- Tweens and teens: Let them take full creative control—maybe even host a decorating contest!
Bonus: use the decorating time to talk about snowmen, share holiday stories, or just blast some holiday music in the background. You’ll make memories that last long after the cookies are gone.
Variations and Creative Twists
While the classic Melted Snowman Sugar Cookies are undeniably adorable as-is, there’s always room to sprinkle in some creativity—literally! Here are some fun twists to customize your snowmen:
Flavor Variations
- Peppermint Snowmen: Add ½ teaspoon of peppermint extract to the icing for a refreshing minty twist.
- Spiced Snowmen: Mix ½ teaspoon of cinnamon or nutmeg into the cookie dough to give a cozy, spiced flavor.
- Chocolate Base: Substitute ¼ cup of the flour for cocoa powder to make chocolate sugar cookies for a delicious flavor contrast.
Decorating Variations
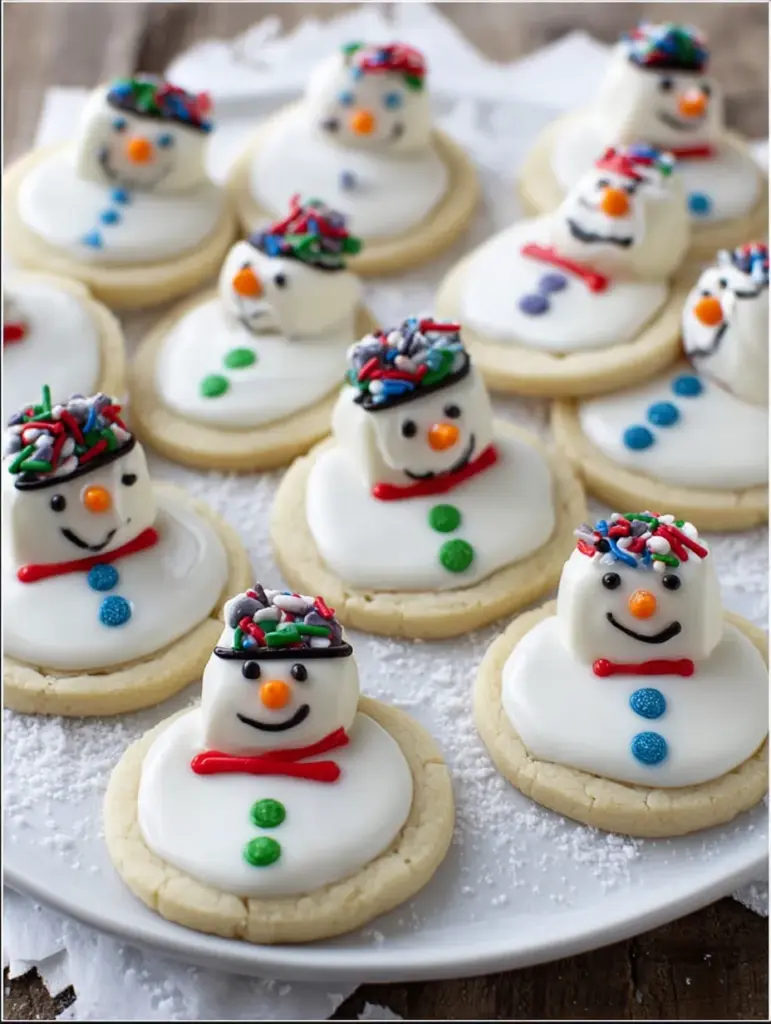
- Hat & Scarf Accessories: Use fruit roll-ups or licorice strings to make tiny scarves or hats.
- Sprinkle Fun: Add festive sprinkles around the icing puddle to mimic snowflakes or a snowy ground.
- Glitter Gel: For extra sparkle, use edible glitter gel on the snow to make your cookies shimmer like fresh snow.
Shape Alternatives
Don’t be afraid to switch it up:
- Use a snowflake cookie cutter for the base instead of round shapes.
- Try mini versions of the cookies using smaller cutters and mini marshmallows.
Let your imagination run wild—there’s no such thing as a wrong snowman!
Troubleshooting Common Cookie Problems
Even with simple recipes, sometimes things don’t go as planned. Here’s how to fix the most common issues:
Cookies Spreading Too Much
- Make sure your butter isn’t overly soft or melted.
- Chill the dough for 15–30 minutes before baking to help it hold shape.
Icing Too Runny or Too Thick
- Add milk one teaspoon at a time to get the right consistency.
- If too runny, add a little extra powdered sugar to thicken.
Decorations Sliding Off
- Wait until the icing is just slightly tacky before adding M&Ms and marshmallows.
- Don’t overload with too much icing, especially in the center.
Marshmallows Not Sticking
- Slightly flatten the base of each marshmallow before placing it.
- Press down gently but firmly into the icing puddle while it’s still wet.
The Best Occasions for Melted Snowman Cookies
These cookies aren’t just for Christmas Day—they’re perfect for all kinds of wintery fun!
- Classroom Holiday Parties – Nut-free and customizable.
- Cookie Exchanges – Eye-catching and crowd-pleasing.
- Holiday Movie Nights – Pair them with hot cocoa and a cozy blanket.
- DIY Gift Boxes – Wrap in clear bags or festive tins.
- Winter Birthdays – Especially fun for kids born in December or January.
And honestly? They’re just as fun to make on a random snowy afternoon with no reason at all—except that cookies make everything better.
Nutrition Information (Per Cookie)
Here’s an estimate if you’re tracking your holiday treat intake:
| Component | Amount |
|---|---|
| Calories | 188 kcal |
| Total Fat | 9g |
| Saturated Fat | 5g |
| Carbohydrates | 26g |
| Sugar | 18g |
| Protein | 1g |
| Sodium | 35mg |
Note: Nutrition values can vary based on exact ingredients and decoration amounts.
Wrapping Up: Holiday Cheer in Every Bite
Whether you’re making them for a holiday party, wrapping them up for gifts, or enjoying a weekend kitchen adventure with your family, these Melted Snowman Sugar Cookies are as festive as it gets. They’re cute, fun, and taste as good as they look. Plus, the decorating part? That’s where the memories are made.
Once you see the little marshmallow snowmen smiling back at you—complete with candy buttons and twiggy arms—you’ll understand why these cookies have become a holiday tradition for so many families.
So gather your ingredients, throw on some holiday music, and get ready to bake up some snowy sweetness. These cookies aren’t just treats—they’re joy in every bite.
Similar recipes :
Peppermint Chocolate-Dipped Sandwich Cookies: A Festive Holiday Treat You’ll Crave All Year Round
Soft Christmas Cookies Recipe: A Melt-in-Your-Mouth Holiday Delight
FAQs About Melted Snowman Sugar Cookies
1. Can I make the cookie dough ahead of time?
Absolutely! You can refrigerate the dough for up to 3 days or freeze it for up to 2 months. Just let it thaw and soften slightly before rolling and baking.
2. What if I don’t have decorating gel?
No worries! Melt some dark or white chocolate and use a toothpick or piping bag to draw the faces and arms. You can also use food-safe markers if you have them.
3. Can I use store-bought cookie dough instead?
Yes! While homemade gives you full control of flavor, store-bought sugar cookie dough will also work just fine. Just make sure the cookies are thick and soft for the best results.
4. How long do these cookies stay fresh?
Stored in an airtight container at room temperature, they’ll stay fresh for about 5 days. If making ahead, wait to decorate until 1–2 days before serving for best appearance.
5. Can I freeze the decorated cookies?
You can, but it’s best to freeze undecorated cookies. The icing and decorations may not hold up well in the freezer, and textures could change once thawed.