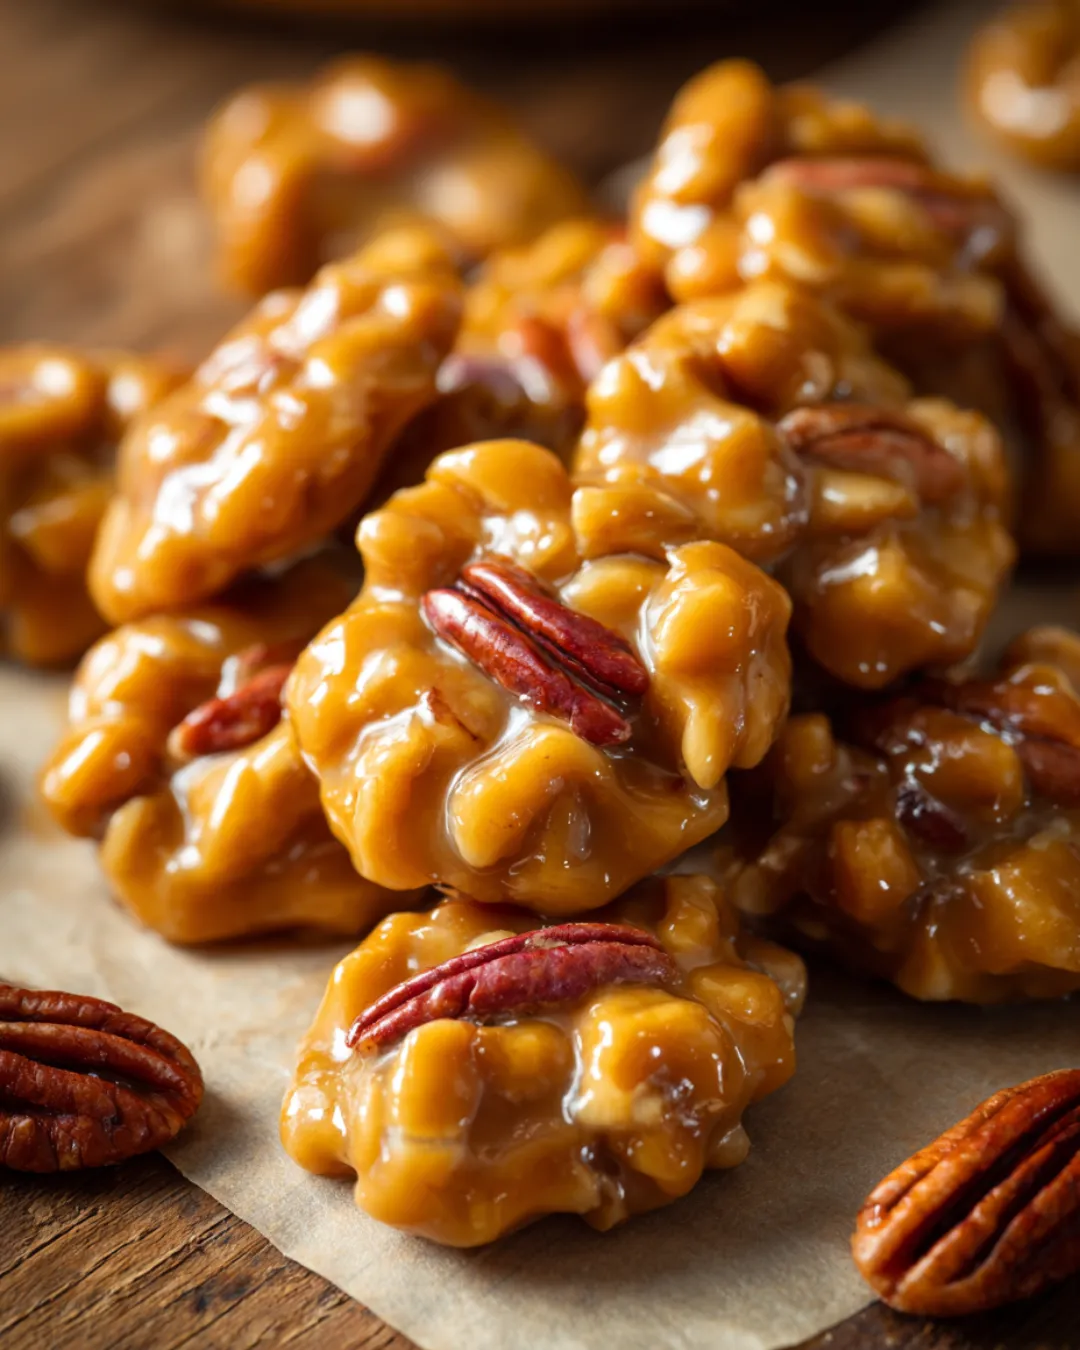
If you’ve ever strolled through the French Quarter in New Orleans, you’ve probably seen (and smelled!) trays of pecan pralines being sold by candy shops and street vendors. The sweet, nutty aroma fills the air, luring in anyone with a sweet tooth. Pecan pralines are more than just candy—they’re a piece of Louisiana history, a taste of Southern hospitality, and a tradition that has been passed down for generations.
This recipe for New Orleans pecan pralines captures the essence of that tradition. It’s simple enough for beginners but authentic enough to impress even the most seasoned praline lovers. In just about 20 minutes, you can whip up a batch of these melt-in-your-mouth treats that are perfect for holidays, gifts, or just indulging yourself with a little sweetness.
But before we dive into the recipe, let’s explore what makes pralines so special and why they’ve remained one of the South’s most beloved confections.
The History of Pecan Pralines

The story of pralines begins in 17th-century France, where sugar-coated almonds were prepared for aristocrats and special occasions. The treat was named after a French diplomat, César, Duke of Choiseul, Count du Plessis-Praslin, whose cook is said to have created the first praline. At that time, pralines were made with almonds or hazelnuts, coated in caramelized sugar.
When French settlers arrived in Louisiana, they brought their praline-making traditions with them. However, almonds weren’t readily available in the South. Instead, they found pecans, a nut native to the region and abundant along the Mississippi River. This substitution wasn’t just practical—it transformed the recipe into something uniquely Southern.
Over time, New Orleans pralines developed their own identity. Unlike the harder, crunchy European pralines, the Louisiana version became softer, creamier, and richer, thanks to the addition of butter and cream or milk. By the 19th century, pralines had become a staple sweet in the South, often sold by women on the streets of New Orleans, especially in the French Quarter.
Today, pralines symbolize more than just candy—they represent a blending of cultures, from French traditions to Native American ingredients and African-American culinary creativity. They’re a true testament to the diverse and flavorful history of Louisiana cuisine.
Why You’ll Love This Recipe
Let’s be honest—there are plenty of candy recipes out there. So why make pralines? The answer is simple: they’re unlike anything else you’ve ever tasted.
Here’s why this recipe is worth trying:
- Texture Perfection: These pralines strike the ideal balance between creamy and crunchy. The smooth, melt-in-your-mouth candy base contrasts beautifully with the nutty bite of fresh pecans.
- Quick and Easy: With only 20 minutes of cooking time and simple ingredients, this recipe doesn’t require hours in the kitchen or fancy equipment. A candy thermometer is helpful but not absolutely necessary if you know what to look for.
- Great for Gifting: Homemade pralines make thoughtful, delicious gifts. Package them in decorative tins, jars, or clear bags tied with ribbon, and you’ve got a present anyone will love.
- A Taste of Tradition: Every bite takes you straight to New Orleans, where pralines are part of the heartbeat of Southern culture.
- Customizable: Whether you like a little spice, an extra-creamy finish, or even a touch of chocolate, this recipe is easily adaptable.
Making pralines is not just about cooking—it’s about creating something that carries a story, a piece of culture, and a lot of heart.
Ingredients for Authentic Pecan Pralines
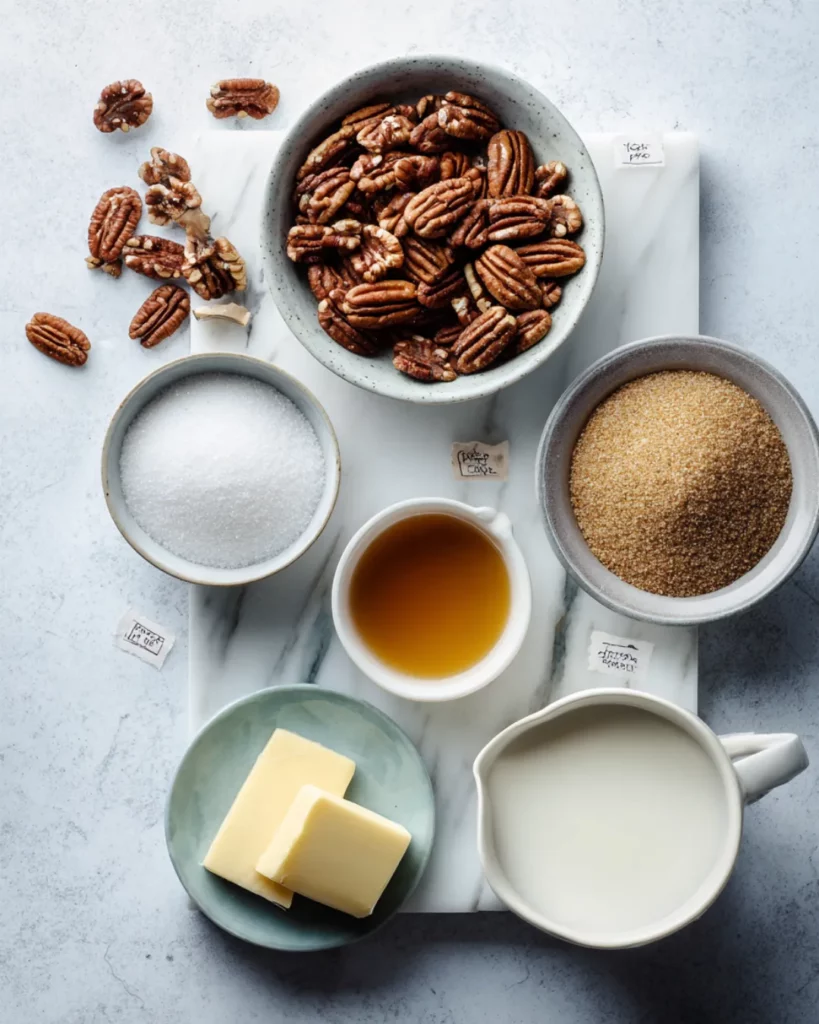
One of the best things about this recipe is how simple the ingredient list is. You probably already have most of these in your pantry, and the rest are easy to find. But don’t let the simplicity fool you—each ingredient plays an important role in achieving that authentic praline flavor and texture.
Here’s what you’ll need:
- 1 1/4 cups granulated sugar – Provides sweetness and structure.
- 1 1/4 cups light brown sugar – Adds depth, molasses notes, and a hint of chewiness.
- 1/4 teaspoon kosher salt – Enhances flavor and balances sweetness.
- 1 cup evaporated milk – Creates the creamy base.
- 1 stick (1/2 cup) unsalted butter – Adds richness and smoothness.
- 1 teaspoon pure vanilla extract – Brings warmth and aroma.
- 2 cups chopped pecans – The star ingredient, adding crunch and nutty flavor.
Sugar Selection
The combination of granulated sugar and brown sugar is what gives these pralines their signature taste. Granulated sugar ensures a firm structure, while brown sugar brings caramel-like undertones and a slightly chewy bite. Using only one type of sugar won’t give you the same balanced flavor.
Dairy Choices
Traditionally, evaporated milk is used to provide a creamy consistency without making the pralines overly soft. It has a concentrated richness that regular milk doesn’t quite match. Some recipes use heavy cream, which can make pralines richer but also softer. Butter is non-negotiable—it lends smoothness and that melt-in-your-mouth quality pralines are known for.
If you want to experiment, you could try substituting half the evaporated milk with heavy cream for an extra-luxurious texture. Just keep in mind that the cooking times might shift slightly.
Step-by-Step Instructions (with Pro Tips)
Now comes the fun part—cooking! Pralines may seem intimidating at first because they involve boiling sugar, but with careful attention and a few pro tips, you’ll be turning out perfect pralines in no time.
Let’s break it down step by step:
Step 1 – Prepping the Baking Sheets
Before you even think about turning on the stove, you’ll want to prepare your baking sheets. This step might feel unnecessary, but trust me—it’s absolutely essential. Once the praline mixture is ready, you won’t have time to scramble around for parchment paper or foil. The candy sets extremely fast, and any delay could leave you with hardened sugar stuck to your spoon instead of neatly shaped pralines.
Line two baking sheets with parchment paper, wax paper, or aluminum foil. Parchment is often the best option since pralines peel off easily once cooled. If you’re using foil, lightly greasing it with butter or nonstick spray will make removal easier. Place the sheets on a flat surface where they won’t be bumped or moved while the pralines are cooling.
Think of this step as laying out your runway—when the candy is ready to “land,” it needs a safe, prepared place. A little planning here makes the rest of the process smooth and stress-free.
Pro Tip: If your kitchen is very humid, consider placing the baking sheets in a cool, dry area. Humidity can sometimes affect how pralines set.
Step 2 – Boiling the Sugar Mixture
This is where the magic begins. In a heavy-bottomed pot (to ensure even heat distribution), combine the granulated sugar, brown sugar, kosher salt, and evaporated milk. Set the pot over medium-high heat and stir occasionally as the mixture warms.
As the sugar dissolves and the mixture begins to boil, you’ll notice it turning creamy and thick. The key here is patience—don’t rush by cranking up the heat. Candy-making is all about precision, and too much heat can lead to burnt sugar or crystallization.
You’ll want to cook the mixture until it reaches 230°F (110°C), which is known as the “thread stage” in candy-making. At this point, if you dip a spoon into the syrup and let it drip, it will form thin threads as it falls. This stage is crucial for setting the base texture of your pralines.
If you don’t have a candy thermometer, don’t worry. You can test the syrup by dropping a little into a glass of cold water—if it forms a thin thread before dissolving, you’re right on track.
Pro Tip: Stir occasionally, but not constantly. Too much stirring can cause sugar crystals to form, leading to a grainy praline instead of the smooth, creamy consistency you’re aiming for.
Step 3 – Adding Butter, Vanilla, and Pecans
Once your sugar mixture hits 230°F, it’s time to bring in the flavor boosters. Add the unsalted butter, vanilla extract, and chopped pecans all at once. This part requires constant stirring for about two minutes, ensuring everything blends smoothly.
The butter melts into the mixture, adding richness and silkiness. The vanilla enhances the flavor, giving the pralines their signature aroma, while the pecans start to toast gently in the hot syrup, releasing their oils and nutty fragrance.
This is when your kitchen will start to smell incredible—a mix of buttery sweetness with a warm, nutty backdrop. It’s the kind of smell that makes neighbors knock on your door just to see what you’re cooking.
Pro Tip: Use fresh pecans whenever possible. Stale or rancid nuts can ruin the flavor of your pralines. If you have time, lightly toast the pecans in the oven beforehand to enhance their flavor even more.
Step 4 – Cooking Until Thickened
Now comes the critical moment—the thickening stage. Continue cooking the mixture while stirring constantly, watching carefully as it reaches 240°F (115°C), also known as the “soft ball stage.”
At this point, the mixture will begin to thicken, and you’ll notice that as you stir, the bottom of the pot becomes visible before the candy mixture flows back to cover it. That’s your sign that the pralines are almost ready.
This stage requires focus. Cook too little, and your pralines will remain runny and won’t set properly. Cook too long, and they’ll harden into something closer to brittle. Finding the sweet spot takes practice, but once you get it, you’ll know exactly when to pull the pot off the heat.
Pro Tip: Don’t walk away at this stage, not even for a second. Sugar mixtures can go from perfect to overcooked in the blink of an eye. Keep stirring and keep your eyes on the thermometer or visual cues.
Step 5 – Scooping and Setting
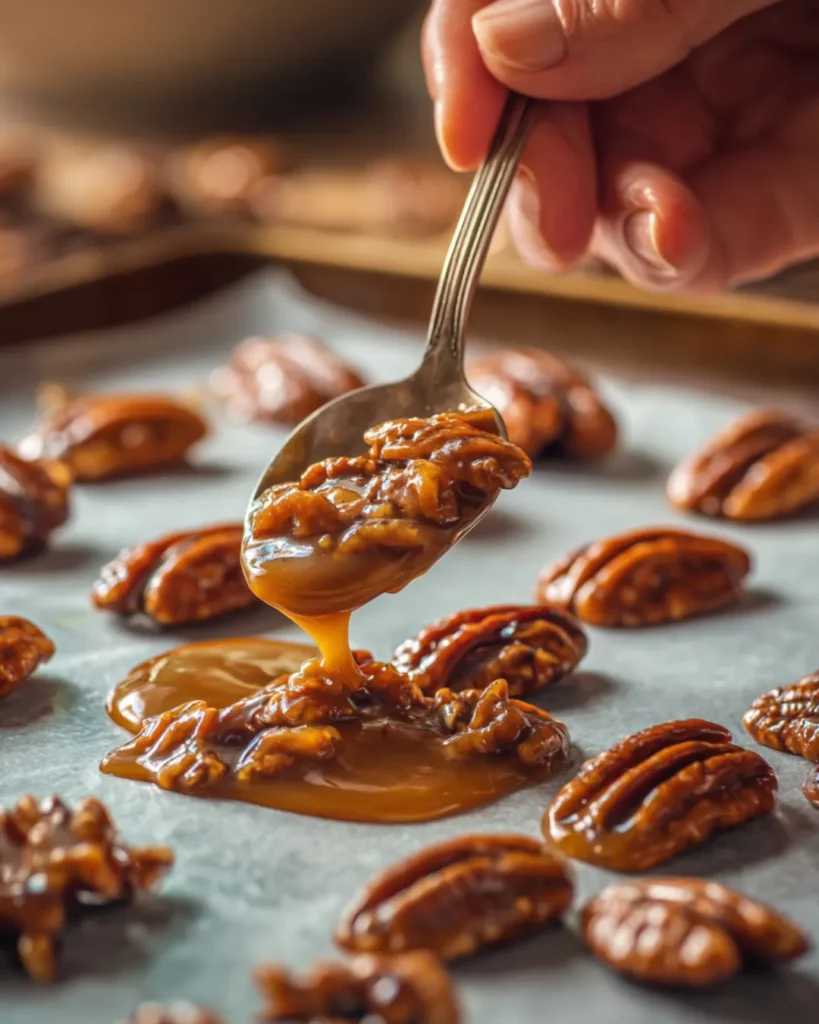
Now it’s time to move fast. Working quickly, use a spoon to drop heaping spoonfuls of the hot praline mixture onto your prepared baking sheets. The candy begins to set within minutes, so don’t pause to admire your work just yet—focus on scooping.
The shapes don’t need to be perfect. In fact, part of the charm of homemade pralines is their slightly rustic appearance. Each piece will look unique, but every bite will taste just as delicious.
If the mixture starts to thicken too much before you finish scooping, don’t panic. You can reheat it gently over low heat to loosen it up, but work carefully to avoid overcooking.
Pro Tip: Use two spoons—one for scooping and one for sliding the candy onto the sheet. This makes the process quicker and cleaner.
Step 6 – Cooling and Storing
Once your pralines are scooped, let them cool at room temperature for about 5–10 minutes. They’ll firm up as they cool, transforming from glossy dollops of syrup into creamy, nutty candies that are ready to enjoy.
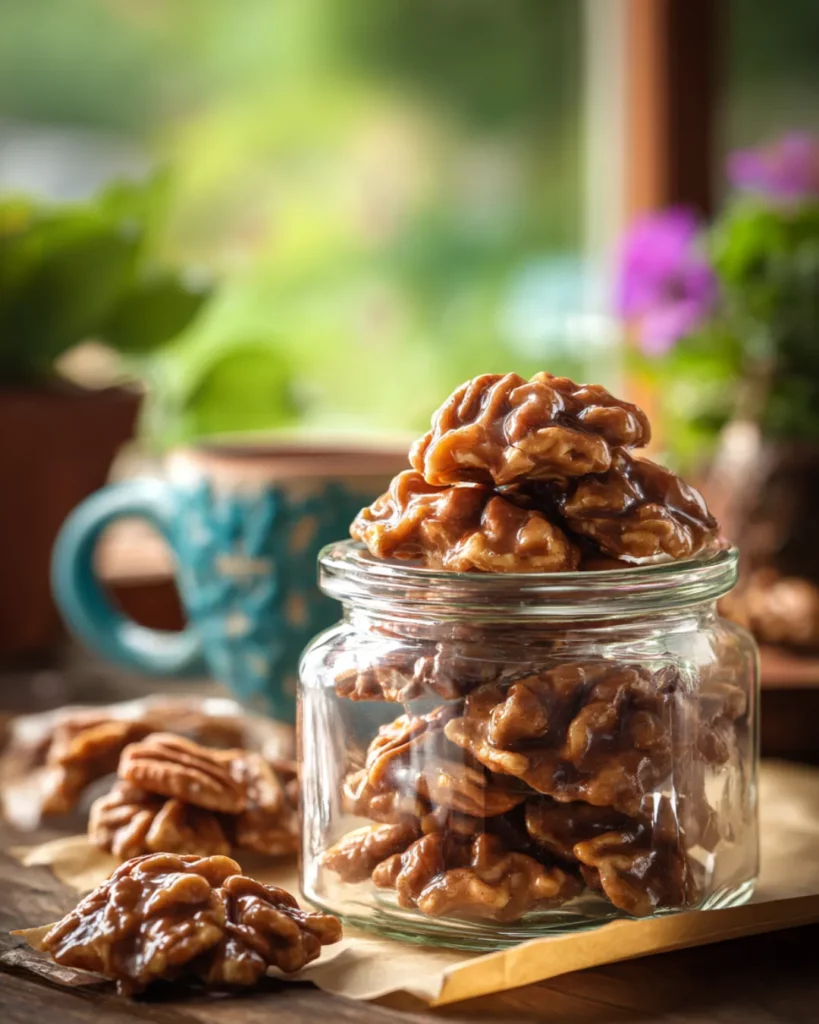
After they’ve set, transfer them to an airtight container. Pralines keep well at room temperature for up to a week, though they rarely last that long—they’re simply too irresistible. If you want to make a larger batch ahead of time, you can freeze pralines for up to two months. Just layer them with parchment paper to prevent sticking.
Pro Tip: For an elegant touch, wrap pralines individually in wax paper or place them in decorative tins. They make wonderful holiday gifts or party favors.
Expert Tips for Perfect Pecan Pralines
Making pralines is part art, part science. To help you avoid common pitfalls and get the best results every time, here are some expert tips:
- Use a reliable candy thermometer – Precision is key. Even a few degrees off can change the texture dramatically.
- Avoid stirring too much at the wrong times – Stirring during the initial boiling stage can cause sugar crystals to form, making the pralines grainy.
- Work quickly when scooping – Once the mixture is ready, it sets fast. Have your baking sheets ready and work with purpose.
- Mind the weather – Humidity can affect candy-making. On very damp days, your pralines may not set as well. If possible, make them on a dry day.
- Experiment with flavors – A pinch of cinnamon, nutmeg, or even a splash of bourbon can add a creative twist without losing authenticity.
With these tips, you’ll be making pralines like a pro in no time.

Flavor Variations You Can Try
One of the best things about pralines is how versatile they are. The classic recipe is always a winner, but sometimes you might want to put your own spin on it. Luckily, pralines are incredibly adaptable, and small tweaks can completely transform their flavor profile.
Here are some creative variations to try:
Cinnamon Spice Pralines
Adding just a pinch of cinnamon to the sugar mixture creates a warm, spiced praline that’s perfect for fall or holiday gatherings. The cinnamon enhances the nuttiness of the pecans while giving the pralines a cozy, festive vibe. You could also sprinkle a touch of cinnamon sugar on top before they set for extra flavor.
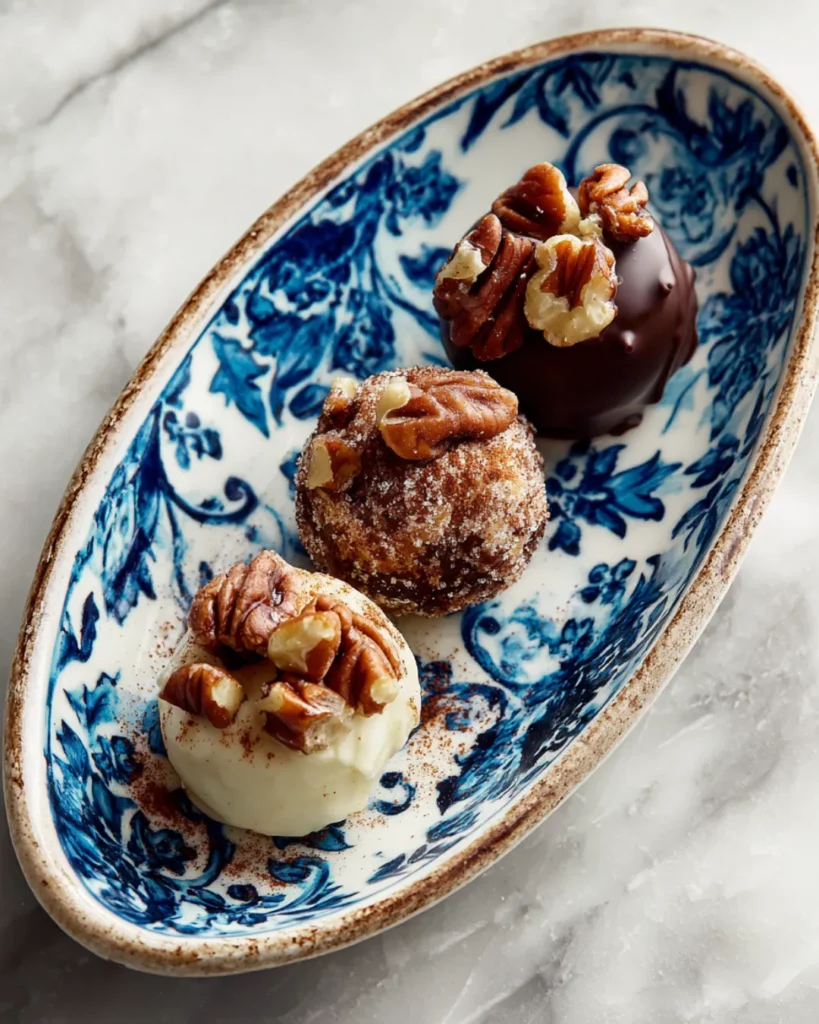
Cream Cheese Pralines
For an even creamier, tangier finish, stir in 1 tablespoon of cream cheese right before scooping. The cream cheese gives the pralines a soft, fudge-like consistency and a subtle tang that balances the sweetness beautifully. These tend to be softer than traditional pralines, so they’re best stored in the fridge if not eaten right away.
Chocolate-Dipped Pralines
Want to take pralines to the next level? Once they’re cooled, dip half of each praline in melted dark or milk chocolate. The bitterness of dark chocolate contrasts perfectly with the sweet, buttery praline, while milk chocolate creates a richer, creamier bite. Lay them back on parchment paper until the chocolate sets, and you’ll have pralines that look (and taste) like they came from a gourmet candy shop.
Bourbon Pralines
If you’re looking for a grown-up twist, stir in a splash of bourbon after removing the candy mixture from the heat. The alcohol burns off quickly, but the rich, smoky caramel notes of bourbon shine through, making these pralines a favorite for dinner parties or gifts.
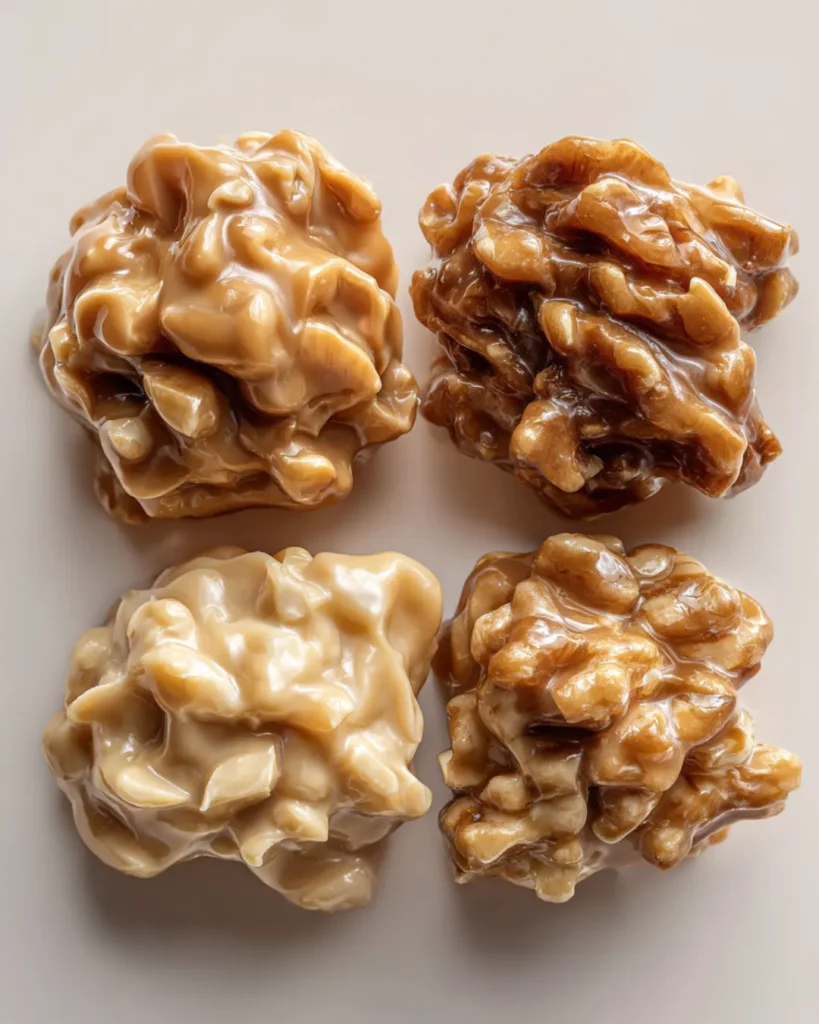
Nut Variations
While pecans are traditional, you can experiment with walnuts, almonds, or cashews. Each nut brings its own unique flavor and crunch. Just be mindful that pecans are softer than most nuts, so others may add a firmer texture.
Pro Tip: If you’re trying new flavors, test a small batch first. Candy-making is precise, and some variations can change the way pralines set.
Serving Ideas

Pralines are delicious straight from the baking sheet, but they can also be presented in fun and creative ways. Whether you’re making them for yourself, as a holiday treat, or as a gift, here are some serving ideas to inspire you:
Holiday Platters
Arrange pralines on a decorative platter alongside other Southern classics like pecan pie bars, fudge, or divinity candy. Their rustic appearance adds charm, and they’ll stand out on any dessert table.
Gift Packaging
Pralines make incredible homemade gifts. Wrap them individually in wax paper, place them in clear cellophane bags, and tie with ribbon for a festive touch. For a more elegant presentation, store them in small tins or glass jars. Not only are they thoughtful, but they also carry a little taste of New Orleans tradition.
Pairing with Coffee or Tea
Pralines are rich and sweet, making them a natural companion for a warm beverage. Enjoy them with coffee, espresso, or black tea to balance the sweetness. They also pair beautifully with herbal teas like chamomile for a lighter treat.
Party Favors
Hosting a wedding, shower, or birthday? Package pralines in small pouches with a custom tag or note. Guests will leave with a memorable, edible keepsake.
Dessert Topping
Crumble pralines over ice cream, cheesecake, or bread pudding for an indulgent topping. The crunch of the candy and the creamy desserts create an irresistible combination.
Storage and Shelf Life
Because pralines are sugar-based candies, proper storage is key to keeping them fresh and tasty. Luckily, they’re relatively easy to store if you follow a few simple guidelines.
- Room Temperature Storage: Place pralines in an airtight container, layering them with parchment paper to prevent sticking. They’ll stay fresh for about 5–7 days at room temperature.
- Refrigeration: If you live in a humid climate, storing pralines in the fridge may help them last longer. They’ll keep for up to 2 weeks this way. Be sure to bring them back to room temperature before serving for the best texture.
- Freezing: Pralines can be frozen for up to 2 months. Wrap each praline individually in wax paper, then place them in a freezer-safe container or bag. When you’re ready to enjoy, thaw them at room temperature.
Pro Tip: Avoid storing pralines in direct sunlight or near a heat source, as this can cause them to melt or lose their shape.
Troubleshooting Common Issues
Candy-making can be tricky, especially if it’s your first time. If something goes wrong, don’t worry—it happens to everyone. Here’s how to troubleshoot the most common praline problems:
Problem: Pralines Are Too Hard
This usually means the mixture was cooked too long or at too high a temperature. Next time, watch the thermometer closely and pull the pot off the heat as soon as it hits 240°F.
Problem: Pralines Are Too Soft or Runny
Undercooking is the likely culprit here. The mixture didn’t reach the right stage, so it didn’t firm up properly. If this happens, you can try reheating the batch and cooking it a little longer.
Problem: Grainy Texture
This happens when sugar crystals form in the mixture. To avoid it, don’t stir too much during the boiling stage and make sure your sugar is fully dissolved before the mixture comes to a boil.
Problem: Mixture Sets Too Quickly
If your pralines harden before you can scoop them all, you can gently reheat the pot over low heat to loosen the mixture again. Work quickly the second time.
Problem: Pralines Stick to the Paper
This can happen if the mixture was too thin when scooped. Next time, cook a little longer before removing from the heat. Greasing the parchment paper slightly can also help.
Remember—every batch of pralines teaches you something new. Even if they don’t look perfect, they’ll almost always taste amazing.
Nutritional Information (Per Serving)
Here’s a general breakdown of the nutritional content per praline (based on making about 24 pieces):
| Nutrient | Amount (Approx.) |
|---|---|
| Calories | 180–200 |
| Fat | 11g |
| Saturated Fat | 4g |
| Carbohydrates | 22g |
| Sugar | 20g |
| Protein | 1.5g |
| Fiber | 1g |
| Sodium | 50mg |
While pralines are definitely an indulgence, portion control makes all the difference. They’re rich, sweet, and satisfying, so one or two pieces go a long way in curbing your sweet tooth.
Pro Tip: If you’re watching your sugar intake, consider making smaller pralines so each serving has fewer calories while still delivering that signature flavor.
Why New Orleans Pecan Pralines Are So Special
When you bite into a New Orleans pecan praline, you’re not just enjoying candy—you’re experiencing a piece of Southern culture that’s been loved for centuries. These little treats are more than sugar and nuts; they’re a symbol of hospitality, tradition, and the unique blend of influences that shaped Louisiana cuisine.
Pralines are deeply woven into the fabric of New Orleans life. Walk through the French Quarter, and you’ll see shops proudly displaying trays of pralines in their windows. Street vendors often sell them wrapped in wax paper, offering a quick bite of sweetness to locals and tourists alike. It’s a treat that instantly connects you to the city’s charm, history, and warmth.
What makes New Orleans pralines different from candies you might find elsewhere? It’s the Southern touch. Pecans, native to the Mississippi River region, give pralines their signature crunch and earthy sweetness. The addition of butter and evaporated milk transforms the French-style praline into something richer, creamier, and unmistakably American. Unlike brittle, pralines don’t shatter; they melt in your mouth, leaving behind layers of nutty flavor.
They also carry a sense of nostalgia. For many Southerners, pralines are tied to holidays, Sunday dinners, and family gatherings. Grandmothers often pass down their praline recipes like family heirlooms, each with a slight twist that makes it uniquely theirs. Making pralines at home becomes a ritual—one that celebrates togetherness, patience, and joy.
Beyond tradition, pralines have become a culinary ambassador for Louisiana. Tourists often take boxes of pralines home as souvenirs, sharing a little piece of New Orleans with loved ones. They embody everything that’s special about Southern sweets: simple ingredients, bold flavors, and a story behind every bite.
So why are New Orleans pecan pralines so special? Because they’re not just a dessert—they’re an experience. They’re history, culture, and comfort wrapped in a sugary, nutty package.
Frequently Asked Questions About Pecan Pralines
1. Can I use other nuts instead of pecans?
Yes, but pecans give pralines their signature Southern flavor. Walnuts, almonds, or cashews can work as substitutes, though the texture and taste will be slightly different.
2. Do pralines need to be refrigerated?
No, pralines keep best at room temperature in an airtight container. If you live in a humid climate, refrigerating can help extend freshness.
3. Can I double the recipe?
Absolutely! Just make sure you use a large enough pot, as the sugar mixture bubbles up as it cooks. Stirring quickly and evenly becomes even more important with a bigger batch.
4. What’s the difference between pralines and brittle?
Pralines are creamy, soft, and melt-in-your-mouth, while brittle is hard, crunchy, and breaks into shards. The addition of milk and butter is what makes pralines creamier than brittle.
5. Can I make pralines without a candy thermometer?
Yes, but it’s trickier. Use the cold-water test: drop a little of the mixture into a glass of cold water—if it forms a soft ball or thread, you’re at the right stage. A thermometer ensures accuracy, but practice helps too.
Conclusion – Bring a Taste of New Orleans Home
Pralines aren’t just candy—they’re history, culture, and comfort all in one. With just a few simple ingredients and a little patience, you can bring the flavors of New Orleans right into your kitchen. Whether you’re making them for the holidays, as gifts, or just to satisfy a sweet craving, pralines are the kind of treat that makes people smile.
They connect us to traditions that stretch back centuries, while also offering plenty of room for creativity with flavors and variations. The beauty of pralines lies not only in their taste but in the memories they help create—around kitchen tables, holiday gatherings, and cozy evenings with loved ones.
So go ahead, try this recipe. Let the sweet, nutty aroma fill your home. Share a batch with family and friends. And in every bite, you’ll taste a little piece of New Orleans.
Print
New Orleans Pecan Pralines 🍬🌰✨
- Prep Time: 5 minutes
- Cook Time: 18 minutes
- Total Time: 33 minutes
- Category: “Dessert”, “Candy”
- Cuisine: Southern
Description
Sweet, nutty, and utterly irresistible! These classic New Orleans pralines melt in your mouth with that perfect creamy texture and a rich pecan crunch. A little taste of Southern magic in every bite! 💛
Ingredients
1 1/4 cups granulated sugar
1 1/4 cups light brown sugar
1/4 teaspoon kosher salt
1 cup evaporated milk
1 stick unsalted butter (1/2 cup)
1 teaspoon pure vanilla extract
2 cups chopped pecans
Instructions
Line two baking sheets with parchment paper, wax paper, or aluminum foil. Set aside. 📝
Prep Time: 5 minutesIn a heavy-bottomed pot over medium-high heat, combine granulated sugar, brown sugar, salt, and evaporated milk. Bring to a boil and cook until the mixture reaches 230°F (110°C), stirring occasionally—about 8 minutes. 🔥
Cooking Time: 8 minutesOnce the sugar mixture hits 230°F, add the butter, vanilla extract, and chopped pecans. Stir constantly for the next 2 minutes. 🥄
Cooking Time: 2 minutesContinue cooking and stirring until the mixture reaches 240°F (115°C) and begins to thicken. You’ll know it’s close when you can see the bottom of the pot as you stir. 👀
Cooking Time: 5 minutesWorking quickly, drop spoonfuls of the praline mixture onto the prepared baking sheets. The candy sets fast, so move fast once it’s ready. 🍬
Cooking Time: 3 minutes
Let pralines cool at room temperature for 5–10 minutes before serving or storing. Enjoy the sweet, nutty goodness! 😋
Cooling Time: 10 minutes
Notes
Tip: For a touch of spice, add a pinch of cinnamon. Want it creamier? Stir in 1 tablespoon of cream cheese before the final stage. Store in an airtight container to keep fresh. 💡
Nutrition
- Serving Size: 20-24
- Calories: 220
- Sugar: 26
- Sodium: 60
- Fat: 12
- Saturated Fat: 5
- Carbohydrates: 28
- Protein: 2
- Cholesterol: 15