It’s the season of twinkling lights, cozy sweaters, and peppermint everything—so what better way to celebrate than with a slice of No-Bake Candy Cane Pie? This creamy, dreamy dessert is cool, festive, and ridiculously easy to make. You don’t even have to touch the oven, which means more time sipping cocoa and watching Christmas movies.
Whether you’re hosting a big holiday dinner or just want to whip up something special to share with family and friends, this pie brings all the merry vibes to the table. Topped with crunchy crushed candy canes and nestled in a buttery graham cracker crust, it’s a showstopper without the stress. Let’s dig into the magic behind this irresistible peppermint treat.
Why This Recipe is a Holiday Winner
First of all, it’s no-bake—yes, really. That means no juggling oven space during the busiest cooking time of the year. Secondly, it’s peppermint-forward without being overpowering. That cooling, refreshing zing balances out the richness of the cream cheese and the fluffiness of the whipped cream beautifully.
It’s also totally customizable. Want a stronger mint flavor? Add a few more drops of peppermint extract. Looking for more color? A couple drops of red food coloring give it a pink peppermint swirl. It’s a dessert that’s just as fun to make as it is to eat.
Plus, have you seen how pretty it is? The crushed candy cane topping looks like snowflakes and confetti all in one—pure Christmas magic!
A Look at the Final Dessert (What to Expect)
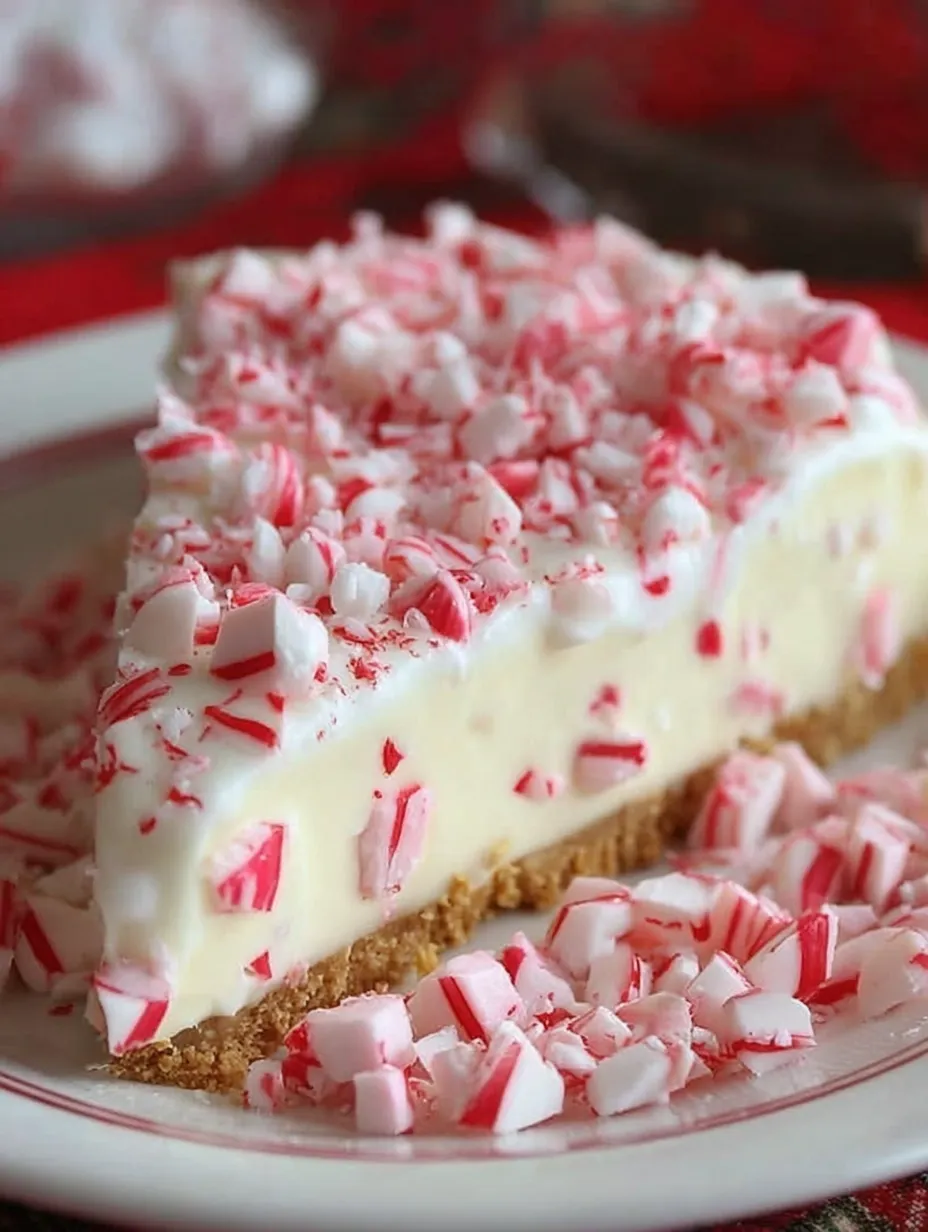
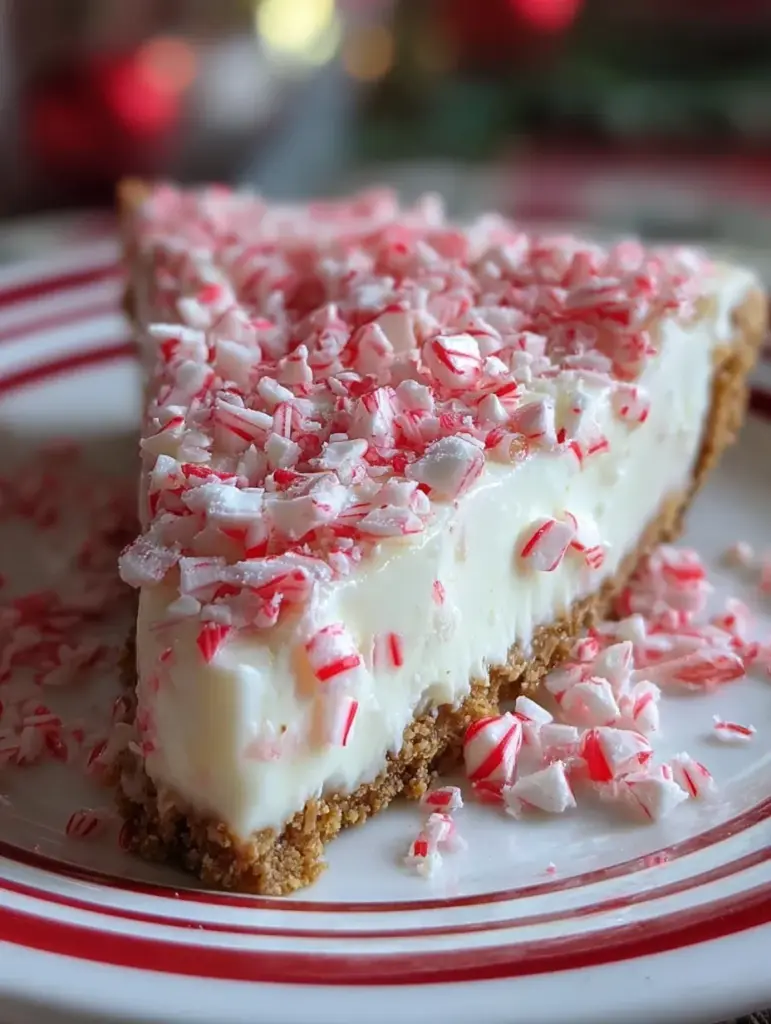
Just take a glance at that final masterpiece (yes, the one in the image you shared). That’s not just dessert. That’s holiday artwork on a plate.
The base? A solid graham cracker crust—golden brown and slightly crumbly, but sturdy enough to hold everything in. The filling? Fluffy, creamy, and snowy white with bits of red from the crushed candy canes. And the topping? A beautiful explosion of red-and-white candy pieces that sparkle like edible Christmas ornaments.
It’s cold, creamy, sweet, and minty—all the best parts of the season in a single slice.
Essential Ingredients
Graham Cracker Crust
This is your foundation. You can buy a pre-made one (easy and convenient), or crush graham crackers yourself and mix with melted butter for a homemade base. Either way, it brings a warm, toasty contrast to the cool, minty filling.
Cream Cheese & Sweetness
Cream cheese makes the pie rich and creamy. When blended with powdered sugar, it creates a cheesecake-like filling that’s not too sweet, but just right. Make sure the cream cheese is softened before you mix, or you’ll end up with lumps.
Whipped Cream: The Fluffy Secret
Homemade whipped cream is what gives this pie its dreamy, mousse-like texture. Don’t skip this step or swap for store-bought unless you’re in a super rush. Whipping it fresh means lighter, airier results.
Peppermint Extract: That Cool Kick
A teaspoon is all you need to transform the filling from plain vanilla to peppermint perfection. Be careful not to overdo it—peppermint extract is strong, and a little goes a long way.
Crushed Candy Canes: Crunch and Color
These are the festive jewels of the pie. They add texture, color, and that unmistakable candy cane flavor. You’ll fold them into the filling and sprinkle them generously on top. Just be sure to crush them right before use so they don’t get sticky.
Optional Add-Ons
- Red food coloring: For a pink swirl effect.
- Mini marshmallows: A fun topping if you’re into extra sweetness and texture.
- Whipped cream: For decorating the edges or layering on top before serving.
Step-by-Step Instructions
Step 1: Prepare the Cream Cheese Base
Start by beating the softened cream cheese in a bowl until it’s completely smooth. No lumps here—you want it as creamy as possible. Slowly add in the powdered sugar, mixing until fully incorporated. This is the sweet, tangy heart of your filling.
Step 2: Whip the Cream
In a separate bowl, whip the heavy cream until soft peaks form. If you’ve never done this before, it’s simple—just beat on medium-high until the cream starts holding shape but still looks soft and fluffy. Don’t overwhip, or it’ll turn grainy.
Gently fold the whipped cream into your cream cheese mixture. Folding (not stirring!) keeps the texture light and airy.
Step 3: Add in Peppermint and Festive Swirl
Now, add your peppermint extract and a few drops of red food coloring if you’re feeling festive. Swirl it gently—don’t overmix if you want that marbled candy cane effect. It adds a touch of whimsy that looks beautiful when you slice into the pie.
Step 4: Fold in the Candy Canes
Take your freshly crushed candy canes and fold them into the filling. This adds that signature peppermint crunch throughout. Save a bit to sprinkle on top later—it’s all about those finishing touches.
Step 5: Pour, Smooth, and Chill
Pour the creamy, minty mixture into your graham cracker crust. Use a spatula to smooth the top, then cover with plastic wrap and pop it in the fridge.
Let it chill for at least 4 hours, but overnight is even better. The flavors settle, the filling firms up, and the candy cane bits soften slightly for the perfect bite.
Step 6: Add the Magical Toppings
Just before serving, add a swirl of whipped cream, extra crushed candy canes, and mini marshmallows if you like. It’s the kind of dessert that brings smiles before the first bite.
Tips for Crushing Candy Canes Without the Mess
Crushing candy canes can be a sticky situation—literally. They tend to turn into a sugary mess if you don’t do it right. But don’t worry, there’s a trick to keeping things tidy and effective.
Here’s how to do it like a holiday baking pro:
- Use a zip-top freezer bag: Place unwrapped candy canes in a sturdy bag and seal it tightly.
- Wrap it in a towel: To prevent the bag from tearing or the pieces from shooting out.
- Smash with a rolling pin or meat mallet: Don’t go overboard. You want small chunks and bits—not peppermint dust (unless you’re into that).
- Do it right before using: Crushed candy canes get sticky as they sit out, so only prep them just before folding into your pie.
Pro Tip: If you’re using a food processor, pulse gently—don’t blend. You want that crunchy texture to show up in the pie and on top.
Chill Time: Why Patience Pays Off
Okay, we get it—you want to dive face-first into this pie as soon as it’s made. But this is one of those desserts where the fridge is your best friend.
Letting the pie chill for at least 4 hours (overnight is even better!) does a few magical things:
- It sets the filling so that when you slice it, it holds its shape.
- It softens the candy cane bits, blending their peppermint flavor into the creamy layers.
- It enhances the flavor, allowing the minty, creamy, and graham cracker notes to blend perfectly.
So yes, patience = delicious payoff. Think of it like letting the holiday spirit simmer. The longer it waits, the better it gets.
Serving Suggestions and Presentation Ideas
Want to make this dessert look as good as it tastes? Here are some easy ideas to present your candy cane pie like a festive masterpiece:
- Slice with a warm knife: Dip it in hot water, wipe, and slice. This gives you those clean, dreamy cuts.
- Serve on red or green plates: It makes the red-and-white topping pop.
- Top each slice with whipped cream and extra crushed candy canes: A little drama never hurt, especially during the holidays.
- Add fresh mint leaves or chocolate curls: For a gourmet twist without the effort.
Hosting a party? Pre-slice the pie and decorate each piece. Your guests will feel like they walked into a cozy bakery—but it’s all you.
Making it Ahead of Time (Holiday Host Hack)
If you’re juggling a full holiday menu (hello, turkey, ham, sides, drinks, and ten thousand cookies), this pie is here to save your sanity.
Make it 1–2 days in advance, store it in the fridge covered with plastic wrap, and just decorate it before serving. It actually gets better the longer it sits, thanks to the candy canes melting slightly into the filling.
Hosting tip: Pre-make two pies. One for the party. One for the fridge raid later. You’ll thank yourself.
Variations of Candy Cane Pie
Want to remix this peppermint perfection? Here are some fun ways to play with the recipe without losing the spirit of the dessert:
Chocolate Peppermint Twist
- Add 1/2 cup melted semi-sweet chocolate to the cream cheese mixture.
- Use an Oreo crust instead of graham cracker.
- Garnish with chocolate chips and crushed peppermint.
Mini Pie Versions
- Use mini graham cracker crusts (available in most stores).
- Pipe filling into each and chill.
- Decorate individually for party-friendly treats.
Vegan/Dairy-Free Version
- Use dairy-free cream cheese and coconut cream (whipped) as substitutes.
- Opt for a vegan graham cracker crust.
- Check that your candy canes are gelatin-free.
Everyone deserves a slice of joy, no matter their dietary needs.
Storage Tips: How Long Does It Last?
You made a masterpiece—now let’s keep it fresh.
- Fridge: Store covered in the refrigerator for up to 5 days. Use plastic wrap or a sealed container.
- Freezer: Yep, you can freeze it! Wrap it tightly in plastic wrap and foil. Store for up to 2 months. Thaw in the fridge overnight before serving.
Just be mindful: candy canes may get a little sticky in the fridge over time, so if you’re making it ahead, add toppings just before serving for best texture.
Print
No-Bake Candy Cane Pie
- Prep Time: 10 minutes
- Total Time: 4 hours 10 minutes
- Category: No-Bake Dessert / Holiday Dessert
Description
🎄 A creamy, peppermint-packed holiday delight! ❄️😍 This festive dessert is cool, refreshing, and bursting with candy cane magic—perfect for Christmas gatherings and sweet holiday moments. 🍬✨
Ingredients
1 pre-made graham cracker crust
8 oz cream cheese, softened
1 cup powdered sugar
1 cup heavy whipping cream
1 tsp peppermint extract
1/2 cup crushed candy canes (reserve some for topping)
1/2 cup mini marshmallows (optional, for topping)
Red food coloring (optional, for a festive swirl)
Whipped cream (for topping)
Instructions
Beat the softened cream cheese until smooth, then gradually add powdered sugar and mix until creamy. (⏱️ 3 minutes)
Whip the heavy cream in a separate bowl until soft peaks form, then gently fold it into the cream cheese mixture. (⏱️ 4 minutes)
Add peppermint extract and a few drops of red food coloring for a holiday swirl, mixing gently. (⏱️ 1 minute)
Fold in the crushed candy canes, reserving a bit for the topping. (⏱️ 1 minute)
Pour the filling into the graham cracker crust and smooth the top. (⏱️ 2 minutes)
Refrigerate for at least 4 hours, or overnight for a firmer set. (⏱️ 4 hours)
Before serving, top with whipped cream, reserved crushed candy canes, and mini marshmallows for a festive finish. (⏱️ 2 minutes)
Notes
Perfect make-ahead Christmas pie
Peppermint lovers’ dream — light, creamy, festive
Ideal for holiday parties and winter gatherings
No baking required, quick prep with simple ingredients
Nutrition
- Serving Size: 8 slices
- Calories: 380 kcal (approx.)
What to Serve With Candy Cane Pie
This pie is fantastic on its own, but if you want to elevate dessert hour, pair it with:
- Hot cocoa with whipped cream and a candy cane stirrer
- Peppermint mocha for the caffeine crowd
- A glass of cold milk (Santa-style)
- Espresso shots for an after-dinner pick-me-up
- Fresh berries on the side for a color contrast
Make it a whole peppermint party—you deserve it!
Troubleshooting Common Mistakes
Even no-bake pies can throw a curveball now and then. Let’s tackle a few common hiccups:
- Filling too runny? Your whipped cream wasn’t stiff enough or the pie didn’t chill long enough. Try chilling overnight next time.
- Lumpy filling? Cream cheese wasn’t softened enough before mixing. Beat it solo first before adding sugar or cream.
- Candy canes melted too much? Add them closer to serving time next time. They tend to dissolve a bit if mixed too early.
- Crust falling apart? If making your own crust, make sure to use enough melted butter to bind the crumbs.
Remember, even a “flawed” pie tastes amazing. Just call it rustic and serve with confidence.
Similar recipes :
Ultimate Nutter Butter Pie Recipe: A Peanut Butter Lover’s Dream Come True
Heavenly No-Bake Mini Key Lime Pies: A Refreshing Bite of Tropical Bliss
Why This Pie is Perfect for Kids to Help With
If your little elves want to help in the kitchen, this pie is a great starter project. No heat, no sharp knives, no stress.
They can:
- Crush the candy canes (great for letting out excitement!)
- Mix the filling
- Decorate the top with marshmallows, sprinkles, whipped cream, and more
- Lick the spoon (obviously)
It’s not just dessert—it’s holiday memory-making in action.
Holiday Magic in Every Bite: Final Thoughts
No-bake Candy Cane Pie is more than just a dessert—it’s a celebration on a plate. It’s easy enough for a weekday whim, festive enough for a Christmas centerpiece, and customizable enough to become your family’s newest tradition.
It looks like you spent hours making it, but only you (and maybe your sous chef kids) will know just how simple it really was.
So whip it up, chill it out, and serve it with a smile. Because nothing says “happy holidays” quite like a creamy slice of peppermint bliss.
You may alsolike : No-Bake Butterscotch Pie
FAQs
1. Can I use Cool Whip instead of homemade whipped cream?
Yes, you can. It saves time, but the texture will be a bit denser. If using Cool Whip, use about 2 cups.
2. Do I have to use red food coloring?
Nope! It’s totally optional. It just adds a festive pink hue. Leave it out if you prefer a classic white filling.
3. How far in advance can I make this pie?
Make it up to 2 days ahead. Store covered in the fridge, and decorate just before serving.
4. Can I add other flavors besides peppermint?
Absolutely. Try a drop of vanilla or almond extract for a different twist. Or even swirl in some melted chocolate.
5. What if I don’t have a premade crust?
You can make your own using 1 ½ cups crushed graham crackers, ⅓ cup sugar, and 6 tablespoons melted butter. Mix, press into a pan, and chill before filling.