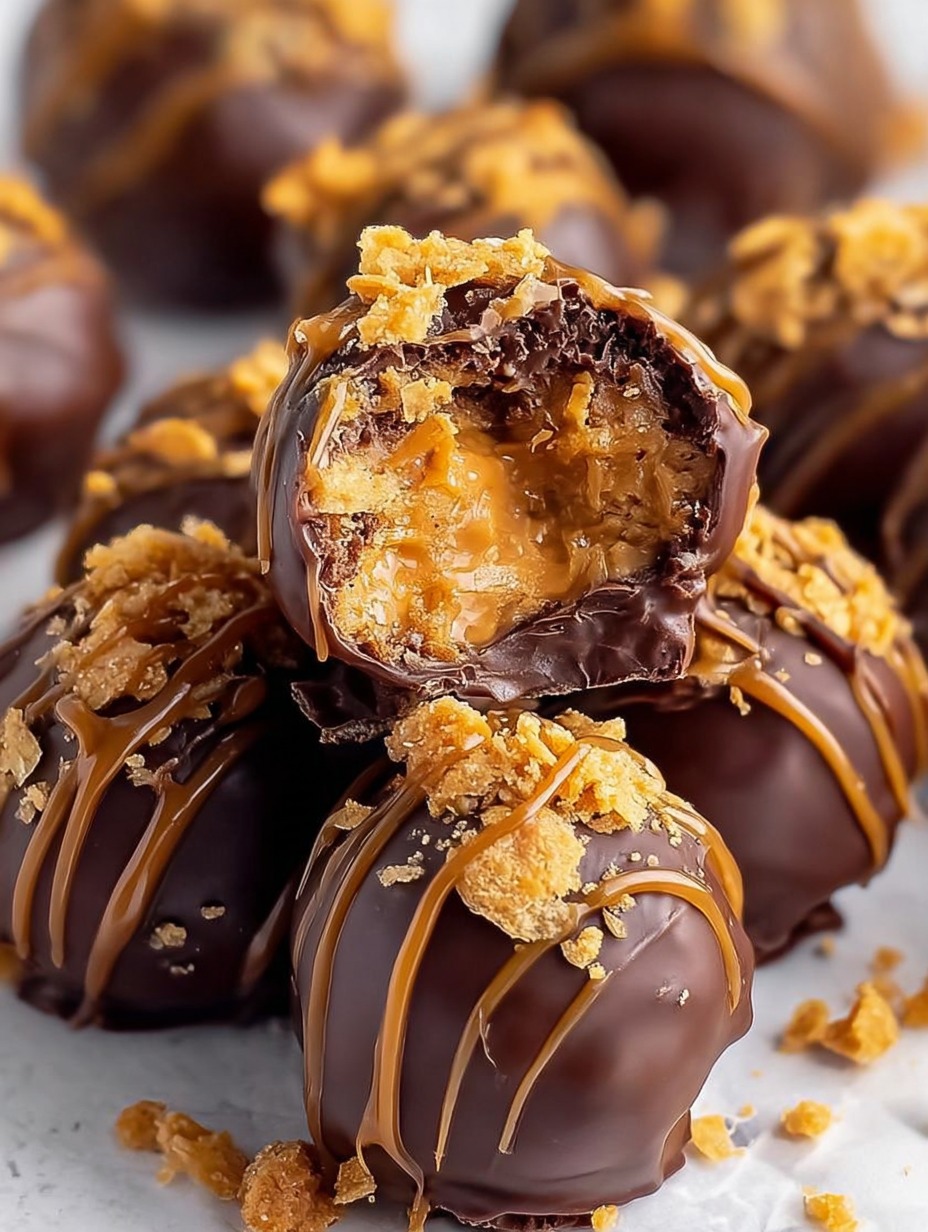
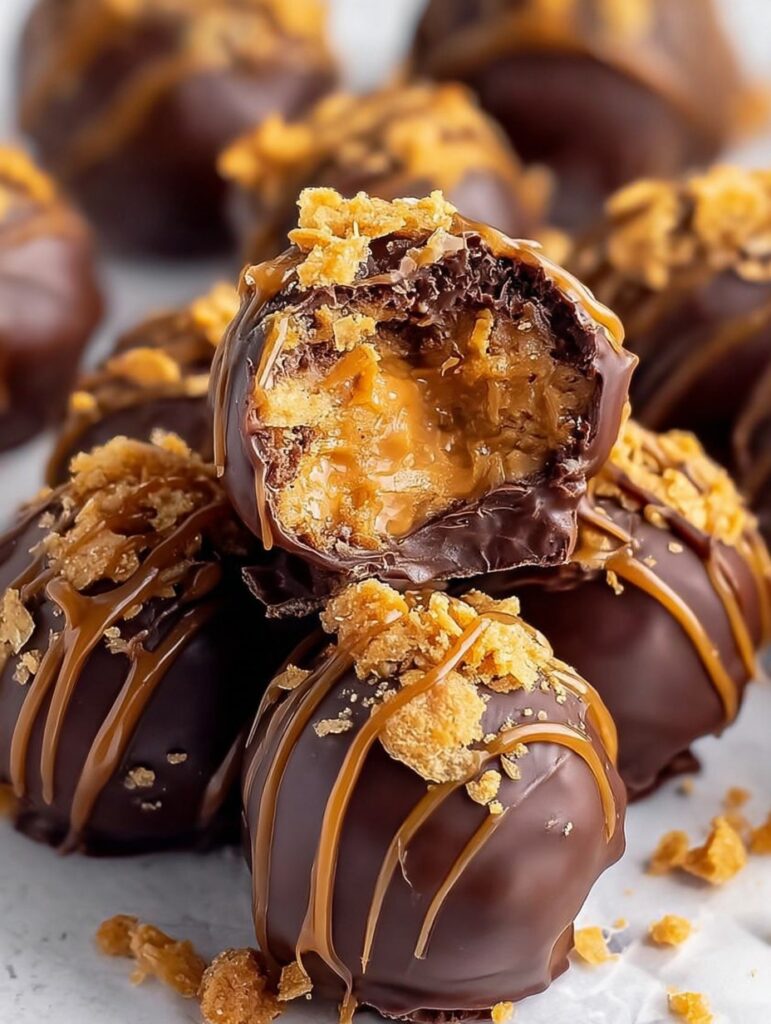
There are desserts that satisfy your sweet tooth—and then there are desserts that make your taste buds dance. These No Bake Caramel Crunch Butterfinger Truffles fall squarely in the second category. Imagine the perfect combination of creamy caramel, crunchy Butterfinger pieces, and rich chocolate coating—all rolled into one delicious bite-sized truffle. The best part? You don’t even need to turn on your oven.
Let’s dive into the sweet magic of this easy, crowd-pleasing treat that’s guaranteed to disappear faster than you can make them.
A Sweet Treat That Melts Hearts Instantly
Ever find yourself craving something rich and chocolatey but don’t want to spend hours baking? These truffles are your answer. They’re smooth, gooey, crunchy, and oh-so-decadent. The buttery caramel and chocolate combo instantly gives that candy shop vibe, but you get to enjoy it right from your kitchen.
This recipe isn’t just for seasoned bakers—it’s perfect for beginners or anyone who loves quick, no-fuss desserts. Whether you’re prepping for a holiday gathering, a movie night, or just need a midweek treat, these Butterfinger Caramel Truffles will become your go-to indulgence.
Why These Truffles Are a Must-Try
Because they’re no-bake, rich in texture, and bursting with flavor. Each truffle packs a delightful crunch from Butterfingers, balanced by the smoothness of cream cheese and caramel. You get a perfect bite every single time.
Plus, they look like something straight out of a gourmet dessert shop—shiny chocolate coating, caramel drizzle, and a sprinkle of Butterfinger crumbs on top. Yep, total eye candy.
The Perfect Blend of Crunch, Caramel, and Creaminess
What sets these truffles apart is the contrasting textures—a bit of crispness from the crushed candy, a smooth caramel center, and that thick chocolate shell that snaps when you bite into it. It’s like the perfect marriage between candy and cheesecake, all wrapped in one bite.
Ingredients You’ll Need for Butterfinger Bliss
Before diving into the fun part (the rolling and dipping!), let’s get to know our ingredients. Each one has a role to play in crafting these little bites of perfection.
Star of the Show – Butterfinger Candy Bars
The crushed Butterfingers give that iconic crunch and peanut-buttery flavor that everyone loves. You’ll need 1½ cups of crushed bars. For best results, place the Butterfingers in a zip-lock bag and crush them with a rolling pin until you have small chunks—not powder. You want that textural contrast!
The Gooey Goodness of Caramel Sauce
Use ½ cup of caramel sauce for the truffle filling, plus a bit extra for drizzling. The caramel binds everything together while adding that luscious gooeyness you see oozing in the photo. You can use homemade caramel or store-bought—just make sure it’s thick and buttery.
The Creamy Base – Softened Cream Cheese
The secret ingredient that gives these truffles their smooth, creamy texture. Use 8 oz of softened cream cheese, and let it sit at room temperature before mixing. This ensures a silky blend with the other ingredients.
Sweet Balance – Powdered Sugar & Vanilla Extract
A cup and a half of powdered sugar adds the right amount of sweetness and structure to your filling. The 1 teaspoon of vanilla extract deepens the flavor, making it taste like you’ve spent hours perfecting the recipe.
Crunchy Contrast – Crushed Graham Crackers
Just ¼ cup of crushed graham crackers goes a long way. They add a buttery, cookie-like base that enhances the flavor of the truffles while balancing the sweetness.
The Final Touch – Melted Chocolate Chips
A dessert isn’t complete without chocolate, right? You’ll need ½ cup of chocolate chips, melted to glossy perfection for dipping. Use either milk or semi-sweet chocolate—depending on how rich you want your truffles to be.
Step-by-Step Guide to Make No Bake Caramel Crunch Butterfinger Truffles
Let’s break it down into easy steps so you can recreate that drool-worthy photo right in your kitchen.
Step 1: Prepare the Truffle Filling
Start by combining the crushed Butterfingers, softened cream cheese, powdered sugar, vanilla extract, and caramel sauce in a large bowl. Mix until the texture is smooth but still slightly chunky from the candy pieces.
The goal is to create a dough-like consistency that holds together when rolled. If it’s too soft, refrigerate for 10–15 minutes before shaping.
Here’s a tip: use a stand mixer or hand mixer to make the blending faster and smoother.
Step 2: Shape the Truffles
Scoop out about a tablespoon of the mixture and roll it between your palms to form small, bite-sized balls—about an inch each. Place them on a parchment-lined baking sheet.
Try to keep them uniform in size for even coating later. It’s okay if they’re not perfectly round; the chocolate will smooth them out.
Step 3: Chill the Truffles
Once all your truffle balls are rolled and ready, it’s time to let them firm up in the fridge. This step is essential because it ensures your truffles hold their shape when you dip them in warm melted chocolate later. Place the tray in the refrigerator for at least 30 minutes or, if you’re in a hurry, pop them into the freezer for about 15–20 minutes.
When chilled properly, the centers will be soft but not sticky—just the right consistency for dipping. This also makes them easier to handle, giving you that perfect round truffle finish.
If you’re planning to make them ahead, you can even chill them overnight. Just make sure they’re covered tightly with plastic wrap to prevent any moisture from affecting their texture.
Here’s a little insider trick: if you want a slightly firmer, more candy-like center, mix in an extra tablespoon of crushed graham crackers before chilling. It’ll give your truffles a balanced crunch while keeping that melt-in-your-mouth smoothness.
Step 4: Coat with Chocolate
Now comes the most satisfying part—coating your truffles in rich, melted chocolate.
Place your ½ cup of chocolate chips in a microwave-safe bowl. Heat them in 20-second intervals, stirring after each until the chocolate is fully melted and glossy. Be careful not to overheat; chocolate burns easily and can turn grainy. You want it smooth and pourable.
Take your chilled truffles out of the fridge, and using a fork or a dipping tool, gently lower each one into the melted chocolate. Roll it around until it’s fully coated, then lift it out, allowing the excess chocolate to drip off.
Set each coated truffle back on the parchment-lined tray. Don’t worry if they’re not perfect—remember, once you drizzle that caramel and sprinkle extra Butterfinger crumbs, they’ll look stunning.
Pro Tip: For a richer shell, you can double-dip them. Just let the first layer set completely, then coat again in another layer of melted chocolate.
Step 5: Drizzle, Set, and Serve
Now it’s time to add that chef’s kiss finishing touch. Drizzle your truffles with extra caramel sauce, and sprinkle a few crushed Butterfinger pieces on top for that irresistible crunch.
Refrigerate them again for another 20–30 minutes, or until the chocolate has completely hardened. When they’re ready, the shell will have a beautiful shine and a delicate snap when bitten into.
Once set, you can transfer them into mini cupcake liners or decorative boxes if you’re gifting them. If serving at a party, arrange them on a dessert platter with a drizzle of caramel zigzagged across the plate—it’ll look straight out of a bakery display!
Storage Tip: Keep your truffles in an airtight container in the refrigerator for up to 7 days. You can also freeze them for up to a month. Just let them thaw in the fridge before serving.
Tips and Tricks for Perfect Butterfinger Truffles Every Time
Want to make your truffles look and taste flawless? Here are a few expert tips to elevate your dessert game.
Texture Tips for the Best Bite
The magic of these truffles lies in the balance of creamy and crunchy. If your mixture feels too sticky, add a tablespoon of crushed graham crackers. If it’s too dry, drizzle in a little more caramel sauce. Adjusting the consistency ensures the truffles are easy to shape and don’t fall apart during dipping.
When crushing your Butterfingers, aim for small chunks rather than powder—tiny bits add that satisfying crunch that contrasts beautifully with the smooth filling.
Chocolate Coating Secrets
The key to a silky chocolate shell? Temperature and patience. Always melt chocolate in short bursts and stir continuously. Adding a teaspoon of coconut oil or shortening to your melted chocolate helps it stay smooth and shiny.
Also, make sure your truffles are cold before dipping. Warm truffles can melt or crack the coating.
Storage and Make-Ahead Options
These truffles are the ultimate make-ahead dessert. You can prepare them several days before your event, and they’ll still taste freshly made. Store them in an airtight container, with parchment paper between layers to prevent sticking.
For gifting, place them in a small box with cupcake liners and tie it with a ribbon—they make for a luxurious homemade treat!
Print
No Bake Caramel Crunch Butterfinger Truffles
- Prep Time: 20 minutes
- Total Time: 1 hour 20 minutes
- Category: Dessert
Description
These No Bake Caramel Crunch Butterfinger Truffles are pure dessert bliss — creamy, crunchy, and loaded with caramel and chocolate goodness! Perfect for holidays, parties, or whenever your sweet tooth calls. Each bite delivers the perfect mix of smooth cheesecake filling, buttery caramel, and crispy Butterfinger crunch. 😍✨
Ingredients
1 ½ cups crushed Butterfinger candy bars
½ cup caramel sauce (plus extra for drizzling)
8 oz cream cheese, softened
1 ½ cups powdered sugar
1 tsp vanilla extract
¼ cup crushed graham crackers
½ cup chocolate chips (for coating)
Instructions
In a large mixing bowl, combine crushed Butterfingers, cream cheese, powdered sugar, vanilla extract, and caramel sauce. Stir well until everything is smooth, creamy, and fully combined.
Scoop and roll the mixture into small bite-sized balls (about 1 inch each). Place them on a baking sheet lined with parchment paper.
Refrigerate for at least 30 minutes, or until firm enough to coat easily.
Melt the chocolate chips in a microwave-safe bowl in 20-second intervals, stirring between each until smooth.
Dip each chilled truffle into the melted chocolate until coated. Place them back on the parchment paper and drizzle extra caramel sauce on top for that irresistible finish.
Refrigerate for 20–30 minutes more, or until the chocolate shell hardens. Then, take a bite and enjoy the magic!
Notes
Make these ahead of time — they store beautifully in an airtight container for up to 1 week in the fridge.
Perfect for gift boxes, dessert trays, or a sweet midnight snack. These will vanish fast — so maybe make a double batch! 😉
Nutrition
- Serving Size: 18 truffles
- Calories: 210 kcal
Creative Variations and Add-Ons
What’s great about this recipe is its flexibility. Once you master the base, you can experiment with different flavors and toppings.
Try It with Other Candy Bars
Swap out the Butterfingers for Snickers, Twix, or Crunch bars for an entirely new twist. Each candy brings its own flavor profile—Snickers adds nuttiness, Twix gives a cookie crunch, and Crunch bars bring extra chocolatey crispiness.
Make It Holiday-Themed
Want to make these festive? Add a sprinkle of crushed peppermint candies for Christmas, or drizzle them with orange and black chocolate for Halloween. During Valentine’s Day, use pink and white chocolate with heart-shaped sprinkles—it’s a guaranteed crowd-pleaser.
Add a Touch of Sea Salt or Nuts
For that high-end, gourmet touch, sprinkle a pinch of flaky sea salt over the caramel drizzle. The salty-sweet combo takes these truffles from delicious to divine. You can also roll them in crushed peanuts or toasted almonds before the chocolate sets for a nutty crunch.
You may read also :
Butterfinger Caramel Crunch Pie: A No-Bake Dream Dessert
Butterfinger Caramel Crunch Mini Pies – Bite-Sized Bliss in Every Bite
Butterfinger Pie – The No-Bake Dessert Dream
Why You’ll Fall in Love with These No Bake Truffles
These No Bake Caramel Crunch Butterfinger Truffles aren’t just dessert—they’re an experience. From the moment you bite through the glossy chocolate shell to the creamy caramel center, every flavor and texture works in harmony.
Effortless Preparation – No Oven, No Problem
You don’t need baking skills, special equipment, or even an oven. If you can mix, roll, and dip, you can make these truffles. It’s a beginner-friendly recipe that delivers professional-level results every time.
The Irresistible Flavor Combination
Butterfingers + caramel + chocolate = dessert heaven. The peanut-buttery crunch of Butterfingers melds with the smooth caramel and tangy cream cheese, creating a rich, balanced flavor that isn’t overly sweet but deeply satisfying.
Perfect for Gifting or Party Platters
These truffles look beautiful and taste even better. Pack them in pretty boxes for holiday gifts, serve them on a dessert table, or bring them to potlucks—they’ll vanish in minutes. People will beg for the recipe (and you’ll look like a dessert pro).
Nutritional Insights (Because Curiosity Matters)
We all know that these truffles are pure indulgence—but hey, a little sweetness now and then is good for the soul. While they’re not exactly diet food, understanding what goes into them helps you enjoy them more mindfully.
Sweet but Worth Every Bite
Each truffle delivers an irresistible punch of flavor, with a mix of chocolate, caramel, and peanut-buttery crunch. On average, one truffle contains around 180–220 calories, depending on its size and the amount of chocolate coating. Most of the calories come from the chocolate and Butterfinger pieces, which means you’re getting a dessert that’s rich, decadent, and totally satisfying in just one or two bites.
If you want to make a slightly lighter version, you can:
- Use light cream cheese instead of regular.
- Substitute dark chocolate for the coating (it’s less sugary and higher in antioxidants).
- Swap out a small portion of powdered sugar for a natural sweetener like stevia or monk fruit.
You’ll still get the same creamy, caramel crunch, but with fewer calories—because balance is key!
Portion Control Tips
Let’s be honest—it’s hard to eat just one. But since they’re bite-sized, you can easily manage your portions by storing them in small batches. Instead of placing all truffles on the counter, keep a few out and store the rest in the fridge.
If serving at a party, arrange them on a tray with toothpicks. This not only looks elegant but also helps guests enjoy one at a time without overindulging.
Serving Suggestions for Maximum Enjoyment
The beauty of these truffles is that they fit every occasion. From casual snacks to elegant parties, they’re versatile enough to suit any mood.
Pair It with Coffee, Milk, or Hot Chocolate
There’s nothing better than pairing these truffles with a warm beverage. The creamy caramel and chocolate flavors come alive when enjoyed with:
- A steaming cup of coffee or espresso – the bitterness balances the sweetness perfectly.
- A glass of cold milk – classic and refreshing.
- A mug of hot chocolate – for an ultra-luxurious, chocolate-on-chocolate experience.
You can even crush one truffle into a cup of hot milk and stir—it melts into a rich, creamy caramel drink.
Presentation Ideas for Parties or Gifts
Presentation matters, especially when you’ve created something this stunning. Arrange your truffles in mini paper cups or small gift boxes lined with tissue paper. Tie it with a ribbon for a charming, homemade touch.
For party platters, drizzle a bit of caramel and melted chocolate over the serving dish before placing the truffles on top. Then, sprinkle extra crushed Butterfingers for a professional finish. Guests will think you bought them from a high-end bakery.
Want to impress someone? Pack six truffles in a box, wrap it with a satin bow, and attach a small note: “Made with love (and Butterfingers).”
Common Mistakes to Avoid When Making Truffles
Even though these truffles are beginner-friendly, a few small mistakes can affect their texture or appearance. Let’s make sure yours turn out picture-perfect every time.
Over-Mixing or Under-Chilling
One common issue is over-mixing the filling. When you blend the cream cheese and caramel too long, the mixture can become overly soft and sticky. To fix this, refrigerate the dough until it firms up before rolling.
Another pitfall is skipping the chilling step. The truffles need to be cold before dipping in chocolate—otherwise, they might melt or lose shape in the warm coating.
Always remember: patience pays off. The more time they chill, the better the texture and finish will be.
Thick or Uneven Chocolate Coating
If your chocolate coating ends up too thick or lumpy, it’s usually because the chocolate wasn’t melted properly or the truffles were too warm when dipped.
Fix it by:
- Adding a teaspoon of coconut oil to the melted chocolate to make it thinner and glossier.
- Rolling each truffle gently with a fork to remove excess chocolate before setting it down.
- Making sure your truffles are cold but not frozen solid—frozen ones can crack the coating.
For an extra glossy finish, refrigerate them immediately after dipping so the shell sets evenly and smooth.
Conclusion – A Bite of Heaven in Every Truffle
And there you have it—No Bake Caramel Crunch Butterfinger Truffles, your new favorite dessert for every occasion. These truffles combine everything we love about sweet treats: creamy, crunchy, chocolatey, and utterly irresistible.
They’re incredibly easy to make, yet look and taste like something out of a gourmet confectionery shop. Whether you’re whipping them up for a holiday party, surprising someone special, or simply treating yourself after a long day, these truffles deliver pure joy in every bite.
Each mouthful gives you that buttery caramel center, a satisfying crunch from the Butterfingers, and a silky chocolate coating that melts perfectly on your tongue. The best part? No baking required—just mix, roll, dip, and chill.
So go ahead—grab your ingredients, put on your apron, and make these truffles happen. You’ll thank yourself (and so will anyone lucky enough to try them).
FAQs About No Bake Caramel Crunch Butterfinger Truffles
1. Can I freeze Butterfinger truffles?
Yes! These truffles freeze beautifully. Just store them in an airtight container with parchment paper between layers. When you’re ready to enjoy, let them thaw in the refrigerator for about 30–45 minutes.
2. How long do Butterfinger truffles last in the fridge?
They stay fresh for up to 7 days when stored properly in an airtight container. Keep them chilled to maintain their texture and prevent the chocolate from softening.
3. Can I use a different type of chocolate for coating?
Absolutely! You can use white chocolate, dark chocolate, or even caramel chocolate chips for unique flavor twists. White chocolate gives a creamy sweetness, while dark chocolate adds a rich contrast.
4. What if I don’t have Butterfinger candy bars?
No problem! Substitute with Heath bars, Snickers, Twix, or KitKats. Each candy brings its own delightful twist, so feel free to experiment.
5. How can I make the truffles more festive for holidays?
Drizzle colored candy melts or add themed sprinkles! For Christmas, go with red and green. For Valentine’s Day, pink and white. For Halloween, orange and black caramel drizzles will steal the show.