
Sweet, salty, chewy, and covered in a glossy chocolate blanket…
Imagine biting into something that’s got the crunch of salty pretzels, the creamy chew of golden caramel, and the rich silkiness of melted chocolate—all layered together like a decadent dream. These No-Bake Caramel Pretzel Crunch Bars aren’t just another treat—they’re a full-blown dessert experience. One that brings back the cozy memories of winter afternoons, sneaking into the fridge for just one more bite before dinner. You know the feeling, right?
This recipe is not just about indulgence; it’s about convenience, too. No oven, no fuss, just layers of pure delight that come together in under 20 minutes (plus chill time). And let’s talk visuals—those mini pretzels on top aren’t just for crunch. They make these bars look like something straight from a bakery window.

Why You’ll Fall in Love with These Bars
Here’s the thing: some recipes just get it right. This is one of them.
- Sweet + Salty: That flavor combo we all secretly (or not so secretly) adore? These bars deliver it in every bite.
- Chewy + Crunchy: You’ve got the gooey caramel hugging the peanuts and pretzels, and then that firm chocolate top? Total texture magic.
- Zero baking required: Because sometimes the oven just doesn’t need to be involved.
They’re festive, crowd-pleasing, and addictive. Whether you’re making a holiday treat box or just want something to munch with your coffee, they deliver every time.
Ingredients Overview
Let’s take a quick inventory of what you’ll need:
Base Layer
- 3 cups mini pretzels, lightly broken
- 1 ½ cups roasted salted peanuts
- 1 ¼ cups soft caramels (store-bought or homemade)
- ¼ cup unsalted butter
- 2 tablespoons heavy cream
Chocolate Topping
- 2 cups semi-sweet chocolate chips
- 1 tablespoon vegetable oil
Decoration
- 8–12 whole mini pretzel twists (for topping)
These are pantry staples in most households—or at least easy to grab during your grocery run. Want to make it a bit fancier? Swap the chocolate chips with dark chocolate chunks or drizzle on white chocolate to elevate the look.
The Magic of Caramel in No-Bake Desserts
Caramel is the glue that holds these bars together—literally and figuratively. But not just any caramel.
Using soft caramels ensures the bars don’t end up too hard to bite or too runny to hold shape. The combination of butter and cream added during melting transforms the texture into a silky, thick, spreadable dream. Stirring constantly is key. You’ll see it morph from lumpy cubes into a luxurious golden pool—just begging to be poured over crunch.
The smell alone is going to stop you in your tracks. There’s something magical about hot caramel, isn’t there?
Pretzels: The Crunchy Backbone
Pretzels are more than just filler here. They bring that perfect salty snap—and they need to be lightly broken. That means not crushed into dust, but cracked into bite-sized pieces. Too small and they disappear into the mix. Too big and they’ll dominate the bite.
Look for mini pretzel twists or sticks. Give them a rough break by hand or in a zip-top bag. You want variety in texture without losing that lovely crunch.
Bonus? They stay crisp even when coated in caramel, thanks to their dry, baked nature.
Peanuts: The Salty-Savory Pop
This recipe calls for roasted salted peanuts, and yes, that salt is intentional. It pops against the sweetness of the caramel and chocolate and adds just enough savory depth to balance the whole thing.
Don’t like peanuts? Swap in:
- Cashews for a buttery bite
- Almonds for a firmer crunch
- Sunflower seeds for a nut-free option
Just make sure whatever you use is roasted—it brings out the nutty flavor and adds necessary texture.
Chocolate Topping: The Final Hug
Here’s the cherry on top—or rather, the chocolate blanket on top.
Melt semi-sweet chocolate chips with a touch of vegetable oil. Why the oil? It gives the chocolate that glossy, gorgeous finish you see in the photo. Microwave in 20-second bursts, stir often, and don’t overheat it. Burnt chocolate = sadness.
Once melted, pour it evenly over the cooled caramel layer and spread it quickly. It firms up fast, especially if your base is cool. Smooth it with the back of a spoon or an offset spatula for a bakery-perfect finish.
Decorating with Whole Pretzels
Now for the fun part.
Take whole mini pretzel twists and press them gently into the still-warm chocolate. Space them out like a checkerboard or randomly—it’s your call. These little gems give visual appeal and that final salty crunch when you bite in.
This small touch turns these bars from “pretty good” to “holy wow, did you make these?”
Step-by-Step Recipe Instructions
Let’s walk through it like we’re baking side by side:
1. Prepare the Pan
Line an 8×8-inch pan with parchment and lightly grease it. This step saves your sanity when it’s time to lift and slice.
2. Melt the Caramel
In a saucepan, toss in your soft caramels, butter, and cream. Melt over medium heat, stirring constantly until smooth and glossy—about 6 to 8 minutes.
3. Mix the Crunch Layer
In a large bowl, combine the broken pretzels and peanuts. Pour the hot caramel over and stir to coat everything evenly.
4. Press Into the Pan
Transfer to your lined pan and press down firmly with a spatula. You want a tight, compact layer so the chocolate doesn’t seep through. Let it cool for 10 minutes.
5. Make the Chocolate Topping
Melt your chocolate chips with vegetable oil in short microwave bursts. Stir to glossy perfection.
6. Spread and Decorate
Pour the chocolate over the cooled base, smooth it out, and press in your whole mini pretzels.
7. Chill
Refrigerate for 1 to 2 hours until everything is set.
8. Slice and Serve
Lift the bars out using the parchment. Use a hot knife for clean cuts. Wipe between slices for that professional edge.
Tips for Perfect Bars
Making no-bake treats might sound like a breeze—and mostly, it is—but a few small tips can take these bars from good to next-level wow.
1. Press Down Firmly
When pressing the caramel-pretzel-peanut mixture into your pan, use the back of a spoon or even a small spatula. You want to compact it well so the bars hold their shape when sliced. Loose layers lead to crumbly pieces.
2. Cool Before Adding Chocolate
Let the caramel base cool for at least 10 minutes. Why? If it’s too warm, the chocolate layer can melt into it and lose that beautiful separation between layers. Cooling ensures a cleaner, more photogenic slice (and a better bite texture!).
3. Smooth Chocolate Quickly
Once you pour that chocolate on top, don’t waste time. Spread it evenly before it starts to set. Use a silicone spatula or offset knife for a perfectly smooth, glossy finish.
4. Hot Knife, Clean Cut
Dip your knife in hot water, wipe it dry, and slice. This helps you cut through the chocolate without cracking or dragging. For sharp, bakery-worthy squares, wipe the knife after every cut.
5. Chill, but Not Freeze
Refrigerate for a firm set, but avoid the freezer unless you’re storing long-term. Freezing can cause the chocolate to crack when cutting and sometimes creates condensation when brought back to room temp—affecting both look and texture.
Flavor Variations
Want to tweak the bars to your taste or surprise your guests with new twists? Try these fun ideas:
1. Dark Chocolate Twist
Swap the semi-sweet chips for dark chocolate (60%–70% cocoa). It brings a rich, slightly bitter contrast that’s heavenly with the sweet caramel.
2. White Chocolate Drizzle
Once your chocolate topping has set, drizzle melted white chocolate over the bars in zigzags for a fancy finish.
3. Sea Salt Sprinkle
After placing the pretzels on top, give the chocolate a light dusting of flaky sea salt. Trust me, it adds a gourmet touch and enhances the flavor contrast.
4. Peanut Butter Lovers’ Version
Add a tablespoon of peanut butter to the melted chocolate layer before pouring it over. It adds depth and a creamy flavor boost.
5. Nut-Free Option
Skip the peanuts and add more pretzels or sunflower seeds for that same crunch without the allergens.
Make It Ahead or Gift It
These bars are made for sharing—and gifting!
- Shelf Life: They stay fresh in an airtight container in the fridge for up to 7 days.
- Freezing: Yes, you can freeze them! Just wrap individual bars in parchment and store in a freezer bag. Thaw in the fridge overnight before serving.
- Gifting Idea: Stack 3–4 squares in a clear treat bag, tie with twine, and add a handwritten tag. Perfect for holidays, birthdays, or just-because treats!
They travel well and hold up beautifully at room temp for a few hours—ideal for party platters and potlucks.
Print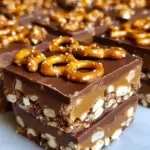
No-Bake Caramel Pretzel Crunch Bars
- Prep Time: 15 minutes
- Total Time: 1 hour 20 minutes
- Category: Dessert / Sweet Treat
Description
🍫🥨 Sweet, salty, chewy, and perfectly crunchy! These bars bring together caramel, peanuts, and pretzels in the most irresistible way. A no-bake treat that feels like pure comfort with every bite. ✨❤️
Ingredients
Base Layer
3 cups mini pretzels, lightly broken
1 ½ cups roasted salted peanuts
1 ¼ cups soft caramels
¼ cup unsalted butter
2 tablespoons heavy cream
Chocolate Topping
2 cups semi-sweet chocolate chips
1 tablespoon vegetable oil
Decoration
8–12 whole mini pretzel twists
Instructions
Prepare the Pan 😊
Line an 8×8-inch pan with parchment paper and lightly spray with nonstick spray.
Duration: 3 minutesMelt the Caramel 🍯
In a saucepan over medium heat, melt the soft caramels, butter, and heavy cream.
Stir until the mixture becomes smooth, thick, and glossy.
Duration: 6–8 minutesMix the Crunch Layer 🥨
In a large bowl, combine the lightly broken pretzels and peanuts.
Pour the warm caramel mixture over them and stir until well-coated.
Duration: 3 minutesPress Into the Pan 📦
Transfer the mixture to the prepared pan and press firmly into an even layer.
Let cool for 10 minutes before adding the chocolate.
Duration: 2–3 minutes + 10 minutes coolingPrepare the Chocolate Layer 🍫✨
Melt chocolate chips with vegetable oil in the microwave using 20-second intervals.
Stir until silky smooth and pour over the caramel base.
Duration: 2 minutesAdd the Pretzel Topping 🎀
Gently press whole mini pretzels onto the warm chocolate layer.
Duration: 1 minuteChill ❄️
Refrigerate for 1–2 hours, or until completely set.
Duration: 1–2 hoursSlice and Serve 🔪
Lift out the slab using parchment paper and slice into neat squares.
For clean cuts, dip the knife in hot water and wipe between slices.
Duration: 2 minutes
Notes
This recipe comes together quickly with simple, accessible ingredients.
Easily customizable — adjust sweetness, toppings, or add-ins to suit your taste.
Great for potlucks, family gatherings, or make-ahead treats.
Kid-friendly and beginner-friendly.
Stores well and tastes even better the next day.
Nutrition
- Serving Size: 16 squares
- Calories: ~320 kcal per bar
Kid-Friendly Kitchen Fun
This is a great recipe to make with kids.
Let them:
- Break the pretzels by hand (they love this part!)
- Stir the caramel mixture (with supervision)
- Place the whole pretzels on top like edible decorations
No oven means no hot pans or baking trays—just sticky fun and sweet rewards. Plus, it’s a super visual dessert, which makes it even more exciting for little helpers.
You may also like :
Church Lady Butter Toffee Pretzels: A Sweet & Salty Addiction in Every Bite
Chocolate Caramel Pretzel Sandwich Bites: The Ultimate Sweet-and-Salty Holiday Treat
Serving Suggestions
These bars are delicious straight from the fridge, but you’ve got options!
1. Slightly Warmed
Pop a square in the microwave for 5–10 seconds. The caramel softens just a little, the chocolate gets that melt-on-your-tongue texture, and it’s like a candy bar met a brownie and had a delicious child.
2. With Ice Cream
Serve a square alongside a scoop of vanilla or salted caramel ice cream. Add a drizzle of chocolate syrup and crushed pretzels on top for a next-level dessert plate.
3. With Coffee or Hot Cocoa
Their rich sweetness pairs beautifully with black coffee or a steamy mug of cocoa. Add marshmallows or whipped cream to your drink for a cozy treat moment.
Final Thoughts
There’s a reason this no-bake treat has become a personal go-to. Every bite hits all the right notes—sweet, salty, chewy, and crunchy—all wrapped up in a rich, shiny chocolate finish. And honestly? They’re just fun to make.
From the satisfying stir of gooey caramel to the final press of those pretzel twists on top, this recipe is more than just a sweet—it’s an experience. One you’ll find yourself making again and again, especially around the holidays, for parties, or just when the mood for something delicious strikes.
So next time you’re craving something that looks fancy but is secretly easy? These No-Bake Caramel Pretzel Crunch Bars have got your back.
Similar recipes : Millionaire Magic Bars – The Ultimate Gooey, Buttery, Irresistible Dessert
FAQs
1. How do I make these bars nut-free?
Easy! Just leave out the peanuts and add more pretzels or use roasted sunflower seeds for that salty crunch without the allergens.
2. Can I freeze these bars?
Yes, absolutely. Wrap each square in parchment and store in a zip-top freezer bag. They’ll keep for up to 2 months. Let them thaw in the fridge before serving.
3. Do I need a candy thermometer?
Nope! This recipe uses pre-made soft caramels, so there’s no need to monitor temperature or worry about sugar stages.
4. Can I double the recipe?
Yes! Use a 9×13-inch pan instead of an 8×8 and double all ingredients. You might need a bit more chilling time, but it works great for parties.
5. How do I keep the chocolate from cracking?
Use a hot knife to slice and wipe it clean between each cut. Adding a bit of oil to the chocolate also helps keep it soft enough to cut smoothly.


