A Bite of Christmas Magic
You know the feeling—twinkling lights, cozy music playing in the background, and the smell of cinnamon and sugar in the air. It’s the holidays, and you’re looking for something sweet, festive, and maybe even a little magical. Well, say hello to your new favorite treat: No-Bake Christmas Cheesecake Bites. These little wonders are creamy, dreamy, and ridiculously easy to make. Imagine buttery graham cracker crusts, smooth and fluffy cheesecake filling, and a sprinkle of colorful holiday joy on top. No oven required, no fancy skills—just pure, joyful, edible Christmas cheer.
Let’s be honest, the holiday season gets chaotic. Between gift shopping, decorating, and family gatherings, who has time for complicated desserts? That’s why these cheesecake bites are the answer. They’re simple to make ahead, store well, and disappear fast. Trust us—you’ll want to double the batch.
Why You’ll Love These Cheesecake Bites
Quick, Easy, and No-Bake
No oven? No problem. These cheesecake bites come together with just a fridge and a few mixing bowls. Whether you’re a baking newbie or a seasoned pro, this recipe is as easy as it gets.
Perfect for Parties and Gifting
Serving a crowd? These mini treats are perfectly portioned for holiday platters. Need a last-minute edible gift? Pop them into a festive box and watch faces light up.
Kid-Friendly and Customizable
Kids love decorating them with sprinkles, and honestly, so do we. Use candy canes, red and green sprinkles, or even edible glitter. You do you!
Ingredients Overview
Let’s break down the festive magic:
- 1 ½ cups graham cracker crumbs – For that crunchy, buttery base.
- 6 tbsp melted butter – Helps bind the crust.
- 2 tbsp granulated sugar – Adds just the right sweetness.
- 8 oz cream cheese, softened – The creamy star of the show.
- 1 cup powdered sugar – For a smooth, sweet finish.
- 1 cup cold heavy cream – Whipped for that airy texture.
- 1 tsp vanilla extract – Adds cozy depth.
- ½ cup crushed candy canes or holiday sprinkles – The festive cherry on top.
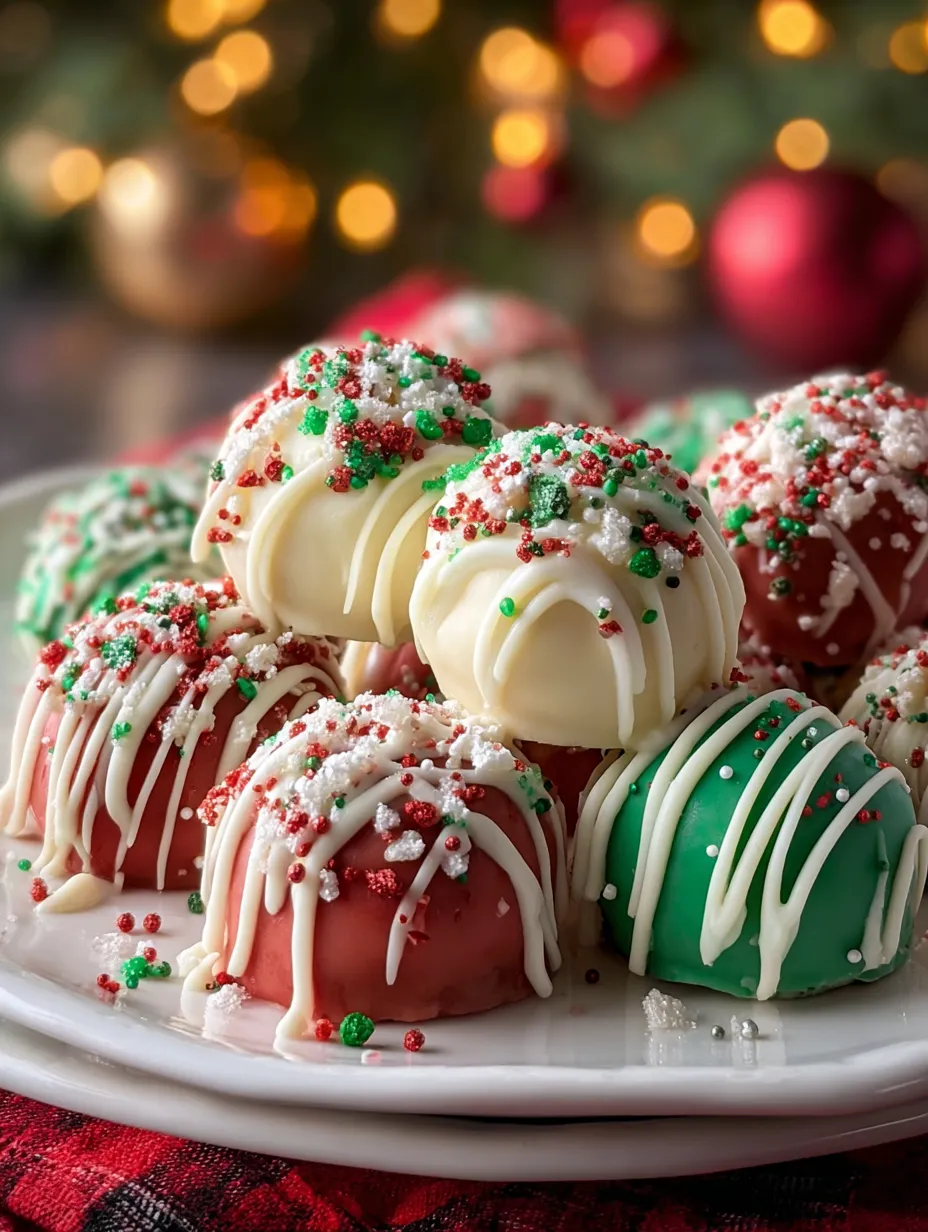
📸 Note: To match the image above, we’ll be dividing and coloring the coating for a colorful red, green, and white finish, plus festive sprinkles and drizzled white chocolate.
Choosing the Right Tools
Cupcake Liners vs. Silicone Molds
You can use mini cupcake liners for that classic shape, or go with silicone molds for an easy pop-out finish and smooth sides. Silicone molds are especially helpful if you want a professional look like the image.
Mixing and Decorating Essentials
- Electric mixer (hand or stand)
- Mixing bowls
- Small spatula or piping bag
- Toothpicks for drizzle details
- Food-safe gloves if shaping by hand
Step-by-Step Instructions
1. Make the Graham Cracker Crust
In a bowl, combine your graham cracker crumbs, melted butter, and sugar. Mix until it feels like wet sand.
🍪 Tip: For extra flavor, add a pinch of cinnamon or nutmeg to your crust.
2. Prepare the Cheesecake Filling
Beat the softened cream cheese and powdered sugar until smooth—no lumps! In a separate bowl, whip the heavy cream until stiff peaks form. Gently fold the whipped cream into the cream cheese mixture with vanilla. It should be light, fluffy, and silky.
🎂 This is your dreamy cheesecake base. Taste it—it’s irresistible!
3. Combine and Chill
Form the Cheesecake Balls
After mixing your cheesecake filling, cover the bowl and chill it for 1–2 hours, or until the mixture becomes firm enough to scoop. Once chilled, use a cookie scoop or spoon to portion the filling into 1–1.5 inch amounts and roll each portion into a smooth ball using clean hands. Place the rolled cheesecake balls on a parchment-lined tray. Freeze for 20–30 minutes so they firm up before dipping.
Optional: Add Graham Cracker Flavor
If you want the graham cracker flavor inside the cheesecake bites, roll each chilled ball lightly in the prepared graham cracker crumb mixture. The crumbs will stick to the outside and give that buttery graham taste without affecting the round dipped look.
Coat with Festive Chocolate
Melt white chocolate or candy melts. Divide into three bowls: keep one white, tint one red, and tint one green using gel food coloring. Dip each firm cheesecake ball fully into one of the colors, lifting with a fork and tapping off the excess. Place them back onto parchment. Immediately top with holiday sprinkles while the coating is still wet. Once the shell sets, drizzle white chocolate over the tops to create the decorative lines seen in the image. Chill again until completely firm.
Decorate with Holiday Cheer
This is where the magic happens! Melt white chocolate and divide it into three small bowls. Leave one plain, tint one red, and one green using gel food coloring. Dip or coat the chilled cheesecake balls in colored chocolate. Before the coating sets, sprinkle with festive nonpareils, mini stars, or crushed candy canes. Drizzle with extra white chocolate to match the photo.
✨ Want a perfect drizzle? Use a fork or small piping bag.
Chilling and Setting
Let’s not skip this step! Chilling is key to making sure everything holds its shape. One hour minimum, but overnight is even better. The cheesecake sets beautifully, and the flavors meld together like a Christmas carol in dessert form.
Tips for the Perfect Cheesecake Bites
- Room Temp Cream Cheese: Cold cream cheese leads to lumpy filling. Let it soften fully.
- Whip Cream Well: Soft peaks won’t hold the structure. Go for stiff peaks.
- Don’t Overmix: Once the whipped cream is folded in, be gentle. You want fluff, not soup.
Decoration Ideas for Maximum Festive Vibes
Feeling creative? Here are a few options:
- Crushed Candy Canes – Classic, crunchy, and minty.
- Red & Green Sprinkles – Use a mix of shapes and colors.
- White Chocolate Drizzle – Adds elegance and extra sweetness.
- Mini M&Ms or Stars – Perfect for a pop of color.
- Edible Glitter – Bring the sparkle!
Flavor Variations to Try
Bored with vanilla? Let’s spice it up:
Peppermint Mocha
- Add 1 tsp instant espresso + peppermint extract to the filling.
White Chocolate Cranberry
- Mix in chopped dried cranberries and drizzle with white chocolate.
Gingerbread Spice
- Add ½ tsp cinnamon, nutmeg, and ginger to the crust and filling.
How to Store and Make Ahead
- Fridge: Keep them in an airtight container for up to 4 days.
- Freezer: Yes, they freeze well! Just thaw in the fridge before serving.
- Make Ahead: You can prep the base and filling a day before. Decorate right before serving for best texture.
Making It a Family Tradition
Why not make this a new holiday tradition? Kids can crush the crackers, mix the filling, and sprinkle toppings. It’s an easy, screen-free activity that ends with delicious rewards. Put on some holiday tunes, make hot cocoa, and have a Christmas dessert party.
Pairing Your Cheesecake Bites
These pair perfectly with:
- Hot Cocoa – Especially peppermint or Mexican chocolate.
- Mulled Wine or Cider – For the grown-up crowd.
- Coffee or Eggnog – Yes, eggnog with cheesecake is a vibe.
Perfect for Gifting
Wrap them up in mini cupcake boxes or clear cellophane bags tied with a ribbon. Add a tag and you’ve got the cutest edible gift ever. Friends, teachers, neighbors—they’ll all be thrilled.
Troubleshooting Common Mistakes
- Filling Too Runny? Make sure your whipped cream is stiff enough and that the cheesecake has chilled long enough.
- Crust Falls Apart? Add a little extra melted butter next time and press down firmly.
- Topping Sliding Off? Let the chocolate cool a bit before dipping, and make sure cheesecake is fully chilled.
🎄 No-Bake Christmas Cheesecake Bites
- Prep Time: 10 minutes
- Total Time: 1 hour 10 minutes
- Category: Holiday Desserts / No-Bake Christmas Treats
Description
🎅 A creamy, festive, melt-in-your-mouth holiday treat! ❄️ These little bites are full of Christmas magic—smooth cheesecake filling, buttery graham crust, and a cheerful sprinkle on top. Perfect for parties, gifting, or keeping in the fridge for sweet holiday cravings! 🍬✨
Ingredients
1 ½ cups graham cracker crumbs
6 tbsp melted butter
2 tbsp granulated sugar
8 oz (225g) cream cheese, softened
1 cup powdered sugar
1 cup heavy cream, cold
1 tsp vanilla extract
½ cup crushed candy canes or holiday sprinkles
Instructions
Combine the graham cracker crumbs, melted butter, and sugar in a bowl until well mixed and sandy. (⏱️ 2 minutes)
Scoop the chilled cheesecake mixture into 1 to 1.5-inch portions using a cookie scoop or spoon, then roll each portion into a smooth ball using clean hands. If you’d like to include the graham cracker flavor inside (like a hidden crust), roll each ball lightly in the prepared graham cracker crumbs until coated. Place the balls on a parchment-lined tray and freeze them for 20–30 minutes to firm up before dipping.
Beat the softened cream cheese and powdered sugar together until smooth and creamy. (⏱️ 3 minutes)
Whip the heavy cream to stiff peaks, then gently fold it into the cream cheese mixture along with the vanilla extract. (⏱️ 4 minutes)
Spoon or pipe the cheesecake filling over the chilled crusts, smoothing the tops. (⏱️ 3 minutes)
Sprinkle crushed candy canes or holiday sprinkles over each bite for a festive touch. (⏱️ 1 minute)
Chill the bites until fully set and beautifully creamy. (⏱️ 1 hour)
Notes
Perfect no-bake option for busy holiday weeks.
Candy canes add crunch and minty flavor, but sprinkles work great for kids.
Use mini silicone molds for the cleanest release and smooth edges.
Keep refrigerated for the best texture — they taste even better the next day!
Nutrition
- Serving Size: 18–20 bites
- Calories: ~160 kcal
Conclusion: A Treat Everyone Will Remember
No-Bake Christmas Cheesecake Bites are everything the holidays should be—joyful, colorful, and made with love. Whether you’re hosting a big family dinner, having friends over for a cozy night in, or just craving something sweet to enjoy with your coffee, these little bites deliver big time. They’re rich without being heavy, festive without the fuss, and so pretty they might just outshine your Christmas tree. So go ahead—get messy with sprinkles, share the joy, and make a little cheesecake magic happen this season. 🎄❤️
FAQs
1. Can I use low-fat cream cheese?
Yes, but the texture may be slightly less rich and creamy. Full-fat gives the best flavor and structure.
2. Can I freeze them?
Absolutely! Freeze them in a single layer, then transfer to a container. Thaw in the fridge overnight.
3. How long can they sit out at room temperature?
No more than 1–2 hours. They’re dairy-based, so they need to stay chilled.
4. Can I make these gluten-free?
Totally! Use gluten-free graham crackers or cookie crumbs for the crust.
5. What’s the best topping combo?
We love crushed candy canes + white chocolate drizzle + sprinkles. Classic and festive!
You may like as well :
No-Bake Christmas Mini Cheesecakes: A Festive Delight
Christmas Sugar Cookie Bars Recipe: The Ultimate Festive Treat You’ll Bake on Repeat
How to Make Your Cheesecake Bites Look Like the Picture (Step-by-Step Styling Tips)
You’ve seen the picture—vibrant red, green, and white cheesecake bites with perfect drizzles and festive sprinkles. Want yours to look just as Instagram-worthy? Here’s how:
1. Color Your Chocolate Coating
After your cheesecake bites are fully set, dip them into melted candy melts or white chocolate that’s been colored using gel food coloring (avoid liquid food dye—it can seize your chocolate).
- Use red candy melts for a bright holiday red.
- Green candy melts or white chocolate tinted with green gel gives that foresty, jolly look.
- Leave some white chocolate plain for a snowy finish.
🍫 Pro Tip: Use a toothpick or fork to dip and gently tap off the excess coating for a smooth outer shell.
2. Add Festive Sprinkles Immediately
While the coating is still wet, sprinkle generously with:
- Red & green nonpareils
- Mini Christmas tree or star sprinkles
- Crushed peppermint candy
Time is everything—sprinkles won’t stick after the coating hardens!
3. Drizzle with Contrasting Chocolate
To match the picture, once your colored coating sets:
- Melt white chocolate.
- Use a spoon, fork, or piping bag with a small tip to drizzle zigzag lines across each bite.
- Let it set at room temperature or chill briefly to harden.
🎨 The drizzle adds dimension and that professional look. Don’t skip it!
Let’s Talk Texture: Why These Bites Are So Satisfying
What makes these cheesecake bites more than just “cute treats”? It’s the contrast of textures in every single bite.
The Crust: Crunchy and Buttery
Thanks to graham cracker crumbs and melted butter, the base is perfectly crumbly with just the right crunch. It balances the soft filling, giving you that satisfying “bite.”
The Filling: Light Yet Rich
Whipping the heavy cream into stiff peaks before folding it into the cream cheese mixture gives the filling a mousse-like texture. It’s light, but not airy. Rich, but not too heavy. It literally melts in your mouth.
The Coating: Crisp and Snappy
The chocolate shell (or candy coating) gives that crack when you bite into it, creating a beautiful contrast to the soft center.
Want to Go the Extra Mile? Add a Surprise Center! 🎁
If you want to add a fun twist, try putting a mini surprise in the middle before chilling:
- A mini marshmallow
- A tiny peppermint patty
- A raspberry or maraschino cherry
- A dollop of Nutella or jam
It’s like a little gift inside your cheesecake bite!
Similar recipes :
Christmas Cookie Bars – Holiday Magic in Every Bite!
The Best Christmas Cookie Cutters for Festive Holiday Baking
Holiday Flavor Add-ins to Consider
Want to remix the flavor profile while keeping that festive feel? Try mixing any of these into your filling:
- Orange zest – Adds brightness and pairs well with white chocolate.
- Peppermint extract – A little goes a long way! Just ¼ tsp adds a cool, wintry twist.
- Crushed Oreos – For a cookies-and-cream version with holiday sprinkles on top.
- Cinnamon or Nutmeg – Adds warmth and depth to the creamy filling.
Creative Ways to Present Your Cheesecake Bites
Presentation turns your treats into a showstopper. Try these ideas:
1. Holiday Tiered Platter
Stack red, green, and white bites in a circular pattern on a 3-tiered tray. Use fresh rosemary sprigs and cranberries around the base for a “wreath” look.
2. Mini Gift Boxes
Use small cardboard or plastic food-safe boxes lined with tissue or parchment paper. Add 4–6 bites per box and tie with a ribbon. Perfect neighbor gifts!
3. Snow Globe Jars
Place a few bites in a clear mason jar with faux snow or crushed candy cane at the bottom. Add a tag that says “Sweet Holiday Wishes.”
Turn This Recipe into a Dessert Board
Imagine a whole Christmas dessert charcuterie board. Add these cheesecake bites along with:
- Chocolate-dipped pretzels
- Mini cookies
- Peppermint bark
- Fudge squares
- Candied nuts
Arrange everything on a large wooden board and garnish with candy canes, rosemary sprigs, or powdered sugar “snow.”
Your guests will lose their minds.
Why These Bites Are a Holiday MVP
Let’s face it—during the holidays, we need desserts that:
- Look amazing ✅
- Taste incredible ✅
- Are easy to make ✅
- Can be made ahead ✅
- Transport well ✅
These cheesecake bites check every box. They’re the kind of treat that makes people say, “Wait, you made these?!” And honestly, isn’t that the best feeling?
Want to Make a Giant Version? Here’s How
Love the idea but want to make one big no-bake cheesecake instead of mini bites?
No problem.
Just press the graham crust into a 9-inch springform pan, pour the filling on top, and chill for 4–6 hours. Decorate the top like you would the bites: colored chocolate drizzle, sprinkles, crushed candy canes.
Cut into slices, and you’ve got a festive cheesecake that serves 10–12.
In Summary: A Holiday Recipe Worth Repeating Every Year
These No-Bake Christmas Cheesecake Bites are more than just a pretty dessert—they’re a celebration in every bite. Between the velvety cream cheese filling, the crunchy graham crust, and the explosion of Christmas colors and flavors, they hit every holiday craving.
Whether you’re hosting a big holiday party or just want a cozy dessert to enjoy with your family, these bites deliver joy, one mini masterpiece at a time. They’re the kind of recipe that becomes a family favorite and shows up year after year.
So tie on your apron, turn on some Christmas tunes, and create some magic in your kitchen. 🎅❄️
FAQs (Holiday Edition)
Q1: Can I make these without heavy cream?
Yes, you can substitute with whipped topping (like Cool Whip), but the texture may be slightly different—still delicious though!
Q2: Can I use chocolate cookies for the crust instead?
Absolutely! Crushed chocolate sandwich cookies make a delicious base. Great for a cookies-and-cream variation.
Q3: How long can they sit out at a party?
Try to keep them under 2 hours at room temp. They’re best served chilled for texture and safety.
Q4: Do I need to use gel food coloring?
Yes! Gel food coloring is concentrated and won’t seize your chocolate like water-based liquid dye might.
Q5: What’s the best way to transport them to a party?
Use a cupcake box or airtight container with parchment between layers. Keep them cold using a cooler or insulated bag.


