The holidays are all about cozy flavors, joyful gatherings, and yes—desserts that bring the “wow” without wearing you out in the kitchen. Enter: No-Bake Christmas Coconut Lasagna, a ridiculously easy, ultra-creamy, show-stopping treat that tastes like the holidays on a plate. You don’t need an oven. You don’t need a culinary degree. All you need is a handful of delicious ingredients, a mixing bowl, and the spirit of the season.
Picture this: layers of sweet vanilla wafer crust, fluffy coconut cream, whipped topping that’s light as a snowflake, and a cheerful shower of red and green sprinkles. It’s the kind of dessert that earns applause at holiday dinners, cookie exchanges, and even casual family movie nights. And guess what? You can make it in less than 30 minutes (plus chill time).
Why You’ll Love This Recipe
Let’s be honest—holiday baking can be a bit overwhelming. Between cookies, pies, and cakes, your oven is probably on overtime. That’s why this no-bake recipe is a holiday game-changer.
Here’s why this Christmas Coconut Lasagna will be your new December favorite:
- No baking required: Perfect for when your oven is occupied—or you just don’t want to bake!
- Festive and eye-catching: That snowy whipped topping with red and green sprinkles? Insta-worthy.
- Simple ingredients: Nothing fancy or hard to find. Just classic pantry staples.
- Make ahead friendly: Great for prepping the night before a party.
- Kid-approved: It’s sweet, creamy, and fun to eat (and decorate).
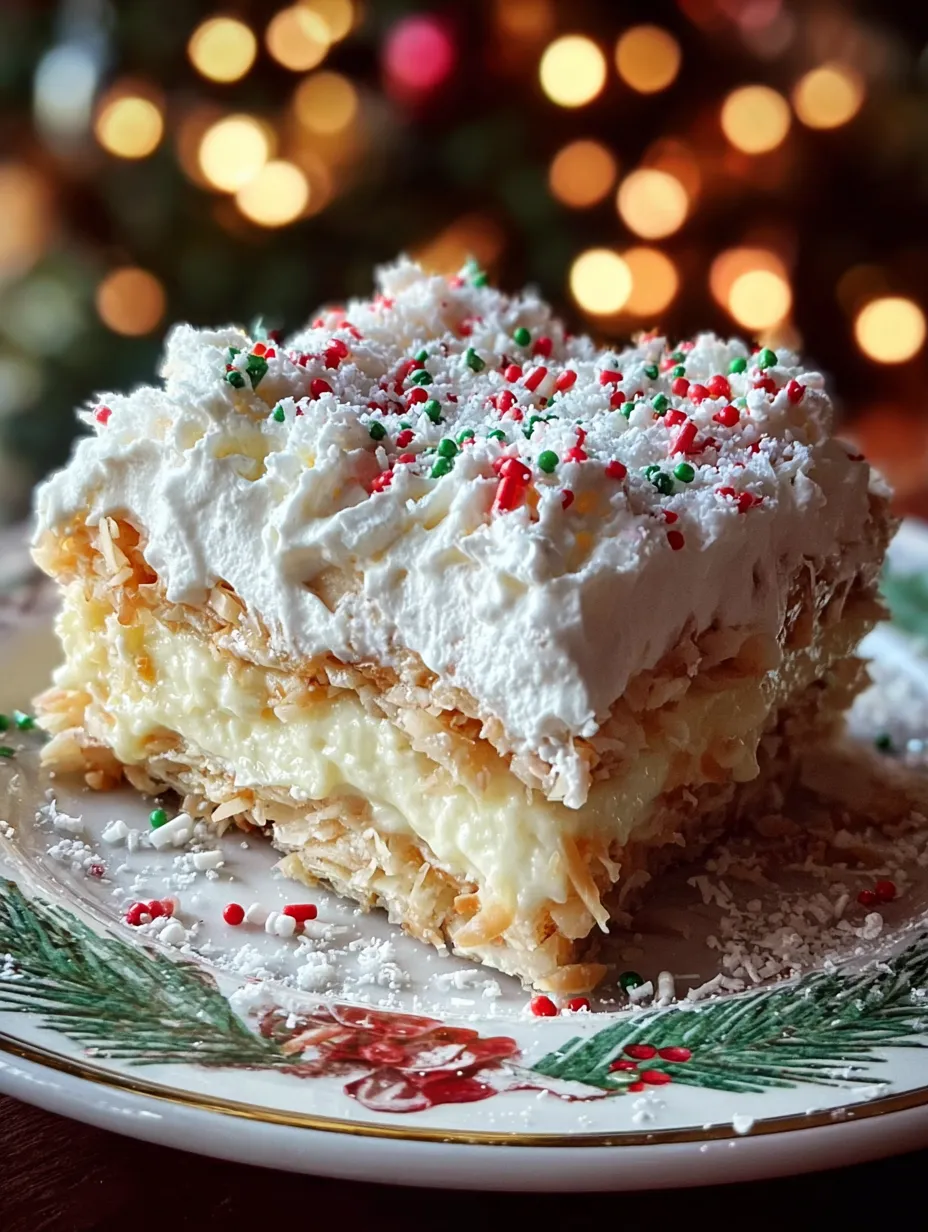
A Peek at the Final Dessert (Matching the Image)
Take a good look at the final product in the image: doesn’t it just scream “Christmas cheer”? That light, snowy whipped topping is topped with a blizzard of red and green sprinkles, capturing the essence of the season. You can see the golden vanilla wafer crust peeking out underneath those thick, creamy layers. The texture looks soft yet structured—perfect for clean slicing.
And let’s not forget the coconut flakes. They add both visual charm (hello, snow vibes) and tropical sweetness that balances all the richness. Each bite is a creamy, crunchy, coconut-kissed wonderland.
Ingredients Breakdown: What You’ll Need
Here’s everything you need to recreate this layered beauty:
- 2 cups crushed vanilla wafer cookies – this makes your crust
- 1/2 cup melted butter – to bind your cookie base
- 1 (8 oz) block cream cheese, softened – creamy layer #1
- 1 cup powdered sugar – sweeten that cream cheese goodness
- 1 teaspoon vanilla extract – for that cozy aroma
- 2 cups whipped topping, divided – you’ll use this in layers
- 1 (3.4 oz) box instant coconut cream pudding mix – tropical magic in a box
- 1 1/2 cups cold milk – to whip up your pudding
- 1/2 cup shredded sweetened coconut – stirred into pudding for extra coconut flair
- Red and green sprinkles – because it’s Christmas!
- Extra shredded coconut – for a snow-dusted finish
The Star Players: Spotlight on Key Ingredients
Vanilla Wafers
These classic cookies make the perfect crust. When crushed and combined with melted butter, they form a sweet, golden base that holds everything together. If you’re out of vanilla wafers, graham crackers work too—but wafers give it that buttery bite.
Cream Cheese + Whipped Topping Combo
This is the creamy base that holds the lasagna together. It’s rich but light, sweet but not overly so. The cream cheese brings tang while the whipped topping keeps it fluffy and smooth.
Instant Coconut Pudding Mix
Here’s where the magic really happens. This pudding mix creates that soft, luscious middle layer. When folded with real shredded coconut, it turns the whole dish into a tropical snowstorm of flavor.
Step-by-Step Instructions: Making Your Holiday Lasagna
1. Make the Crust
Start by combining 2 cups of crushed vanilla wafer cookies with 1/2 cup melted butter in a mixing bowl. Stir until the texture is like damp sand. Then press it into the bottom of a 9×9-inch dish. Press firmly to create an even, compact layer. Stick it in the fridge for at least 10 minutes so it sets.
2. Whip the Cream Cheese Layer
Using a hand mixer or stand mixer, beat together the softened cream cheese, powdered sugar, and vanilla extract until super smooth—no lumps! Gently fold in 1 cup of whipped topping. Spread this layer over your chilled crust. Smooth it out with a spatula for an even surface.
3. Mix the Pudding Layer
In another bowl, whisk the coconut cream pudding mix with cold milk. Beat for about 2 minutes until it thickens up. Fold in shredded coconut. Now, gently spread this coconut pudding mixture over the cream cheese layer.
4. Top It Off
Add the remaining 1 cup of whipped topping on top, smoothing it out to the edges.
5. Decorate
Sprinkle generously with red and green sprinkles. Then add a snowfall of extra shredded coconut to make it feel like Christmas just landed on your dessert.
6. Chill
Cover and refrigerate for at least 4 hours, preferably overnight, so everything sets up beautifully.
Pro Tips for the Perfect No-Bake Coconut Lasagna
Want to make your dessert not just good—but absolutely stunning? These simple tips will help you create the best version of your Christmas Coconut Lasagna every time:
- Chill everything: Use cold milk and chilled whipped topping. Warm ingredients can cause the layers to turn soupy.
- Let each layer set slightly before adding the next: You don’t have to wait hours between layers, but a few minutes in the fridge after each can help keep them crisp and defined.
- Use a sharp knife when slicing: For those perfect, clean squares like in the image, dip your knife in warm water and wipe clean between each slice.
- Use full-fat cream cheese and milk: This isn’t the time to go low-fat. Full-fat versions hold their texture better and create richer layers.
- Fold, don’t stir the whipped topping: You want to keep it airy and light. Stirring too hard will deflate it.
Customize Your Christmas Coconut Lasagna
Let’s say you love the idea of this dessert but want to make it your own. Totally doable! Here are some fun twists:
Add Chocolate
- Drizzle melted chocolate over the top before chilling.
- Swap the vanilla wafer crust for crushed chocolate sandwich cookies.
Add Fruit
- Add a thin layer of crushed pineapple between the cream cheese and pudding layers.
- Garnish the top with maraschino cherries for extra holiday pop.
Make It Gluten-Free
- Use gluten-free vanilla wafers or almond flour cookies.
Dairy-Free Option
- Use dairy-free cream cheese (like Kite Hill or Daiya).
- Sub in coconut whipped cream and plant-based milk.
The Christmas Magic: Decoration Ideas
Half the joy of this dessert is how pretty it looks when finished. Want to go even more festive? Here are a few decorating ideas that go beyond red and green sprinkles:
- Mini Candy Canes: Crush and sprinkle on top for minty flair.
- Gold edible glitter or stars: Adds sparkle that’ll catch the eye.
- Toasted coconut flakes: For a contrast in texture and a warm, nutty taste.
You can even use holiday-themed cookie cutters to cut out individual servings in fun shapes—like trees, stars, or snowflakes.
Print
No-Bake Christmas Coconut Lasagna
- Prep Time: 20 minutes
- Total Time: 4 hours 20 minutes
- Category: Christmas Desserts
Description
🥥 A creamy, dreamy no-bake coconut lasagna perfect for the holidays! Layers of coconut cream, whipped topping, and festive sprinkles make this dessert as joyful to look at as it is to eat. 🎄✨
Ingredients
2 cups crushed vanilla wafer cookies
½ cup melted butter
1 (8 oz) block cream cheese, softened
1 cup powdered sugar
1 teaspoon vanilla extract
2 cups whipped topping, divided
1 (3.4 oz) box instant coconut cream pudding mix
1½ cups cold milk
½ cup shredded sweetened coconut
Red and green sprinkles
Extra shredded coconut for topping
Instructions
Combine crushed vanilla wafers with melted butter until crumbly. Press into the bottom of a 9×9-inch dish and refrigerate.
⏱️ Prep: 10 minutesBeat cream cheese, powdered sugar, and vanilla until smooth. Fold in 1 cup whipped topping and spread over the chilled crust.
⏱️ Prep: 5 minutesWhisk coconut pudding mix with cold milk until thickened, then fold in shredded coconut. Spread evenly over the cream cheese layer.
⏱️ Prep: 5 minutesTop with the remaining whipped topping and smooth the surface. Sprinkle festive red and green sprinkles plus extra coconut on top.
⏱️ Prep: 5 minutesRefrigerate for at least 4 hours before slicing to allow layers to set perfectly.
⏱️ Chill: 4 hours
Notes
Use Full-Fat Dairy for Best Results:
Full-fat cream cheese and whole milk give the best stability and richness. Low-fat options may make the layers runnier or softer than desired.Don’t Overmix the Whipped Topping:
Gently fold it in to maintain the fluffy texture. Overmixing will cause it to deflate and lose volume.Apply Sprinkles Just Before Serving:
Red and green sprinkles can bleed into the topping if added too early. For vibrant color like in your photo, add them last-minute.Slicing Tips for Clean Layers:
Use a sharp knife dipped in warm water, wiping between each slice. This keeps layers clean and defined like in the image.Use Sweetened Shredded Coconut Only:
This is essential for both flavor and the snow-like appearance on top. The dessert in your image uses this type of coconut clearly.
Store Covered in the Fridge:
Keeps fresh for up to 4–5 days. Avoid freezing if you want the same texture shown in the photo—whipped topping can lose structure after thawing.
Nutrition
- Serving Size: 12 servings
- Calories: 310 kcal
Storage Tips and Make-Ahead Magic
This dessert is practically made for making ahead. Here’s how to store it without compromising taste or texture:
- Fridge: Store covered in the fridge for up to 5 days. It actually tastes better the next day!
- Freezer: You can freeze it—just skip the sprinkles until you’re ready to serve. Cover tightly with foil and freeze up to 2 months. Thaw in the fridge overnight.
- Make-ahead tip: Assemble it fully the night before, then decorate with sprinkles and coconut just before serving to keep them crisp and colorful.
Serving Suggestions
Sure, you can just cut and serve—but why not level up your presentation?
- Serve with hot chocolate or peppermint mocha to balance the creamy sweetness.
- Add a scoop of vanilla ice cream on the side if you’re feeling indulgent.
- Garnish each plate with a mint leaf or candy cane for extra holiday vibes.
For large gatherings, consider doubling the recipe and using a 9×13-inch pan. It scales beautifully!
Nutrition Breakdown (Per Serving)
This recipe yields about 12 servings. Here’s the approximate nutritional info for each:
| Nutrient | Amount (per slice) |
|---|---|
| Calories | 310 kcal |
| Fat | 18g |
| Carbohydrates | 34g |
| Sugar | 21g |
| Protein | 3g |
Note: This is an indulgent holiday treat—perfect in moderation, and absolutely worth the splurge!
Common Mistakes to Avoid
Even though this recipe is super simple, a few missteps can cause a Christmas catastrophe. Here’s what to avoid:
- Using warm cream cheese that’s too soft can make your layer runny.
- Over-whipping pudding can break down its structure—just whisk until thickened.
- Skipping chill time ruins the layers. Be patient and let it firm up.
- Adding sprinkles too early—they might bleed color into the topping. Add just before serving for the freshest look.
You may read as well :
Chocolate Coconut Pecan Cream Pie
Coconut Cream Pie Cookie Cups: A Sweet Escape in Every Bite
Why It’s a Christmas Favorite Year After Year
There’s something nostalgic about coconut desserts during the holidays. Maybe it’s the “snowy” look. Maybe it’s the tropical escape it offers while it’s freezing outside. Or maybe it’s just how good it tastes.
This no-bake coconut lasagna checks all the boxes:
- It’s easy.
- It’s festive.
- It makes people smile.
You’ll be amazed how many guests ask for the recipe—or go back for seconds. It’s not just a dessert; it’s a tradition in the making.
Conclusion: Make the Season Sweet and Stress-Free
If the holiday season has you overwhelmed, this No-Bake Christmas Coconut Lasagna is your sweet escape. No baking. No drama. Just layers of creamy, coconut-infused joy topped with cheerful sprinkles and snowy coconut.
It’s festive. It’s simple. And it looks like it came straight from a fancy bakery window.
Whether you’re hosting a big Christmas dinner or need something special for your office potluck, this dessert will deliver. It brings the holiday magic with minimal effort—leaving you more time to sip cocoa, decorate the tree, and enjoy what really matters.
Similar recipe : Pineapple Coconut Dream Cake
FAQs
1. Can I freeze coconut lasagna?
Yes! Wrap tightly and freeze for up to 2 months. Let it thaw overnight in the fridge. Add sprinkles and coconut right before serving for best appearance.
2. Can I use homemade whipped cream instead of whipped topping?
Absolutely. Just make sure it’s whipped stiff enough to hold shape. Keep in mind, homemade cream may deflate faster than store-bought.
3. What if I can’t find coconut pudding mix?
You can substitute vanilla pudding and add a bit of coconut extract (½ teaspoon) and extra shredded coconut. It won’t be quite the same, but it’ll still be delicious.
4. Can I double the recipe for a crowd?
Yes! Use a 9×13 dish and double all the ingredients. It’s a great make-ahead dessert for parties or potlucks.
5. How long does it last in the fridge?
It’ll stay fresh and tasty in the fridge for up to 5 days. Just cover it tightly to prevent it from drying out.


