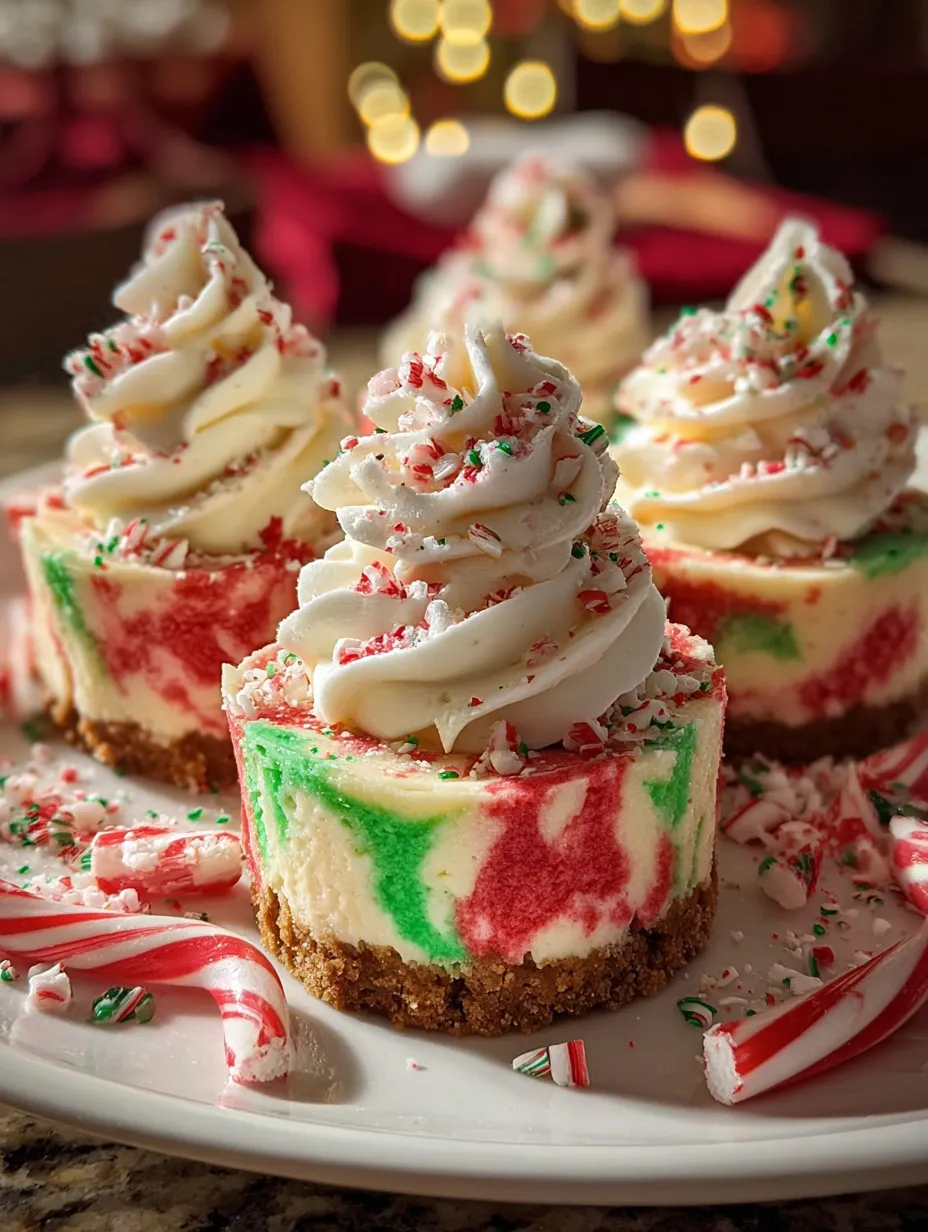
If Christmas had a flavor, it might just taste like these No-Bake Christmas Mini Cheesecakes. Imagine a velvety, creamy filling nestled over a buttery graham cracker crust, swirled with festive red and green coloring, and topped with a generous swirl of whipped cream and crushed candy canes. Yep — these are the kind of treats that make people pause mid-bite and say, “Wow.”
And the best part? No oven required.
That means no holiday kitchen chaos, no stressing about baking time, and no fighting for oven space on a day when every dish seems to need 375°F for exactly 45 minutes.
These mini cheesecakes are adorable, merry, and incredibly simple to whip up. They’re the perfect combo of fun and fancy, making them just right for holiday parties, edible gifts, or a quiet night by the fire with a treat in hand.
Why These Mini Cheesecakes Are a Holiday Must-Have
Everyone’s got that one dish they have to make every December. Well, this is about to be yours.
Here’s why:
- No-bake = no stress. Say goodbye to cracked cheesecake tops or overbaking disasters.
- They’re bite-sized perfection. Individual portions make them party-friendly and easy to serve.
- They look like they belong on a Hallmark movie dessert table. Seriously — look at those colors!
- They’re light but indulgent. Fluffy whipped filling, not overly sweet, but incredibly satisfying.
Whether you’re prepping for a cookie swap or just want something sweet to nibble on during your holiday movie binge, these little cheesecakes check all the boxes.
Perfect for Parties, Gifting, or a Solo Treat
Hosting a party? These minis are ideal — no forks or slicing needed. Handheld, gorgeous, and gone in three bites.
Need a homemade gift? Pop a few into a holiday tin and tie it with a ribbon. You’re officially the favorite friend/coworker/neighbor.
Just craving something festive after dinner? These keep beautifully in the fridge. One cheesecake at a time = built-in portion control (sort of 😉).
Let’s Talk About That Irresistible Look (and Taste!)
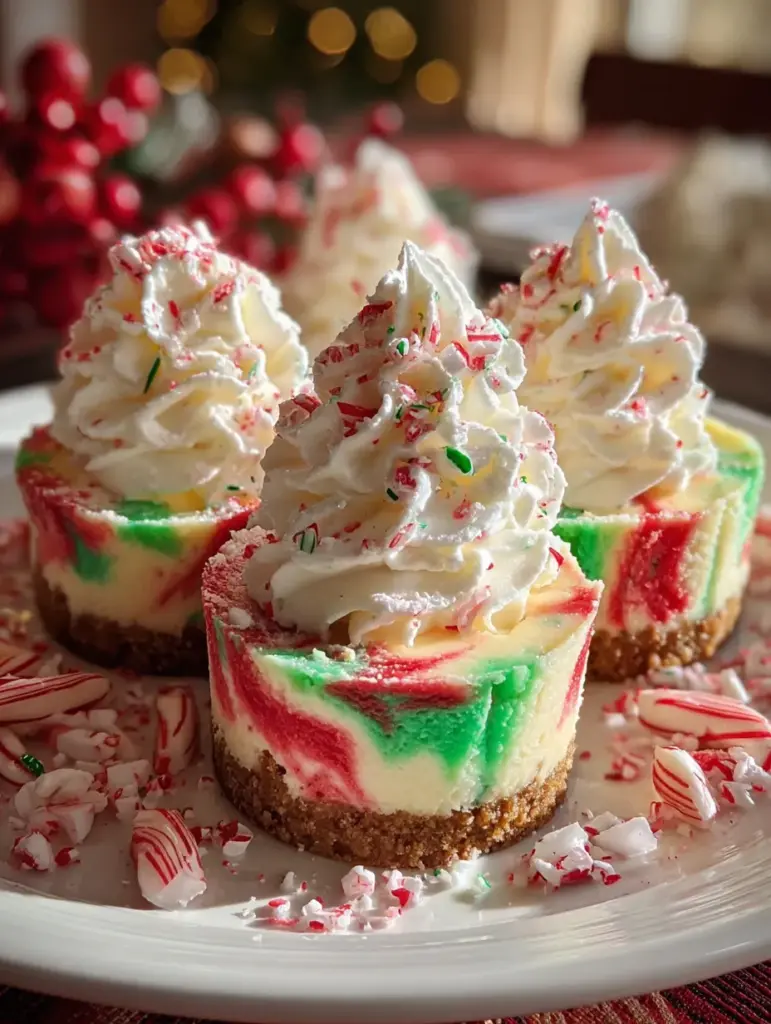
So let’s talk aesthetics: swirls of red and green marbled into snowy-white cheesecake filling, each one nestled in a golden graham cracker crust and topped with fluffy whipped cream. Then… crushed peppermint and festive sprinkles? Chef’s kiss.
But this isn’t just about looks — it’s about texture and flavor:
- The crust gives that buttery crunch you crave.
- The filling is cool, rich, and cloud-like in texture.
- The toppings add both color and that perfect sweet crunch.
Basically, they taste like Christmas joy.
Ingredients You’ll Need
Let’s break down exactly what goes into these holiday gems.
Crust Base:
- 1 ½ cups graham cracker crumbs
- 6 tbsp melted butter
- 2 tbsp granulated sugar
Creamy Cheesecake Filling:
- 8 oz (225g) cream cheese, softened
- 1 cup powdered sugar
- 1 cup cold heavy cream
- 1 tsp vanilla extract
Festive Toppings:
- Red and green food coloring (gel preferred for vibrant colors)
- Red & green sprinkles
- Optional: Crushed candy canes
Optional Add-Ins to Make It Your Own
Feeling creative? Try adding:
- Peppermint extract to the filling for a minty twist.
- Mini chocolate chips folded in for a cookies-and-cream vibe.
- Crushed Oreos instead of graham crackers for a chocolate crust.
- Gingerbread crumbs for a more seasonal base.
Kitchen Tools You’ll Need
You don’t need anything fancy! Just:
- Mixing bowls
- Hand mixer or stand mixer
- Cupcake pan or silicone molds
- Cupcake liners (festive ones are a bonus!)
- Piping bag or spoon for filling
- Food coloring (gel is best for color without thinning)
How to Make No-Bake Christmas Mini Cheesecakes (Step-by-Step)
Let’s get to the good part — putting it all together!
Step 1: Make the Graham Cracker Crust
Mix the graham cracker crumbs, melted butter, and sugar in a bowl. Stir until everything’s evenly coated and the texture feels like wet sand. This will help it press easily and hold its shape.
Step 2: Press and Chill
Line a cupcake pan with liners or use silicone molds. Scoop about a tablespoon of the crust mixture into each cup, then press it down firmly using the back of a spoon or your fingers. Pop the pan into the freezer or fridge to chill while you make the filling (about 10 minutes is perfect).
Step 3: Whip the Cheesecake Filling
In one bowl, beat the softened cream cheese with the powdered sugar until it’s silky smooth and lump-free. In another bowl, whip the heavy cream to stiff peaks — this is what gives your filling its light, airy texture. Gently fold the whipped cream into the cream cheese mixture with vanilla extract. Take your time — you want this mixture light and fluffy.
Step 4: Divide, Tint & Swirl
Divide your creamy filling into three bowls. Leave one plain white, then tint the second red and the third green using gel food coloring.
To create the festive swirl, spoon a small dollop of each color into the cupcake liner in layers, or alternate dropping red, green, and white into each mold. Use a toothpick or skewer to gently swirl the colors together — don’t overmix or you’ll lose the marbling.
Step 5: Fill the Cups
Now scoop or pipe the swirled filling onto your chilled crusts. Smooth the tops with a spoon or offset spatula. Already looking magical, right?
Step 6: Decorate Like It’s Christmas Morning
Top each mini cheesecake with whipped cream (use a star tip for that dramatic swirl!). Then finish with a generous sprinkle of crushed candy canes or red and green sprinkles.
Step 7: Chill & Serve
Place your cheesecakes in the fridge for at least one hour, or until set. If you’re prepping ahead, they’ll keep beautifully for up to 3 days in the fridge.
Coloring Tips for That Red and Green Swirl Magic
Want those vibrant, picture-perfect Christmas colors just like in the image? The secret is gel food coloring. Unlike liquid food dye, gels are more concentrated, so they give rich color without watering down your cheesecake batter.
Here’s how to get it just right:
- Use just a toothpick tip of gel coloring at first. A little goes a long way.
- Mix thoroughly in a separate bowl before adding to your main swirl mix to avoid clumps.
- For the cleanest swirl, layer dollops of red, green, and white, then swirl just once or twice. Too much swirling will blend the colors into a not-so-festive mess.
Pro tip: Use a wooden skewer or toothpick for swirling instead of a spoon — it gives you more control and cleaner patterns!
Print
No-Bake Christmas Mini Cheesecakes
- Prep Time: 10 minutes
- Total Time: 1 hour 10 minutes
- Category: Dessert • No-Bake • Holiday Treats • Christmas Sweets
Description
🎄✨ Creamy, festive, and wonderfully easy — these mini Christmas cheesecakes are the perfect chilled treat for holiday parties, gifting, or enjoying with family by the tree! 🎅❄️
Ingredients
1 ½ cups graham cracker crumbs
6 tbsp melted butter
2 tbsp granulated sugar
8 oz (225g) cream cheese, softened
1 cup powdered sugar
1 cup cold heavy cream
1 tsp vanilla extract
Red and green sprinkles
Optional: Crushed candy canes
Instructions
Mix the graham cracker crumbs, melted butter, and sugar in a bowl until fully combined. (⏱️ 2 minutes)
Press the crumb mixture firmly into cupcake liners or silicone molds to form the base. Chill to set. (⏱️ 10 minutes)
Beat the softened cream cheese with powdered sugar until smooth and creamy. (⏱️ 3 minutes)
Whip the cold heavy cream to stiff peaks, then gently fold it into the cream cheese mixture with vanilla. (⏱️ 4 minutes)
Spoon or pipe the cheesecake filling over the prepared crusts, smoothing the tops. (⏱️ 3 minutes)
Add festive sprinkles or crushed candy canes on top. (⏱️ 1 minute)
Chill until completely set and firm. (⏱️ 1 hour)
Notes
Nutrition
- Serving Size: 12 mini cheesecakes
- Calories: ~165 kcal
How to Get Perfect Whipped Cream Swirls on Top
Now, let’s talk about that snowy swirl of whipped cream topping. It’s not just about looks — it adds the perfect airy texture to balance the dense cheesecake below.
Here’s how to make it fabulous:
- Use a piping bag with a star tip to get that perfect bakery-style swirl.
- If you don’t have a piping bag, a zip-top bag with the corner snipped off works in a pinch.
- Chill your whipped cream in the fridge for 10-15 minutes before piping — it helps hold the shape better.
- Add the whipped cream just before serving if you want the best texture and appearance.
Want extra flavor? Fold in a little powdered sugar and a dash of vanilla extract when whipping!
You may like as well :
Cookie Butter Cheesecake Cup: The Ultimate No-Bake Indulgent Dessert
Strawberry Crunch Cheesecake Bites — Creamy, Crunchy, and Totally Addictive
No-Bake Pumpkin Cheesecake Balls: A Fall Dream Come True
Best Toppings for a Festive Finish
Toppings are where the magic happens. You can stick with the classic combo — like in the photo — or get a little extra creative. Here are some ideas that take your mini cheesecakes from cute to wow:
- Crushed candy canes: A must. They add color, crunch, and a pepperminty pop.
- Christmas sprinkles: Red, green, gold, stars, snowflakes — the more festive, the better!
- White chocolate shavings: Adds a snowy, elegant touch.
- Mini marshmallows or crushed cookies: Fun and flavorful.
- Sugared cranberries or rosemary sprigs: Fancy and festive!
How to Store Mini Cheesecakes
These little guys store really well — which makes them great for making ahead.
Here’s how:
- In the fridge: Store in an airtight container for up to 3 days. Keep them chilled until ready to serve.
- In the freezer: You can freeze them for up to 2 months. Just wrap each cheesecake in plastic wrap, then store them in a freezer-safe container. Thaw overnight in the fridge before serving.
- Avoid the toppings if freezing. Add whipped cream and candy just before serving for best results.
Make Ahead Tips for Busy Holiday Schedules
December is hectic. So here’s how to make your life easier with these make-ahead tips:
- Make the crust and filling the night before.
- Pipe the filling into the cups and keep them covered in the fridge.
- Wait to add whipped cream and toppings until just before serving for maximum freshness.
You can even prep batches in advance, freeze them (without toppings), and bring them out when guests arrive — no one will know they weren’t made that day!
Fun Variations to Try
Want to shake things up? Here are some fun spins on the classic:
- Peppermint Mocha Cheesecakes: Add a touch of cocoa powder and instant espresso to the filling.
- Gingerbread Cheesecakes: Use gingerbread cookie crumbs for the crust and top with cinnamon whipped cream.
- Eggnog Mini Cheesecakes: Add a splash of eggnog and a dash of nutmeg to the mix.
- Grinch Green Cheesecakes: Go all green, then top with a single red heart sprinkle (adorable for kids!).
- Chocolate-Dipped Bottoms: Freeze the cheesecakes, then dip the crust bottoms in melted chocolate before serving.
Serving Suggestions
Presentation matters — especially during the holidays. Here are some ideas to impress:
- Serve them on a festive tiered cake stand with holly and mini ornaments.
- Plate each mini cheesecake with a drizzle of chocolate or caramel sauce.
- Add a tiny candy cane or holiday pick on top of the whipped cream swirl.
- Wrap them in individual cupcake boxes for party favors or gifts.
Pair them with:
- A mug of hot cocoa
- Holiday spiced tea
- Mulled wine or eggnog
Nutrition Info Breakdown (Per Serving Approx.):
| Nutrient | Amount (per mini cheesecake) |
|---|---|
| Calories | ~165 kcal |
| Carbohydrates | 13g |
| Sugar | 10g |
| Fat | 12g |
| Saturated Fat | 7g |
| Protein | 2g |
Note: Nutritional values can vary based on specific brands and ingredients used.
Conclusion: Let the Holidays Taste As Good As They Look
So there you have it — the ultimate holiday treat that’s no-bake, no-stress, and all kinds of merry. These No-Bake Christmas Mini Cheesecakes bring together everything we love about the season: joy, color, sweetness, and that extra bit of magic that makes you stop and smile.
Whether you’re hosting a big gathering, need a last-minute dessert, or just want something special to snack on while watching “Elf” for the fifteenth time, these are the answer.
So go ahead — get festive, get baking (without baking), and make this your sweetest holiday season yet. 🎄❤️
Similar recipes : No-Bake Salted Caramel Cheesecake Cups
FAQs
1. Can I make these mini cheesecakes ahead of time?
Yes! You can make them up to 3 days in advance and store them in the fridge. For longer storage, freeze them (without toppings) for up to 2 months.
2. Do I need a mixer to make the filling?
A hand mixer or stand mixer helps get the smoothest texture, but you can use a whisk and elbow grease — just make sure the cream cheese is softened.
3. Can I use store-bought whipped cream for topping?
Absolutely. Though homemade whipped cream holds up better, store-bought is fine for a quick shortcut.
4. How do I keep the colors from mixing too much?
Layer the colors carefully and swirl gently with a toothpick. Less is more when it comes to swirling!
5. What other crust options can I use?
Try crushed Oreos, vanilla wafers, ginger snaps, or even chocolate graham crackers for a fun twist!


