Picture this: It’s Christmas Eve, the fireplace is crackling, carols are humming in the background, and on the table sits a glistening tray of creamy, dreamy Christmas Oreo Lasagna. No oven needed, no fancy baking skills required—just layers of festive goodness stacked into a chilled dessert that looks just as magical as it tastes. If you’re looking for the ultimate crowd-pleasing treat that screams Christmas spirit, you’ve found it.
This dessert is more than just pretty—it’s a flavor-packed experience. With layers of crushed holiday Oreos, fluffy cheesecake filling, rich chocolate pudding, and a whipped cream topping, it’s sweet, soft, crunchy, creamy—all in one bite. And the best part? You can make the whole thing in under 30 minutes (plus chill time) with just a few simple ingredients. Let’s dig in.
🎁 What is Christmas Oreo Lasagna?
Christmas Oreo Lasagna is a layered, no-bake dessert that feels like a holiday party in your mouth. Think of it like a dessert lasagna where the pasta sheets are swapped for crushed Oreo cookies, and the sauces are layers of sweetened cream cheese, pudding, and whipped topping. Each layer is creamy, decadent, and just the right amount of indulgent.
But this version isn’t your everyday Oreo lasagna. This one’s dressed up for the holidays—decked out in red, green, and white sprinkles, with festive Oreo cookies and cheerful colors peeking through the layers. It’s soft yet structured, rich yet light, and looks like it belongs on the cover of a Christmas magazine.
🌟 Why This Recipe is a Holiday Winner
- Zero baking required. No hot ovens or complicated steps—just mix, layer, chill, and serve.
- It’s beautiful. With its snowy whipped topping and vibrant red and green sprinkles, this dessert is a showstopper.
- It’s versatile. Perfect for family dinners, potlucks, Christmas parties, or even as a fun activity to make with kids.
- Make-ahead friendly. You can whip it up the night before and let it set in the fridge until dessert time.
- Crowd-pleaser. It’s got layers of flavor and texture everyone—from toddlers to grandparents—will love.
🛒 Ingredients You’ll Need
Here’s everything you’ll need to bring this dessert to life:
For the Crust:
- 1 package (14.3 oz) Holiday Oreos (preferably with red & green crème)
- ¼ cup unsalted butter, melted
For the Cheesecake Layer:
- 1 package (8 oz) cream cheese, softened
- ½ cup powdered sugar
- 1 tsp vanilla extract
- 1 container (8 oz) whipped topping (like Cool Whip)
For the Pudding Layer:
- 2 boxes (3.4 oz each) instant chocolate pudding
- 3 cups cold milk
For the Topping:
- 1 container (8 oz) whipped topping
- Crushed holiday Oreos
- Red and green sprinkles
Optional Add-ons:
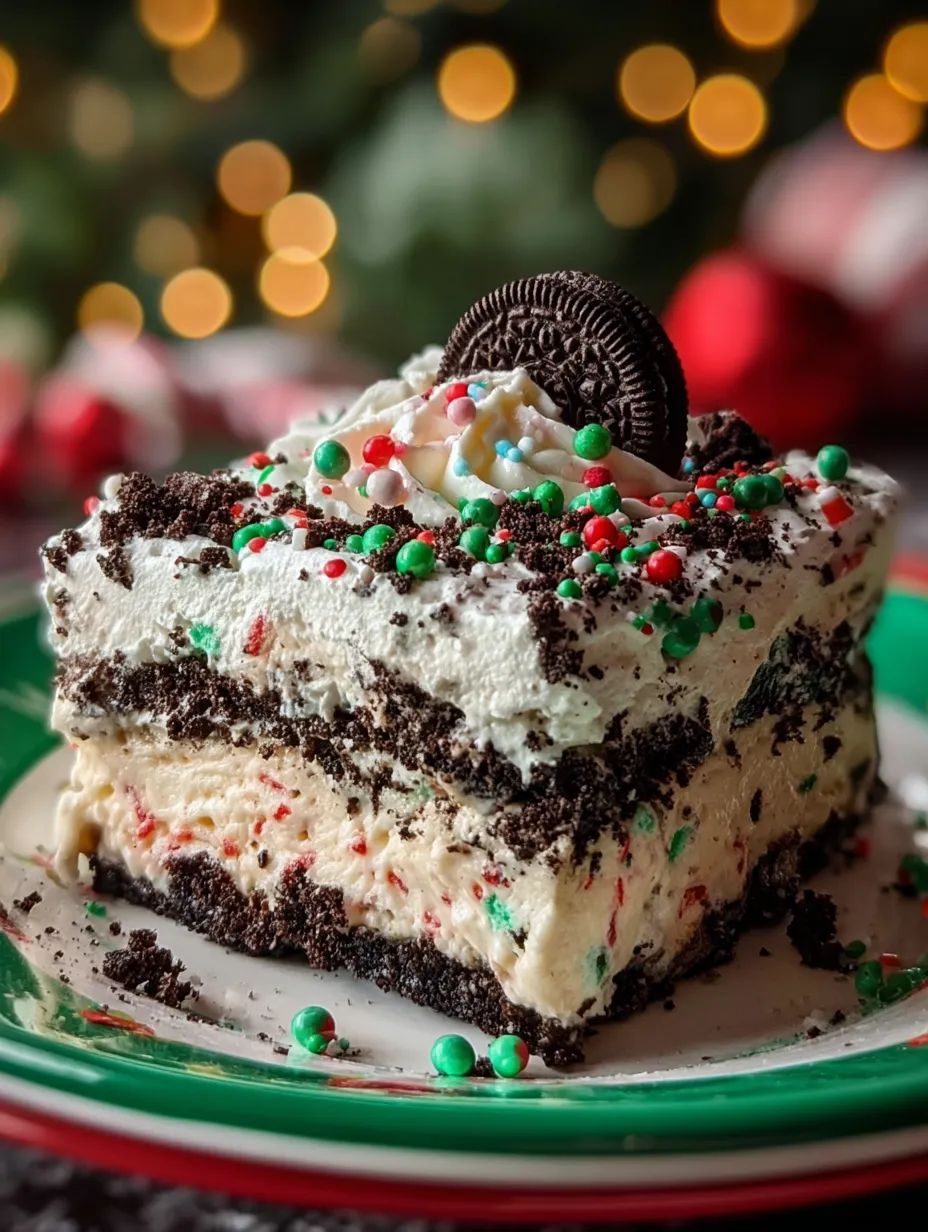
- Mini Oreos for garnish (like in the image)
- Peppermint bits for extra holiday flair
🍪 Let’s Talk About the Oreos – The Star of the Show
The soul of this dessert? Oreos. Specifically, those festive, limited-edition red and green crème-filled holiday Oreos. They bring both the chocolate crunch and that seasonal pop of color that makes this dessert Instagram-worthy.
Pro tip: Don’t remove the filling! Crush them whole—it helps bind the crust and adds a creamy texture throughout. You can use a food processor for fine crumbs or place them in a zip-top bag and go to town with a rolling pin.
Reserve about ¼ cup of crumbs for the final topping—because that extra crunch on top? Chef’s kiss.
🥄 Making the Perfect Oreo Crust
Your first layer sets the stage, so let’s get it right. Mix your crushed Oreos (minus that reserved ¼ cup) with melted butter until you have a damp, sand-like mixture. Press it into the bottom of a 9×13-inch dish. Use the back of a spoon or your fingers to really pack it down tight. You want a firm, even layer that holds its shape when sliced.
Pop the crust in the fridge for about 10–15 minutes to set. This helps solidify the butter and creates a solid base for the soft layers to come.
🍰 Creamy Cheesecake Layer – Light, Tangy, and Fluffy
This layer is where the magic starts to build. Beat the softened cream cheese until smooth and lump-free. Then add the powdered sugar and vanilla extract—this adds that sweet, slightly tangy cheesecake flavor that balances out the rich chocolate below.
Fold in the whipped topping gently. You don’t want to beat the air out—you want it fluffy! Spread this layer over the chilled crust. Use a spatula to make it as even as possible, going all the way to the edges.
The combination of cream cheese and Cool Whip gives this layer a mousse-like texture that pairs beautifully with the crunchy Oreo base.
🍫 Luscious Chocolate Pudding Layer
Grab your instant pudding mix and cold milk (whole milk works best for creaminess). Whisk them together for about 2 minutes until thick and velvety. You want the pudding to be nice and set—not runny—before you spread it.
Layer the pudding evenly on top of the cheesecake layer. It adds a rich, chocolatey surprise in the middle that contrasts perfectly with the sweet, tangy layers surrounding it.
This is where the dessert starts to feel like a chocolate dream come true.
☁️ Cloud-like Whipped Topping Magic
Top everything off with your final container of whipped topping. It acts like fluffy snow blanketing your dessert lasagna. Carefully spread it out with a spatula or spoon so it covers the pudding layer without disturbing it.
Think of this as your frosting layer—it ties everything together visually and taste-wise.
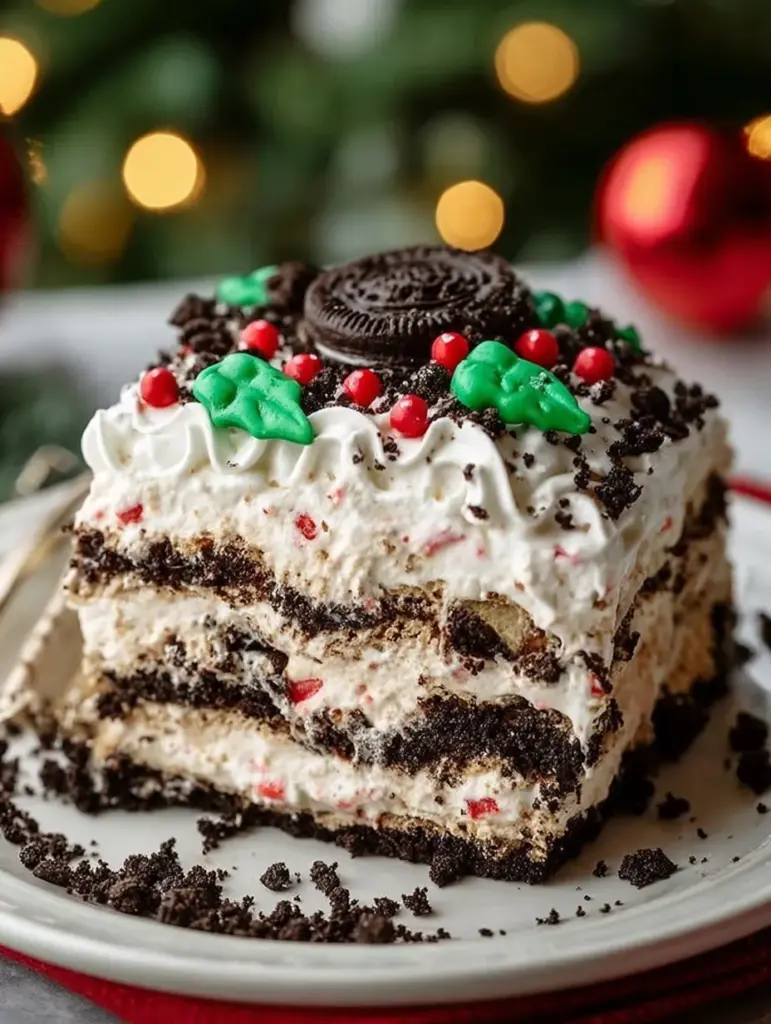
✨ Garnishing: The Festive Finish
Now for the fun part! Sprinkle the reserved Oreo crumbs across the top, then scatter red and green sprinkles generously. Want to take it up a notch? Press a few mini Oreos into the top (as shown in the photo) and maybe even a drizzle of white chocolate or crushed peppermint.
This step transforms your lasagna from a delicious dessert to a centerpiece-worthy Christmas creation.
🕒 Chill Time: The Most Important Step
Don’t skip this step—it’s crucial. After assembling all your layers, cover the dish with plastic wrap or a lid and pop it into the refrigerator for at least 4 hours, but overnight is even better. This allows all the layers to firm up and meld together, so when you slice into it, everything holds its shape beautifully.
It might be tempting to dive in right away (especially with how good it smells), but trust the process. A properly chilled Oreo lasagna is creamy yet structured, and every bite delivers a little piece of holiday heaven.
🎁 Serving Suggestions
Once your dessert is fully chilled, slice it into squares using a sharp knife. For cleaner cuts, wipe your knife with a warm cloth between slices. You can serve it straight from the dish, or transfer slices onto festive holiday plates for a touch of seasonal charm.
Want to get a little fancy? Add a dollop of whipped cream, a drizzle of chocolate syrup, or a peppermint stick on the side. It’s also perfect with a cup of hot cocoa or peppermint coffee.
Portion Tips:
- This recipe yields about 12 generous servings, or 16 smaller squares if you’re serving a crowd.
📆 Make It Ahead: Perfect for Holiday Planning
One of the best things about this Christmas Oreo Lasagna? It’s a dream for holiday prep.
You can make it 1–2 days in advance and store it, covered, in the fridge until ready to serve. It actually gets better as it sits, allowing the flavors to blend even more. Just hold off on adding the sprinkles until the day of serving if you want them to stay crisp and vibrant.
Bringing it to a party?
- Assemble it in a disposable foil pan with a lid for easy transport.
- Keep it chilled in a cooler with ice packs if it’ll be out for a while.

No-Bake Christmas Oreo Lasagna
- Prep Time: 25 minutes
- Total Time: 4 hours 25 minutes
- Category: No-Bake Holiday Desserts / Christmas Lasagna Treats
Description
🎄✨ A creamy, chocolatey, festive dessert layered with holiday Oreos, velvety cheesecake, and chocolate pudding! This no-bake Christmas delight is the easiest showstopper for parties and family gatherings. 🎅🍫❄️
Ingredients
For the Crust:
1 package (14.3 oz) holiday Oreos (red & green filling)
¼ cup unsalted butter, melted
For the Cheesecake Layer:
1 package (8 oz) cream cheese, softened
½ cup powdered sugar
1 teaspoon vanilla extract
1 container (8 oz) whipped topping
For the Pudding Layer:
2 packages (3.4 oz each) instant chocolate pudding mix
3 cups cold milk
For the Topping:
1 container (8 oz) whipped topping
Crushed holiday Oreos
Holiday sprinkles
Instructions
Crush the holiday Oreos into fine crumbs, reserving ¼ cup for garnish. Mix crumbs with melted butter and press into a 9×13-inch dish to form the crust. Chill to set. ⏱️ 10–15 minutes
In a bowl, beat cream cheese, powdered sugar, and vanilla until smooth. Fold in whipped topping gently. Spread evenly over the chilled crust. ⏱️ 5 minutes
Whisk instant pudding mix with cold milk until thickened. Spread over the cheesecake layer. ⏱️ 2 minutes
Spread the remaining whipped topping over the pudding layer. Garnish with crushed Oreos and festive sprinkles. ⏱️ 3 minutes
Cover and refrigerate until fully set before serving. Slice into squares and enjoy chilled. ⏱️ 4 hours
Notes
Perfect make-ahead dessert for busy holiday gatherings.
Chill it long enough for clean, beautiful layers.
Use holiday Oreos for the festive color pop — red & green crumbs look amazing on top!
Can be frozen for 20–30 minutes before slicing for extra firmness.
Nutrition
- Serving Size: 12
- Calories: 320 kcal
🌀 Creative Twists & Variations
Want to give your Oreo Lasagna a personal touch? Try some of these fun and festive twists:
🎄 Peppermint Oreo Lasagna
- Add ½ teaspoon of peppermint extract to the cream cheese layer.
- Sprinkle crushed candy canes on top instead of sprinkles.
🍫 Double Chocolate Dream
- Swap regular Oreos for double chocolate ones.
- Add a layer of chocolate chips or chocolate fudge sauce between the cheesecake and pudding layers.
🎂 Birthday Holiday Mashup
- Use Birthday Cake Oreos for a sprinkle explosion.
- Add a thin layer of colorful sprinkles between each layer.
🥜 Nutty Nutcracker Version
- Add a sprinkle of chopped toasted pecans or walnuts on top.
- Drizzle with caramel or peanut butter sauce.
🌾 Gluten-Free Option
- Use gluten-free Oreos (yes, they exist and taste great!).
- Double-check your pudding mix and whipped topping for gluten-free labeling.
You may like also : Oreo Balls for Christmas: The Ultimate No-Bake Holiday Treat You’ll Love
🚨 Troubleshooting Common Mistakes
Even a no-bake dessert can have its moments. Here’s how to troubleshoot if things don’t go exactly as planned:
1. My dessert is too runny.
- Make sure the pudding was fully set before layering.
- Chill the entire dessert for the full 4+ hours.
- Whipped topping and cream cheese should be cold to hold better.
2. The layers are mixing together.
- Spread each layer gently and evenly.
- Chill after each step if your kitchen is warm.
3. The crust is crumbly or falling apart.
- Make sure to press the crust down firmly.
- If too dry, add a bit more melted butter.
4. It’s too sweet for my taste.
- Reduce powdered sugar in the cheesecake layer by 1–2 tablespoons.
- Use plain whipped cream instead of sweetened topping for a lighter flavor.
🎬 Final Thoughts
Christmas is a time for traditions, and once you make this No-Bake Christmas Oreo Lasagna, it’s going to become one of yours. It’s festive, easy, gorgeous, and so incredibly delicious, it might just steal the show at every holiday gathering.
Whether you’re baking with kids, hosting a party, or just looking for a new way to celebrate the season, this dessert hits all the right notes. You get the nostalgic flavors of Oreos, the richness of pudding and cheesecake, and the fun of sprinkles all in one pan.
So grab a spoon, a big slice, and a cozy blanket—Christmas just got a whole lot sweeter. 🎄❤️
Similar recipes :
Oreo Dessert Cups
Strawberry Oreo Cookies
🎅 5 Festive FAQs About Christmas Oreo Lasagna
1. Can I freeze Oreo Lasagna?
Yes, but it’s best enjoyed fresh from the fridge. If you do freeze it, wrap it tightly and let it thaw in the fridge overnight before serving. The texture may be slightly softer.
2. Can I make this without cream cheese?
You can substitute mascarpone or a mix of Greek yogurt and whipped topping, but it will change the flavor and texture slightly.
3. Is it okay to use different pudding flavors?
Absolutely! Vanilla, white chocolate, or even peppermint pudding can add fun holiday twists.
4. How long does it last in the fridge?
It stays fresh for about 4–5 days when stored in an airtight container. The crust may soften slightly over time.
5. Can I use homemade whipped cream instead of Cool Whip?
Yes! Whip 1 cup of heavy cream with 2 tablespoons of powdered sugar until stiff peaks form for a homemade alternative.


