Introduction to No-Bake Christmas Oreo Lasagna
Ah, the holiday season! It’s that magical time when the air is filled with festive joy and the hustle and bustle begins. And what better way to celebrate than whipping up a delightful No-Bake Christmas Oreo Lasagna? For busy moms like me, finding a dessert that’s not only easy to prepare but packed with flavor is a game-changer. This layered wonder combines the rich taste of Oreo cookies with creamy puddings, making it a total crowd-pleaser. Plus, no baking means more time to enjoy the season with family and friends!
Why You’ll Love This No-Bake Christmas Oreo Lasagna
This No-Bake Christmas Oreo Lasagna is the perfect dessert for the festive season! It’s incredibly easy to make, taking just 30 minutes of prep time. The taste? Absolutely heavenly! Every bite is a delightful blend of cookies and cream that’s sure to impress your family and friends. Plus, you can make it ahead of time, leaving you with more moments to savor the holidays instead of being stuck in the kitchen!
Ingredients for No-Bake Christmas Oreo Lasagna
Gathering the right ingredients is the first step to making this festive treat shine! Here’s a list of what you’ll need for your No-Bake Christmas Oreo Lasagna:
- Oreo cookies: Both regular or holiday-themed Oreos work wonderfully for the base and topping.
- Unsalted butter: This adds richness to the crust, providing a nice buttery flavor.
- Cream cheese: Softened cream cheese creates a smooth, creamy layer that’s hard to resist.
- Powdered sugar: It sweetens the cream cheese, adding that delightful touch of sweetness.
- Heavy whipping cream: Whipping this cream gives you that luscious texture; it’s what makes this dessert so indulgent!
- Vanilla extract: A splash of vanilla enhances the overall flavor, making it warm and inviting.
- Instant vanilla pudding mix: This is key for the creamy pudding layer, adding flavor and thickness.
- Milk: Needed to create the pudding; feel free to use your preferred type of milk.
- Mini marshmallows (optional): For those who love extra fluffiness in their layers, these are a fun addition!
- Crushed peppermint candies or mini M&Ms: These seasonal garnishes add a festive crunch and pop of color.
- Red and green sprinkles (optional): For a fun, festive touch, sprinkle these on top before serving.
- Extra whole Oreos: These are perfect for topping, making your dessert look even more irresistible.
Don’t worry; exact quantities are at the bottom of this article for easy printing. Feel free to mix and match these ingredients or make substitutions based on what you have at home. Enjoy your culinary adventure!
How to Make No-Bake Christmas Oreo Lasagna
The joy of creating a festive dessert is in the layers, and this No-Bake Christmas Oreo Lasagna is a masterpiece just waiting for your touch! Let’s dive into the easy steps of making this crowd-pleaser that will wow your family and friends.
Step 1: Prepare the Oreo Crust
Start by crushing those Oreo cookies! Use a food processor for an effortless task, or place them in a zip-top bag and crush them with a rolling pin. You want them finely crushed, like sand at the beach.
Once crushed, mix the Oreos with melted unsalted butter until the crumbs are well coated.
The mixture should feel slightly damp, allowing it to hold together when pressed. Firmly pack this crumb mixture into the bottom of a 9×13-inch baking dish to form a sturdy crust. Set it aside to begin your layering adventure.
Step 2: Make the Cream Cheese Layer
Now, let’s create that smooth and creamy layer that takes center stage! In a large mixing bowl, beat the softened cream cheese and powdered sugar together until it’s creamy and dreamy.
You want a velvety texture, so don’t rush this step!
In a separate bowl, beat the heavy whipping cream and add in a teaspoon of vanilla extract. Keep mixing until you achieve stiff peaks; think of clouds in the sky.
Gently fold the whipped cream into the cream cheese mixture. This creates a light, fluffy consistency. Spread this delicious layer over the Oreo crust, letting it shine!
Step 3: Make the Pudding Layer
Next up, the pudding layer! In another bowl, whisk together the instant vanilla pudding mix and milk.
Make sure you whisk vigorously to avoid lumps; this will ensure a smooth texture.
Let the mixture sit for about 2 minutes. This step is key because it allows the pudding to thicken up beautifully.
Once thickened, spread this creamy pudding layer over the cream cheese layer in the baking dish, smoothing it out evenly.
Your dessert is really taking shape now!
Step 4: Top with Marshmallows (Optional)
If you’re looking for extra fluffiness, sprinkle some mini marshmallows over the pudding layer. These delightful bites add a chewy texture that complements your creamy layers. It’s optional but well worth it for the holiday magic!
Step 5: Chill
Now it’s time to chill out! Cover your baking dish with plastic wrap and refrigerate your lasagna for at least 3 hours.
Chilling is crucial because it helps the layers set properly, making it easy to slice later.
The longer you chill, the firmer it will become, so feel free to prepare it the night before!
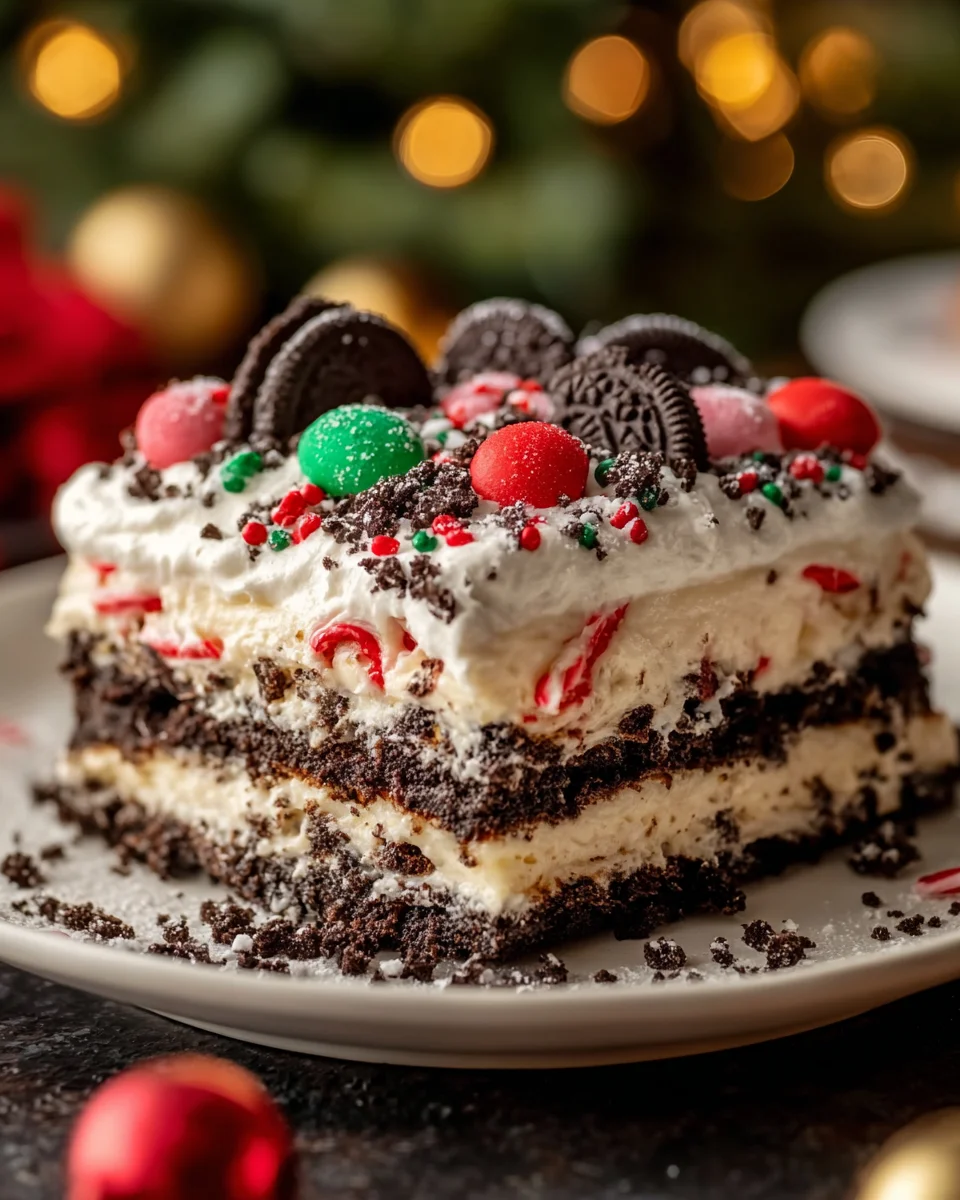
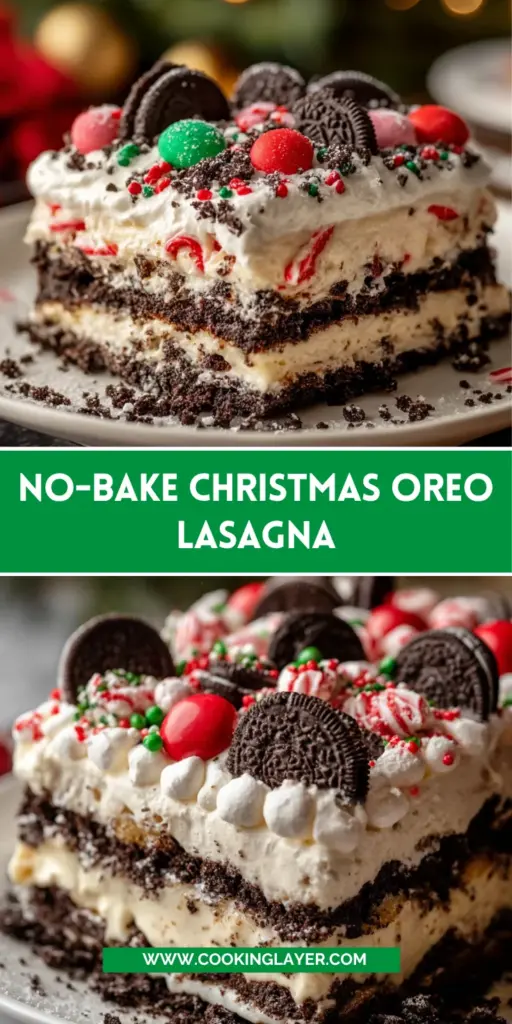
Step 6: Garnish and Serve
Before serving, let’s make this dessert sparkle! Remove the lasagna from the fridge and decorate it with crushed peppermint candies or mini M&Ms for a festive flair.
A sprinkle of red and green sprinkles adds that holiday cheer.
Top it off with extra whole Oreos, then slice it into squares and serve. Your guests will be calling you the holiday dessert queen!
Tips for Success
- Always use softened cream cheese for easy blending; it makes a world of difference.
- Use a food processor for quick and uniform cookie crushing.
- Don’t skip the chilling time; it helps the layers set beautifully.
- Feel free to double the recipe for larger gatherings. It’s a hit!
- Customize the toppings based on your family’s favorites for a personal touch.
Equipment Needed
- Food processor: Ideal for crushing Oreos quickly; a zip-top bag and rolling pin can work in a pinch.
- Mixing bowls: Use two large bowls for easy mixing of layers.
- Whisk: Essential for blending the pudding; a fork works if you’re in a hurry.
- 9×13-inch baking dish: The perfect size for this dessert; any similar-sized dish will do.
- Spatula: Handy for spreading layers evenly; a spoon can substitute if necessary.
Variations
- Gluten-Free Version: Use gluten-free Oreo cookies in place of regular ones for a gluten-free delight!
- Chocolate Lovers: Swap out some of the vanilla pudding with chocolate pudding for a rich, chocolatey twist.
- Nutty Flavor: Add chopped nuts, such as walnuts or pecans, to the layers for added crunch and flavor.
- Fruit Layer: Incorporate a layer of fresh strawberries or raspberries for a fruity burst that complements the creamy layers.
- Dairy-Free Option: Substitute dairy ingredients with non-dairy alternatives like coconut cream and almond milk for a dairy-free treat.
Serving Suggestions
- Pair your No-Bake Christmas Oreo Lasagna with a warm cup of cocoa or peppermint tea for a festive touch.
- Serve alongside fresh fruit, like strawberries or raspberries, to balance the richness.
- For a special presentation, arrange the slices on a decorative platter with festive napkins.
- Add whipped cream dollops on the side for an extra creamy delight.
FAQs about No-Bake Christmas Oreo Lasagna
Can I make No-Bake Christmas Oreo Lasagna in advance?
Absolutely! This dessert not only keeps well but actually tastes better the next day as the flavors meld together. You can make it up to three days in advance and keep it in the refrigerator, ready to thrill your guests!
How can I make it more festive for holiday gatherings?
Consider adding seasonal toppings like crushed peppermint candies, festive sprinkles, or even edible glitter! These accents will elevate your No-Bake Christmas Oreo Lasagna and bring a joyful spark to any holiday table.
Is there a way to customize the layers?
<pDefinitely! You can switch out the vanilla pudding for chocolate pudding for a delicious twist. Add fruit, like fresh raspberries, between the layers for a refreshing burst of flavor. The possibilities are endless with this versatile recipe!
What if I don’t have heavy whipping cream?
If you’re in a pinch, you can substitute heavy whipping cream with whipped topping like Cool Whip. Just fold it into the cream cheese mixture for that delightful fluffiness we all love in our No-Bake Christmas Oreo Lasagna.
How should I store any leftovers?
To keep your No-Bake Christmas Oreo Lasagna fresh, cover it tightly with plastic wrap or transfer it to an airtight container. It will stay good for up to three days in the fridge. Though, let’s be honest, there probably won’t be any left!
Final Thoughts
Creating this No-Bake Christmas Oreo Lasagna is more than just making dessert; it’s about building memories during the holidays! Each layer tells a story of love, laughter, and joy shared around the family table. The combination of flavors and textures is a delightful celebration of the season, perfect for busy moms like me who want something special without the fuss of baking. Plus, the smiles on your loved ones’ faces as they enjoy each bite? That’s truly the sweetest reward. So go ahead, embrace the magic of this festive treat and make it part of your holiday traditions!
Print
No-Bake Christmas Oreo Lasagna
- Prep Time: 30 minutes
- Cook Time: 0 minutes
- Total Time: 3 hours 30 minutes
- Yield: 12 servings 1x
- Category: Dessert
- Method: No-Bake
- Cuisine: American
- Diet: Vegetarian
Description
A delicious and festive no-bake dessert featuring layers of Oreo cookies, cream cheese, and vanilla pudding, perfect for the holiday season.
Ingredients
- 1 package (15.35 oz) Oreo cookies (regular or holiday-themed)
- 1/4 cup unsalted butter, melted
- 1 package (8 oz) cream cheese, softened
- 1/4 cup powdered sugar
- 2 cups heavy whipping cream
- 1 teaspoon vanilla extract
- 1 package (3.4 oz) instant vanilla pudding mix
- 2 cups milk
- 1 cup mini marshmallows (optional, for extra fluffiness)
- 1/2 cup crushed peppermint candies or mini M&Ms (for garnish)
- Red and green sprinkles (optional, for decoration)
- Extra whole Oreos for topping
Instructions
- Prepare the Oreo Crust: In a food processor, pulse the Oreo cookies (reserve some for topping) until finely crushed. Combine the crushed Oreos with melted butter and mix until the crumbs are evenly coated. Press this mixture into the bottom of a 9×13-inch baking dish to form a crust. Set aside.
- Make the Cream Cheese Layer: In a large mixing bowl, beat the softened cream cheese and powdered sugar together until smooth. In a separate bowl, beat the heavy whipping cream and vanilla extract until stiff peaks form. Fold the whipped cream into the cream cheese mixture until fully combined. Spread this mixture over the Oreo crust in the baking dish.
- Make the Pudding Layer: In another bowl, whisk together the instant vanilla pudding mix and milk. Let it sit for about 2 minutes to thicken. Spread the pudding layer evenly over the cream cheese layer in the dish.
- Top with Marshmallows (Optional): For an extra fluffy layer, sprinkle mini marshmallows over the pudding layer.
- Chill: Refrigerate the lasagna for at least 3 hours or until it’s set. The layers should firm up, making it easy to slice.
- Garnish and Serve: Before serving, garnish the lasagna with crushed peppermint candies, sprinkles, and whole Oreo cookies for a festive touch. Slice into squares and enjoy!
Notes
- Make sure to use softened cream cheese for easy mixing.
- If you want to prepare this dessert in advance, it keeps well in the refrigerator for up to 3 days.
- Feel free to customize the toppings as per your preference.
Nutrition
- Serving Size: 1 square
- Calories: 350
- Sugar: 30g
- Sodium: 150mg
- Fat: 22g
- Saturated Fat: 10g
- Unsaturated Fat: 8g
- Trans Fat: 0g
- Carbohydrates: 40g
- Fiber: 2g
- Protein: 4g
- Cholesterol: 30mg