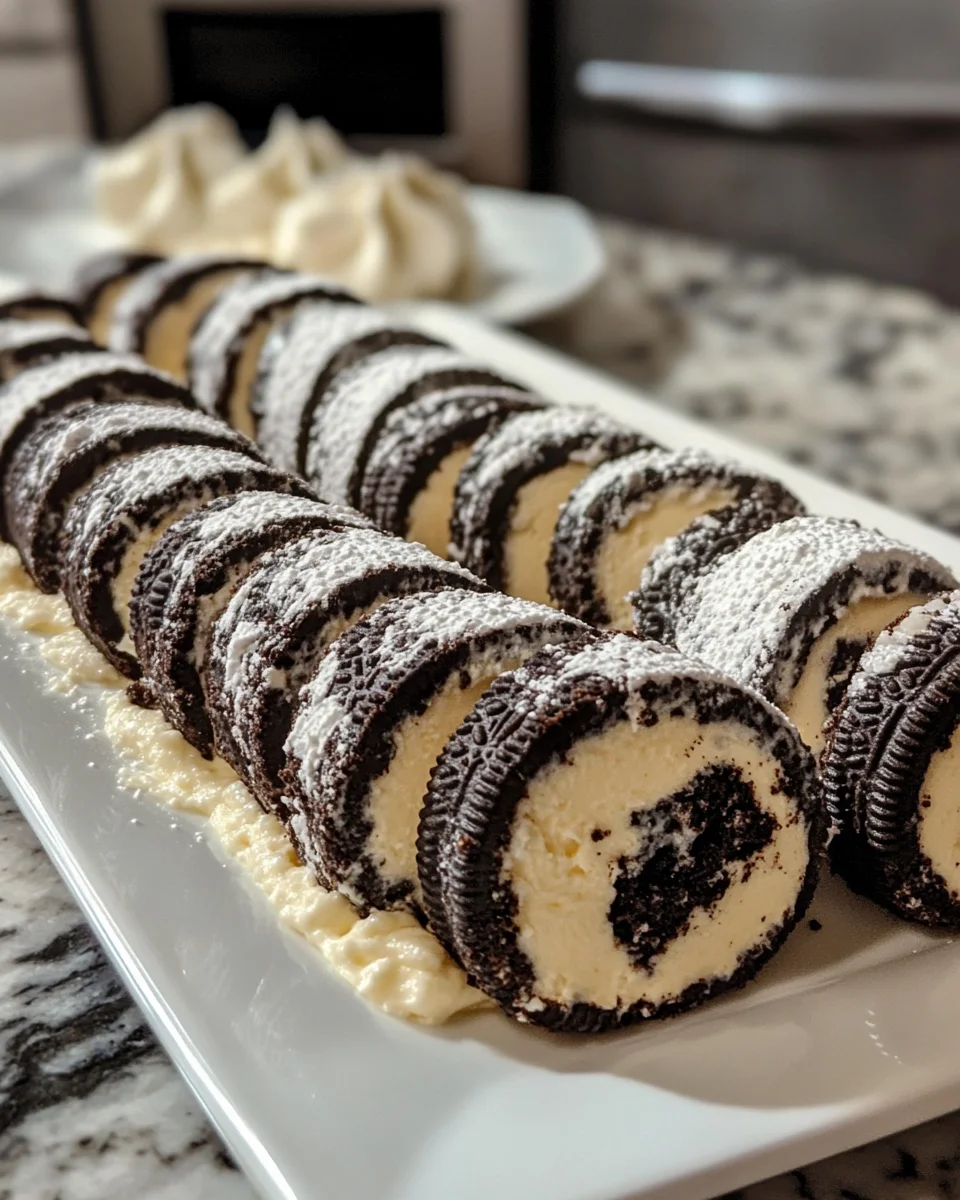
Introduction to No-Bake Oreo Cheesecake Sushi Rolls
Hey there, fellow dessert lovers! If you’re anything like me, the idea of a sweet, delicious treat that requires minimal effort is like music to your ears. That’s where my favorite creation, No-Bake Oreo Cheesecake Sushi Rolls, comes into play. Perfect for those busy days when you want to impress your loved ones without spending hours in the kitchen. It’s a fun twist on classic cheesecake, combining familiar Oreo flavors with a unique presentation. So, grab your ingredients and let’s roll into this delectable adventure!
Why You’ll Love This No-Bake Oreo Cheesecake Sushi Rolls
These No-Bake Oreo Cheesecake Sushi Rolls are a true game-changer in the dessert world. They’re ridiculously easy to whip up, making them perfect for moms on the go or anyone short on time. Plus, the creamy, dreamy cheesecake paired with crunchy Oreo goodness creates a flavor explosion in every bite. You’ll love how they can be customized and made into a visually stunning dessert that’s sure to impress.
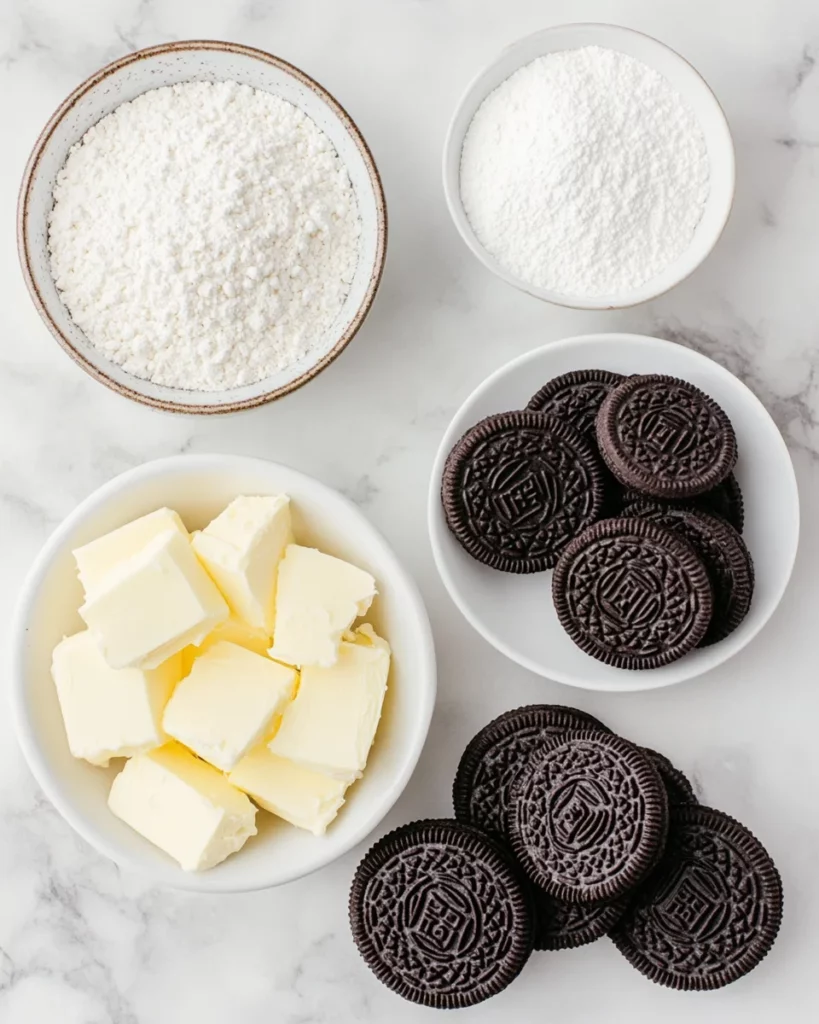
Ingredients for No-Bake Oreo Cheesecake Sushi Rolls
Gathering the right ingredients is the first step to making your delightful No-Bake Oreo Cheesecake Sushi Rolls. Let’s break them down:
- Cream Cheese: This is the star ingredient that gives our cheesecake its rich and smooth texture. Aim for full-fat cream cheese for the best flavor.
- Powdered Sugar: This sweetener blends beautifully into the cream cheese, providing just the right amount of sweetness without any gritty texture.
- Oreo Cookies: The classic chocolate cookie with cream filling adds that nostalgic flavor we all love. Feel free to use any variety of Oreos, like Double Stuff or even seasonal flavors.
- Melted Butter: This binds the cookie crumbs together, giving structure to our sushi roll. Unsalted butter works best for a balanced taste.
- Chocolate Drizzle (optional): A drizzle of chocolate on top adds a decadent touch. Use melted chocolate or store-bought chocolate syrup for ease.
- Crushed Oreos (optional): Sprinkle these on top for extra texture and flavor. It’s an easy way to make your presentation pop!
- Whipped Cream (optional): A dollop of whipped cream can make each slice feel like a treat. Use store-bought or homemade, whichever you prefer.
- Sliced Strawberries or Bananas (optional): These fruits add freshness and flavor variation. Plus, they make your rolls look even more appealing.
For exact quantities and details for the ingredients, you can find them listed at the bottom of this article, available for easy printing!
How to Make No-Bake Oreo Cheesecake Sushi Rolls
Now that we have our ingredients ready, it’s time to dive into the exciting process of making our No-Bake Oreo Cheesecake Sushi Rolls! Follow these step-by-step instructions, and you’ll find the technique simple and fun. Let’s get rolling!
Step 1: Prepare the Cream Cheese Mixture
Start by taking your softened cream cheese and adding it to a mixing bowl. Then, sprinkle in the powdered sugar. Using an electric mixer, beat the mixture on medium speed until it’s smooth and fluffy, like a cloud on a sunny day! This creates the heavenly cheesecake filling that will go inside the rolls. Making sure there are no lumps is key for that silky texture we all adore.
Step 2: Crush the Oreos
Next up, it’s time to crush those Oreos! You can either place them in a zip-top bag and smash them with a rolling pin or pulse them in a food processor. Aim for fine crumbs; they should resemble sand from a tropical beach, perfect for holding our cheesecake together. It’s a fun little stress reliever, too!
Step 3: Make the Oreo Crust
In a bowl, combine your crushed Oreos with melted butter. Stir until well mixed; the crumbs should feel like damp sand. Next, place a sheet of parchment paper on your counter. Press the Oreo mixture into a thin rectangle on the parchment, about ¼ inch thick. Be sure to make the edges as even as possible to create a perfect canvas for your cheesecake layer!
Step 4: Assemble the Cheesecake Layer
Now comes the fun part! Grab your creamy cheesecake mixture and spread it evenly over the Oreo crust, leaving about half an inch of space at the edges. This is where that magic happens! The mixture should cover the crust completely, so every bite is a delightful combination of flavors. It should be smooth and inviting, just begging to be rolled up!
Step 5: Add Fruit
If you fancy adding fruits, this is the time! Sliced strawberries, bananas, or any fruit you like can be layered on top of the cheesecake mixture. These fruits not only add freshness but also a splash of color! Plus, they elevate the taste, creating a delightful balance with the sweetness of the cheesecake.
Step 6: Roll It Up
With the filling in place, it’s time to roll up your creation! Grab the edge of the parchment paper and start rolling the mixture tightly into a log. Keep the roll as tight as possible, like a burrito, to maintain its shape. The parchment paper helps guide you, making the process super easy and preventing sticking. Don’t worry if it’s not perfect; the deliciousness will make up for it!
Step 7: Freeze
Place your rolled cheesecake sushi in the freezer for about 30 to 45 minutes. This step is crucial! Freezing allows the roll to firm up, making it easier to slice without squishing all that creamy goodness inside. Patience, my friends, it will be worth it when you feel that satisfying texture!
Step 8: Slice and Serve
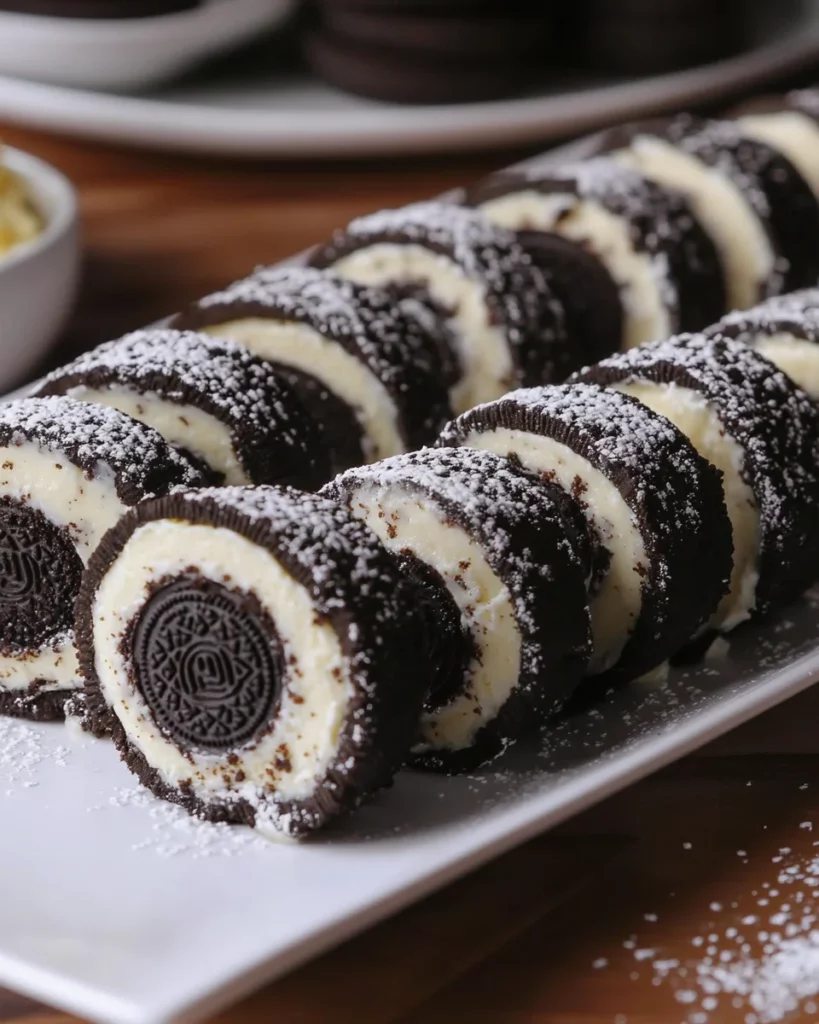
Once the roll is firm enough, pull it out of the freezer and remove the parchment paper. Using a sharp knife, slice it into 1-inch rounds. For an extra touch, consider drizzling with chocolate, sprinkling crushed Oreos, or topping with whipped cream. Each slice will reveal the beautiful layers, and trust me, everyone will want a piece of your delicious creation!
Tips for Success
- Make sure your cream cheese is softened for easier mixing. This helps achieve that silky-smooth texture.
- Freeze the roll longer than 30 minutes for a firmer slice, especially in warmer kitchens.
- Use a hot knife to slice the rolls effortlessly; just dip it in hot water and wipe it dry between cuts.
- Personalize the rolls with seasonal fruits or toppings for an extra special touch.
- Don’t skip the parchment paper; it’s your best friend for rolling!
Equipment Needed
- Mixing Bowl: A medium bowl works well. A large bowl can also be used if you’re preparing more toppings.
- Electric Mixer: A hand mixer is perfect. A whisk can work, but it will take longer to blend.
- Parchment Paper: Essential for easy rolling. You can use wax paper if you’re short on supplies.
- Sharp Knife: A serrated knife is ideal for slicing. Alternatively, use a kitchen knife—just ensure it’s sharp!
- Food Processor (optional): Great for crushing Oreos quickly. If you don’t have one, the zip-top bag method works just as well!
Variations
- Nut Butter Crunch: Swap out some of the cream cheese for your favorite nut butter for a protein boost and a delightful twist!
- Fruit-Infused: Use flavored cream cheese or mix in pureed fruits like strawberries or raspberries for a delicious fruity cheesecake filling.
- Gluten-Free: Opt for gluten-free Oreos and ensure that any other ingredients you use are certified gluten-free for a guilt-free treat.
- Vegan Option: Substitute the cream cheese with a vegan alternative and use agave syrup in place of powdered sugar.
- Chocolate Lovers: Add cocoa powder to the cheesecake mixture for an extra chocolatey experience or use chocolate-flavored Oreos.
Serving Suggestions
- Pair your No-Bake Oreo Cheesecake Sushi Rolls with a scoop of vanilla ice cream for an indulgent treat.
- Serve alongside fresh berries or a fruit salad to complement the rich flavors.
- Consider a drizzle of raspberry or strawberry sauce for a beautiful presentation.
- A hot cup of coffee or tea also enhances the overall dessert experience.
- To impress, plate the rolls on a colorful serving platter garnished with mint leaves.
FAQs about No-Bake Oreo Cheesecake Sushi Rolls
Curious about making these No-Bake Oreo Cheesecake Sushi Rolls? Here are some common questions I often hear:
Can I use different cookies instead of Oreos?
Absolutely! You can try different sandwich cookies like chocolate mint or even golden Oreos. Just remember, the flavor will change, but it can be a delicious experiment!
How long do these rolls last in the fridge?
They can last for up to 3 days in the fridge when stored in an airtight container. Just make sure to slice them fresh for the best flavor!
Can I make these ahead of time?
Yes, you can prepare the rolls a day in advance. Just be sure to keep them frozen until you’re ready to serve. This makes them a great make-ahead dessert for gatherings!
Is it possible to personalize the filling?
Definitely! Feel free to add flavored extracts, or even chocolate chips to the cream cheese mixture. Your creativity is your only limit.
What is the best way to slice the rolls?
Using a hot knife makes slicing easier—just dip the knife in hot water and wipe it dry. This method prevents squishing the cheesecake filling.
Final Thoughts
Making these No-Bake Oreo Cheesecake Sushi Rolls is more than just whipping up a dessert; it’s about creating memories in the kitchen with your loved ones. Each bite brings a wave of nostalgia, merging the classic taste of Oreos with the creamy delight of cheesecake. Whether you’re prepping for a family gathering, a spontaneous get-together, or simply treating yourself, these rolls are sure to bring smiles. With their playful presentation and customizable flavors, they make dessert fun and exciting. So grab your ingredients, roll up those sleeves, and embark on a sweet adventure that everyone will adore!
Print
No-Bake Oreo Cheesecake Sushi Rolls You’ll Love to Make!
- Prep Time: 20 minutes
- Cook Time: 0 minutes
- Total Time: 1 hour
- Yield: 4 servings 1x
- Category: Dessert
- Method: No-Bake
- Cuisine: American
- Diet: Vegetarian
Description
Delicious and easy-to-make No-Bake Oreo Cheesecake Sushi Rolls that are perfect for any dessert lover!
Ingredients
- 8 oz cream cheese, softened
- 0.25 cup powdered sugar
- 20 Oreo cookies
- 2 tbsp melted butter
- Chocolate drizzle (optional)
- Crushed Oreos (optional)
- Whipped cream (optional)
- Sliced strawberries or bananas (optional)
Instructions
- Beat the softened cream cheese and powdered sugar together in a bowl until it’s smooth and fluffy.
- Crush the Oreos into fine crumbs.
- Mix the Oreo crumbs and melted butter until well combined.
- Press the Oreo mixture into a thin rectangle on a sheet of parchment paper.
- Spread the cheesecake mixture evenly over the Oreo crust, leaving about a ½-inch border.
- If using, add your optional fruit filling now.
- Carefully roll up the cheesecake mixture using the parchment paper as a guide.
- Freeze the roll for 30-45 minutes, or until firm.
- Once frozen, slice the roll into 1-inch rounds.
- Drizzle with chocolate, sprinkle with crushed Oreos, or top with whipped cream – get creative!
Notes
- Customize the rolls with your favorite fruits.
- Let the rolls thaw slightly before slicing for easier cutting.
Nutrition
- Serving Size: 1 roll (approx.)
- Calories: 250
- Sugar: 15g
- Sodium: 150mg
- Fat: 15g
- Saturated Fat: 8g
- Unsaturated Fat: 5g
- Trans Fat: 0g
- Carbohydrates: 30g
- Fiber: 2g
- Protein: 3g
- Cholesterol: 30mg


