The Dessert That Requires Zero Oven Time
When the craving for cheesecake hits but turning on the oven sounds like torture, this recipe swoops in to save the day. No-Bake Salted Caramel Cheesecake Cups are everything you love about rich, creamy cheesecake — minus the effort.
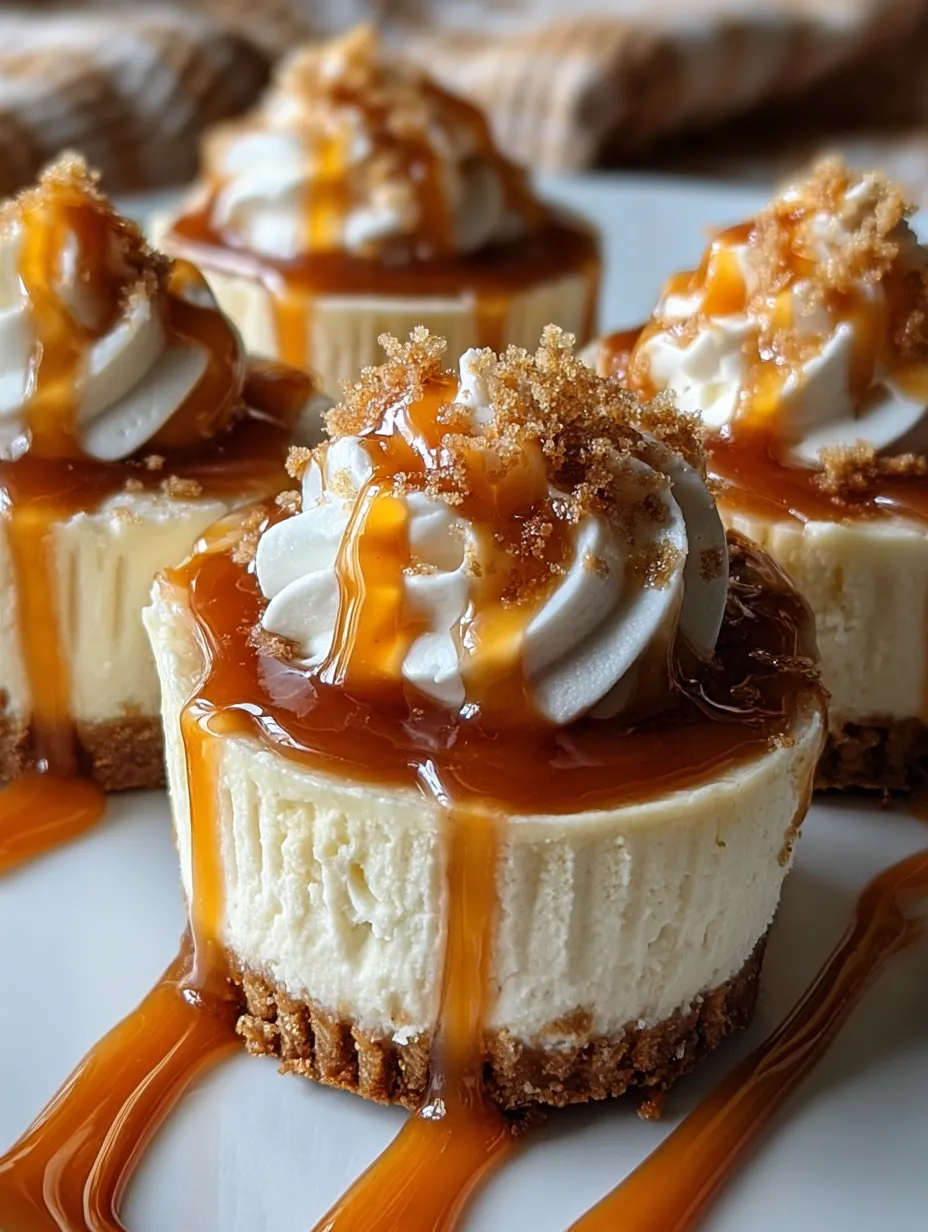
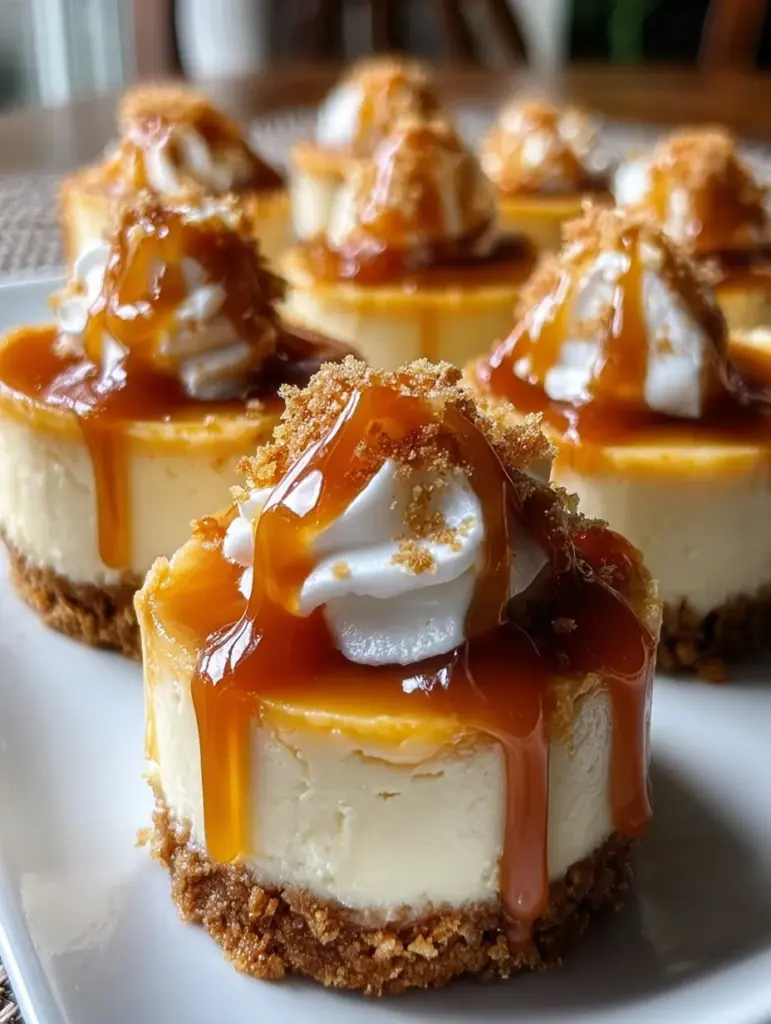
Imagine velvety cream cheese mousse sitting on a buttery graham base, crowned with a glossy golden caramel that’s just the right balance of sweet and salty. Every spoonful melts in your mouth like a caramel cloud.
The best part? You don’t need any fancy equipment — no water baths, no cracked tops, no waiting hours for it to bake. Just a whisk, a bowl, and a little chill time in the fridge. These cups look like something out of a café display case, but they’re secretly one of the easiest desserts you’ll ever make.
Whether you’re hosting friends, prepping date-night desserts, or just craving something special after dinner, these no-bake cheesecake cups are pure bliss.
Why You’ll Fall in Love with These Cheesecake Cups
Here’s the thing — once you make these, you’ll understand why they’re a dessert darling. They’re elegant yet simple, indulgent yet effortless.
- No-Bake Simplicity: Forget oven drama. These come together in 20 minutes flat.
- Individual Portions: Perfect for parties or sharing (or not sharing — no judgment!).
- Texture Heaven: Silky filling meets crunchy crust and smooth caramel drizzle.
- Flavor Balance: Sweet caramel meets a whisper of salt — perfection in contrast.
- Customizable: You can add toppings like pretzels, chocolate curls, or nuts for a personal twist.
If you’ve ever wished for a dessert that looks gourmet but feels easy, this one’s it. It’s the perfect mix of classy and comfort — the kind of dessert that impresses without trying too hard.
No-Bake Cheesecake Magic – The Secret to Creamy Success
The secret to the no-bake texture lies in the balance between cream cheese and whipped cream. When combined, they form a stable, airy mixture that sets beautifully in the fridge without gelatin or baking.
The cream cheese adds body, tang, and that signature cheesecake flavor, while whipped cream gives it a light mousse-like fluffiness. The trick is to beat the mixture just enough to hold shape — you want it thick but not dense.
Then comes the caramel — rich, glossy, and buttery, with a whisper of sea salt that brings every flavor to life. The salt doesn’t just season; it transforms. It turns sweetness into sophistication.
The result? Each spoonful is creamy, dreamy, and layered with contrast — crunchy, smooth, sweet, and salty all in one.
The Ingredients Breakdown: Simple Yet Luxurious
The Buttery Crumb Crust
- Graham cracker crumbs (or digestive biscuits): The classic cheesecake base.
- Melted butter: Binds the crumbs and adds a toasty flavor.
- Brown sugar: Deepens the flavor and gives a caramel undertone.
Together, they create that firm, sandy texture you can press into cups — the perfect foundation for the creamy filling above.
The Dreamy Cheesecake Filling
- Cream cheese: Use full-fat for maximum richness and structure.
- Heavy cream: Whipped to soft peaks, it gives lift and silkiness.
- Sugar & vanilla: Balance the tanginess.
- Pinch of salt: Enhances every flavor note — don’t skip it.
The key is softness. Start with room-temperature cream cheese for the smoothest result.
The Salted Caramel Topping
- Sugar & water: Cook until deep amber — the heart of caramel flavor.
- Butter & cream: Add creaminess and shine.
- Sea salt: That irresistible contrast that defines the dessert.
You’ll make a small batch, but it’s powerful — one spoonful transforms each cup into a gourmet masterpiece.
Essential Tools for Perfect Cheesecake Cups
You don’t need much, but having these on hand helps:
- Mixing bowls
- Hand or stand mixer
- Rubber spatula
- Small saucepan (for caramel)
- Spoon or piping bag (for layering)
- Serving cups or jars
Clear glass cups make these desserts look especially gorgeous — every layer visible like a work of art.
Step-by-Step Recipe Guide
Step 1: Make the Crust
Mix your graham crumbs, brown sugar, and melted butter until the texture feels like wet sand. Spoon into serving cups and press down with the back of a spoon. Chill in the fridge while you prepare the next layer.
Step 2: Whip the Filling
Beat softened cream cheese until fluffy. Add sugar, vanilla, and salt, then gradually whisk in heavy cream. Keep going until the mixture turns thick, smooth, and luscious.
Step 3: Craft the Caramel
In a saucepan, combine sugar and water. Watch carefully — it turns amber fast. Swirl, don’t stir. Once golden, remove from heat and whisk in butter, then cream. Stir until glossy, then mix in sea salt. Cool before using.
Step 4: Assemble and Swirl
Spoon cheesecake filling over crust. Drizzle caramel and gently swirl with a toothpick for a marbled pattern. Sprinkle a pinch of flaky salt.
Step 5: Chill to Perfection
Let the cups chill for at least 2 hours, or overnight for best flavor. When ready to serve, top with whipped cream, caramel drizzle, and crushed pretzels for crunch.
Tips for the Silkiest, Creamiest Cheesecake Texture
Here’s how to make every cup taste like it came from a fancy dessert café:
- Soften Your Cream Cheese Properly
Hard cream cheese = lumpy filling. Let it sit out for at least 30 minutes before mixing so it whips smoothly. - Chill Your Cream Before Whipping
Cold cream whips into soft, airy peaks — the secret to that mousse-like texture that melts on your tongue. - Whip, Don’t Overwhip
Beat just until thick and billowy. Overbeating can make the texture grainy. - Cool the Caramel Before Adding
Warm caramel will melt the filling. Let it cool to room temp before swirling. - Chill Time Is Everything
Two hours minimum — but overnight is golden. It allows the crust to firm, the filling to set, and the caramel to infuse flavor throughout.
When you scoop your spoon through a perfectly chilled cup, the contrast of buttery crust, airy filling, and salty caramel is absolute perfection.
Serving and Presentation Ideas
Presentation turns a simple dessert into something unforgettable. Here’s how to make these cups look picture-perfect:
- Whipped Cream Swirls: Pipe soft peaks on top just before serving.
- Extra Caramel Drizzle: Warm leftover caramel slightly and let it cascade over the whipped cream.
- Crushed Pretzels: Adds crunch and that sweet-salted contrast.
- Chocolate Shavings or Toffee Bits: Because more indulgence never hurts.
- Mini Mason Jars or Glass Cups: Clear sides show off every luscious layer.
For a dinner party, arrange them on a tray with tiny dessert spoons and a sprinkle of sea salt on top — guests will think you spent all day baking.
Flavor Variations to Try
Once you’ve mastered the classic, try remixing it:
- Mocha Caramel Cups: Add a teaspoon of espresso powder to the filling.
- Peanut Butter Twist: Swirl in a tablespoon of peanut butter before chilling.
- Chocolate Lovers’ Dream: Add melted dark chocolate to half the filling for a layered effect.
- Maple Pecan Version: Replace caramel with warm maple syrup and chopped pecans.
- Berry Swirl: Add a ribbon of raspberry sauce instead of caramel for a tangy-sweet finish.
Each version keeps the creamy base and buttery crust but changes the mood entirely — from cozy fall treat to rich café dessert.
Pairing Ideas – Drinks That Love Cheesecake
What you drink with dessert can take it to another level:
| Drink | Why It Works |
|---|---|
| Latte or Cappuccino ☕ | Coffee’s bitterness balances caramel sweetness |
| Sparkling Water with Lemon 🍋 | Refreshes the palate between bites |
| Irish Cream Liqueur 🥃 | Echoes the creaminess of the cheesecake |
| Chilled Moscato or Riesling 🍷 | Light, fruity, and perfect with caramel notes |
| Salted Hot Chocolate 🍫 | Doubles down on sweet-salty comfort |
Every sip complements that silky filling — a little indulgence harmony.
How to Store and Make Ahead
These cups are make-ahead heroes.
- Refrigerate: Store covered in the fridge for up to 4 days.
- Freeze: For longer storage, freeze for up to 2 months. Thaw in the fridge before serving.
- Prep Ahead: You can make crusts and filling a day early; assemble and add toppings right before serving.
Pro Tip: Keep caramel in a sealed jar at room temp for two days or refrigerated for a week. A quick microwave zap softens it again.
Print
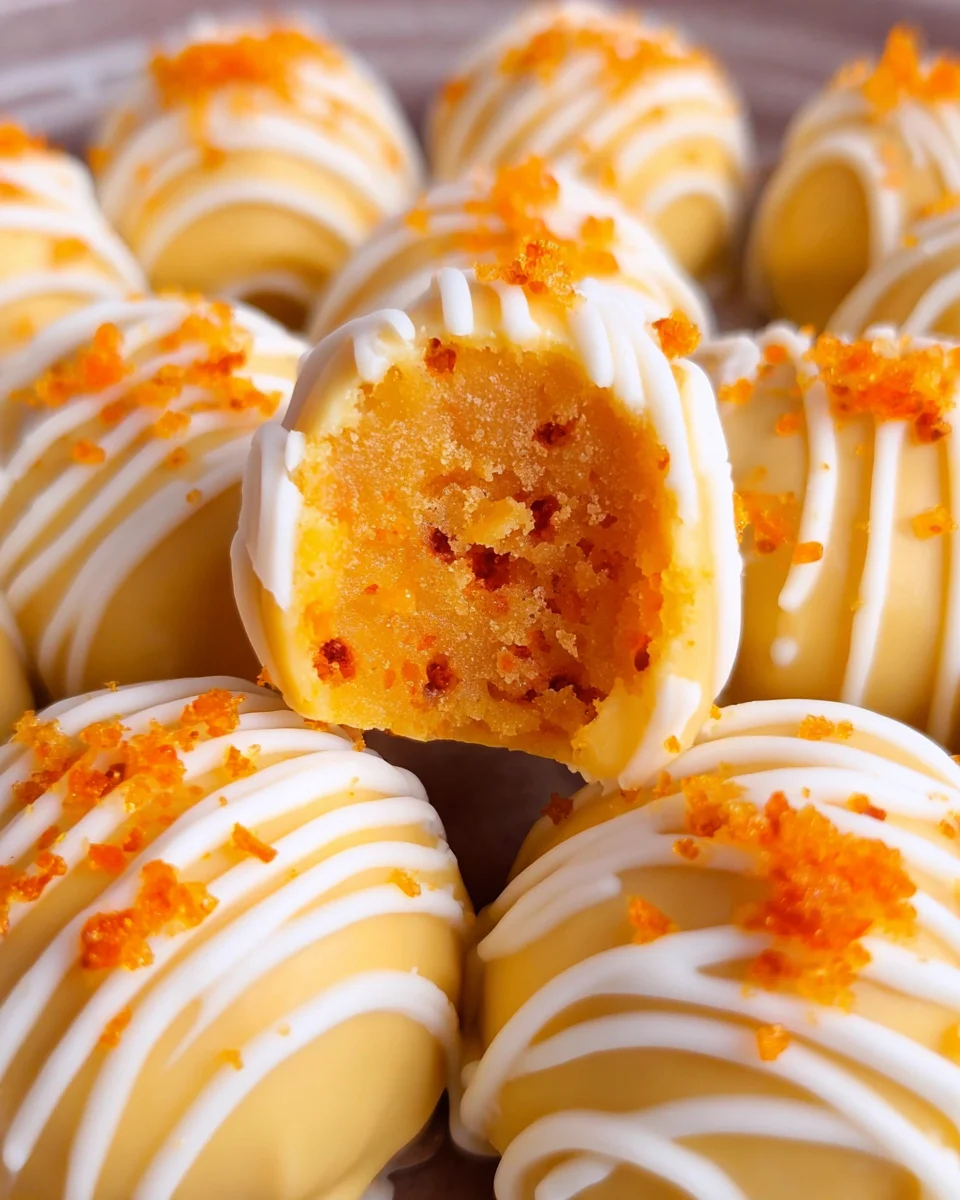
🧁 No-Bake Salted Caramel Cheesecake Cups
- Prep Time: 15 minutes
- Cook Time: 20 minutes
- Total Time: 2 hours 35 minutes
- Category: Dessert
Description
🥄 Creamy, dreamy, and perfectly balanced between sweet and salty! These No-Bake Salted Caramel Cheesecake Cups are an effortless dessert that tastes like a luxury treat — buttery graham crust, silky cheesecake filling, and a glossy caramel swirl that melts in your mouth. 💛
Ingredients
For the crust:
1 cup graham cracker crumbs (or crushed digestive biscuits)
3 tbsp melted butter
1 tbsp brown sugar
For the cheesecake filling:
8 oz (225 g) cream cheese, softened
½ cup (120 ml) heavy cream
¼ cup (50 g) granulated sugar
1 tsp vanilla extract
Pinch of salt
For the salted caramel:
½ cup (100 g) granulated sugar
2 tbsp water
3 tbsp unsalted butter
¼ cup (60 ml) heavy cream
½ tsp flaky sea salt (plus extra for garnish)
Optional toppings:
Whipped cream, caramel drizzle, crushed pretzels, or chocolate shavings 🍫🥨
Instructions
Make the crust: In a bowl, combine graham cracker crumbs, melted butter, and brown sugar. Mix until the texture resembles wet sand. Spoon a few tablespoons into each serving cup or jar and gently press down to form the base. Place in the fridge to chill while preparing the filling. (⏱️ 5 minutes)
Prepare the filling: In a medium bowl, beat the softened cream cheese until smooth and fluffy. Add sugar, vanilla, and salt, and continue beating until well combined. Gradually whip in the heavy cream until the mixture becomes light and creamy with a slight thickness. (⏱️ 7 minutes)
Make the salted caramel: In a small saucepan over medium heat, add sugar and water. Allow it to cook without stirring until it turns a deep amber color — gently swirl the pan if needed. Remove from heat and whisk in butter until melted and smooth. Slowly add the cream while stirring constantly (it will bubble up). Mix in the flaky sea salt, then let the caramel cool slightly. (⏱️ 8 minutes)
Assemble: Spoon the cheesecake filling over the chilled crusts. Drizzle the cooled salted caramel on top and use a toothpick or skewer to create a marbled swirl effect. Sprinkle lightly with sea salt. (⏱️ 5 minutes)
Chill and serve: Refrigerate for at least 2 hours (or overnight) to set completely. Before serving, top each cup with whipped cream, an extra drizzle of caramel, and a pinch of flaky salt for the perfect finish. (⏱️ 2 hours chill time)
Notes
Crust options:
You can swap graham crackers for Biscoff cookies, Oreos, or digestive biscuits for a flavor twist.
Add a pinch of cinnamon to the crust mixture for extra warmth.
Cheesecake texture:
Make sure the cream cheese is fully softened before beating — this prevents lumps.
Chill your heavy cream and whip it until soft peaks form before folding in for a fluffier texture.
Salted caramel success:
Don’t stir the sugar as it melts; gently swirl the pan to prevent crystallization.
Use room temperature cream to avoid splattering when added to the hot caramel.
If your caramel thickens too much, reheat it gently over low heat until smooth again.
Make-ahead friendly:
These cups keep beautifully in the fridge for 3–4 days, covered tightly.
You can make the caramel up to a week ahead — just store it in a jar and warm slightly before using.
Presentation ideas:
Serve in mini glass jars or dessert cups for a chic look.
Top with sea salt flakes, crushed pretzels, or caramel drizzle right before serving for a bakery-style finish.
Nutrition
- Serving Size: 6 cups
- Calories: 370 kcal
The Science of Salted Caramel (Why It Works So Well)
Caramel is pure chemistry — sugar molecules caramelize when heated, developing complex nutty, buttery flavors.
Adding salt enhances that flavor by cutting sweetness and unlocking hidden depth. It also triggers the tongue’s taste receptors differently, so the caramel tastes even richer.
It’s that contrast — creamy vs. crunchy, sweet vs. salty — that makes salted caramel desserts feel addictive. Science meets satisfaction.
You may like to read also :
Butterfinger Caramel Crunch Bars – Layers of Crunch, Caramel, and Chocolate Bliss
Baby Caramel Pecan Impossible Pies – Tiny Bites of Heaven
Caramel Crunch Cookies
Troubleshooting Common Cheesecake Mistakes
Even easy recipes can trip you up. Here’s how to fix the most common hiccups:
- Lumpy Filling? Cream cheese wasn’t soft enough — beat longer next time before adding cream.
- Runny Filling? Over-whipped cream or not enough chill time. Refrigerate longer.
- Caramel Crystallized? Stirring too much during cooking — swirl gently instead.
- Greasy Crust? Too much butter; reduce by a tablespoon next time.
- Caramel Too Salty? Add a splash of cream to balance.
With a few tweaks, every batch becomes dessert-shop worthy.
Healthier Ingredient Swaps
Want to lighten it up without losing indulgence?
| Ingredient | Healthier Option |
|---|---|
| Cream cheese | Greek yogurt cream cheese or Neufchâtel |
| Heavy cream | Coconut cream or whipped cashew cream |
| Butter | Coconut oil in crust |
| Sugar | Coconut sugar or maple syrup |
| Graham crackers | Oat biscuits or almond crust |
It still tastes luscious but trims the richness for a lighter, everyday treat.
Why No-Bake Desserts Are a Game-Changer
Life’s too short to stress over oven timing. No-bake desserts are freedom — mix, chill, enjoy.
They’re faster, cooler (literally), and almost impossible to mess up. You can make them the night before a party or prep them during a busy afternoon and still serve something show-stopping.
Plus, they’re perfect for summer days when the idea of preheating an oven sounds unbearable. One spoonful of this creamy, caramel heaven, and you’ll be team no-bake for life.
Conclusion: Sweet Luxury Without the Stress
These No-Bake Salted Caramel Cheesecake Cups deliver everything you love about cheesecake — the creamy filling, the buttery crust, the luscious caramel — with none of the hassle.
They look stunning, taste divine, and require almost no effort. Whether for holidays, birthdays, or random Tuesdays, they turn any moment into a celebration.
So, go ahead — grab a spoon and dive in. Because dessert this good shouldn’t wait for oven time.
Similar recipes :
Caramel Apple Cupcakes – The Ultimate Fall Dessert Dream
Baptist Pound Cake with Caramel Icing
Homemade Salted Caramel Recipe
FAQs
1. Can I make these ahead of time for guests?
Absolutely! Chill overnight, and they’ll taste even better the next day.
2. My caramel hardened — what do I do?
Reheat gently over low heat or microwave in 10-second bursts until pourable.
3. Can I make this without cream?
Yes, substitute coconut cream for a dairy-free option.
4. How do I make the caramel darker or lighter?
Control color by cooking sugar longer for deeper flavor or less for mild sweetness.
5. Can I use store-bought caramel sauce?
Sure! Homemade has richer flavor, but store-bought works in a pinch.