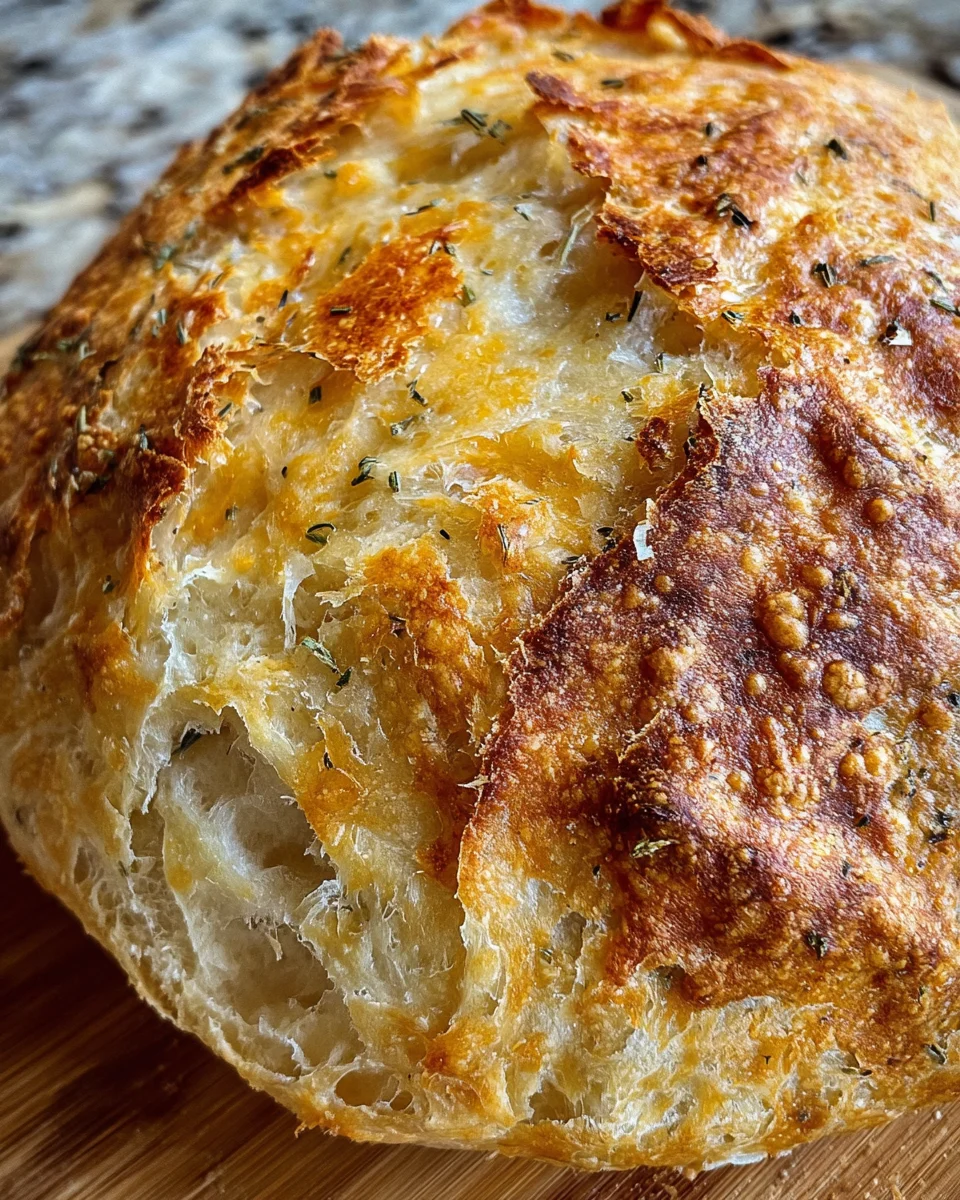
Introduction to No-Knead Dill Gouda Artisan Bread
There’s something magical about the combination of fresh dill and Gouda cheese, especially when it comes to homemade bread. My No-Knead Dill Gouda Artisan Bread is the answer to any busy mom’s or professional’s quest for an easy yet impressive bake. This flavorful bread doesn’t require any kneading, making it a quick solution for those hectic days when you want to impress family or guests without spending all day in the kitchen. Picture warm, golden slices fresh from the oven, filling your home with the delightful aroma of baked goodness. Trust me— you’ll want to make this recipe!
Why You’ll Love This No-Knead Dill Gouda Artisan Bread
This No-Knead Dill Gouda Artisan Bread is a game changer in the kitchen. It’s incredibly easy to make, requiring little hands-on work, which makes it perfect for busy days. The delightful blend of fresh dill and rich Gouda creates a flavor profile that wows everyone at the dinner table. Plus, it bakes beautifully with that artisan crust you’d find in fancy bakeries, allowing you to feel accomplished without the fuss.
Ingredients for No-Knead Dill Gouda Artisan Bread
Gathering the right ingredients for my No-Knead Dill Gouda Artisan Bread sets the stage for a fantastic baking experience. While the exact measurements are listed at the bottom, let’s discuss each component to help you understand why they matter.
- Water: Use room temperature water, ideally around 70°F (21°C), to ensure the yeast activates properly.
- Active dry yeast: This is your bread’s leavening agent, giving it that lovely rise and fluffy texture.
- Bread flour: Higher in protein than all-purpose flour, it yields that chewy, artisan-style texture we all crave.
- Kosher salt: A key ingredient that enhances flavor and strengthens the dough structure.
- Freshly ground black pepper: A pinch of this adds a subtle kick, perfectly complementing the dill and Gouda.
- Fresh dill: This fragrant herb brings a burst of freshness, making each bite taste like spring!
- Gouda cheese: The star of the show! Its nutty, creamy flavor melts beautifully throughout the bread, creating pockets of deliciousness.
Feel free to experiment with these ingredients! For a twist, try using different herbs or cheeses. And remember, the exact quantities are right at the bottom of this article for easy printing.

How to Make No-Knead Dill Gouda Artisan Bread
Prepare the Yeast Mixture
To start, add your active dry yeast to the warm water and give it a little stir. Let this sit for about 10 to 15 minutes. You want the yeast to become frothy and bubbly. This means it’s active and ready to work its magic in our dough!
Mix Dry Ingredients
In a large mixing bowl, whisk together the bread flour, kosher salt, freshly ground black pepper, and chopped dill. This step is crucial, as it combines the flavors well. Let this mixture rest for about 10 minutes. Remember, patience will set the stage for deliciousness!
Combine Wet and Dry Ingredients
Now it’s time for the fun part! Pour the yeast mixture into your bowl with the dry ingredients. Use a rubber spatula to gently mix it all together. The dough should be sticky and shaggy, with some flour still clinging to the edges. Don’t worry if it looks a little messy; that’s just part of the charm!
Let the Dough Rise
Cover the bowl with a clean kitchen towel or plastic wrap. Place the bowl in a warm spot, like on your kitchen counter away from drafts. You want the dough to rise until it doubles in size, which usually takes about 8 to 10 hours. Overnight works wonders, too!
Shape and Incorporate Gouda
When the dough has risen, sprinkle a little flour on your work surface. Gently transfer the dough onto it. Fold the dough into itself a few times to build some structure. Flatten it into a rectangle and press those delightful Gouda cubes into the dough. Roll it up like a jelly roll and tuck the ends underneath to create a lovely ball shape.
Refrigerate the Dough
Dust the shaped dough with a bit more flour, and place it in a flour-dusted bowl. Now, cover it and let it chill in the refrigerator for at least overnight, up to 48 hours. This extended cold fermentation process enhances flavors and improves texture, making your bread truly artisan.
Bake the Bread
When you’re ready to bake, preheat your oven to 450ºF (232ºC) with a Dutch oven inside. That’s crucial for achieving that fantastic crust! Carefully turn the dough out onto a floured surface and shape it into a loaf. Score the top with a sharp knife—it helps the bread expand evenly. Place the dough on parchment and carefully transfer it into the hot Dutch oven. Cover it and bake for 30 minutes. Then uncover and bake for another 15 to 20 minutes, letting the crust get beautifully golden brown!
Cool Before Slicing
Once baked, lift your gorgeous bread from the Dutch oven and let it cool on a wire rack for up to an hour. I know it’s hard to wait, but this step is essential. Allowing the bread to cool properly ensures a perfect texture when you slice into it!
Tips for Success
- Make sure your water is the right temperature—too hot or too cold can harm the yeast.
- Let the dough rise in a warm spot—temperature matters for that perfect texture.
- Don’t skip the overnight refrigeration—it’s key for developing flavor.
- Use a sharp knife to score the dough; it helps with even baking.
- Cool the bread completely before slicing to maintain its structure!
Equipment Needed
- Bowl: A large mixing bowl for combining ingredients. A clean plastic or glass bowl works great.
- Rubber spatula: Essential for mixing the dough. You can also use a wooden spoon if needed.
- Kitchen towel: To cover the dough during rising. A clean cloth or plastic wrap serves the same purpose.
- Dutch oven: For baking. A cast-iron pot or any heavy, oven-safe pot with a lid will do!
- Parchment paper: Helps transfer the dough easily. You can also use a floured surface if you’re in a pinch.
Variations of No-Knead Dill Gouda Artisan Bread
- Herb Infusion: Experiment with other herbs like rosemary, thyme, or oregano for a different flavor profile.
- Cheese Alternatives: Swap out Gouda for cheddar or fontina for a unique twist on taste and texture.
- Whole Wheat Flour: Use a mix of whole wheat and bread flour for added nutrition while keeping a soft texture.
- Spicy Kick: Add a pinch of red pepper flakes to the dry ingredients for a subtle heat.
- Olive Add-Ins: Fold in chopped Kalamata olives or sun-dried tomatoes for a Mediterranean flair.
- Vegan Version: Substitute Gouda with a plant-based cheese and omit the dairy for a delicious vegan option.
Serving Suggestions for No-Knead Dill Gouda Artisan Bread
- Accompany with Soup: Serve alongside a steaming bowl of tomato bisque or creamy potato soup for a comforting meal.
- Add a Salad: Pair with a fresh garden salad topped with a tangy vinaigrette for a crunchy contrast.
- Cheese Platter: Slice it up for a cheese board featuring fruits, nuts, and your favorite cheeses.
- Toast with Spread: Enjoy toasted with butter, herb cream cheese, or even a dollop of hummus.
- Pair with Wine: A glass of Sauvignon Blanc or a light red complements this bread wonderfully.
FAQs about No-Knead Dill Gouda Artisan Bread
Can I use all-purpose flour instead of bread flour? Yes, you can! However, bread flour gives this No-Knead Dill Gouda Artisan Bread its lovely chewy texture. All-purpose flour will work in a pinch, but the results may be different.
How do I store this bread? Keep your bread in a paper bag at room temperature for up to three days. If you want it to last longer, slice it and freeze it in a zip-top bag.
Can I add other ingredients to this recipe? Absolutely! Feel free to experiment by adding nuts, seeds, or even olives for additional flavor. Just remember not to overload the dough, as balance is key.
What should I do if my dough doesn’t rise? If your dough didn’t rise, your yeast might have been expired, or the water temperature might have been off. Ensure your ingredients are fresh and try to create a warm environment for rising.
Can I make this bread vegan? You can definitely adapt this recipe! Substitute Gouda with a plant-based cheese or leave it out entirely for a delightfully herby bread, full of dill flavor.
Final Thoughts
Baking my No-Knead Dill Gouda Artisan Bread has become a cherished ritual. It fills my home with warmth, and the fragrant aroma invites my family to gather around the table. Each slice is a delightful blend of comforting flavors, making every meal special. The simplicity of this recipe means I can enjoy quality time with my loved ones while the bread does its magic. Whether it’s a cozy dinner or a festive gathering, this artisan bread is sure to impress. Give it a try; I promise you’ll find joy in the process and, even more, in the delicious results!
Print
No-Knead Dill Gouda Artisan Bread
- Prep Time: 10 minutes
- Cook Time: 45 minutes
- Total Time: 9-10 hours (including rising time)
- Yield: 1 loaf 1x
- Category: Bread
- Method: Baking
- Cuisine: Artisan
- Diet: Vegetarian
Description
A simple yet flavorful artisan bread featuring dill and Gouda cheese, made without kneading.
Ingredients
- 1½ cups water, room temperature (at or near 70°F/21°C)
- 1 teaspoon active dry yeast
- 3½ cups bread flour, plus more for dusting
- 1 teaspoon kosher or fine sea salt
- ½ teaspoon freshly ground black pepper
- 2 tablespoons fresh dill, finely chopped
- 1 cup cubed Gouda cheese
Instructions
- Add the yeast to the water and let it sit for 10-15 minutes.
- In a large bowl, whisk together flour, salt, pepper and fresh dill until evenly distributed. Let sit for 10 minutes.
- Add yeast mixture to the bowl and stir together using a rubber spatula just until combined. The dough should look a little sticky and shaggy and there should still be a little flour around the edges of the bowl.
- Cover and let rise somewhere warm until it has doubled in size, about 8-10 hours.
- Once the dough has doubled in volume, transfer it to a floured surface and fold the dough into itself several times.
- Stretch and smooth out the dough into a rectangular shape and press Gouda cubes into the dough.
- Roll up the dough into a log shape, adding flour as needed, and fold the ends underneath.
- Dust with more flour, gently shape into a ball, and place in a flour-dusted bowl.
- Cover and refrigerate overnight or up to 48 hours.
- When ready to bake, preheat the oven to 450ºF (232ºC) with a Dutch oven inside.
- Turn the dough out onto a floured surface and shape into a loaf.
- Place on parchment paper and score the top with a knife.
- Transfer the dough into the preheated Dutch oven and cover.
- Bake for 30 minutes, then uncover and bake for an additional 15-20 minutes until browned.
- Lift the bread from the Dutch oven and let cool on a wire rack for up to an hour before slicing.
Notes
- For best results, allow the dough to rise in a warm environment.
- If using alternative flours, adjust the liquid as necessary.
Nutrition
- Serving Size: 1 slice
- Calories: 200
- Sugar: 0g
- Sodium: 280mg
- Fat: 8g
- Saturated Fat: 4g
- Unsaturated Fat: 3g
- Trans Fat: 0g
- Carbohydrates: 28g
- Fiber: 1g
- Protein: 6g
- Cholesterol: 15mg