Introduction to Old Fashioned Pecan Tassies
As a home cook, there’s nothing quite like the joy of whipping up an irresistible batch of Old Fashioned Pecan Tassies. These delightful little treats are perfect for those busy days when you need a sweet pick-me-up or something special to share. I often find myself turning to this recipe when I want to impress guests with minimal effort. The buttery crust holds a luscious pecan filling, offering that wonderful homemade touch. Plus, who can resist that lovely aroma wafting through the kitchen? Grab your apron, and let’s create something delicious together!
Why You’ll Love This Old Fashioned Pecan Tassies
Old Fashioned Pecan Tassies are not just easy to make; they’re also a delightful way to savor those sweet moments in life. With a prep time of just 30 minutes, they fit perfectly into our busy schedules. Whether it’s for a family gathering or a cozy night in, these bite-sized wonders are sure to impress. Plus, each tassie bursts with rich flavors, making it hard to resist just one—though I often end up having two or three!
Ingredients for Old Fashioned Pecan Tassies
Gathering the right ingredients is key to making perfect Old Fashioned Pecan Tassies. Here’s what you’ll need:
- Salted butter: Adds a rich, creamy flavor to the dough.
- Cream cheese: Gives the crust a delightful tang and makes it tender.
- All-purpose flour: Forms the base of the crust, lending structure.
- Dark brown sugar: Enhances the filling with its deep, caramel-like sweetness.
- Melted butter: Helps bind the filling and adds extra moisture.
- Large eggs: Key for creating a lovely custard-like texture in the filling.
- Maple extract: Infuses a subtle warmth and a hint of sweetness.
- Finely chopped pecans: Provides that beloved nutty crunch in every bite.
- Pecan halves: Perfect for topping, adding both beauty and flavor.
Feel free to get creative! You could use unsalted butter if that’s what you have on hand, just reduce any added salt. For a nut-free version, try swapping the pecans with sunflowers seeds for a similar texture. The exact quantities are conveniently listed at the bottom of the article for you to print out.
How to Make Old Fashioned Pecan Tassies
Step 1: Prepare the Dough
Let’s dive right in! Start by creaming together the salted butter and cream cheese in a small bowl. Use a hand mixer for about a minute until they’re smooth and well combined. The mixture should feel fluffy and light, like a cloud of happiness!
Next, gradually add the all-purpose flour into the mix. Keep mixing until everything is silky and smooth. You want a dough that holds together without being sticky. This step is crucial for that perfect tassie crust!
Step 2: Chill the Dough
Once your dough is ready, it’s time to rest. Grab your mini muffin pans and give them a spritz of cooking spray. Using a mini cookie scoop, drop dough balls into each muffin cup. They should be evenly distributed to ensure even baking.
Now, to let the dough firm up, refrigerate the pans for about 15 minutes. This helps prevent the dough from spreading too much while baking. A cool dough is key for achieving that beautiful crust!
Step 3: Make the Filling
As the dough chills, let’s create that magical filling! In a medium bowl, combine the dark brown sugar, melted butter, eggs, maple extract, and finely chopped pecans. Whisk everything together until it’s smooth and glossy. It’s almost like crafting a treasure chest of flavors.
The maple extract adds a warm, inviting flavor. Make sure to give it a taste! You want that perfect balance of sweetness that pairs beautifully with the nuttiness of the pecans.
Step 4: Form the Tart Shells
With the dough chilled and the filling ready, it’s time to form the tart shells. Preheat your oven to 350ºF. Quickly grab one muffin pan from the fridge. Using your fingers, gently press the chilled dough into the bottom and up the sides of each muffin cavity. Aim for about halfway up the sides.
This will create the “cups” that hold our delightful filling. Repeat the same process for the second pan. Don’t worry if they aren’t perfect; remember, we’re going for rustic charm here!
Step 5: Assemble the Tassies
Now for the fun part—assembling the tassies! Carefully fill each dough shell with the prepared filling, making sure to fill them about two-thirds full. Don’t overdo it; we want those golden tops, not lava overflow!
Top each filled tart with a pecan half. This little touch not only looks charming but adds an extra crunch. It’s like putting a cherry on top, but better!
Step 6: Bake to Perfection
Finally, it’s time to bake these beauties! Place the pans in your preheated oven and set a timer for 18 minutes. Keep an eye on them; you’re looking for a lovely golden brown top.
When they’re done, let them cool slightly. Use a small knife to gently loosen the tassies from the pan. Transfer them to a cooling rack to let them cool completely. Trust me, the aroma wafting from your kitchen will be irresistible!
Tips for Success
- Make sure your butter and cream cheese are at room temperature for easy mixing.
- Chill the dough long enough to prevent spreading while baking.
- Keep a close eye on the baking time to avoid overcooking.
- Customize the filling by adding chocolate chips or dried fruit for extra flavor.
- Allow tassies to cool completely before storing them to maintain their texture.
Equipment Needed for Old Fashioned Pecan Tassies
- Mini muffin pans: Essential for shaping the tassies; muffin liners can be used if you prefer.
- Mixing bowls: Have at least one medium and one small for convenience.
- Hand mixer: A great tool for easy mixing; a whisk works too, just more elbow grease.
- Scoop: A mini cookie scoop ensures uniform dough portions; a tablespoon can work in a pinch.
- Cooling rack: Ideal for letting your tassies cool; a plate can substitute if necessary.
Variations on Old Fashioned Pecan Tassies
- For a chocolate twist, add a handful of semi-sweet chocolate chips to the filling.
- Try using chopped walnuts or almonds instead of pecans for a different nutty flavor.
- Add a dash of cinnamon or nutmeg to the filling for a warm, spiced variation.
- Substitute the maple extract with vanilla extract for a classic taste.
- For a gluten-free version, swap all-purpose flour with a gluten-free blend.
- Make it a salted caramel treat by drizzling caramel sauce over the finished tassies.
Serving Suggestions with Old Fashioned Pecan Tassies
- Pair your tassies with a rich cup of coffee or a warm chai latte for a delightful afternoon treat.
- Serve alongside a scoop of vanilla ice cream for a decadent dessert experience.
- Garnish with a dusting of powdered sugar for a picturesque presentation.
- Arrange on a beautiful platter and add fresh berries for a pop of color.
FAQs about Old Fashioned Pecan Tassies
Can I make Old Fashioned Pecan Tassies ahead of time?
Absolutely! You can prepare the dough and filling separately in advance. Just store them in the fridge, and assemble when you’re ready to bake!
How should I store the tassies?
Once they’ve cooled, store your Old Fashioned Pecan Tassies in an airtight container at room temperature for up to a week. They never last that long in my house, though!
Can I freeze Old Fashioned Pecan Tassies?
Yes! These beauties freeze well. Just place them in a single layer in a freezer-safe container. When you crave a treat, just thaw at room temperature.
What can I use instead of pecans?
If you’re not a fan of pecans, feel free to experiment! Chopped walnuts or hazelnuts can provide a tasty alternative that keeps the nutty delight.
Are Old Fashioned Pecan Tassies suitable for a gluten-free diet?
Indeed! You can substitute the all-purpose flour with a gluten-free flour blend. Just keep an eye on the dough consistency; it should still hold together nicely!
Final Thoughts
Baking Old Fashioned Pecan Tassies is more than just a recipe; it’s a heartwarming experience. These delightful treats bring together family and friends, sparking sweet conversations and smiles. The rich flavors and tender texture make each bite a little piece of heaven. I love how they add a touch of nostalgia, reminding us of simpler times. Whether it’s a cozy evening at home or a festive gathering, these tassies never fail to impress. So get ready to create lasting memories in your kitchen—because each tassie is a bite of joy just waiting to be shared!
Print
Old Fashioned Pecan Tassies
- Prep Time: 30 minutes
- Cook Time: 18 minutes
- Total Time: 48 minutes
- Yield: 36 tassies 1x
- Category: Dessert
- Method: Baking
- Cuisine: American
- Diet: Vegetarian
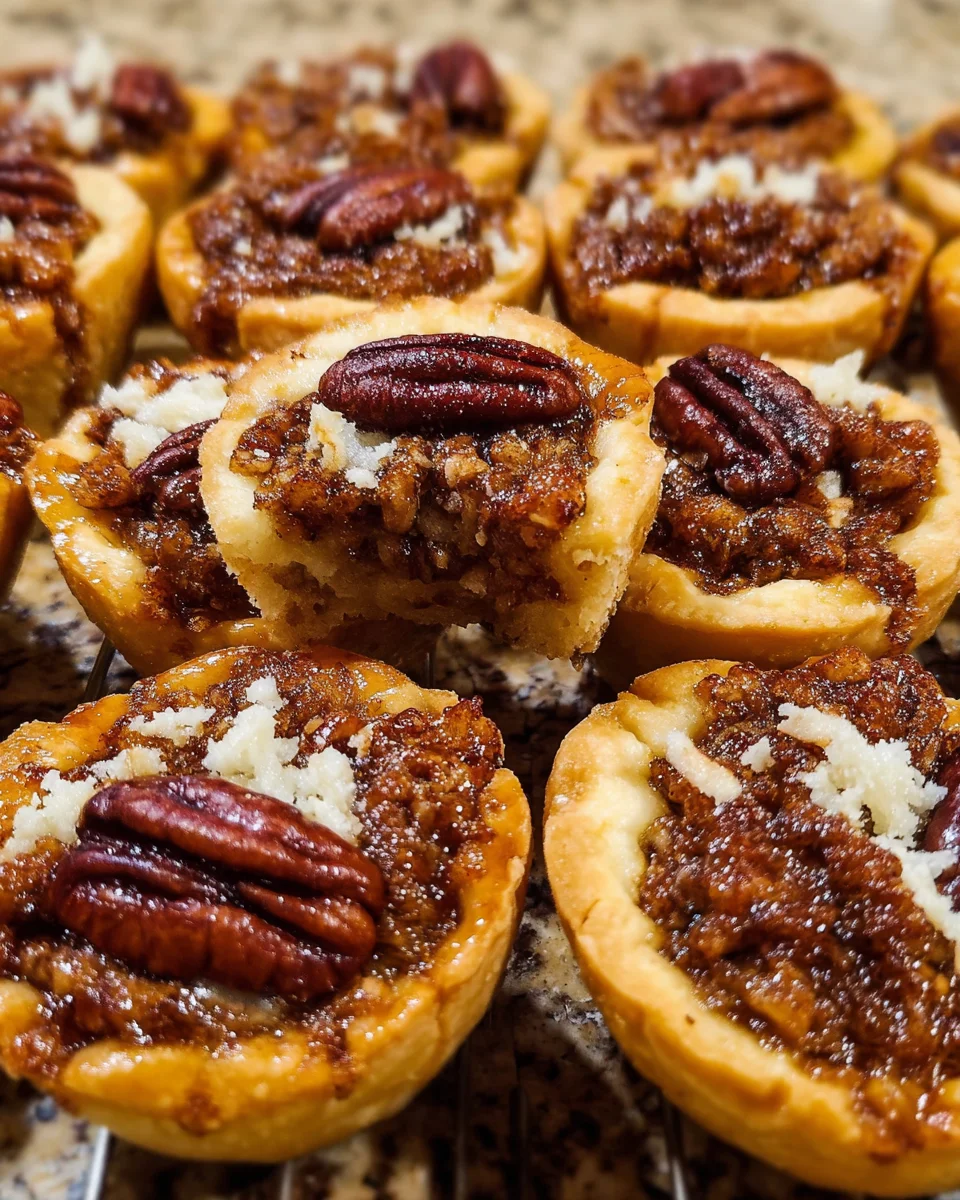
Description
Old Fashioned Pecan Tassies are delightful bite-sized treats filled with a rich pecan mixture, topped with a pecan half, and baked until golden brown.
Ingredients
- 3/4 cup salted butter, room temperature
- 5 ounces cream cheese, room temperature
- 1 1/2 cups all-purpose flour
- 1 ½ cups dark brown sugar
- 2 tablespoons salted butter, melted
- 2 large eggs
- ½ teaspoon maple extract
- ½ cup finely chopped pecans
- 36 pecan halves for topping
Instructions
- In a small bowl, use a hand mixer to cream together the butter and cream cheese until well combined. Add the flour and mix until smooth.
- Spray three mini muffin pans (36 tarts total) with cooking spray. Using a mini cookie scoop, scoop dough balls into the muffin pans, dividing the dough between the 36 cups evenly. Refrigerate the dough while making the filling.
- In a medium bowl, mix together the brown sugar, melted butter, eggs, maple extract, and finely chopped pecans.
- Preheat the oven to 350ºF. After the tarts have refrigerated for about 15 minutes, remove one pan from the fridge. Press the dough on the bottom and up the sides of each muffin cavity to create a “cup” with the dough. Do the same with the other pan.
- Fill the dough shells ⅔ full with the filling. Place a pecan half on top of each cup.
- Bake for 18 minutes or until the tarts are golden brown on top. Allow the tarts to cool, then loosen them with a small knife and remove to a cooling rack.
Notes
- Make sure not to overfill the tart shells as the filling may overflow while baking.
- These tassies can be stored in an airtight container for several days.
Nutrition
- Serving Size: 1 tart
- Calories: 150
- Sugar: 10g
- Sodium: 100mg
- Fat: 8g
- Saturated Fat: 4g
- Unsaturated Fat: 4g
- Trans Fat: 0g
- Carbohydrates: 18g
- Fiber: 1g
- Protein: 2g
- Cholesterol: 35mg